- 6.9.1 Oracle VM Server Roles
- 6.9.2 Adding an Oracle VM Server to a Server Pool
- 6.9.3 Removing an Oracle VM Server from a Server Pool
- 6.9.4 Editing a Server Pool
- 6.9.5 Selecting the Master Oracle VM Server
- 6.9.6 Changing Oracle VM Agent Passwords on Oracle VM Servers
- 6.9.7 Editing Server Pool Policies
- 6.9.8 Deleting Server Pools
When you have created a server pool, you can perform a number of actions on it, like adding and removing Oracle VM Servers, and editing server pool policies. This section discusses the actions you can perform on a server pool.
Oracle VM Server roles allow you to fine tune how your Oracle VM Servers are used in your environment. Roles allow you to designate Oracle VM Servers to perform utility functions and/or to run virtual machines. Oracle VM Manager supports the following server roles:
VM Server role: The VM Server role enables an Oracle VM Server to run virtual machines.
Utility Server role: A Utility Server will be favored to do operations other than hosting virtual machines, for example, importing virtual machine templates and assemblies, creating virtual machine templates from assemblies, and creating repositories. If no Utility Servers are available, a non-utility server is chosen to do the work.
When you add an Oracle VM Server to a server pool it has both the Utility Server role and the VM Server role automatically selected by default. The VM Server role is required to run virtual machines. The Utility Server role is not required, it is advisory only.
You can select certain Oracle VM Servers to have the Utility Server role and others to have the VM Server role. This reduces the likelihood of impeding virtual machine performance due to utility operations. To edit an Oracle VM Server role, see Section 6.10.5, “Editing Oracle VM Server Information”.
You cannot update the VM Server role for an Oracle VM Server if the server is not in a server pool or if the Oracle VM Server has any virtual machines, running or not running. You must own the Oracle VM Server to change the VM Server role. To take ownership of an Oracle VM Server, see Section 6.10.3, “Taking Ownership of an Oracle VM Server”.
Turning off the VM Server role on all Oracle VM Servers within a server pool prevents any virtual machines from running.
You can change the Utility Server role anytime as long as you own the Oracle VM Server. To take ownership of an Oracle VM Server, see Section 6.10.3, “Taking Ownership of an Oracle VM Server”.
When you need more resources in a server pool (such as the number of CPUs and the size of memory), you can add more Oracle VM Servers. For example, when you want to run more virtual machines and the resources in the server pool are reaching capacity, you can add more Oracle VM Servers which increases the available resources.
Adding Oracle VM Servers to a server pool requires the modification of both the cluster configuration information and the server pool information, on all Oracle VM Servers. This is performed automatically.
Adding Oracle VM Servers to a server pool may trigger pending HA operations if there were previously insufficient resources to run all HA virtual machines.
It is advisable that the password is the same on all Oracle VM Servers to avoid authentication issues for the Oracle VM Manager.
To add servers to a server pool, you can edit the server pool and click on the Servers tab to add available servers. See Section 6.9.4, “Editing a Server Pool” for more information.
You can also drag and drop Oracle VM Servers into and out of server pools, and to the Unassigned Servers folder. See Section 3.11, “Drag and Drop” for information on using the drag and drop feature.
When you want to remove resources in a server pool, perhaps to be used elsewhere, you can remove an Oracle VM Server from a server pool. Removing an Oracle VM Server from a server pool does not delete it, but places it in the unconfigured state.
Before you can remove an Oracle VM Server from a server pool, all virtual machines must be stopped or migrated. To automatically migrate the running virtual machines, place the Oracle VM Server in maintenance mode. See Section 6.10.10, “Placing an Oracle VM Server into Maintenance Mode” for information on putting an Oracle VM Server into maintenance mode.
Removing an Oracle VM Server from a server pool requires modification of both cluster configuration information and server pool information on all Oracle VM Servers in the server pool. This is performed automatically.
To remove servers to a server pool, you can edit the server pool and click on the Servers tab to remove servers that are already assigned to the server pool. See Section 6.9.4, “Editing a Server Pool” for more information.
You can also drag and drop Oracle VM Servers into and out of server pools, and to the Unassigned Servers folder. See Section 3.11, “Drag and Drop” for information on using the drag and drop feature.
You can edit the configuration information of a server pool, including the server pool name, description, and key mapping. You can also change the master server, which controls the cluster, as well as whether the virtual machines are migrated securely. You cannot change the virtual IP address or the file system used for the server pool.
To add or remove Oracle VM Servers from a server pool, see Section 6.9.2, “Adding an Oracle VM Server to a Server Pool” and Section 6.9.3, “Removing an Oracle VM Server from a Server Pool”.
To edit a server pool:
Click the Servers and VMs tab.
Select the server pool in the Server Pools folder in the navigation pane. Click Edit Selected Server Pool...
 in the toolbar. The Edit Server
Pool dialog box is displayed.
in the toolbar. The Edit Server
Pool dialog box is displayed.
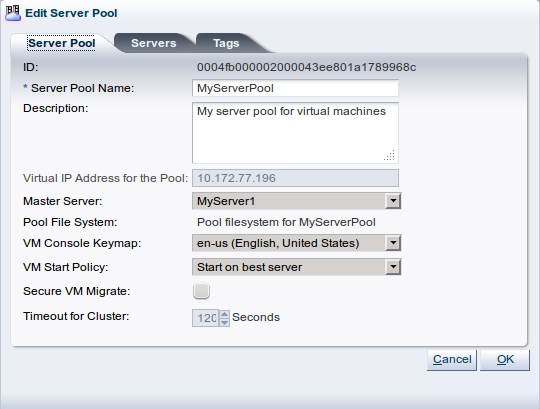
Edit the server pool information:
Server Pool Name: The name of the server pool. The maximum length of a server pool name is 256 characters and may contain any character.
Description: A description of the server pool.
Virtual IP Address for the Pool: This field cannot be modified.
Master Server: The master server that handles interactions with Oracle VM Manager.
Pool File System: This field cannot be modified.
VM Console Keymap: The key mapping to use in the consoles for all virtual machines in the server pool.
VM Start Policy: Define the default startup policy for all of your virtual machines handled by this server pool. It is possible to override the default policy within the configuration of each virtual machine. See Section 7.7, “Creating a Virtual Machine” for information on setting the start policy for an individual virtual machine.
Secure VM Migrate: Select whether to enable encrypted migration of virtual machines.
Timeout for cluster: If clustering is enabled for the server pool, this option allows you to set the timeout parameter. The maximum cluster timeout setting is 300 seconds. The minimum cluster timeout is 12 seconds. The default cluster timeout is 120 seconds. The Disk heartbeat and network heartbeat are automatically derived from the cluster timeout value.
The cluster timeout can only be changed when there are no servers in the server pool, therefore it is usually good to set this during the creation of your server pool. See Section 6.4, “High Availability (HA)” for more information on HA policies and configuration.
To edit the servers in the server pool, click the Servers tab.
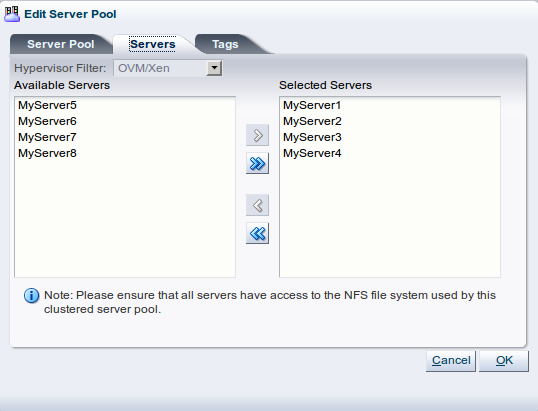
Using the controls provided, you can add or remove servers that comprise the server pool.
To edit the tags associated with the server pool, click the Tags tab.
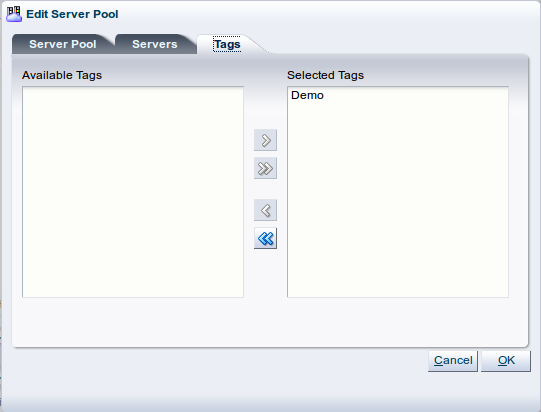
Using the controls provided, you can add or remove tags that can be used to identify the server pool and to group it with other objects within Oracle VM Manager.
See Section 3.15, “Tags” for more information on creating and managing tags.
Click OK to apply your changes.
The server pool changes are automatically propagated to all Oracle VM Servers in the server pool by the master server.
You can select any Oracle VM Server in a server pool to perform the master Oracle VM Server role.
To change the master Oracle VM Server in a server pool:
In the Servers and VMs tab, select Server Pools in the navigation tree, then select the server pool in the table in the management pane. Click Change Master Server
 in the management pane toolbar.
The Change Master Server for Server Pool dialog box is displayed. Select the Oracle VM Server from the Master Server drop-down list. Click OK.
You can also select which Oracle VM Server performs the master Oracle VM Server role in a server pool with the Edit the Server Pool dialog box. See Section 6.9.4, “Editing a Server Pool” for information on using the Edit the Server Pool dialog box.
Oracle VM Manager allows you to change the password for the Oracle VM Agent running on each Oracle VM Server. However, you must change the Oracle VM Agent password for all Oracle VM Servers in a server pool. This is why the password change can only be executed at the server pool level and is applied to all Oracle VM Servers in the server pool at the same time.
To change the Oracle VM Agent password for all Oracle VM Servers in a server pool:
Click the Servers and VMs tab.
In the navigation pane, select the server pool for which you want to change the Oracle VM Agent password. Click Change Servers Agent Password
 in the toolbar. The Change Agent
Password for All Servers within the Server Pool
dialog box is displayed.
in the toolbar. The Change Agent
Password for All Servers within the Server Pool
dialog box is displayed.
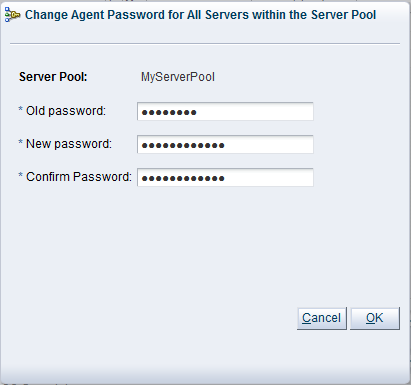
Enter the current password first. Then enter a new password and confirm it in the respective fields.
Click OK to complete the operation. Oracle VM Manager logs into each Oracle VM Server in the server pool and changes the Oracle VM Agent password.
When you select a server pool in the navigation pane, the Policies view is available in the Perspective field in the management pane showing the power and resource utilization policy settings for the server pool. The two policies you can set are for:
Distributed Resource Scheduler (DRS): Optimizes virtual machine resource utilization in a server pool.
Distributed Power Management (DPM): Increases the consolidation ratio to use fewer Oracle VM Servers during periods of relative low resource utilization.
The policy is also able to be set for networks used in a server pool. You can set the server pool to use either DRS, or DPM, but not both at the same time.
See Section 6.5, “Server Pool Policies” for more information on these server pool policies.
To set or edit a server pool policy:
Click the Servers and VMs tab.
Select the server pool in the Server Pools folder in the navigation pane.
From the Perspective field in the management pane, select Policies from the drop-down list. Click Edit
in the toolbar. The Configure
Policy step of the
Configure DRS/DPM wizard is
displayed.
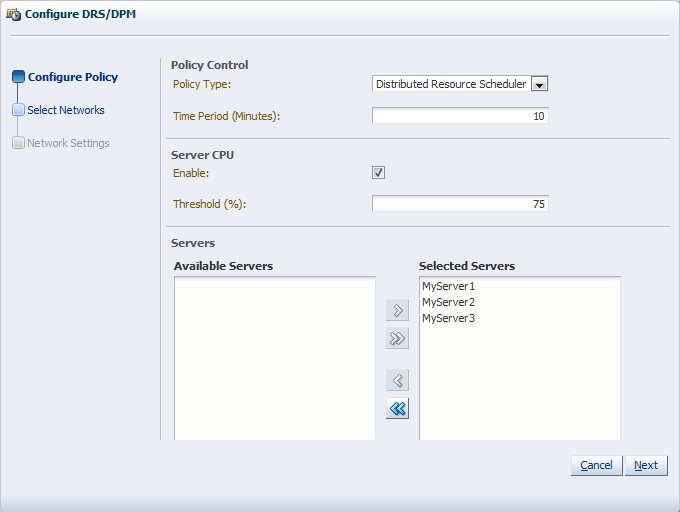
Enter the server pool policy information:
Policy Control:
Policy Type: You can choose from either DRS, DPM, or none. You cannot set both DRS and DPM to be active at the same time.
Time Period (Minutes): The time period for the policy job to run. This sets the policy job to run every n minutes, for example, 10 sets the policy job to run every 10 minutes. You can enter a number between 1 and 60.
Server CPU:
Enable: Set whether to enable or disable logging of CPU performance and utilization.
Threshold (%): The maximum amount of CPU percentage usage allowed before the policy must be enacted. You can enter between 0 and 99.
Servers: Select the Oracle VM Servers for which the policy is to be enabled by moving the selected Oracle VM Servers from the Available Servers to the Selected Servers shuttle box.
Click Next.
The Select Networks step of the Configure DRS/DPM wizard is displayed.

Select the networks to be included in the policy. Click Next.
The Network Settings step of the Configure DRS/DPM wizard is displayed.

Select whether to enable the policy on the network, and select the threshold at which the policy is to be enacted for the network. Click Finish.
The policy is set for the server pool.
Before you can delete a server pool, you must delete or remove all virtual machines and remove all Oracle VM Servers from the server pool.
To delete a virtual machine, see Section 7.10.13, “Deleting Virtual Machines”, to move a virtual machine, see Section 7.10.10, “Moving Virtual Machines Between Oracle VM Servers”, and to move a virtual machine to the Unassigned Virtual Machines folder, see Section 7.10.11, “Moving Virtual Machines To/From Unassigned Virtual Machines Folder”. To remove an Oracle VM Server from a server pool, see Section 6.9.3, “Removing an Oracle VM Server from a Server Pool”.
To delete server pools:
Click the Servers and VMs tab.
Select the Server Pools folder in the navigation tree.
Select Server Pools from the Perspective drop-down list.
Select one or more server pools in the table in the management pane. Click Delete
 in the toolbar.
The Delete Confirmation dialog box is displayed. Click OK to delete the server pools.
The server pools are deleted.
To delete a server pool which is HA-enabled, you must have an Admin server assigned to any NFS file server-based storage. See Section 4.6.1, “Discovering File Servers” for information on editing a file server to add an Admin server.