- 6.10.1 Discovering Oracle VM Servers
- 6.10.2 Rediscovering Oracle VM Servers
- 6.10.3 Taking Ownership of an Oracle VM Server
- 6.10.4 Viewing Oracle VM Server Information and Events
- 6.10.5 Editing Oracle VM Server Information
- 6.10.6 Starting Oracle VM Servers
- 6.10.7 Stopping Oracle VM Servers
- 6.10.8 Killing Oracle VM Servers
- 6.10.9 Restarting Oracle VM Servers
- 6.10.10 Placing an Oracle VM Server into Maintenance Mode
- 6.10.11 Updating and Upgrading Oracle VM Servers
- 6.10.12 Managing Ethernet Ports and Network Bonding on an Oracle VM Server
- 6.10.13 Managing Access Groups and Storage Initiators on an Oracle VM Server
- 6.10.14 Managing Physical Disks on an Oracle VM Server
- 6.10.15 Viewing Oracle VM Server Operating System Information and Control Domains
- 6.10.16 Deleting Oracle VM Servers from Oracle VM Manager
- 6.10.17 Managing NTP on Oracle VM Servers
Use Oracle VM Manager to manage Oracle VM Servers. Do not manage Oracle VM Servers directly using the Oracle VM Server command line unless directed to do so by a My Oracle Support document, or by Oracle Support.
A server pool must contain at least one Oracle VM Server. After installing an Oracle VM Server, you must discover it in Oracle VM Manager before it can be added to a server pool.
Before you discover Oracle VM Servers and add them to a server pool, you must:
Identify the IP address of the Oracle VM Server(s). If you installed Oracle VM Server with a static IP address (recommended), this is the IP address you use. If you installed Oracle VM Server with a dynamic IP address, log onto the Oracle VM Server and determine the IP address.
Identify the password to access the Oracle VM Agent installed on the Oracle VM Server.
When an Oracle VM Server is installed and starts up, it listens for Oracle VM Manager server pool discovery events. Before you can add an Oracle VM Server to a server pool, it must first be discovered.
To discover an Oracle VM Server:
Click the Servers and VMs tab.
Click Discover Servers
 in the toolbar. The Discover
Servers dialog box is displayed.
in the toolbar. The Discover
Servers dialog box is displayed.
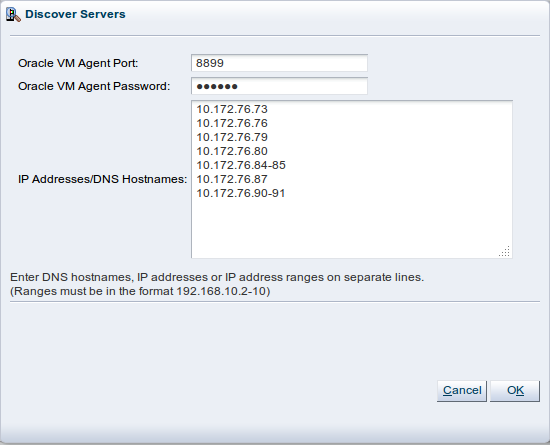
Enter information about the Oracle VM Server(s) to be discovered:
Oracle VM Agent Port: The port on which the Oracle VM Agent is listening. This is most likely the default port 8899.
Oracle VM Agent Password: The password to connect to the Oracle VM Agent. It is advisable that the password is the same on all Oracle VM Servers to avoid authentication issues for the Oracle VM Manager.
An incorrect password results in an error message, notifying you of an 'Unauthorized access attempt'.
IP Addresses/DNS Hostnames: Enter the IP address(es), IP ranges or DNS hostnames of the Oracle VM Server(s) to be discovered. You can paste a list of multiple IP addresses or multiple DNS hostnames. If you enter an IP range it must be in the format 192.168.10.2-10. For example, if you enter 192.168.10.2-4 Oracle VM Manager will discover 192.168.10.2, 192.168.10.3 and 192.168.10.4. IP addresses, IP ranges and DNS host names must be entered on separate lines.
NoteInvalid entries may result in a job that will fail to complete and may need to be aborted. See Section B.1.9, “Aborting Jobs” for information on aborting a job.
Click OK.
The Oracle VM Servers are discovered and added to the Unassigned Servers folder. The newly discovered Oracle VM Server contains some basic information about itself, and about any immediate connectivity to a shared SAN, but it is considered to be in an unconfigured state. The Oracle VM Server cannot be used to perform any virtual machine, or active cluster operations. Physical network and storage configuration can be performed, and any subsequent storage discovery operations may also be performed.
The Utilization % column in the Servers perspective in the management pane does not report the utilization statistics of an Oracle VM Server that is in the Unassigned Servers folder. This field does not report utilization statistics unless an Oracle VM Server is included in a server pool.
Discovered Oracle VM Servers do not use a Virtual IP address until they are properly configured by being included in a server pool.
When an Oracle VM Server has been discovered, it can be added to a server pool. See Section 6.9.2, “Adding an Oracle VM Server to a Server Pool” for information on adding an Oracle VM Server to a server pool.
If there are either changes to the physical state of an Oracle VM Server or its attached storage, you should discover it again to update the configuration information in Oracle VM Manager.
To rediscover Oracle VM Servers:
Click the Servers and VMs tab.
Select the server pool in which the Oracle VM Servers reside in the navigation tree.
Select Servers from the Perspective drop-down list. Select one or more Oracle VM Servers in the management pane, and click Rediscover Server
in the management pane toolbar.
The configuration and storage information about the Oracle VM Servers is updated in Oracle VM Manager.
In order to cut load time within Oracle VM Manager, Oracle VM Server rediscovery is not performed at start-up, therefore there may be cases where you want to update the configuration information for all Oracle VM Server instances within the Oracle VM Manager. Note that in larger deployments this may be a resource consuming action.
To rediscover all Oracle VM Servers, file servers and SAN servers:
The configuration information about all Oracle VM Server instances is updated in Oracle VM Manager.
By default, the the instance of Oracle VM Manager that first adds the Oracle VM Server has ownership of that Oracle VM Server. If an Oracle VM Server is in the Unassigned Servers folder and does not have ownership by your user, you need perform the following steps to take ownership and use the Oracle VM Server in a server pool.
To take ownership of an Oracle VM Server:
Click the Servers and VMs tab.
Select the Oracle VM Server in the Unassigned Servers folder in the navigation pane. Click Edit Server
 in the toolbar. The Edit
Server dialog box is displayed.
in the toolbar. The Edit
Server dialog box is displayed.
Select the Take Ownership check box to take ownership of the Oracle VM Server. Click OK.
To relinquish ownership of the Oracle VM Server, repeat the same procedure and uncheck the Take Ownership check box.
You cannot relinquish ownership of an Oracle VM Server while it is in a server pool, you must first remove it from the server pool. See Section 6.9.3, “Removing an Oracle VM Server from a Server Pool” for information on removing an Oracle VM Server from a server pool. You also cannot relinquish ownership of an Oracle VM Server if a repository is presented to it. However, it is possible to take ownership of an Oracle VM Server regardless of whether it is in a server pool or not.
You can view basic information about an Oracle VM Server, or drill down for more detailed information. The basic Oracle VM Server information is what you are likely to want to see on a regular basis for system monitoring, for example, the status (running, starting, stopped), utilization, IP address, memory, CPUs, and whether a software update is available. If this information is not enough, you can drill down to the more detailed information.
To view basic Oracle VM Server information:
Click the Servers and VMs tab, and select the server pool on which the Oracle VM Server resides in the navigation tree.
Select Servers in the Perspective drop-down list in the management pane. General information about the Oracle VM Servers in the server pool is displayed in the management pane.
To view detailed Oracle VM Server information:
Click the Servers and VMs tab, and select the Oracle VM Server in the navigation tree.
Select Info in the Perspective drop-down list in the management pane. Detailed information about the Oracle VM Server is displayed in the management pane. Expand any arrows for more information.
To view Oracle VM Server events:
Click the Servers and VMs tab, and select the Oracle VM Server in the navigation tree.
Select Events from the Perspective drop-down list. A list of the events associated with the Oracle VM Server are displayed in the management pane table. Select an event in the table, and expand the arrow for more information about the event.
If an Oracle VM Server has error event associated with it you must acknowledge the event to clear the error. See Section B.1.11, “Acknowledging Events/Errors” for information on acknowledging events.
You can edit the configuration information for an Oracle VM Server to change the name, description, any server pool roles, and to take it off-line to perform system maintenance.
To edit the configuration information of an Oracle VM Server:
Click the Servers and VMs tab.
Select the Oracle VM Server in the navigation pane. Click Edit Server
in the toolbar. The Edit
Server dialog box is displayed.

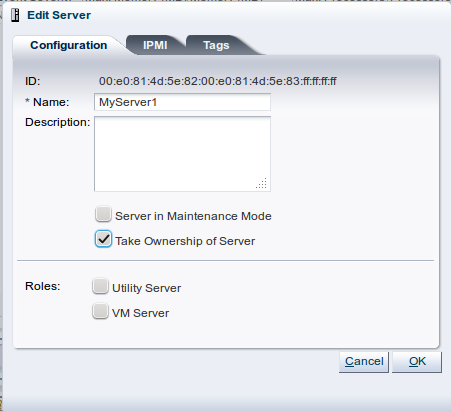
In the Configuration tab, edit the information about the Oracle VM Server:
Name: The name of the Oracle VM Server.
Description: A description of the Oracle VM Server.
Maintenance Mode: Select whether to place the Oracle VM Server in maintenance mode. See Section 6.10.10, “Placing an Oracle VM Server into Maintenance Mode” for more information about Oracle VM Server maintenance mode.
Take Ownership: Select to take ownership of the Oracle VM Server. See Section 6.10.3, “Taking Ownership of an Oracle VM Server” for information on ownership of an Oracle VM Server.
TipYou cannot edit the ownership of an Oracle VM Server if it is included in a server pool or if a repository is presented to it. .
Utility Server: Select to designate the Oracle VM Server to perform utility functions such as importing, cloning and storage refresh. See Section 6.9.1, “Oracle VM Server Roles” for information on Oracle VM Server roles.
VM Server: The virtual machine role is required to run virtual machines. See Section 6.9.1, “Oracle VM Server Roles” for information on Oracle VM Server roles.
In the IPMI tab, select the Enable Server IPMI check box to enable the Intel®ligent Platform Management Interface (IPMI). IPMI allows you to remotely power on or power off an Oracle VM Server. If IPMI is either not available or not enabled on the Oracle VM Server, Oracle VM Manager may still be able to remotely power on an Oracle VM Server using a Wake on LAN message without having to physically press the power button, and it may be able to send a system power off message to shut it down.
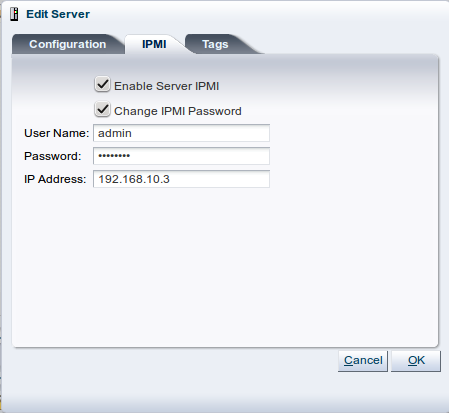
To configure IPMI enter the following information in the fields:
User Name: The user name for the IPMI.
Password: The password for the IPMI.
To set or modify the IPMI password, you must also select the Change Password check box.
IP Address: The IP address of the IPMI.
To edit the tags associated with the server, click the Tags tab.
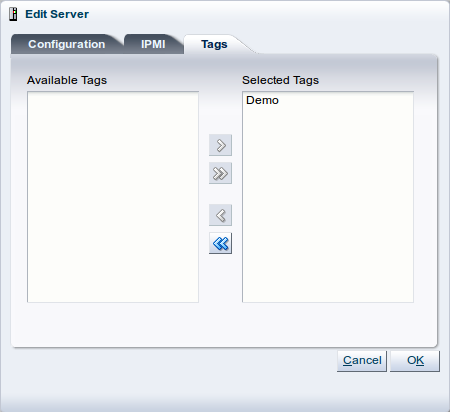
Using the controls provided, you can add or remove tags that can be used to identify the server and to group it with other objects within Oracle VM Manager.
See Section 3.15, “Tags” for more information on creating and managing tags.
Click OK. The Oracle VM Server is updated.
You can edit the information for more than one Oracle VM Server at a
time by using the
multi-select
functionality provided within the Oracle VM Manager interface to
select multiple items before clicking on the
Edit Server
![]() icon in the toolbar.
icon in the toolbar.
When editing a group of Oracle VM Servers in batch mode the options available to you are limited to actions that can be applied to all selected items. The following options are available:
Server in Maintenance Mode: Checking this checkbox sets all selected items into Maintenance Mode
Take Ownership of Server: Checking this checkbox allows Oracle VM Manager to take ownership of all of the selected items
Utility Server: Checking this checkbox changes the role of all selected items to Utility Servers
VM Server: Checking this checkbox changes the role of all selected items to Virtual Machine Servers
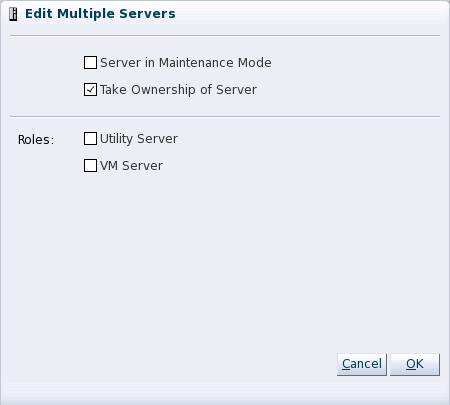
If the values set for the options provided vary across the selected servers, the dialog will display the values for the first server in the selection. Clicking OK will update all of the selected servers to have the same status.
When you start an Oracle VM Server, it is started using the Intel®ligent Platform Management Interface (IPMI), or Wake-on-LAN (WOL). If neither IPMI nor WOL have been configured, the job to start the Oracle VM Server cannot be completed. The Oracle VM Server must then be powered on manually. See Section 6.10.5, “Editing Oracle VM Server Information” for information on configuring IPMI.
To start Oracle VM Servers:
Click the Servers and VMs tab.
Select the server pool in which the Oracle VM Server resides in the navigation tree.
Select Servers from the Perspective drop-down list. Select one or more Oracle VM Servers in the management pane, and click Start Server
 in the management pane toolbar.
The Oracle VM Servers are started.
When you stop an Oracle VM Server, it is stopped using the Intel®ligent Platform Management Interface (IPMI), or a system power off command. Before you can stop an Oracle VM Server, you must stop any running virtual machines, or place the Oracle VM Server into maintenance mode to automatically migrate the running virtual machines.
Make sure that the IPMI is properly configured on the Oracle VM Server, otherwise it cannot be started again remotely. See Section 6.10.5, “Editing Oracle VM Server Information” for IPMI configuration. Alternatively, make sure that you activate the Wake-on-LAN (WOL) feature in the Oracle VM Server BIOS and that you have tested that it is properly working. If an Oracle VM Server cannot start through IPMI or WOL, it must be power-cycled manually.
To stop Oracle VM Servers:
Stop or migrate any running virtual machines. To stop the virtual machines see Section 7.10.4, “Stopping (Shutting Down) Virtual Machines”. To automatically migrate the virtual machines to other Oracle VM Servers in the server pool, place the Oracle VM Servers into maintenance mode , see Section 6.10.10, “Placing an Oracle VM Server into Maintenance Mode” .
Click the Servers and VMs tab.
Select the server pool in which the Oracle VM Server resides in the navigation tree.
Select Servers from the Perspective drop-down list. Select one or more Oracle VM Servers in the management pane, and click Stop Server
 in the management pane toolbar.
The Oracle VM Servers are powered off.
To kill an Oracle VM Server is equivalent to performing a power off of an Oracle VM Server, similar to unplugging the power cable from the physical machine. This is not the recommended method of shutting down an Oracle VM Server, but may be used if the shut down command fails to shut down the Oracle VM Server.
To kill Oracle VM Servers:
Click the Servers and VMs tab.
Select the server pool in which the Oracle VM Server resides in the navigation tree.
Select Servers from the Perspective drop-down list. Select one or more Oracle VM Servers in the management pane, and click Kill
 in the management pane toolbar. Click
OK in the
Confirmation dialog.
in the management pane toolbar. Click
OK in the
Confirmation dialog.
The Oracle VM Servers are powered off.
When you restart an Oracle VM Server, an operating system restart command is sent and the Oracle VM Server is restarted. Before you can restart an Oracle VM Server, you must stop any running virtual machines, or place the Oracle VM Server into maintenance mode to automatically migrate the running virtual machines.
When the Oracle VM Server is restarted and rejoins the server pool, the master Oracle VM Server initiates any pending HA operations in the server pool. When Oracle VM Manager is notified that the Oracle VM Server is online and available, any pending state changes are reconciled before any policy actions are resumed.
To restart Oracle VM Servers:
Stop or migrate any running virtual machines. To stop the virtual machines see Section 7.10.4, “Stopping (Shutting Down) Virtual Machines”. To automatically migrate the virtual machines to other Oracle VM Servers in the server pool, place the Oracle VM Servers into maintenance mode , see Section 6.10.10, “Placing an Oracle VM Server into Maintenance Mode” .
Click the Servers and VMs tab.
Select the server pool in which the Oracle VM Server resides in the navigation tree.
Select Servers from the Perspective drop-down list. Select one or more Oracle VM Servers in the management pane, and click Restart
 in the management pane toolbar.
The Oracle VM Servers are restarted.
An Oracle VM Server can be placed into maintenance mode to perform hardware or software maintenance. When an Oracle VM Server is placed in maintenance mode, any virtual machines running on the Oracle VM Server are automatically migrated to other Oracle VM Servers in the server pool, if they are available. If the Oracle VM Server is the master Oracle VM Server in the server pool, this role is moved to another Oracle VM Server in the server pool, if available, after the server is shutdown. If any of these automatic processes fail, check the Oracle VM Server event log (Section 6.10.4, “Viewing Oracle VM Server Information and Events”) for reasons why the failure occurred.
To place an Oracle VM Server into maintenance mode:
In the Servers and VMs tab, select the Oracle VM Server in the navigation pane. Click Edit Server
in the management pane toolbar.
The Edit Server dialog box is displayed. Select the Maintenance Mode check box to place the Oracle VM Server into maintenance mode. Click OK.
The Oracle VM Server is placed into maintenance mode. In the navigation
pane, you can recognize a server in maintenance mode by its
different icon:
![]() .
.
When you have finished performing maintenance on the Oracle VM Server and you are ready for it to rejoin the server pool, perform the same procedure and uncheck the Maintenance Mode check box.
Updates and upgrades to Oracle VM Servers can be automatically performed using a Yum repository. To access patch updates for Oracle VM, you should contact Oracle to purchase an Oracle VM Support contract and gain access to the Unbreakable Linux Network (ULN) which contains updates for Oracle VM. If you have access to ULN you can use this to set up your own Yum repository to use when updating your Oracle VM Servers. Setting up a Yum repository is beyond the scope of this documentation, however you can read about setting one up in an OTN article "Yum Repository Setup" at:
http://www.oracle.com/technetwork/articles/servers-storage-admin/yum-repo-setup-1659167.html
Make sure you subscribe to the Oracle VM Release 3.2 channel on ULN when you set up your Yum repository.
If you have a Yum repository configured for Oracle VM Server updates, you add this to Oracle VM Manager and perform updates using Oracle VM Manager.
To see which version the Oracle VM Server is running before and after an upgrade, click the Servers and VMs tab, select the Oracle VM Server in the navigation tree and then select Control Domains in the Perspective drop-down list.
To add a Yum repository:
Click the Tools and Resources tab.
Click the Server Update Management (YUM) sub-tab.
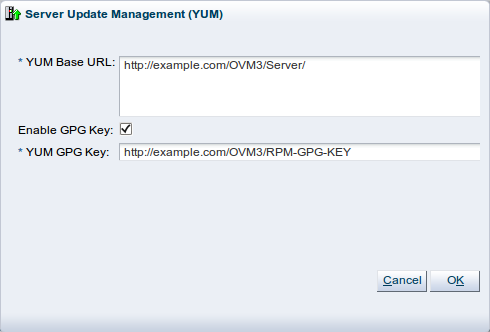
Click Update to display the Server Update Management (YUM) dialog box. Enter the following information about the Yum repository:
YUM Base URL: The URL to access the Yum repository, for example:
http://example.com/OVM3/Server/
NoteThe YUM Base URL should contain the RPMs and the repodata directory created by the createrepo tool. If you are copying the RPMs from the Oracle VM Server ISO media, or loop mounting the ISO file, make sure to include the
Serverdirectory (which includes therepodatadirectory), for example:http://example.com/OVM3/Server/
Enable GPG Key: Whether to use a GPG key for the Yum repository. The GPG key (or GnuPG key) is the key used in the GNU project's implementation of the OpenPGP key management standard. The GPG key is used to check the validity of the Yum repository, and any packages (RPMs) downloaded from the repository.
YUM GPG Key: The GPG key for the Yum repository, for example:
http://example.com/OVM3/RPM-GPG-KEY
The GPG key must be available via one of HTTP, FTP, FILE or HTTPS protocols.
The GPG key for Oracle-signed updates from ULN is pre-installed on Oracle VM Server at /etc/pki/rpm-gpg/RPM-GPG-KEY-oracle. If you want to use this GPG key, enter:
file:///etc/pki/rpm-gpg/RPM-GPG-KEY-oracle
This field is only enabled when you select Enable GPG Key.
Click Apply.
The YUM repository is added and ready to use to update Oracle VM Servers.
The YUM repository is checked for updates every 6 hours, so there may be a delay between the YUM repository being updated and the notification being displayed in Oracle VM Manager. To change the frequency of this recurring job, see Section B.1.7, “Managing Recurring Jobs”.
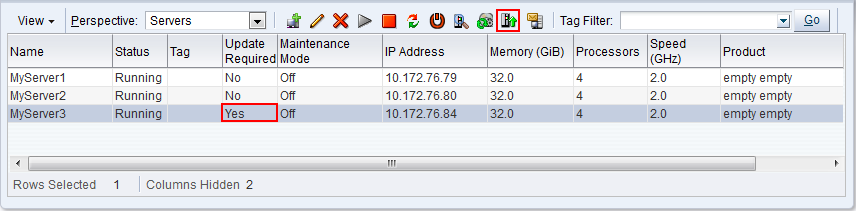
When an Oracle VM Server update is available, an event is posted to the Oracle VM Server and displayed in the Update Required column in the Servers perspective in the management pane.
To update an Oracle VM Server, the virtual machines on the Oracle VM Server must first be stopped or migrated to another Oracle VM Server. You can manually stop or migrate the virtual machines, or, if you prefer, have the upgrade server job perform the virtual machine migration automatically.
To update Oracle VM Servers:
Click the Servers and VMs tab, and select the server pool in which the Oracle VM Servers reside in the navigation tree.
Select Servers in the Perspective drop-down list in the management pane.
Select the Oracle VM Servers in the management pane table and click Update Server
 from the management pane toolbar.
A confirmation dialog is displayed. Click OK. Each Oracle VM Server is placed into maintenance mode, and the update performed. Any virtual machines on the Oracle VM Servers are automatically migrated to another Oracle VM Server when it is put into maintenance mode. If the Oracle VM Server is a master Oracle VM Server, the master role is transferred to another Oracle VM Server in the server pool. When the update is complete the Oracle VM Server is restarted and remains in maintenance mode.
To have the Oracle VM Servers rejoin the server pool as a fully functioning member, edit each the Oracle VM Server and take it out of maintenance mode.
For information on manually migrating virtual machines, see Section 7.10.12, “Migrating Virtual Machines”. For information on taking an Oracle VM Server out of maintenance mode, see Section 6.10.10, “Placing an Oracle VM Server into Maintenance Mode”.
While Oracle VM Manager uses the Linux terminology for network bonds, Oracle Solaris users should understand this to be equivalent to IP MultiPathing (IPMP).
To view and edit the Ethernet ports and network bonding on an Oracle VM Server, select the Servers and VMs tab, the Oracle VM Server in the navigation tree, then the Ethernet Ports and Bond Ports options in the Perspective drop-down list. You can view which ports are bonded to which networks and VLAN groups, and set network addressing and the MTU (Maximum Transmission Unit) on a port. You can also configure the network bonding of each Ethernet port. For information on managing Ethernet ports and bonding on an Oracle VM Server see Section 5.10, “Managing Bonded Interfaces”.
You cannot edit the MTU setting of an Ethernet port which is part of a bond configuration. Change the MTU setting for the bond port instead of the individual Ethernet port. For more information on the MTU setting, or if your network supports jumbo frames, please see Section 5.10, “Managing Bonded Interfaces”.
In order to access SAN server storage, an access group must be created, and a storage initiator configured on the Oracle VM Server. Storage initiators are added to an Oracle VM Server during discovery, based on your storage configuration. You configure access groups to bind storage initiators to physical disks. For information on creating access groups, see Section 4.6.4.2, “SAN Server Access Groups”. You can also view and configure existing storage initiators for a particular Oracle VM Server.
To view storage initiators on an Oracle VM Server:
Click the Servers and VMs tab, and select the Oracle VM Server in the navigation tree.
Select Storage Initiators in the Perspective drop-down list in the management pane. The storage initiators configured on the Oracle VM Server are listed in the management pane table.
Select a storage initiator in the table, and click View access groups for selected initiator
 .
.
The View Access Groups for Initiator dialog box is displayed.
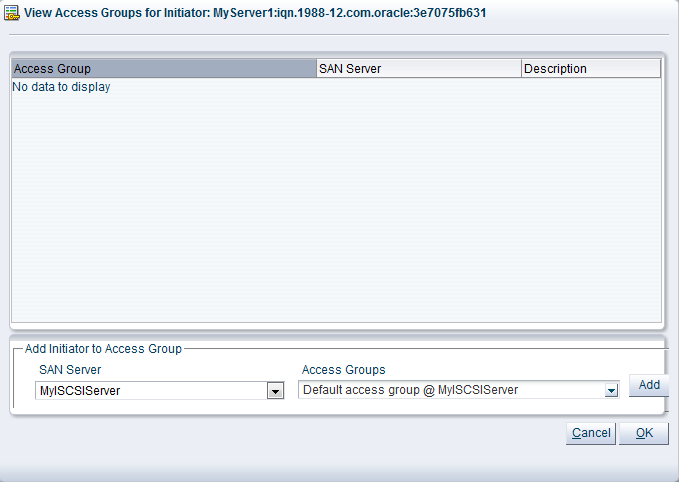
Select the SAN Server and Access Groups from the drop-down lists and click Add. Click OK.
See Section 4.6.4.2, “SAN Server Access Groups” for more information on managing SAN server access groups.
You can view and manage the physical disks on an Oracle VM Server, as well as those available to it from a SAN server. You can also refresh the physical disks on an Oracle VM Server when SAN server disks have been added or removed.
To refresh the physical disks on Oracle VM Servers:
Click the Servers and VMs tab, and select the server pool in which the Oracle VM Servers reside in the navigation tree.
Select Servers in the Perspective drop-down list in the management pane.
Select the Oracle VM Servers in the management pane table and click Rescan Physical Disks
 in the management pane toolbar.
A confirmation dialog box is displayed. Click OK.
To view and manage the physical disks on an Oracle VM Server:
Click the Servers and VMs tab, and select the Oracle VM Server in the navigation tree.
Select Physical Disks in the Perspective drop-down list in the management pane.
A list of the physical disks accessible by the Oracle VM Server is displayed in the table in the management pane and the management functions you can perform on the disk are available as icons in the management pane toolbar. Some management options are only available to SAN server disks that use a non-generic storage connect plug-in. The physical disk management options available are listed in Table 6.2, “Oracle VM Server Physical Disks Toolbar Icon Options”.
Table 6.2 Oracle VM Server Physical Disks Toolbar Icon Options
Toolbar Icon Option
Icon
Description
Rescan Physical Disks
Request an update of the all the physical disks available to the Oracle VM Server to see if changes have been made.
Edit Physical Disk
Change the name, description and extra information of the physical disk, or make it shareable.
Delete Physical Disk

Stop using the selected physical disk in your Oracle VM environment.
WarningIf you effectively delete a LUN from a registered storage array, make sure that you delete it in Oracle VM Manager first, before you physically delete it from the storage server. If you do not respect this order of operations, the system will go into an unknown state, which can only be resolved by rebooting the Oracle VM Servers the deleted LUN is connected to.
Clone Physical Disk

Create a thin clone, sparse copy or non-sparse copy of the physical disk on the selected target.
Delete File System

Delete one or more file systems and contents of the physical disks.
Refresh Physical Disk

Request an update of one or more physical disks to see if changes have been made to the size and configuration.
Display Servers using Physical Disk...

Display the Servers using Physical Disk... dialog box which shows the servers that are using the selected physical disk.
Display Selected Storage Element Events...

Display the Events dialog box which contains the job events associated with the physical disk.
For more information on managing SAN servers and their contents, see Section 4.6.4.1, “Discovering a SAN Server”. For more information on using storage, see Chapter 4, Managing Storage.
You can view information about the underlying operating system and hardware on an Oracle VM Server using the Control Domains perspective when you select an Oracle VM Server. This perspective lists each control domain and information about it. Xen has only one control domain, whereas other hypervisors may have multiple control domains. This information may be useful when talking to Oracle Support Services, as you can find out the exact version of Oracle VM Server, Oracle VM Agent, and the hypervisor kernel installed on the machine.
To view control domain information:
Click the Servers and VMs tab, and select the Oracle VM Server in the navigation tree.
Select Control Domains in the Perspective drop-down list in the management pane. The control domain is listed in the management pane table. Expand the table row for more information about the control domain.
When you delete an Oracle VM Server, it is removed from the Oracle VM Manager repository and becomes unmanaged. The Oracle VM Server is not stopped, nor is anything physically done to the Oracle VM Server.
Before you can delete an Oracle VM Server, you must stop any running virtual machines, or place the Oracle VM Server into maintenance mode to automatically migrate the running virtual machines.
To delete Oracle VM Servers from Oracle VM Manager:
Stop or migrate any running virtual machines. To stop the virtual machines see Section 7.10.4, “Stopping (Shutting Down) Virtual Machines”. To automatically migrate the virtual machines to other Oracle VM Servers in the server pool, place the Oracle VM Server into maintenance mode, see Section 6.10.10, “Placing an Oracle VM Server into Maintenance Mode”.
Click the Servers and VMs tab.
Select the Unassigned Servers folder in the navigation tree. Select Servers from the Perspective drop-down list.
Select one or more Oracle VM Servers in the management pane. Click Delete
 in the management pane toolbar.
The Delete Confirmation dialog box is displayed. Click OK to delete the Oracle VM Servers.
The Oracle VM Servers are deleted from Oracle VM Manager.
Network Time Protocol (NTP) time source servers enable time synchronization between all Oracle VM Servers managed by Oracle VM Manager. By default, the Oracle VM Manager host computer is set as the NTP time source. To use the default option you should make sure the Oracle VM Manager host computer is set up properly. For information on setting up the Oracle VM Manager host computer as an NTP server, see Configuring the NTP Service in the Oracle VM Installation and Upgrade Guide. You can also set your own list of NTP servers.
By default, when an Oracle VM Server is (re)discovered, it is configured to use the Oracle VM Manager host computer as the NTP time source. If you configure your own list of NTP servers, each time an Oracle VM Server is (re)discovered, your custom list is instead used to configure the NTP time sources.
A list of the NTP servers configured for an Oracle VM Server is available on the server's information page, which is available by selecting Info from the Perspective dropdown when an Oracle VM Server is selected in the Servers and VMs tab.
To configure NTP servers:
Click the Tools and Resources tab, and click the
 NTP subtab.
Click Edit to display the Update NTP Configuration dialog box.
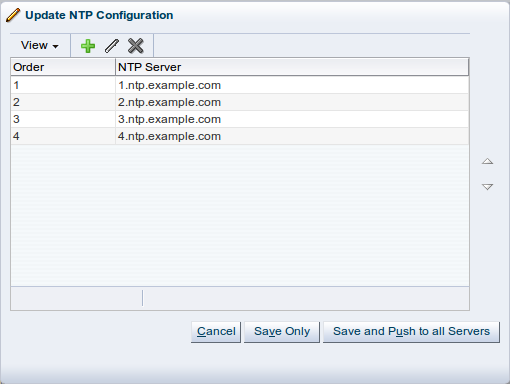
To add an NTP server, click Create New NTP...
 in the dialog box toolbar to display the
Add NTP Server dialog box.
Enter the IP address or hostname of the NTP server in the
IP Address/DNS Hostname
field and click OK to
return to the Update NTP
Configuration dialog box.
in the dialog box toolbar to display the
Add NTP Server dialog box.
Enter the IP address or hostname of the NTP server in the
IP Address/DNS Hostname
field and click OK to
return to the Update NTP
Configuration dialog box.
To edit an NTP server, select the server in the table and click Edit NTP...
in the dialog box toolbar. To delete a server, select it and
click Delete NTP...
in the dialog box toolbar.
As the order of the NTP servers may be important, you can change the order of the servers using the arrows on the right of the dialog box.
To push the NTP server configuration to each Oracle VM Server managed by Oracle VM Manager, click Save and Push to all Servers. Any previous NTP configuration is overwritten. Alternatively, you can save the NTP server configuration and push it to the Oracle VM Servers at another time by clicking Save Only. Click Cancel to exit the dialog box.