13 Enabling User Preferences
This chapter describes how to create both ADF Mobile application-level and application feature-level user preference pages.
This chapter includes the following sections:
-
Section 13.1, "Creating User Preference Pages for an ADF Mobile Application"
-
Section 13.2, "Creating User Preference Pages for Application Features"
-
Section 13.3, "Using EL Expressions to Retrieve Stored Values for User Preference Pages"
13.1 Creating User Preference Pages for an ADF Mobile Application
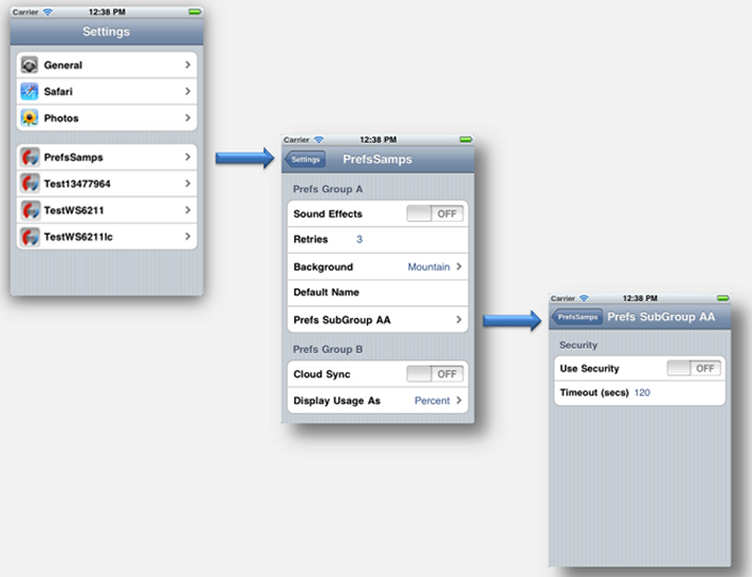
Preferences enable you to add settings that can be configured by end users. Within both the adfmf-application.xml and adfmf-feature.xml files, the user preference pages are defined with the <adfmf:preferernces> element. As shown in Example 13-1, the child element of <adfmf:preferences> called <adfmf:preferenceGroup> and its child elements define the user preferences by creating pages that present options in various forms, such as read-only strings, dropdown menus, or in the case of Example 13-1, as a child page that can present the user with additional options for application settings.
You also use the <adfmf:preferences> element to create the preferences that users manage within each application feature.
Example 13-1 Defining Application-Level Preferences with the <adfmf:preferences> Element
<?xml version="1.0" encoding="UTF-8" ?>
<adfmf:application xmlns:xsi="http://www.w3.org/2001/XMLSchema-instance"
                   xmlns:adfmf="http://xmlns.oracle.com/adf/mf"
                   name="MobileApplication"
                   id="com.company.MobileApplication"
                   appControllerFolder="ApplicationController"
                   version="1"
                   vendor="oracle"
                   listener-class="application.LifeCycleListenerImpl">
  <adfmf:description>This is an ADF Mobile application</adfmf:description>
  <adfmf:featureReference id="PROD"/>
  <adfmf:featureReference id="HCM"/>
  <adfmf:featureReference id="Customers"/>
      <adfmf:preferences>
      <adfmf:preferenceGroup id="a" label="Prefs Group A">
        <adfmf:preferenceBoolean id="a1-sound" label="Sound Effects"/>
        <adfmf:preferenceNumber id="a2-retries" label="Retries" default="3"/>
        <adfmf:preferenceList id="a3-background" label="Background" default="3">
          <adfmf:preferenceValue name="None" value="0"/>
          <adfmf:preferenceValue name="Field" value="1"/>
          <adfmf:preferenceValue name="Galaxy" value="2"/>
          <adfmf:preferenceValue name="Mountain" value="3"/>
        </adfmf:preferenceList>
        <adfmf:preferenceText id="a4-name" label="Default Name"/>
        <adfmf:preferencePage id="aa" label="Prefs SubGroup AA">
          <adfmf:preferenceGroup id="aa-sec" label="Security">
            <adfmf:preferenceBoolean id="aa-sec-useSec" label="Use Security"/>
            <adfmf:preferenceNumber id="aa-sec-timeout" label="Timeout (secs)" default="120"/>
          </adfmf:preferenceGroup>
        </adfmf:preferencePage>
      </adfmf:preferenceGroup>
      <adfmf:preferenceGroup id="b" label="Prefs Group B">
        <adfmf:preferenceBoolean id="b-cloudSync" label="Cloud Sync"/>
        <adfmf:preferenceList id="b-dispUsage" label="Display Usage As" default="1">
          <adfmf:preferenceValue name="Percent" value="1"/>
          <adfmf:preferenceValue name="Minutes" value="2"/>
        </adfmf:preferenceList>
      </adfmf:preferenceGroup>
    </adfmf:preferences>
</adfmf:application>
Figure 13-1 shows an example of how opening child user preferences page can offer subsequent options.
Preference pages are defined within the <adfmf:preferenceGroup> element and have the following child elements:
-
<adfmf:preferencePage>—Specifies a new page in the user interface. -
<adfmf:preferenceList>—Provides users with a specific set of options.-
<adfmf:preferenceValue>—A child element that defines a list element.
-
-
<adfmf:preferenceBoolean>—A boolean setting. -
<adfmf:preferenceText>—A text preference setting.
See Oracle Fusion Middleware Tag Reference for Oracle ADF Mobile Tag Documentation for more information on these elements and their attributes.
For an example of creating preference pages at both the ADF Mobile application and application-feature levels, refer to the PrefDemo sample application. This sample application is located in the PublicSamples.zip file at the following location within the JDeveloper installation directory of your development computer:
jdev_install/jdeveloper/jdev/extensions/oracle.adf.mobile/Samples
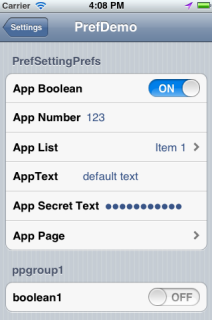
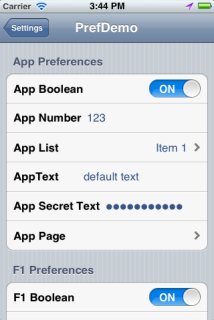
The PrefDemo application is comprised of an application-level settings page as well as three application feature preference pages, which are implemented as ADF Mobile AMX. Figure 13-2 shows the PrefDemo application settings page, which you invoke from the general settings page. In this illustration, the preference settings page is invoked from the iOS Settings application.
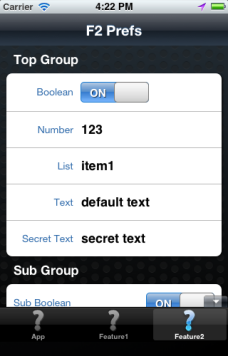
The application feature preference pages, illustrated by App, Feature1 (which is selected), and Feature 2 in Figure 13-3, provide examples of preferences pages constructed from the ADF Mobile Boolean Switch, Input Text, and Output Text components that use EL (Expression Language) to access the application feature and the various <adfmf:preferences> components configured within it. For more information, see Section 13.3, "Using EL Expressions to Retrieve Stored Values for User Preference Pages."
In the PrefDemo application, each ADF Mobile AMX preference page is referenced by a single bounded task flow comprised of a view activity and a control flow case that enables the page refresh.
13.1.1 How to Create Mobile Application-Level Preferences Pages
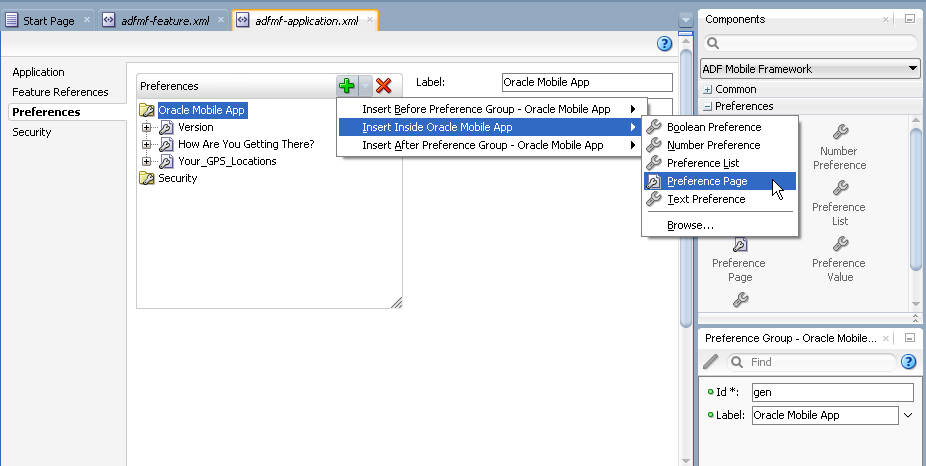
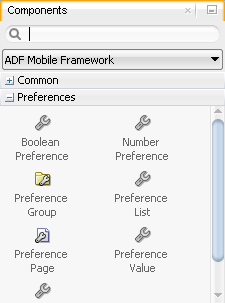
The Preferences page of the adfmf-application.xml overview editor, shown in Figure 13-4, enables you to build sets of application-level preference pages by nesting the child preference page elements within <adfmf:preferenceGroup>. The page presents the <adfmf:preferencesGroup> and its child elements as similarly named options (that is, Preference Group, Preference Page, Preference List, and so on), which you assemble into a hierarchy (or tree), similar to the Structure window in JDeveloper.
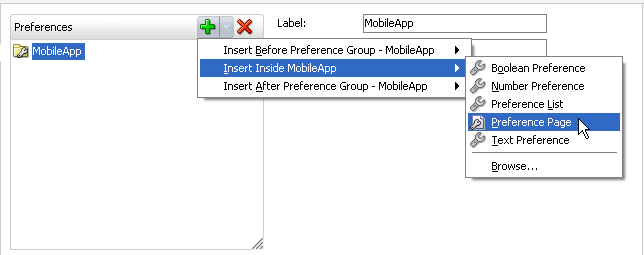
To ensure that the adfmf-application.xml file is well-formed, use the Preferences page's Add drop-down list, shown in Figure 13-4 to construct the user preferences pages. While you can also drag components from the Preferences palette, shown in Figure 13-5, into either the editor, the Source window, or the Structure window, the page's drop-down list presents only the elements that can have the appropriate parent, child, or sibling relationship to a selected preferences element. For example, Figure 13-4 shows only the components that can be inserted within the Preference Group element, Oracle Mobile App. The editor also enables you to enter the values for the attributes specific to each preference element.
-
Click Preferences.
-
Click Add to create the parent
<adfmf:preferenceGroup>element. -
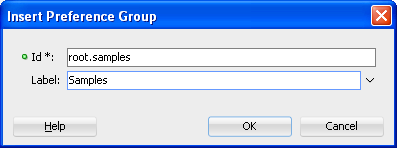
Enter the following information in to the Insert Preference Group dialog, shown in Figure 13-6.
-
Enter a unique identifier for the Preference Group element.
-
Enter the descriptive text that displays in the user interface. For an example of how this text displays in the user interface, see Sample in Figure 13-1.
-
-
Click Add to further define the preference pages using the Insert Before, Insert Inside, Insert After options to ensure that the XML document is well formed.
13.1.1.1 How to Create a New User Preference Page
The Preference Page component enables you to create a new user interface page. You create a Preference Page using the Insert Before, Insert Inside, Insert After options.
You must create a Preferences Group element.
To create a new user preference page:
-
Select the Preference Group element.
-
Click Add, choose Insert Inside (Preference Group), then select Preference Page. As shown in Figure 13-7, the Preference Group is called MobileApp.
-
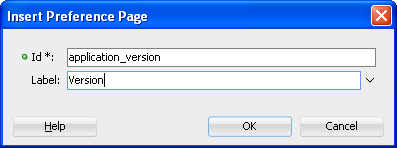
Define the following Preference Page attributes in the Insert Preference Page dialog, shown in Figure 13-8:
-
Enter a unique identifier for the Preference Page element.
-
Enter the descriptive text that displays in the user interface.
-
-
Create the body of the preference page by inserting a child Preference Group element by selecting the Preference Page, and then first choosing Insert Inside (Preference Page) and then Preference Group, as shown in Figure 13-9. After you define a unique identifier and display name for the child Preference Group, you can populate it with other elements, such as a Preference List element, as shown in Example 13-2.
13.1.1.2 What Happens When You Add a Preference Page
After you define the Preference Page and its child Preference Group components in the overview editor, JDeveloper generates an <adfmf:preferencePage> with attributes similar to Example 13-2. The <adfmf:preferencePage> is nested within a parent <adfmf:preferenceGroup> element.
Example 13-2 Adding an <adfmf:PreferencePage element>
<adfmf:preferences>
          <adfmf:preferenceGroup id="gen" label="Oracle Mobile App">
               <adfmf:preferencePage id="application_version" label="Version">
                    <adfmf:preferenceGroup id="version_select" label="Select Your Version">
                         <adfmf:preferenceList id="edition" label="Edition" default="PERSONAL">
                              <adfmf:preferenceValue name="Enterprise" value="ENTERPRISE"/>
                              <adfmf:preferenceValue name="Personal" value="PERSONAL"/>
                         </adfmf:preferenceList>
                    </adfmf:preferenceGroup>
               </adfmf:preferencePage>
     </adfmf:preferences>
13.1.1.3 How to Create User Preference Lists
Add a Preference List component to create a list of options.
You must create Preference Group as the parent to the Preference List or any other list-related component.
To create a user preference list:
-
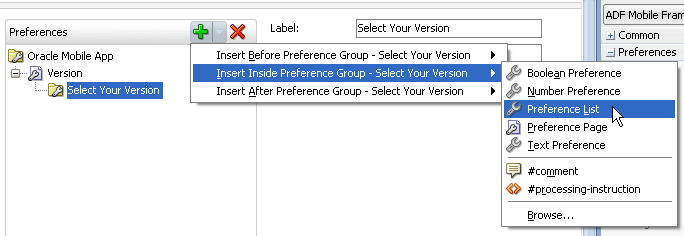
Select a Preference Group or Preference Page and then click Add, then Insert Inside, and then Preference List. Example 13-2 shows adding a Preference List as a child of a Preference Group component called Select Your Version.
-
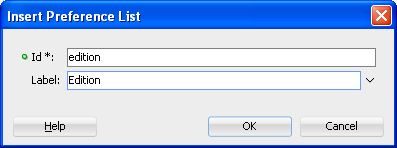
Define the following attributes using the Insert Preference List dialog, shown in Example 13-2, and then click OK.
-
Enter a unique identifier.
-
Enter the descriptive text that displays in the user interface.
-
-
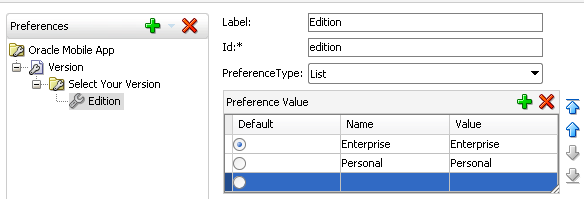
Define a list of read-only items by clicking Add in the Preference Value table, shown in Figure 13-12. You can also remove a preference value by selecting it and then clicking Delete. You can change the order in which the preference values display by selecting the preference value and then using the up- and down-arrows.
You can present the user with a default setting by choosing Default. As illustrated in Example 13-2, the default status is defined within the
<adfmf:preferenceList>element asdefault="ENTERPIRSE".Tip:
In addition to clicking Add, you can add Preference Value components by dragging them either into the Structure window or the Source window.
13.1.1.4 What Happens When You Create a Preference List
After you add Preference List component to a Preference Group and then define a series of Preference Values, JDeveloper updates the <adfmf:preferences> section with an <adfmf:preferenceList> element, as shown in Example 13-2.
13.1.1.5 How to Create a Boolean Preference List
See, for example, Example 13-1.
Because an <adfmf:preferenceBoolean> element must be nested within an <adfmf:preferenceGroup> element, you must first insert a Preference Group component to the hierarchy.
To create a boolean preference list:
-
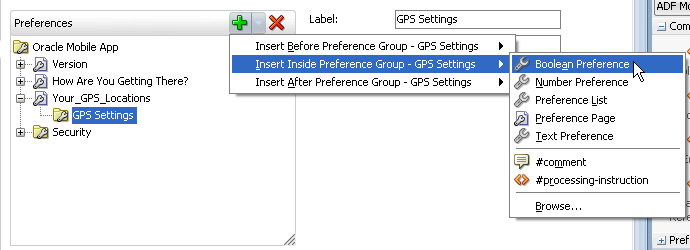
Select a Preference Group element, such as GPS Settings in Figure 13-13.
-
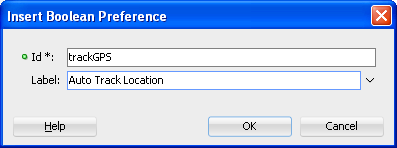
Define the following attributes using the Insert Boolean Preference dialog, shown in Figure 13-14, and then click OK.
-
Enter a unique identifier.
-
Enter the descriptive text that displays in the user interface.
-
-
Accept the default value of
false, or selecttrue.
13.1.1.6 What Happens When You Add a Boolean Preference
When you add a Boolean Preference and designate its default value, JDeveloper updates the <adfmf:preferences> section of the adfmf-application.xml file with a <adfmf:preferenceBoolean> element, as illustrated in Example 13-3.
13.1.1.7 How to Add a Text Preference
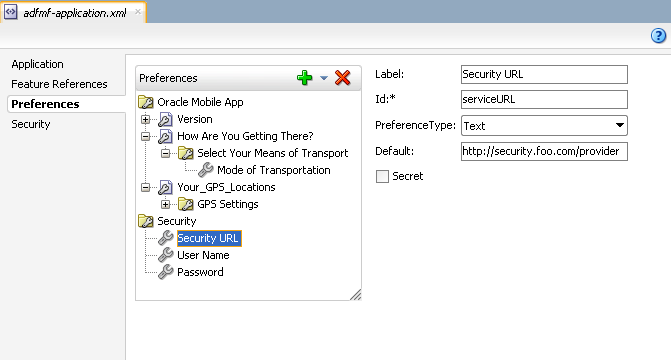
Use the insert options, shown in Figure 13-15, to create a Text Preference, a dialog that enables users to store information or view default text. Figure 13-15 shows creating a text preference within a Preference Group called Security.
Create a Preference Group element.
-
Select a Preference Group element.
-
Select Insert Inside and then Text Preference.
-
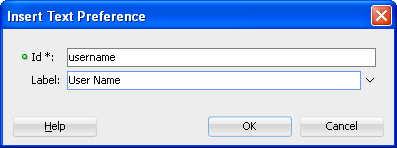
Enter the following information into the Insert Text Preference dialog, shown in Figure 13-16, and then click OK.
-
Enter a unique identifier.
-
Enter the descriptive text that displays in the user interface.
-
-
Define the following for the preference text dialog:
-
Enter the default text value.
-
Select Secret to hide the text preference to prevent users from editing it.
-
13.1.1.8 What Happens When You Define a Text Preference
When you add a Text Preference and designate its default value, JDeveloper updates the <adfmf:preferences> section of the adfmf-application.xml file with a <adfmf:preferenceText> element, as illustrated in Example 13-4.
Example 13-4 Adding the <adfmf:preferenceText> Element
   <adfmf:preferenceGroup id="security" label="Security">
      <adfmf:preferenceText id="serviceURL"
                            label="Security URL"
                            default="http://security.foo.com/provider"/>
      <adfmf:preferenceText  id="username"
                             label="User Name"/>
      <adfmf:preferenceText  id="password"
                             label="Password"
                             secret="true"/>
   </adfmf:preferenceGroup>
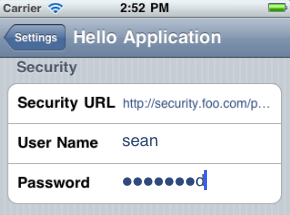
The Preference Group elements that define a security URL, user name, and password preference setting display similarly to Figure 13-18.
Figure 13-18 illustrates <adfmf:preferenceText> elements with a read-only value for the Security URL and an input value for the User Name. Because the ADF Mobile preferences are integrated with the iOS Settings application, the secret="true" attribute for the Password input text results in the application following the iOS convention of obscuring the user input with bullet points. For more information, see the description for the isSecure text field element in Settings Application Schema Reference, available from the iOS Developer Library (http://developer.apple.com/library/ios/navigation/) and Section 13.4, "Platform-Dependent Display Differences."
13.1.2 What Happens When You Create an Application-Level Preference Page
After you deploy the ADF Mobile application, the application-wide preference settings page is propagated to the device's global settings application, such as the Settings application on iOS-powered devices. For more information, see Section 16.2.3.6, "What Happens in JDeveloper When You Deploy an Application to an Android Emulator or Android-Powered Device," Section 16.4.5.1, "What Happens in JDeveloper When You Deploy an Application to an iOS Simulator or iOS-Powered Device," and Appendix B, "Converting Preferences for Deployment."
13.2 Creating User Preference Pages for Application Features
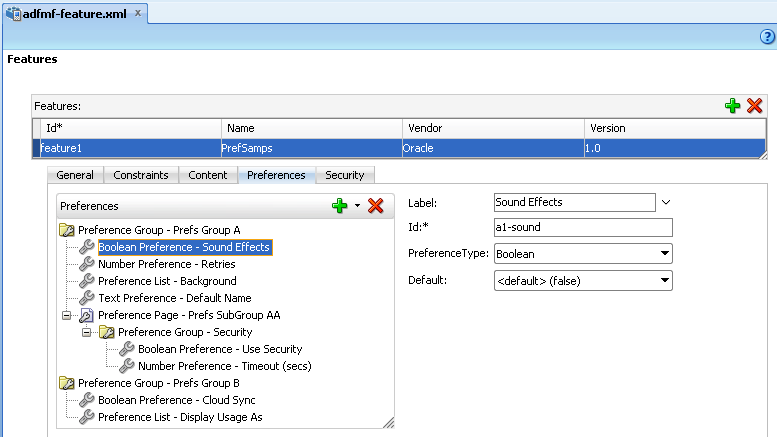
The Preferences tab, shown in Figure 13-19, enables you to define the user preferences that are applicable to a particular application feature. You build these preferences in the manner that you build the mobile application-level preferences as described in Section 13.1, "Creating User Preference Pages for an ADF Mobile Application." You then build the actual preference by creating an application feature that references an ADF Mobile AMX page that is embedded with the Boolean Switch, Input, and Output components described in Section 8.3, "Creating and Using UI Components."
13.3 Using EL Expressions to Retrieve Stored Values for User Preference Pages
When creating an application feature-level preference page, you add EL expressions to the ADF Mobile AMX components, such as the Input Text component in Example 13-5.
Example 13-5 Referencing Preference Values Using EL in ADF Mobile AMX Components
<amx:inputText label="Number" id="it1" inputType="number"
               value="#{preferenceScope.feature.Feature1.f1top.f1Number}"/>
As illustrated in Example 13-5, EL expressions use the preferenceScope object to enable applications to access an application feature-level preference. These EL expressions are in the following format:
preferenceScope.feature.feature-id.group-id.property-id
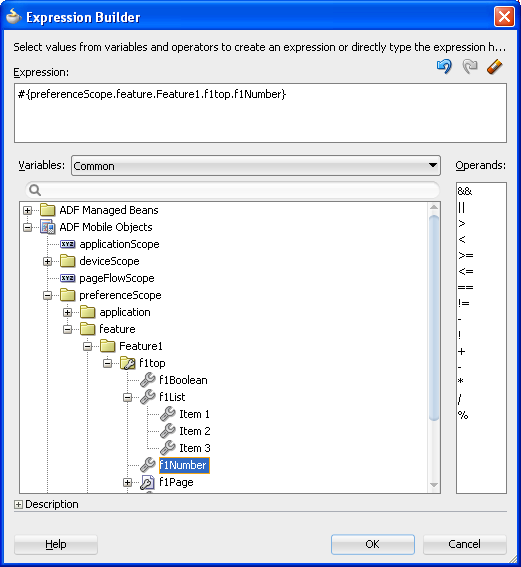
Figure 13-20 illustrates using the Expression Builder to create the EL expression.The preference itself is designated by the IDs configured for various components in adfmf-feature.xml, such as the ID of the application feature <adfmf:feature id="Feature1">), the ID of a Preference Group (<adfmf:preferenceGroup id="f1top">), and the ID of a preference property (<adfmf:preferenceNumber id="f1Number">).
The EL expression may include zero or more group-id and property-id elements.
13.3.1 What You May Need to Know About preferenceScope
An EL expression has the following resolution pattern:
-
From the JavaScript layer, EL value expressions are resolved using the following JavaScript function:
adf.mf.el.getValue(expression, success, failed)
The resolution of
adf.mf.el.getValuebegins with an attempt to resolve the expression locally using the JS-EL parser and JavaScript Context Cache. If the expression cannot be resolved locally, the expression is passed to the embedded Java layer for evaluation where it is resolved by the Java EL parser. This is done through theGenericInvokeRequestto the Model'sgetValuemethod. -
At the Java layer, an EL value expression is resolved using the following approach:
String val = AdfmfJavaUtilities.evaluateELExpression("#{preferenceScope.feature.f0.vendor}");For a
setValuemethod, the expression is resolved as follows:ValueExpression ve = AdfmfJavaUtilities.getValueExpression("#{preferenceScope.feature.f0.vendor}"); ve.setValue(AdfmfJavaUtilities.getADFELContext(), value);Evaluation of the EL expression involves looking up the
preferenceScopeobject. The evaluation is from left to right, where each token is resolved independently. After a token is resolved, it is used to resolve the next token (which is on its right).
Preferences cannot be exposed without the preferenceScope object.
13.3.2 Reading Preference Values in iOS Native Views
ADF Mobile integrates APIs provided for a native UI (such as UIView or UIViewController) to allow certain configurations on iOS platform.
When the native UI is initialized, an instance of the ADFSession object becomes available. You can use its getPreferences method to instruct ADF Mobile to provide a listing of the available preferences for the application as defined in the adfmf-application.xml file. As shown in Example 13-6, this method returns a NSArray* of preference property objects that can include the id, value, and label for the preference. This API call ensures that either the end user provided the value for a particular preference, or that the default value of the preference is returned.
Example 13-6 Getting Preferences
//...
-(id) initWithADFSession:(id<ADFSession>) providedSession
{
   id me = [self init];
   session = providedSession;
   //...
   // Dump the preferences to the data display
   NSArray* prefsArray = [session getPreferences];
   NSString* prefs = [prefsArray JSONRepresentation];
   self.theData.text = [[NSString alloc ] initWithFormat:
        :@"%@\nUser Preferences = --> %@ <--", self.theData.text, prefs];
   //...
   return me;
}
13.4 Platform-Dependent Display Differences
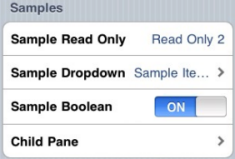
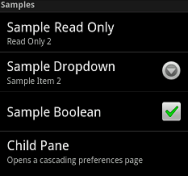
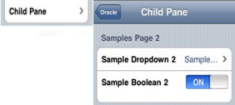
The ADF Mobile preference pages maintain the native look-and-feel for both the iOS and Android platforms. Consequently, the ADF Mobile preference pages display differently on the two platforms. As shown in Table 13-1, preferences display inline on the iOS platform, meaning that the system does not invoke dialog pages. With a few exceptions, the Android platform presents these components as dialogs.
Table 13-1 Preference Component Comparison by Platform
| Component | iOS | iOS Display Examples | Android | Android Display Examples |
|---|---|---|---|---|
|
Boolean Preference List |
The Boolean preference is represented as value pair, such as on and off. |
Android presents the Boolean preference as a check box. |
 |
|
|
Text Preference (as default, read-only text) |
iOS displays the read-only text inline. |
Android displays the read-only text inline. |
||
|
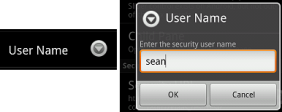
Text Preference (as input text) |
On iOS platforms, users enter text inline. |
Android launches an input text dialog. |
 |
|
|
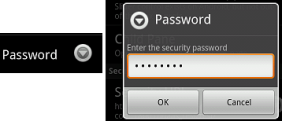
Text Preference (as secret input text) |
On iOS platforms, users enter text inline, with each character obscured by a bullet point after it has been entered. For more information, see Section 13.1.1.8, "What Happens When You Define a Text Preference." |
Android launches an input text dialog and obscures each character with a bullet point after it has been entered. |
 |
|
|
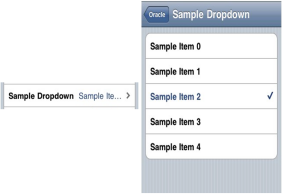
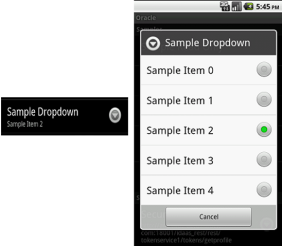
Single Item Selection List (from a Preference List) |
iOS platforms display the single item selection list in a separate preferences page. |
 |
Android displays the single item selection list in a dialog. |
 |
|
Preference Groups (Category Selection) |
The iOS platform displays the preference elements within their parent preference group. |
 |
The Android platform displays the preference elements within their parent preference group. |
 |
|
Preference Page |
iOS launches a child preference page from a preference group. |
 |
Android launches a child preference page from a preference group. |
 |
Although iOS and Android platforms have a Settings application, only the iOS platform supports integrating application-level preferences into the Settings application, as shown by the Oracle preferences in Figure 13-21.
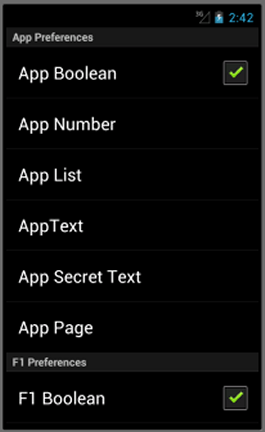
On Android-powered devices, users access preferences pages through the Preferences menu, as shown in Figure 13-22.
