| Oracle® Enterprise Data Quality for Product Data Oracle DataLens Server Administration Guide Release 11g R1 (11.1.1.6) Part Number E29138-02 |
|
|
PDF · Mobi · ePub |
| Oracle® Enterprise Data Quality for Product Data Oracle DataLens Server Administration Guide Release 11g R1 (11.1.1.6) Part Number E29138-02 |
|
|
PDF · Mobi · ePub |
You can configure and administer various Administration Server related elements.
This chapter describes the following functions contained in the Configuration panel:
The administration of the Administration Server and all other Oracle DataLens Servers are controlled from the Administration Server.
From the Configuration panel, select Configuration to modify the various Administration server constant options.
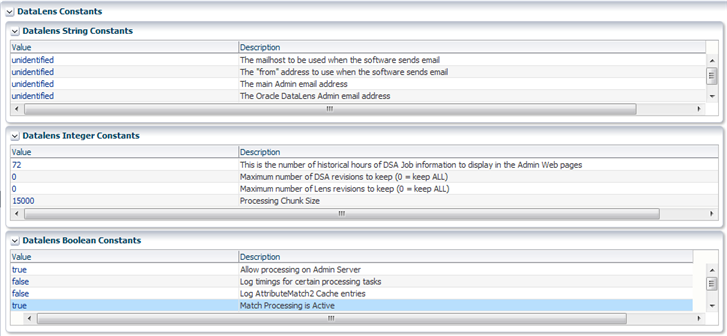
Each of these settings is a configuration parameter that is set globally. Select any of the value links to change the current settings as described in the following:
| Default Value | Description | What It Does |
|---|---|---|
unidentified |
The "from" address to use when the software sends email |
The sending email address that will be used when EDQP sends email to defined recipients and should be the Administrator of your Oracle DataLens Administration Server. This value is not validated so ensure that you have entered the text string correctly. For example, admin@yourcompany.com.
Some email programs can misdirect this type of email to a junk or spam folder so you should ensure that this address is added to your safe email sender list. |
unidentified |
The main Admin email address |
The main Oracle DataLens Administration Server Administrator's email address and will likely be the same as the above constant value. All administrative change alerts are emailed to this recipient including user and role changes, DSA and data lens check-ins and check-outs, and server group changes. For example, admin@yourcompany.com.
An email alias can be used to alert a group of administrators. This value is not validated so ensure that you have entered the text string correctly. |
unidentified |
The Oracle DataLens Admin email address |
The data lens Administrator's email address. This recipient receives alerts about actions to data lenses only. This value is not validated so ensure that you have entered the text string correctly. For example, dl_admin@yourcompany.com. |
unidentified |
The DSA Admin email address |
The DSA Administrator's email address. This recipient receives alerts about actions to DSAs only. This value is not validated so ensure that you have entered the text string correctly. For example, dsa_admin@yourcompany.com. |
unidentified |
System User |
The data lens and DSA system user that is used for check-ins and autodeployments. |
DataLens Numeric Constants Administration
| Default Value | Description | What It Does |
|---|---|---|
72 |
This is the number of historical hours of DSA Job information to display in the Admin web pages |
This is the number of historical hours of DSA Job information to display in the Administration web pages though all history is logged for review. This value can be changed to dynamically view more or less hours of history. For example, setting to 720 will give you about 30 days of history. To view the transactional history, click the Job Status link. |
0 |
Maximum number of DSA revisions to keep (0 = keep ALL) |
Sets the maximum number of DSAs that will be retained on the Administration Server and displayed in the list of DSAs displayed in each deployment area. The default is zero, which retains all revisions of all DSAs. See "Managing Data Service Applications". |
0 |
Maximum number of Lens revisions to keep (0 = keep ALL) |
Sets the maximum number of data lens that will be retained on the Administration Server and displayed in the list of data lenses displayed in each deployment area. The default is zero and this value should be changed with caution, which retains all revisions of all data lenses. See "Managing Data Lenses". |
Warning:
Changing theMaximum number of Lens revisions to keep (0 = keep ALL) value can result in a currently deployed data lens being deleted when the maximum revision value is reached. If an older revision is deployed within the maximum revision threshold, it can result in the deployed data lens deletion. This occurs in rare instances so should be consider before changing this value.15000 |
Processing Chunk Size |
Sets the number of records (lines of data) that are processed within each DSA step. For example, if 45,000 lines are sent into a DSA step for processing when this value is set to the default of 15,000 then the server will create chunks of 15000 records to process. The server processes each chuck one record at a time until all of the records are processed. |
DataLens Boolean Constants Administration
| Value | Description | What It Does |
|---|---|---|
true |
Allow processing on Admin Server |
Allow job processing on the Oracle DataLens Administration Server. To ensure good performance of this server, job processing should take place on production and development servers. When this is the case, this value should be set to false.
If set to |
false |
Log timings for certain processing tasks |
Log timings for certain processing tasks. Oracle recommends that you use the default value. |
false |
Log AttributeMatch2 Cache entries |
Log AttributeMatch2 Cache entries. Oracle recommends that you use the default value. |
true |
Match Processing is Active |
Allow matching component processing on Oracle DataLens Servers.
This value should only be set to When this value is changed, all Oracle DataLens Servers must be restarted to enable match processing. |
This section describes how to:
create and manage server groups
configure and add servers to server groups.
Server groups allow Oracle DataLens Servers to be grouped together for use in the following scenarios.
Development
Production
Quality Assurance Testing
Each Server in the group will participate in automatic server load balancing within the group. The servers can also be used for round robin checking from client applications to determine which server in the group is running and available to handle requests. It is important for the QA server group to match the Production server group so realistic stress testing, load balancing, and performance monitoring can occur.
The Oracle DataLens Servers do not have a "type" until they are assigned to a server group. The type of server will depend on the type of group that the server is assigned to.
To administer your server groups, from the Configuration panel, select Server Group.
You can add a server group, see "Adding a New Server Group" or add a server to an existing server group, see "Adding a Server to a Server Group". You can view all of the server group information by clicking Expand All.
The options and informational columns are described as follows:
The server group name and the names of the servers in that group.
You can take the following actions using the buttons in this column:
| View or Edit | Click to review or edit the parameters of the given server group. | |
| Delete | Click to delete the server group. The list is refreshed once the server group has been deleted from the server. You cannot delete a server group if there are servers are in the group. You must delete all servers first, then the delete action icon appears so that the Server Group delete is possible. | |
| View Log | Click to view the log associated with the server group in the panel. You can download the log to review independent of the Administration Server web page by clicking Download Log. A text file of the log is downloaded locally. |
Reports whether the server is on line or off line. You can click on the On-Line link to log into the given server.
A description of the server group and is defined when the server group is created though it can be changed using the View or Edit action.
Reports the total number of servers in the group.
These columns report when the server group was created or the server added to the group and by which user.
These columns report when the server group was updated and by which user. If the server group or server has not been updated then NA is displayed.
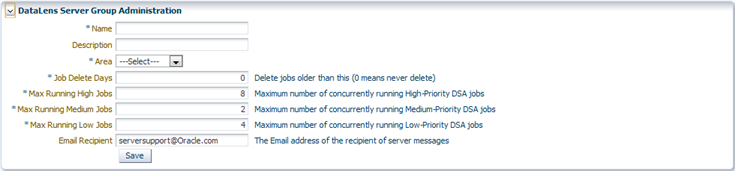
From the DataLens Server Group - Administration panel, click Create a New Server Group.
Enter the name of the new server group.
(Optional) Enter a server group description to differentiate it.
Select a type. There are 3 choices in the drop-down menu
Production - This group will contain the servers used in a production environment to process data.
Development - This group will contain the servers used in a development environment to test new changes to data lenses, and DSAs.
QA - This group will contain the servers used in a Quality Assurance environment to test the work done by the developers, prior to their use in a production group.
Set the parameters for this server group.
Max Running High Jobs
This is the maximum number of high-priority jobs that will be run simultaneously on this server group.
Max Running Medium Jobs
This is the maximum number of medium-priority jobs that will be run simultaneously on this server group.
Max Running Low Jobs
This is the maximum number of low-priority jobs that will be run simultaneously on this server group.
These parameters can be increased as new servers are added to the group.
(Optional) Enter the Email Recipient email address of the administrator that is notified when warnings or errors occur at a server group level from the Oracle DataLens Server.
Select Save to create the new server group.
From the DataLens Server Group - Administration panel, click the name of the server group or the View or Edit button in the adjacent Actions column.
All of the options can be edited as described in "Adding a New Server Group".
You must create a server group before can create an Oracle DataLens Server as described in the previous section.
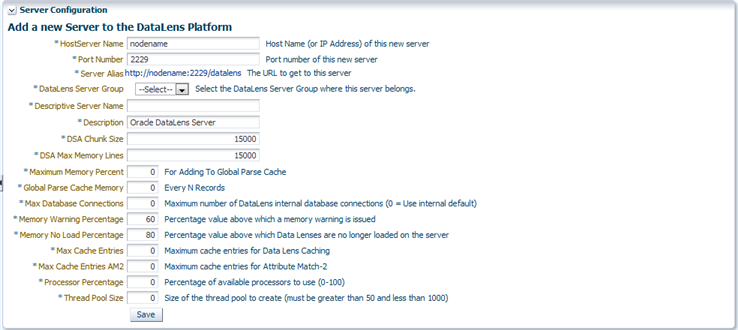
From the DataLens Server Group - Administration panel, click Add a New DataLens Server.
Enter or select the following information:
Host Server Name
The name or IP of the server you want to add.
Port Number
The port number on which this server communicates.
Server Alias
The server alias link is automatically updated with the name and port number you enter in the preceding fields.
Data Lens Server Group
The server group in which you want this server to operate.
Descriptive Server Name
A unique description of how this server will be identified.
DSA Chunk Size
Sets the number of records (lines of data) that are processed within each DSA step and held in memory. For example, if 45,000 lines are sent into a DSA step for processing when this value is set to the default of 15,000 then the server will create chunks of 15000 records to process. The server processes each chuck one record at a time until all of the records are processed.
DSA Max Memory Lines
Sets the number of records (lines of data) that held in memory within each DSA step.
Maximum Memory Percent
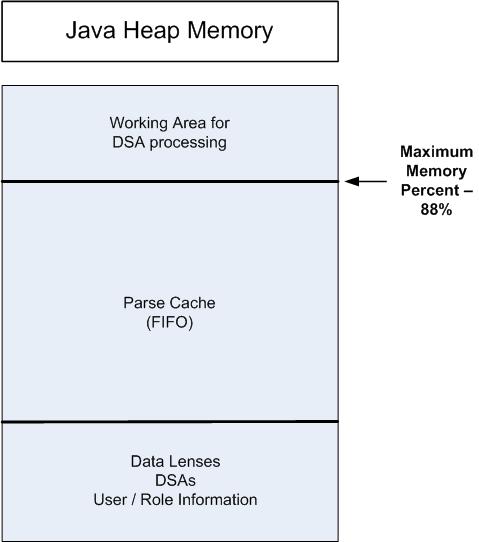
Sets the portion of the total global Java Heap memory allocated for the Global Parse Cache. This total includes the memory already allocated at server startup for DSA, data lens, user, and role information needed for processing. The difference between the memory allocated at server startup and the threshold value is the Global Parsing Cache. The heap memory above this threshold is available for run time processing for each DSA step (all Transformation and Decision Maps). Setting this value to zero turns it off, which turns off the Global Parse Cache Memory option. This global constant is most useful when your data contains the literally the same strings of repeating data. This global constant and the next are used in conjunction to tune your data so the values set will be unique to your environment. If memory allocation errors occur, see "Configuring the Server".
Global Parse Cache Memory
Sets the frequency, every N records, to check how close the Maximum Memory Percent for adding to Global Parse Cache constant is to its defined value. Setting this value too low can use valuable memory and processing while setting it to high can result in exceeding the allocated memory.
The Global Parse Cache Memory and Max Cache Entries are controlled by the Java Heap as follows:
Following is an explanation of how these cache and memory settings operate together:
If Max Cache Entries = 0 and Maximum Memory Percent = 0, then NLE Parse Results caching is turned off.
If Maximum Memory Percent > 0, then the following are true:
The default Maximum Memory Percent is 88, which means that by default Global Parse Caching is on with unlimited entries. In conjunction, setting Max Cache Entries has the following two meanings:
Max Database Connections
This is the maximum number of connections that the Oracle DataLens Server will use to connect to the internal database.
Memory Warning Percentage
This is a value from 0 to 100. If the memory currently being used by the web server and the Oracle DataLens Server exceeds this value, then a warning is issued to the main Administration and server group email recipients. See "Configuring Server Constants" and "Managing Server Groups and Server Configurations".E
Memory No Load Percentage
This is a value from 0 to 100. If the memory currently is being used by the Application Server and the Oracle DataLens Server exceeds this value, then no more data lenses will be loaded into memory on this particular server. Email alerts are sent to the main Administration and server group email recipients. See "Configuring Server Constants" and "Managing Server Groups and Server Configurations".
Max Cache Entries
This is an integer value. It sets the maximum number of parsed lines of data that a data lens will cache. This cache is a Least Recently Used Cache, so when the maximum is reached, the least recently used entry is dropped and the newly parsed data is added as an entry. The default value, zero, indicates that caching will occur to the maximum amount of memory percentage set by the Maximum Memory Percent for adding to Global Parse Cache Numeric Constant. For more information about this constant, see "Configuring Server Constants".
Max Cache Entries AM2
This is an integer value. It sets the maximum number of entries in the Attribute Match 2 Cache. This cache is a Least Recently Used Cache, so when the maximum is reached, the least recently used entry is dropped and the new data retrieved from a database query is added as an entry. The default value, zero, indicates that no caching will occur; the higher the value the more memory is allotted for caching.
Note:
The behavior of this value is the opposite of the Max Cache Entries value.Processor Percentage
This is a value from 0 to 100. It sets how DSA processing distribution is distributed across all CPUs in the server by percentage. If this value is set to 0, processing distribution is off; this is the default. If the value is > 0, processing is distributed to CPUs as calculated by the defined percentage value rounding to the nearest whole number though never less than 1. For example, if the server contains eight CPUs and you set the value to 87, processing is distributed to seven of the eight CPUs. To distribute processing to all eight CPUs, you would set this value to 100.
Thread Pool Size
This is an integer value from 50 to 1000. It sets the thread pool boundary on the number of threads in the pool that can be running on the Oracle DataLens Server. Because the server can run numerous jobs simultaneously and each job can start multiple threads to distribute the work across processors, a thread pool is created so that the server does not run out of threads. The default value is 500. Any value less than 50 is set to 50; any value greater than 1000 is set to 1000.
The following algorithm is intended to aid you in calculating the thread pool size value:
(Number of jobs running simultaneously * (Number of Lens Transform Maps in the DSA) + (Number of DB Update Transform Maps in the DSA) + (a few spare)
Click Save to add the server to the server group.
From the DataLens Server Group - Administration panel, click the name of the server or the View or Edit button in the adjacent Actions column.
All of the options can be edited as described in "Adding a Server to a Server Group". In addition, the list of deployed data lenses and loaded on the server is displayed. The set of check boxes for all the data lenses that are deployed to the Oracle DataLens Servers enables the system administrator further control over which data lenses are loaded on each particular Oracle DataLens Server. This is the most important consideration because the bulk of the processing usually takes place in the data lenses, and the data lenses take up the most memory on the server as well.
This is not applicable to the Oracle DataLens Administration Server because data lenses are loaded on demand. In other words, data lenses are loaded when needed for job processing.
Note:
If all of the servers in a server group are set to deploy all of the data lenses, then the Oracle DataLens Administration Server will manage the load-balancing of datalens job processing across all the servers in the server group.EDQP users, both client and administrative, are added to Oracle DataLens Servers by adding them to your EDQP WebLogic Server domain.
WebLogic domains contain one or more Security Realms that provide user authentication and authorization within the WebLogic security framework. A user can be a person, such as application end user, or a software entity, such as a client application, or other instances of WebLogic Server. As a result of authentication, each user is given a unique identity within the security realm and placed into groups that are associated with security roles, or can be directly associated with security roles. In addition, applications deployed in the WebLogic domain may be configured to use the Security Realm. For more information about WebLogic Server security, see Oracle Fusion Middleware Understanding Security for Oracle WebLogic Server 11g Release 1 (10.3.6).
Caution:
The use of Oracle Virtual Directory in combination with Microsoft Directory Server is not supported. Do not use this combination.You create and manage all users in the Security Realm of EDQP WebLogic domain that you created when you installed your Administration server. These users are populated in your Administration server for you to configure how users will use EDQP. For information about adding users to your WebLogic Server, see Oracle Fusion Middleware Oracle WebLogic Server Administration Console Online Help 11g Release 1 (10.3.6) at
http://docs.oracle.com/cd/E23943_01/apirefs.1111/e13952/taskhelp/security/DefineUsers.html
The security roles for all EDQP users and groups are managed using your Oracle DataLens Server Administration web page. Security roles are a set of defined privileges and can be grouped together to form a group; both are defined in your WebLogic domain and applied in EDQP. Users can be associated with both roles and groups in a myriad of ways as in the following:
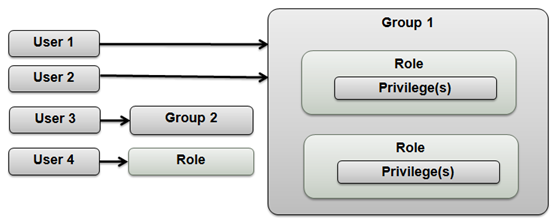
The role with the highest privilege is always applied for each user. For example, when both the 'System Admin' and 'Manager' roles are applied to a user the System Admin role is applied because it has the most comprehensive set of privileges.
The standard set of EDQP user roles in equal (all User roles are equal) and ascending privilege order are:
| Role | Description |
|---|---|
| Application Studio User | Access to all Application Studio functions |
| Dev Area Manager | Deploy data lens and DSAs to Development
Run restricted DSAs in Development |
| Excel Services User | Access to all Excel Services functions |
| Governance Studio User | Access to all Governance Studio functions |
| Knowledge Studio User | Access to all Knowledge Studio functions |
| Task User | Create any and manage own tasks |
| PIM AutoBuild User | Access to all PIM AutoBuild functions |
| Task Manager | Create and manage all tasks |
| Production Area Manager | Deploy Assets to Production
Run Restricted DSAs in Production |
| QA Area Manager | Deploy Assets to QA
Run Restricted DSAs in QA |
| System Admin | Access to All Functions (see the following description) |
The EDQP System Admin privileges are:
| Privilege | Description |
|---|---|
| Access Administration | Access Administration website functions |
| Administer configurations | Change settings and server configurations |
| Administer data lenses | Unlock and lock |
| Administer DSAs | Unlock and lock |
| Rename assets | Rename both data lenses and DSAs |
| Run reports | Reports and dashboard |
| Administer jobs | Schedule, edit, delete, and run jobs |
| Cancel jobs | Cancel running jobs |
| Change job priorities | Change running jobs priority |
| View log entries* | View all types of log entries, including administration entries |
From the Configuration panel, select the User Administration link to view all of the users.
There are two tabs in the User Administration panel and are described in the following sections:
Users - Allows you to set roles for individual users created in your WebLogic Server Administration Console; these are direct roles.
Enterprise Groups - Allows you to change the roles assigned to the groups created in your WebLogic Server Administration Console; these are indirect roles.
The Users tab allows you to select a user and assign roles that control how that user is authorized to use EDQP components and is the default tab for user administration.
The options and informational columns in Figure 4-6 are described as follows:
You can search for a specific user or set of users by entering a string value, which can include an asterisk (*) wildcard, in the field adjacent to the Search button. Leaving this field blank in your search results in a list of all available users.
Filter your search by selecting one of the following from the drop-down list:
CONTAINS - The default that searches for a name that contains the search string.
STARTS WITH - Searches for a name that starts with the search string.
ENDS WITH - Searches for a name that ends with the search string.
Click Search to view the results.
The user id that was set when the user was created in the WebLogic Server Administration Console.
These roles are assigned to individual users using the Users tab. All direct roles are displayed in square braces. For example, [Application Studio User, Excel Services User, Knowledge Studio User].
These roles are assigned to a group of users using the Enterprise Groups tab; these are indirect roles because they are inherited from the groups configured in your WebLogic Server Administration Console. Indirect roles are indicated with the name of the role and the indirect roles and the name of the group the roles are from in square brackets. For example, System Admin,[From Group: Administrators]Governance Studio User, PIM AutoBuild User, Task Manager[From Group: Monitors]
To change the roles for a user:
From the Configuration panel, select User Administration.
Click on the User ID name link of the user you want to modify.

Select one or more of the Available EDQP Roles then click the right arrow to add the role or the left arrow to remove it. You can add all roles with the double right arrow button or remove all roles with the double left arrow button.
Click Save to save your changes.
A message that your roles were saved is displayed above the Available EDQP Roles list.
The groups that you have configured in your WebLogic Server Administration Console allows you to conveniently group users together to assign similar permissions from the Enterprise Groups tab.
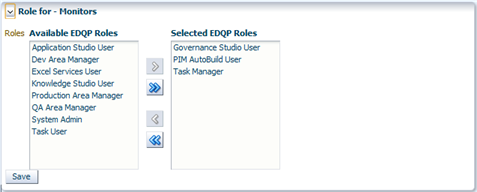
For example, you could create Monitors' group intended for users that will only monitor jobs rather than use and modify data lenses and DSAs. First you would create the group in WebLogic, then you would assign the PIM AutoBuild User, Task Manager, and Governance Studio User roles in your EDQP Administration server as in Figure 4-7.
The options on this tab operate the same way as described in "Changing User Roles". However, the User ID column is the Group ID column and there is no Indirect Roles column since group roles are direct.
To change the roles for a group:
From the Configuration panel, select User Administration.
Click the Enterprise Groups tab.
Click on the Group ID name link of the group you want to modify.
Select one or more of the Available EDQP Roles then click the right arrow to add the role or the left arrow to remove it. You can add all roles with the double right arrow button or remove all roles with the double left arrow button.
Click Save to save your changes.
A message that your roles were saved to the group is displayed above the Available EDQP Roles list.
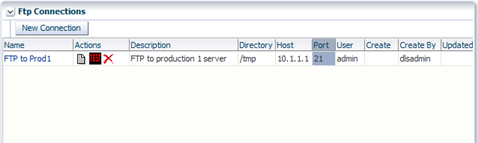
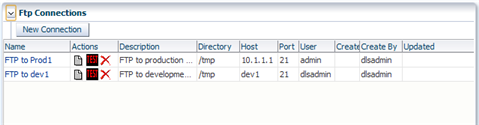
Named FTP connections can be created for use in DSAs and from DSA Transformation Maps (used by a DSA Step). The result data from a DSA job can be sent directly to one of these named FTP connections. Jobs run from the real-time programming interface can specify an FTP connection for the output.
From the Configuration panel, select the Ftp Connections link.
The options and informational columns are described as follows:
The FTP connection name.
You can take the following actions using the buttons in this column:
| View or Edit | Click to review or edit the parameters of the given FTP connection. | |
| Test | Click to test the FTP connection. See "Testing the FTP Connection". | |
| Delete | Click to delete the FTP connection. The list is refreshed once the FTP connection has been deleted from the server. |
A description of the FTP connection and is defined when the connection is created though it can be changed using the View or Edit action.
The directory to which files will be transferred on the remote server.
The name or IP of the server you want to transfer files to.
The port number on which this server communicates.
The user that is used to log in to the remote server that has permissions to FTP files to the directory.
These columns report when the FTP connection was created and by which user.
These columns report when the FTP connection was updated and by which user.
To create a new FTP connection:
From the Configuration panel, select the Ftp Connections link.
Click New Connection.
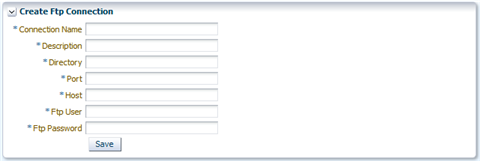
Enter a name for the connection.
Specify a directory where the files will be placed in the remote FTP directory. This directory must be a sub-directory of the FTP connection destination directory, when connecting to the FTP host.
Enter the Port and Host.
Enter a user and password that has FTP permissions on the server.
Save the new FTP connection definition.
The new connection is listed in the Ftp connections page.
To test an FTP connection:
From the Configuration panel, select the Ftp Connections link.
Click the TEST button for the connection that you want to test.
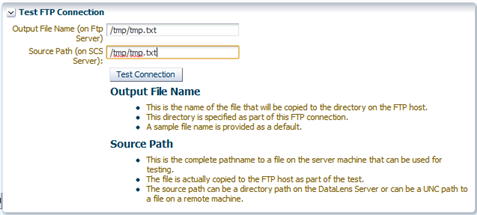
Enter the full path name to the directory to use to test the FTP connection in the Output File Name (on Ftp Server) field. You must use a forward slash (/) to end the path name.
Enter the full path name of a text file that you want to use to test the FTP connection in the Output File Name (on Ftp Server) field. This directory must be the same as the directory specified when the connection was created.
Click Test Connection.
A confirmation message of testing success or failure is displayed.
You must create named database connections for use by DSAs that require database input so that you can process these data records. Database connections are used across the Oracle DataLens Server topology and so only need to be created once. Oracle recommends that, for a given database connection string and database user, you create only one database connection.
Caution:
If you to use a database connection other than the preconfigured Oracle database connection, you must configure your database driver for use before attempting to create a database connection on your Oracle DataLens Administration Servers otherwise the database connection will fail. Oracle provides WebLogic-branded versions of DataDirect drivers for DB2 and MySQL Server with the standard installation though they are not configured for use in the classpath.For configuration instructions, see the corresponding appendix in the Oracle® Enterprise Data Quality for Product Data Installation Guide atFrom the Configuration panel, select the Database Connections link.
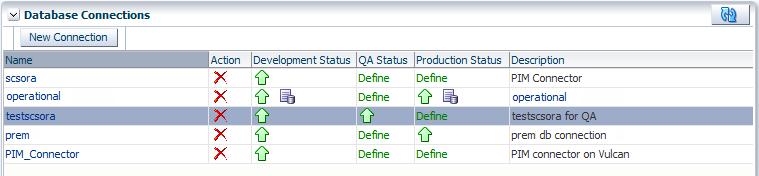
The Administration Server includes a pre-configured JavaDB operational database connection named, "operational" as shown in Figure 4-9. This JavaDB operational database connection is only for use in development and demonstration as proof of concepts. Because the JavaDB is not certified for Production processing, it is possible that an error may occur when running multiple concurrent jobs using this operational database. It is not intended for Production concurrent job processing. The Administration Server will not allow a database connection to be created for QA or Production. An Oracle database connection is available for use in a Production configuration.
Caution:
When using an Oracle Database or PostgreSQL Database, you must configure your database to use UTF-8 encoding if you want to store non-Latin characters. If your database is not configured as UTF-8, then some characters may not be rendered correctly due to encoding differences.The options and informational columns are described as follows:
The database connection name that is a link to allow you to edit the connection. These names are those that can be used by any of the DSA to use the connection. To change the database connection, click on its name, see "Creating a Web Service".
You can take the following actions using the buttons in this column:
| Delete | Click to delete the database connection. The list is refreshed once the database connection has been deleted from the server. |
Warning:
If you delete an operational database connection then subsequently want to reconnect to the identical connection, you must recreate it as described in "Creating a New Operational Database Connection". To ensure accurate versioning, the database is dropped, the connection recreated, and tested when you create the database schema. However, you must recreate the data associated with this operational database connection (for example, all you StatSim indexes.)The status in each of these columns for the given database connection is displayed. The default when creating a new connection is Development so that column is always populated. Use the Refresh button to ensure that you are viewing the most current status of all connections. The status icons are as follows:
A green up arrow indicates that the connection is responsive.
A red down arrow indicates that the connection is unresponsive.
The double blue refresh arrows indicate that you should refresh the page using the Refresh button.
The data/database icon indicates that it is an operational connection rather than a standard database connection.
A description of the database connection that is defined when the connection is created though it can be changed.
To create a new standard connection to a database:
From the Configuration panel, select the Database Connections link.
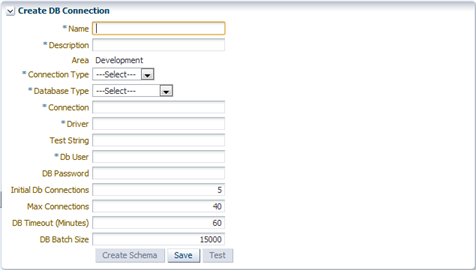
Enter a name and description for this connection.
Select Standard as the Connection Type.
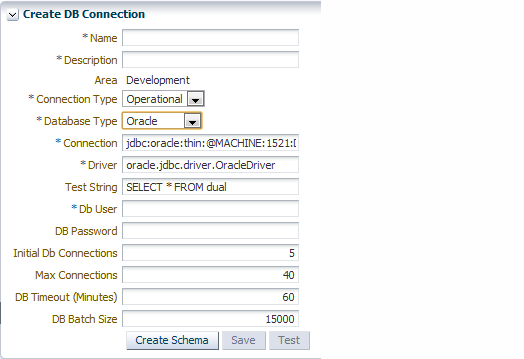
Select a Database Type to pre-populate the Connection and Driver fields. There is default connection information for the following databases:
User Defined
Oracle
MySQL
SQL Server 2008
SQL Server 2005
PostgreSQL
DB2
Additionally, the User Defined option allows you to enter any connection information for alternate databases.
Edit the Connection field as needed to define your server name, port, and database name (SID).
Edit the Driver field as needed to define your Oracle database driver parameters. The default installation driver configuration is the default.
Enter the database user in the Db User field. Enter that user's password, if necessary, in the DB Password field.
(Optional) You can use the default settings if you are unsure what values to use for the other options on this page or you can modify the remaining connection values.
Click Save to save your connection.
Click Test to test the connection.
The connection is created and tested for successful connection. Any connection errors encountered are reported so that you can correct them. If you need to modify your connection to operate correctly, you must click Save to save your changes.
Once a database connection is successfully created, you can select it from the list of database connections and return to the Create DB Connection page. You can modify any of the parameters with the exception of the Area, then retest and save it.
Additionally, you can use the Development schema to create either a QA or Production schema by clicking Create for QA and Create for Production respectively. Both of these actions advance you to the Create DB Connection page and automatically changes the Area to the new schema you selected, QA or Production. You modify the parameters, such as the Description, and use the form as described in this section.
To create a new operational connection to a database:
From the Configuration panel, select the Database Connections link.
Enter a name and description for this connection.
Select Operational as the Connection Type.
The Database Type option is populated with Oracle and the Connection and Driver fields are pre-populated with the corresponding information.
Edit the Connection field as needed to define your server name, port, and database name (SID).
Edit the Driver field as needed to define your Oracle database driver parameters. The default installation driver configuration is the default.
Enter the database user in the Db User field. Enter that user's password, if necessary, in the DB Password field.
(Optional) You can use the default settings if you are unsure what values to use for the other options on this page or you can modify the remaining connection values.
Click Create Schema to create and validate the operational database schema.
Click Save to save your connection and add it to the list of database connections.
Click Test to test the connection.
The connection is created and tested for successful connection. Any connection errors encountered are reported so that you can correct them. If you need to modify your connection to operate correctly, you must click Save to save your changes.
Once a database connection is successfully created, you can select it from the list of database connections and return to the Create DB Connection page. You can modify any of the parameters with the exception of the Area, then retest and save it.
Additionally, you can use the Development schema to create either a QA or Production schema by clicking Create for QA and Create for Production respectively. Both of these actions advance you to the Create DB Connection page and automatically changes the Area to the new schema you selected, QA or Production. You modify the parameters, such as the Description, and use the form as described in this section.
You must have an Oracle database configured and operating on a server to enable you to configure your DSAs to create StatSim indexes on your Administration Server. An operational database connection to your Oracle database must then be created as described in "Creating a New Operational Database Connection".
You can edit the DbConnectionTemplates.xml file and modify the defaults to create new database connections. Mirror the syntax provided in the file to create one or more connections. You must manually test these connections though the connections and corresponding status can be viewed as in Figure 4-9.
Named Web Services Description Language (WSDL) connections are created and configured for use in a DSA and its Transformation Maps within a step. These connections can be configured differently for Development, QA, and Production servers though all share a common name. This allows the web services to be different in different environments and DSAs never need to change based on the deployment environment.
Note:
The web service that is being called must only return a single string. All Transformation Maps in the Application Studio are expected to return a single string and this includes the web service calls.Web services that return multiple fields (such as in the following example), return the multiple fields as character-separated data (such as a vertical bar) within the single string. In the Application Studio, you could then use the Get Field add-in function to extract the individual fields in the returned data.
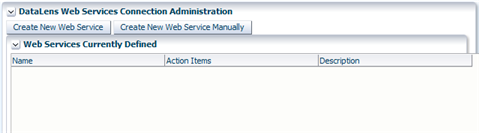
From the Configuration panel, select the Web Services link.
The options and informational columns are described as follows:
The initial page is empty as in Figure 4-10 and this list is updated when a web service is updated.
The web service name that is a link to allow you to edit the service. These names are those that can be used by any of the DSA to use the web service. To change the web service, click on its name, see "Creating a Web Service".
You can take the following actions using the buttons in this column:
| View or Edit | Click to review or edit the parameters of the given web service. | |
| Delete | Click to delete the web service. The list is refreshed once the web service has been deleted from the server. |
A description of the web service that is defined when the service is created though it can be changed. See "Creating a Web Service".
You can create a web service in one of two ways, using the EDQP pre-configured WSDL or by manually entering all of the parameters for the WSDL of your choosing. All of the same parameters are configured as described in the following process.
To create a web service:
From the Configuration panel, click Web Services.
Click Create New Web Service or Create New Web Service Manually.
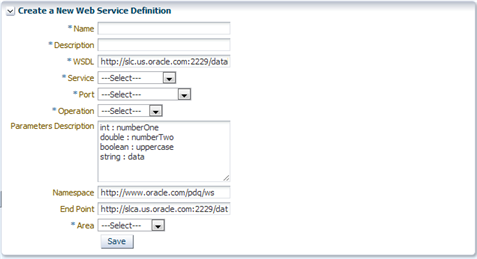
Enter a name and description for the web service.
Ensure that the WSDL field is populated with the correct server name and port for the server that contains your WSDL file. In this example, the Administration server hostname and port is pre-populated.
Select the service that you want from the Service drop-down list or enter it.
Select the port that you want from the Port drop-down list or enter it.
Select the operation that you want from the Operation drop-down list or enter it.
In this example, the parameters are populated automatically from the web service
For the EDQP WSDL the Parameters Description, Namespace, and End Point options are pre-populated and should not be changed.
If you are manually creating a web service, enter the appropriate information in these options.
Select the Area that you want to use this web service in, Development, QA, or Production.
Click Save to save this web service.
After creating a web service you should test it to ensure that it is operational. Additionally, you can update the description and parameter description.
From the Configuration panel, click Web Services.
Click on the name of one the currently defined web services to test it.
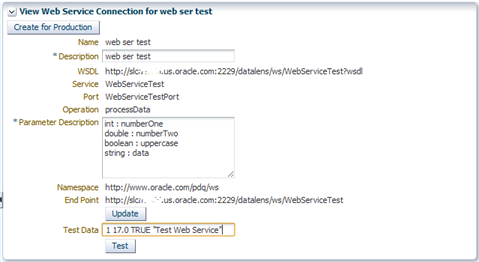
Enter the test data for the web service into the Test Data input field. The test data is space delimited and must follow the parameter input requirements defined in the Parameter Description field. In this example of the EDQP WSDL, you would enter 1 17.0 TRUE "Test Web Service" to test it.
Click Test to test the connection by processing the data with the EDQP web service.
A successful test results in messages similar to the following is displayed:
Test Output

1 times 17.0 = 17, Test Web Service
The web service is now ready for use by DSAs.
(Optional) Update the Description field or the Parameter Description fields, and then click Update to save your changes.
|
Copyright © 2001, 2013, Oracle and/or its affiliates. All rights reserved. Legal Notices |
|