3 Managing a TapePlex
In general, managing a TapePlex is similar to managing VTCS, which is to (1) periodically and continuously, keep tabs on the health of your TapePlex(es) and (2) do as-needed chores as the need for them occurs. This chapter, however, intermixes periodic and as-needed tasks as it addresses the physical elements of a TapePlex and what you need to do to keep them operating normally. SMC/HSC/VTCS is server software, so it is designed to be self-correcting. Similarly, there is redundancy and resilience built into the library hardware itself. As long as you frequently check the status of the software and hardware and fix any problems, that takes care of the bulk of your TapePlex management tasks.
Managing Library Hardware
One of your best status tools is the innocuously named DISPLAY EXCEPTNS command, where ”exceptions” are less-than optimal hardware conditions. The command output you want to see is a series of messages that say ”No name of hardware component problems were detected”. If you are experiencing system problems, this kind of output tells you that the hardware is fine, but there might be software problems.
If, on the other hand, you get output such as ”CAP Not Operational”, ”Robot Hand needs Maintenance”, and ”LSM is Offline”, you need more information to determine if the problem is with the software or hardware. Therefore, if you get any of these messages, look them up in ELS Messages and Codes, where you find detailed explanations and user responses. In some cases, the response is obvious and straightforward. If a robot hand needs maintenance, you put in a call to the CSE. Sometimes the response is not so clear, however. If an LSM is offline, the obvious move is to modify it back online, unless the LSM is down for maintenance, or you are changing drive unit addresses, in which case you wait until the work is done before bringing the LSM back online.
If you have used DISPLAY EXCEPTNS as your first diagnostic tool, and either found no problems or found problems and resolved them and you are using the Activities and ACS daily Reports to tune up the library performance, what is next in terms of managing the library hardware? The following sections get more detailed with status commands and responses to the conditions they show.
Managing ACSs
Two other commands you should know and use are DISPLAY ACS and DISPLAY ALL. DISPLAY ACS shows you the status of your ACSs, which includes hardware statuses for the ACSs, LMUs, and stations; and scratch volumes and free cells available. DISPLAY ALL tells you all that plus LSM and CDS status. You may see components that are not in an online or operational state: ACSs disconnected, stations offline or in standby mode, LSMs offline, and so forth. You use the MODIFY command to change the state of LSMs and CAPs, and the VARY command to change ACS state. But as described in the above discussion, know why you are changing hardware states and how to do it before you enter the appropriate command. If you need to modify an LSM offline for maintenance, make sure you have quiesced tape activity to that LSM before you do so and, correspondingly, make sure the maintenance is complete before you vary the LSM online.
Managing SL8500 Redundant Electronics
A Redundant Electronics option is available to minimize control path downtime caused by a Library Controller (LC) failure by automating a Library Controller switch. In this configuration a second Library Controller is cabled to the local area network, connecting it to the LSM(s). HSC directs all work to one Library Controller, called the active LC, while the second LC, called the standby, remains powered on as a ready backup. Designation of active and standby LC is dynamic and their roles change according to environmental conditions.
For information about the commands and utilities discussed in this section, see ELS Command, Control Statement, and Utility Reference.
Dual Library Controller Configuration
For this implementation, a dual LC configuration is one pair of LCs installed and network connected to one library in a string. This is the only valid configuration. Figure 3-1 shows an example of this configuration.
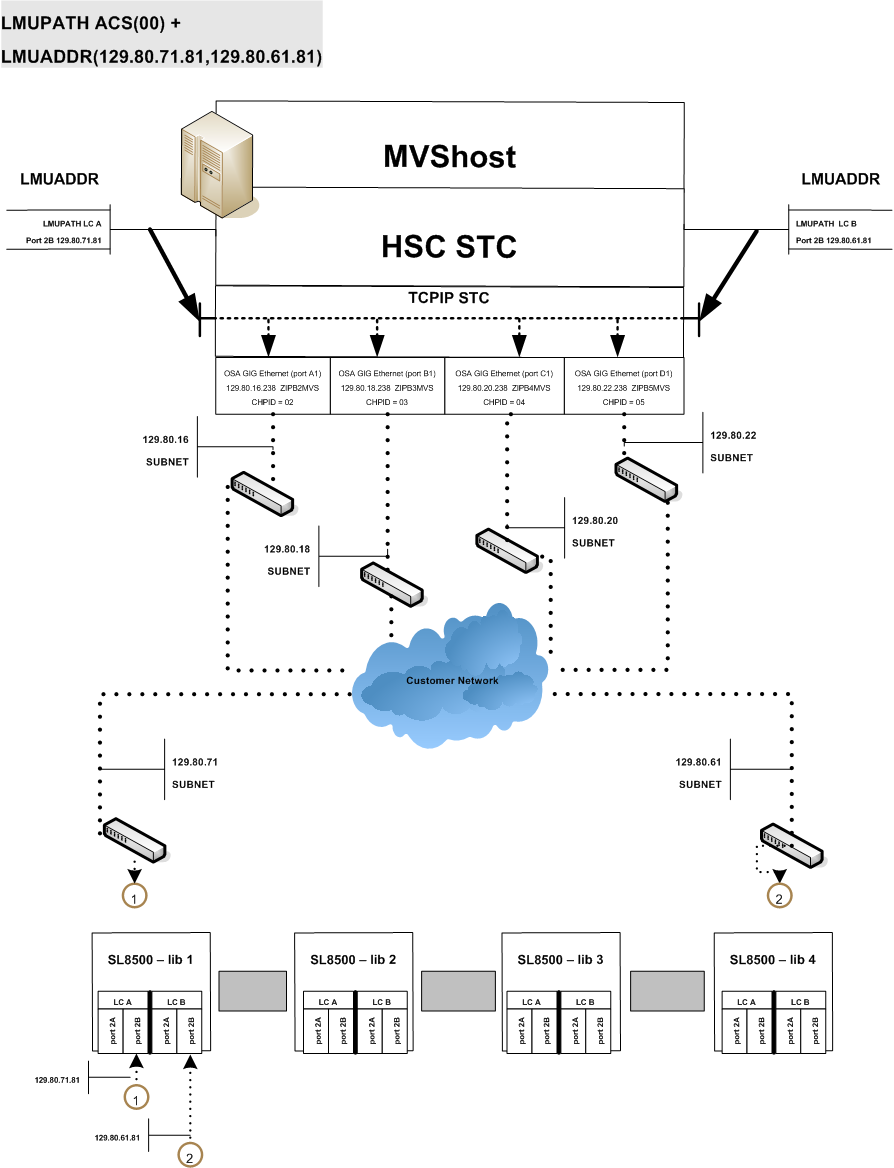
The following rules apply to a dual LC configuration. Both LCs
-
Should be connected to all hosts
-
Can be powered on at all times
-
Must be connected to both LAN 0 and LAN 1.
In the event of a failure from the active LC, an automated switch occurs and the standby assumes the active LC role. The HSC is informed and notifies the operator of the switch. Most outstanding requests are re-driven and all future library requests are sent to the newly activated LC. Once the failed LC is repaired and powered on, it assumes the standby role.
An operator SWitch command is provided for those occasions when it becomes desirable to dynamically activate a standby LC. The operator issues the Switch command, and the standby LC assumes the active LC role after instructing the former active LC to initiate a reboot. If the former active LC reboots successfully, it assumes the standby LC role.
Note:
Warnings and precautions apply to operating in a dual LC environment. See "Redundant LC Operational Overview" and become familiar with these requirements.Network connections must be specified for both the active and standby LCs when the HSC is installed.
SL8500 Redundant Electronics Environment
Library requests cannot be automated if all network connections paths are offline to the LC, or if all network connection paths are inoperative. In a Redundant Electronics environment, if all network connection paths are inoperative to the active LC, use the HSC SWitch command to move the workload to the standby LC.
SL8500 LC Operation
The Library Controller (LC) responds to mount and dismount requests from the host through the HSC and passes each request to the appropriate LSM, to perform the physical action requested.
The following procedures are described in this section:
Note:
-
When you reboot an LC, error messages appearing before the message:
... ACS AA LSM LL ready; ...
can be ignored. Do not ignore error messages that are displayed after the message.
-
Refer to the appropriate Oracle hardware operator's guide for a description of the library control panel and information on how to power on, power off, and boot a Library Controller in both stand-alone LC and redundant LC configurations.
Displaying ACS Status
To determine the status of the LC, issue the following command:
Display Acs acsid
The command response lists the following:
-
Current status of the ACS
-
Current status of the Redundant LC (if configured) including:
-
HSC/LC compatibility levels
-
Active LCs
-
Standby LCs
-
Online, offline or standby status of each LC
-
Redundant LC Operational Overview
Redundant Electronics configurations provide a backup LC which can take over if the active LC fails. (Refer to "Dual Library Controller Configuration" for a description of the dual LC option.) Both LCs are capable of being the active one but only one can be the active LC at any given moment. Each LC regularly checks the status of the other LC over the LAN. HSC directs all I/O to the active LC.
When an LC is powered on in a dual LC configuration, it places itself in a standby status and checks for an active LC. If an active LC exists, the second LC remains ready as the standby. If an active LC does not exist, the first LC to be fully initialized assumes the active role.
If both LCs power on successfully, the following HSC message is displayed:
... ACS AA: RE LIBID C1 is configured; Active is y, Standby is ready
where y is the configured LC identifier: "A" or "B."
LC Switch Overview
The active LC functionality can be switched in the following ways:
-
An automatic switch from a self-detected failure or power supply problem in the active LC.
-
An operator initiated switch (using the
SWitchcommand) after all online stations become incapable of communication. -
An operator initiated switch (using the
SWitchcommand) while online stations remain capable of communication with the active LC. -
When the reboot switch on the active LC is pressed.
-
When the active LC is powered off.
Consequences of an LC Switch
When an LC switch occurs, a series of console messages track the changing status of the active and standby LCs. Critical status changes appear as highlighted messages which remain on the screen until the condition is corrected or the message is superseded.
The following message is displayed when status changes and the standby LC is ready:
... ACS AA: RE LIBID C1 is configured; Active is y, Standby is ready
The following message is displayed if there is a status change and an LC error occurs:
... ACS AA: : RE LIBID C1 Is Not configured; Active Is y, Standby is not ready
The following message is displayed if there is a status change and the standby LC is not ready:
... ACS AA: : RE LIBID C1 Is configured; Active Is y, Standby is not ready
In the messages above, y is the configured LC identifier, "A" or "B".
When an LC switch occurs, the HSC interrogates each LC to determine the current status. The status of each station is maintained as online, offline, standby, pending online, pending offline, or pending force offline. Use the Display Acs acsid command to determine the status of each station and LC.
Note:
Auto-mode CAPs are locked during an LC switch until the LSM completes initialization.Automatic LC Switch
LC microcode detects, reports, and reacts to LC failures as necessary to keep the ACS operational. Note that this happens automatically so some work may be in process within the LC. When the standby LC assumes the active role, it notifies HSC of its changed status and sends the LC Ready signal. HSC reads the recovery information provided by the new active LC concerning in transit cartridges within the various LSMs in the ACS. HSC then:
-
Modifies, or marks "completed," the queued requests, reflecting the current locations of in-transit cartridges
-
Sends all incomplete requests to the active LC
-
Marks cartridges as errant when requests cannot be completed successfully.
Note:
Enter and eject operations may have to be restarted after an LC switch.Operator Initiated LC Switch
Before initiating an LC switch if some network connections are communicating, determine if the need to switch LCs is immediate, or if processing can be completed before initiating the switch. If the need to switch LCs is not critical, wait until the LSMs are relatively idle.
Initiate an LC switch for a Library ID by issuing the following command:
SWitch Acs acsid LIB libid
The command is routed through the standby LC to the disconnected LC, causing it to reboot. The following sequence of events occurs:
-
HSC issues the message
... ACS AA: Switch initiated, expect notification in 20 seconds
-
The standby LC assumes the active LC role ("ACTIVE" indicator illuminates).
-
Online LSMs perform quick-init.
-
As each LSM becomes ready, the HSC issues the message:
... ACS AA LSM LL Ready; Temp Outage Queue Will Be ReDriven
-
If the former active LC completes reboot successfully, it assumes the standby LC role.
If the SWitch command is issued while processing is active, cartridges may be in-transit in various LSMs. Recovery procedures occur automatically as described in "Automatic LC Switch." Upon receiving the LC Ready signal, HSC waits for the LSMs to complete a quick-init and then re-drives the requests through processing the Temp Outage Queue.
CAP Manual Recovery
When the LC Switch occurs and certain CAP functions are processing requests (enter/eject), manual intervention for recovery is required after the switch has completed. Below are various CAP scenarios with an appropriate procedure to resolve for each.
A switch occurs when an Enter function is active
When a switch occurs and an enter function is active, after the switch completes, two possible events can occur simultaneously or individually:
-
A cartridge is selected by HSC/ELS, but not moved to an LSM home cell when the switch occurred. After the switch completes, the cartridge is selected and cannot be moved to an LSM cell.
-
The cartridges in the CAP to be moved to the LSM receives message SLS0699I - 03/01 error from the library during a move. The library reserves the CAP because there are carts in the CAP after the switch completes. The library retains ownership of the CAP until the cartridges are removed. This is normal behavior of the SL8500 library.
Procedure to resolve:
-
Use the procedure in the SL8500 Operator's Guide to manually remove the cartridges from the CAP with the SLC.
-
Issue a
Display Capaa:ll:cc command for the specific cap affected. -
If the CAP is offline, issue the
Modify CAPaa:ll:cc,onlinecommand. -
Issue the
ENteraa:ll:cc command to restart the enter function for the CAP. -
If the CAP is automatic, issue:
CAPP x aa:ll:cc MANual
CAPP x aa:ll:cc AUTO
to reset it to auto mode.
-
Insert the balance of the cartridges removed from the previous enter function into the CAP.
-
If an SLS0251E message that states that volser is a duplicate, run the Unselect utility to unselect the volser. Afterwards, the volser may be entered into the LSM.
When entering the volser, a message SLS0694D is displayed to ask you what you want to do with the duplicate, you should respond logically delete.
A switch occurs when an Eject function is active
When a switch occurs and an eject function is active, after the switch completes, the cartridges in the LSM to be moved to the CAP receive an SLS0699I message - 03/01 error from the library for the move operation. The library reserves the CAP because there are carts in the CAP after the switch completes. The library retains ownership of the CAP until the cartridges are removed. This is normal behavior of the SL8500 library.
Procedure to resolve:
-
Use the procedure in the SL8500 Operator's Guide to manually remove the cartridges from the CAP with the SLC.
-
Issue a
Display Capaa:ll:cc command for the specific cap affected. -
If the CAP is offline, issue the
Modify CAP,onlinecommand. -
Re-issue the
EJECTvol-list or vol-range aa:ll:cc command or restart the eject utility to eject the balance of the cartridges. -
If the CAP was automatic before the eject function, issue the
CAPPx aa:ll:ccmanualand then re-issue is asCAPPx aa:ll:ccautoto reset it to automode.
A switch occurs when CAPs are set to automatic mode
When a switch occurs and CAPs are set to automatic mode, when the switch completes, message SLS0699I may be presented with a return/reason code of 07/05 error from the library during a reserve of the CAP. This is because the CAPs have not initialized completely after the switch has completed. This is normal behavior of the SL8500 library.
Procedure to resolve:
-
Wait until the message SLS0668I for the last LSM in the library switched is issued.
-
Issue a
CAPPref prefvalueaa:ll:ccMANualfor each automatic CAP. -
Issue a
CAPPref prefvalueaa:ll:ccAUTOfor each CAP to become automatic.
Managing CAPs
DISPLAY CAP shows you CAP settings and status; MODIFY CAP changes the CAP state. DISPLAY CAP, in addition to basic status, provides some other valuable information that helps you decide whether you want to change CAP state, and if so, when:
-
CAPid
-
CAP size: PCAP (priority CAP); 21-cell or 14-cell 9740 (standard CAP); 40-cell (enhanced CAP); 20-cell (9360 CAP); 30-cell (9360 optional CAP); 36-cell Bulk CAP (SL8500); or 39-cell (SL8500 CAP)
-
Host ID of the host owning the CAP
-
Priority: CAP preference value
-
CAP mode: cleaning, draining, ejecting, entering, or idle
-
CAP status: active, automatic mode, manual mode, offline, online, and/or recovery needed
The CAPPREF command lets you set the CAP mode (manual or automatic) and preference for selection (0-9, where 9 is the highest preference). CAPs in manual mode require an ENTER command to unlock them; CAPs in automatic mode do not. In general, you specify CAP modes and preferences in a CAPPREF command at configuration in the HSC PARMLIB Member and run with these settings. If you do need to change a CAP's setting, you can do it dynamically by entering a CAPPREF command. For example, If your systems is experiencing high levels of enters and ejects, you may want to bump up the CAP preferences for enhanced CAPs. The caveat on CAP preferencing is that Priority CAPs (PCAPs) always have a priority of 0 (never selected unless specifically requested) so that they remain generally available.
Defining Manual RTDs
In a DR situation, you may have no automated tape resources available. To support nonlibrary VSM configurations, you must define manual RTDs in a nonexistent ACS.
To define manual RTDs:
-
Generate LIBGEN macros to define a nonexistent ACS.
The SLIDRIVS macro defines the device address for the manual RTDs.
Note:
The LSM in the nonexistent ACS can be defined as an SL8500 or SL3000 to take advantage of theMODIFY CONFIGcommand. -
Run the SLICREAT utility to format a new CDS.
-
Run SET SLIDRIVS utility to set the MODEL for the manual RTDs, for example:
SET SLIDRIVS(400,401,402,403) MODEL(T9840C)
Note:
Manual RTDs on the same panel must be the same drive type. -
Run the VTCS CONFIG utility to define the VSM system.
-
Use the VTCS IMPORT utility to import MVCs into the new CDS to use with the manual RTDs.
These MVCs are treated as nonlibrary volumes.
Protecting Tape Data
This section describes the ELS facilities that you can use to prevent data over-writes on both real and virtual tape volumes.
Protecting Native Tape Data
Oracle/StorageTek T9840, T9940B and T10000 tape cartridges can be ordered with VOLSAFE secure media technology which provides a non-rewritable protection solution for data residing on tape. VOLSAFE cartridges are also known as WORM (Write Once Read Many) cartridges.
Once data is written to VOLSAFE secured media, it can be appended to but never modified or deleted. These cartridges have physical, visual and electronic features to differentiate them from non-VOLSAFE cartridges.
Protecting VTV Data
VSM systems now offer VOLSAFE protection for VTVs. VTVs are assigned a protection attribute when scratch mounted and retain this attribute as long as the VTV is non-scratch. RACF ALTER authority on the TAPEVOL class is required to scratch a VOLSAFE protected VTV.
VTCS enables this protection through the MGMTclas WRITE parameter, which specifies the VTV VOLSAFE policy as follows:
- MANY
-
the default, specifies no VOLSAFE write protection.
- ONCE
-
provides read-only protection, VTVs cannot be modified once non-scratch.
Protecting MVC Data
Although HSC does not allow MVCs to be marked as scratch, consider additional methods of protecting MVC data such as:
-
Establishing RACF authority to ensure only the HSC task can write to the MVC volumes.
-
Setting MVCs as read-only using the
MVCMAINTutility. -
Using VOLSAFE protected media as MVCs. Like native tape, once data is written to a VOLSAFE secured MVC, it can be appended to but never modified or deleted.
-
Specifying the
POOLPARM MVC NORECLAMparameter for any MVC pools with VOLSAFE volumes to prevent space reclamation for the pool. This guarantees a writable EOT position. -
All VTV recall processing is unaffected for VOLSAFE MVCs.
-
Managing Library Volumes
Managing library volumes has a wide range of tasks, ranging from using a Volume Report, where you start, through managing cleaning cartridges.
Using a Volume Report
The VOLRPT utility provides volume information that can help you manage the physical volumes in your library. The VOLRPT utility function uses the Unified User Interface, and therefore provides output formats of either text, XML or Comma Separated Values (CSV). See ELS Command, Control Statement, and Utility Reference and ELS Programming Reference for more information about how to request the XML and CSV formats and explanations of the outputs, as well as for command syntax details.
You may want to run the VOLRPT on a periodic basis to display and resolve volume exception conditions or just display volume status, such as described in the following sections:
There are many other uses for VOLRPT. See ELS Command, Control Statement, and Utility Reference for other ways to select volumes and sort the VOLRPT output.
Errant and Selected Volumes
Sample VOLRPT control card:
VOLRPT SORT(LOC) INCLUDE(SEL,ERR)
This request produces a report of all errant and selected cartridges in location sequence.
The "selected" status is normally temporary and represents a cartridge being scratched or moved from one location to another. For each ”selected” volume on the report, you should issue a DISPLAY VOLUME console command to determine if the volume has become unselected. If the volume remains selected, it may represent an abnormal termination of a host while the volume was selected. If you are certain that the volume is not currently in use, you can run the UNSELECT utility to reset the selected status.
An errant volume is one that is not in its last known location. Attempting to eject or mount an errant volume causes HSC to look for the volume in its home cell, its last known source location and its last known destination location. If the volume is not in any of these locations, you may need to run an audit of the ACS to locate the volume.
Unmatched VOLPARM and External Label Status
Sample VOLRPT control card:
VOLRPT INCLUDE(NONMEDEQ)
This request produces a report of all volumes for which the media label on the cartridge does not match the VOLPARM media type.
The character preceding the Media indicates the type of mismatch detected. The character '*' means that the label did not match the VOLPARM media code. The character '-' means that there was no VOLPARM matching the volume. Note that these volumes also have a scratch subpool of '*NON-VOLPARM*'. The '@' character means that the volume had no physical media label.
Sample output of this command is shown in Figure 3-2.
Figure 3-2 Volume Report (Unmatched VOLPARM and External Label)
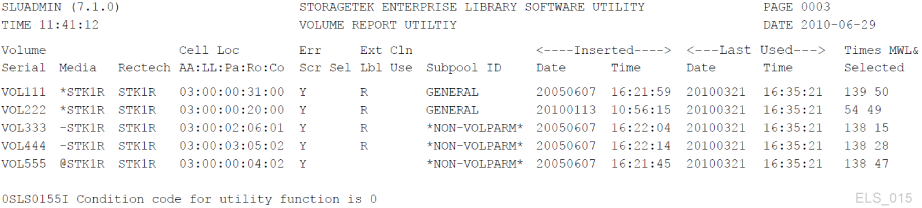
Description of ''Figure 3-2 Volume Report (Unmatched VOLPARM and External Label)''
Volumes not included in VOLPARM
If your subpool totals only show volumes in the *NON-VOLPARM* pool, you want to get a detailed list of these volumes. There is no special control card to select these volumes, but the INCLUDE(NONMEDEQ) can be used. You also see any volumes where the VOLPARM media does not match the media on the volume label.
Managing Scratch Subpools
You can obtain a report showing subpool totals by subpool, library location, and media type without listing individual volumes by running the command:
VOLRPT SUMM(SUBPOOL) NOVOL
Sample output of this command is shown in Figure 3-3.
Figure 3-3 Volume Report (Scratch Subpools)
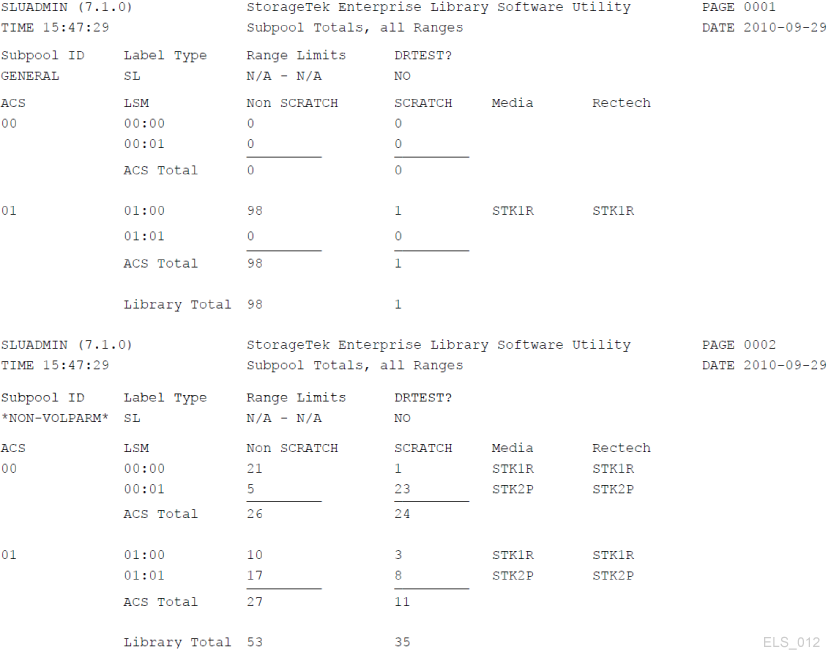
Description of ''Figure 3-3 Volume Report (Scratch Subpools)''
Using a VOLRPT to Track Cleaning Cartridge Usage
You can produce a report containing only cleaning cartridges, sorted by use count, using the following:
VOLRPT VOL(CLN%%%) SORT(USE) DESCEND
Sample output is shown in Figure 3-4.
Figure 3-4 Volume Report (Cleaning Cartridges)
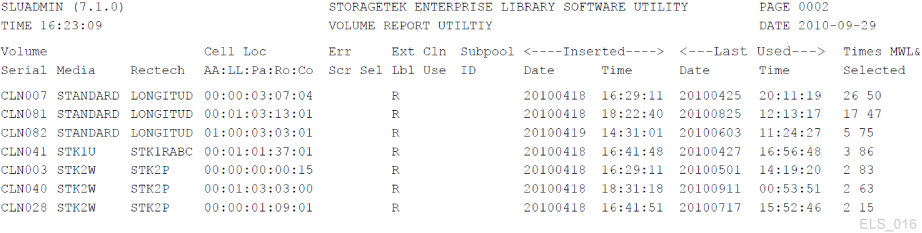
Description of ''Figure 3-4 Volume Report (Cleaning Cartridges)''
The clean use count is actually the field labeled "Times Selected" at the far right. The field labeled "Cln Use" in the middle of the report indicates Y when a cleaner is overuse.
Optimizing Mount Performance
"Optimal mount performance" is measured by how quickly you can get real tape volumes mounted and dismounted. Here, your best tool is the Activities Report, which pulls data from SMF records and provides information that helps you balance mount/dismount activity across ACSs and LSMs. This report shows Total Mount and Dismount activity broken out as follows:
-
Scratch mount/total mounts and average time per mount
-
Nonscratch mounts/total mounts, and average time per mount
-
Scratch mounts in a different LSM/total mounts, average time per mount, and average number of passthrus
-
Nonscratch mounts in a different LSM/total mounts, average time per mount, and average number of passthrus.
If the Activities Report uncovers performance problems due to scratch mounts, you can use the HSC Scratch Redistribution utility or LCM to redistribute scratch volumes across the LSMs within a particular ACS. If you are running low on scratch volumes, you can run scratch synchronization to scratch volumes with non-current data or enter more scratch volumes into the ACS. If you are seeing excessive passthru activity or long mount times for nonscratch volumes, you can use LCM to redistribute nonscratch volumes.
Using Volume Access Security
The HSC Volume Access User Exit (SLSUX14) performs security checking for volumes. When SLSUX14 is enabled, security checking for volumes is performed for mount, eject, and scratch requests. The Volume Access User Exit is not called for LibraryStation set_scratch requests.
See ELS Programming Reference, Volume Access User Exit (SLSUX14) for programming details.
SLSUX14 can allow the request to complete or be rejected. Coding in SLSUX14 can issue RACROUTE macros or use other methods to determine whether the request is to proceed or be rejected. Another option is for SLSUX14 to indicate for HSC to perform the security checks using RACROUTE and RACF definitions to determine the success/rejection of the request. One SLSUX14 return code specifies that the TAPEVOL class is used for the volume access checks. Another SLSUX14 return code specifies that the user exit has placed in the parameter list the RACF class to use for the volume access checks. HSC then uses that RACF class for the volume security checks.
RACF Attributes
The user issuing the following volume requests needs different RACF authority for the request to succeed when HSC performs the RACROUTE macro.
-
MOUNT – RACF UPDATE authority allows the mount to proceed.
-
MOUNT – RACF READ authority allows the mount to proceed. The volume is mounted write-protected.
-
EJECT – for eject requests the user requires RACF UPDATE authority.
-
SCRATCH – for scratch requests the user requires RACF CONTROL authority.
The following shows an example of commands to set RACF authorities.
RDEFINE TAPEVOL 111111 UACC(NONE)
PERMIT 111111 CLASS(TAPEVOL) ID(USER1) ACCESS(READ)
PERMIT 111111 CLASS(TAPEVOL) ID(USER2) ACCESS(UPDATE)
PERMIT 111111 CLASS(TAPEVOL) ID(USER3) ACCESS(CONTROL)
As shown in this example, USER1 can mount volume 111111 for read access (write-protected). USER2 can mount volume 111111 for write access. For all other users any mount requests for 111111 is rejected. USER3 can perform scratch requests.
Write Once/Read Many (WORM) Support
To support a WORM scenario, SLSUX14 can be used to enforce a ”never scratch” policy as shown in the updated command set in the following example.
RDEFINE TAPEVOL 111111 UACC(NONE)
PERMIT 111111 CLASS(TAPEVOL) ID(USER1) ACCESS(READ)
PERMIT 111111 CLASS(TAPEVOL) ID(USER2) ACCESS(UPDATE)
In this example, USER3 no longer has CONTROL access to volume 111111. Therefore, SCRATCH requests from all users, except the user that defines the RACF configuration and gets CONTROL authority, are rejected for volume 111111.
Note:
UX14 is not called for a LibraryStationset_scratch request. For LibraryStation set_scratch requests, Volume Access Security is controlled by the LibraryStation VOLAUTH and VOLACC parameters of the LSINIT command.Managing Scratch Volumes
Managing scratch volumes basically means having enough scratch volumes, but not too many, and having them in the right place (preferably in an LSM with sufficient drives types compatible with the volume media). Table 3-1 describes the scratch volume management tasks and associated tools.
Table 3-1 Scratch Volume Management Tasks and Tools
| Task | Tool | Notes |
|---|---|---|
|
Maintain Sufficient Quantities of Scratch Cartridges |
|
In general: Use the If you are running low on scratch volumes, run scratch synchronization, redistribute scratch volumes, and then add more scratch volumes, in that order. For more information, see "Adding Scratch Volumes." |
|
Synchronizing CDS Scratch Status with TMS Status |
OR
|
As described above, scratch synchronization can free scratch volumes. Typically, you do scratch synchronization after your daily TMS run. |
|
Redistributing Scratch Volumes |
Use the HSC Scratch Redistribution utility or LCM to redistribute scratch volumes across the LSMs within a particular ACS. |
As described in "Optimizing Mount Performance," poor scratch distribution can inhibit optimum library performance. Scratch redistribution balances the number of scratch volumes between specified LSMs in an ACS, and can be done by subpool. |
|
Scratching Specific Volumes |
|
Yes, if you have the command authorization, you can actually scratch and unscratch specific volumes. In general, however, do not explicitly scratch specific volumes unless you really know what you are doing. Let the TMS manage volume scratch status and do scratch synchronization instead. |
|
Displaying Scratch Subpool Information |
Display SCRatch |
This only displays scratch subpool information for the host the command is executed on; to display all scratch subpool information use the VOLRPT utility. |
Adding Scratch Volumes
Adding scratch volumes to the library is a general task that breaks down into two separate cases:
In both cases, you first need to create POOLPARM and VOLPARM definitions for the new volumes as described in "Defining Nearline Volumes."
Defining Nearline Volumes
To define Nearline volumes:
-
Create a POOLPARM statement to define the volume scratch pool.
For example, to define a scratch pool for use by hosts
MVS1andMVS2:POOLPARM NAME(SYS19840P22)TYPE(SCRATCH)HOSTID(MVS1,MVS2)LABEL(SL
-
Create a VOLPARM statement to define the volumes.
For example, to define a range of 9840C volumes:
VOLPARM VOLSER(C2000-C2999)MEDIA(STK1R)RECTECH(STK1RC)
-
Enter a SET VOLPARM command to apply the volume definitions.
SET VOLPARM APPLY(YES)
Populating a New LSM
After you have done your POOLPARM and VOLPARM definitions, to populate a new LSM, use one of the following methods:
-
Set one or more CAPs to automatic mode and repeatedly open and fill the CAP with new cartridges.
-
If the LSM is a non-Streamline library and is large enough for you to enter:
-
Open the LSM access door.
-
Manually place cartridges into the storage cells in the LSM.
-
Close and lock the access door.
-
Run an HSC Audit on the LSM.
A full LSM audit can take considerable time, but so can entering cartridges through the CAP, so you have to judge which method is faster.
Adding Volumes to An Existing LSM
After you have done your POOLPARM and VOLPARM definitions, enter the cartridges as described in "Entering Cartridges."
Entering Cartridges
Cartridges are just cartridges until they get entered into the ACS; then they become volumes in the CDS. You can enter scratch cartridges, non-scratch cartridges, cartridges to be used as MVCs, or cleaning cartridges.
To enter cartridges:
-
Verify that the LSM where you want to enter the cartridges is online.
For example, to see the status of LSM 00:00:
DISPLAY LSM 00:00
An SLS0054I message ”LSM 00:00 now online” indicates that the verification was successful. Otherwise, you have to figure out what the problem is and, at a minimum, enter a
MODIFY LSMaa:ccONLINEcommand to get it back online. -
Check the CAP mode:
For example, to see the status of the PCAP on LSM 00:00:
DISPLAY CAP 00:00:02
If the CAP mode is Automatic, go to step 4. Otherwise, continue with step 3.
-
If the CAP mode is Manual, you have two choices, depending on your site's practices:
-
Change the CAP mode to Automatic.
For example, for the PCAP in step 2, to set the CAP preference to zero (always required for PCAPs) and mode to Automatic:
CAPPREF 0 00:00:02 AUTO
-
Use
ENTERto make the CAP ready for cartridge entry (mode stays Manual).For example, for the PCAP in step 2, to make the CAP ready for entry and set scratch status on for the entered cartridges:
ENTER 00:00:02 SCRATCH
Note:
If all CAPs are currently in use for ejects, you can use theSENtercommand to schedule a CAP for cartridge entry.
-
-
Enter the cartridges as described in the Operator's Guide for your LSM type.
Ejecting Volumes
As described in the following sections, there are basically three reasons why you want to eject volumes:
-
You defined too many scratch volumes, and temporarily need some room for specific volumes; see "Ejecting Scratch Volumes."
-
You have specific volumes that are no longer in use, and you want to vault them. For more information, see ELS Disaster Recovery and Offsite Data Management Guide.
-
You have specific 9x40 volumes that are nearing end of Media Warranty Life. Figure 3-2 shows a volume report with the %MWL column on the extreme right. This column shows the percentage of Media Warranty Life used for the volume, where %100 means the volume has exceeded its Media Warranty Life.
Note:
For 9x40 volumes, the Media Information Record (MIR) stores the number of times the cartridge has been mounted during its lifetime. During dismount processing, HSC uses the mount count value read from the MIR to compute the %MWL. For HSC to report MWL% for a library-resident volume, the volume must have been mounted and dismounted at least once after it was entered into the library. When a volume is ejected, the associated CDS VAR record is deleted, and HSC can no longer report MWL% for that volume while it remains outside the library. However, the mount count is maintained in the MIR, and the next time the volume is entered into the library and mounted and dismounted at least once, HSC can again report MWL% for that volume while it resides in the library.If a transport cannot read or write the MIR, the drive can reinitialize a new MIR elsewhere on the volume. Errors processing a MIR are rare, and although the drive reconstructs a new MIR if it must, it is possible the drive might not be able to transfer the mount count from the failed MIR to the replacement MIR, in which case the drive initializes the mount count to zero in the replacement MIR. If you observe a non-zero mount count go to zero for a volume (for example, by monitoring the MWL% on a volume report), you should examine the SYSLOG for data checks on this volume and have the tape drive examined, and you should also consider retiring this volume.
The Media Warranty Life feature requires the following:
-
Tape library LMU compatibility level 21
-
T9x40 transports with 1.42 drive firmware
Note:
T9840B is not supported because of memory constraints. -
T10000A and T10000B with 1.38 drive firmware
-
PTF SES700 L1H154V
-
-
You have cleaning cartridges that have exceeded their useful life and must be replaced. See "Manually Ejecting Used Cleaning Cartridges."
Ejecting Scratch Volumes
To eject scratch volumes:
-
Verify that the LSM where you want to eject the volumes is online.
For example, to see the status of LSM 00:00:
DISPLAY LSM 00:00
An SLS0054I message ”LSM 00:00 now online” indicates that the verification was successful. Otherwise, you have to figure out what the problem is and, at a minimum, enter a
MODIFY LSMaa:ccONLINEcommand to get it back online. -
Use
EJECTto start the eject operation.For example, to eject 100 scratch volumes with media STK1R and rectech STK1RC from pool
SYS19840P1:EJECT SCRTCH SUBPOOL(SYS19840P1)VOLCNT(100) MEDIA(STK1R) RECTECH(STK1RC)
WAITCAP(YES)is the default. -
When you get operator messages to empty the CAP, remove the volumes from the CAP.
Managing Cleaning Cartridges
Hopefully, you defined sufficient cleaning cartridges when you configured ELS. If not, Configuring HSC and VTCS tells you how. After you define the cleaning cartridges, enter them as described in "Entering Cartridges." There are some additional things you can do with MNTD (either through the PARMLIB member or command) to manage cleaning cartridges.
Note:
To manage cleaning cartridges, HSC requires them to have external labels with prefix CLN followed by 3 numeric digits. Some LTO cartridges, however, have external labels that are not in this format. In this case, contact your Oracle representative for information on obtaining external labels for LTO cleaning cartridges.Cleaning Cartridge Selection
To automatically select a cleaning cartridge when a drive needs cleaning, set the ”auto clean” option on:
MNTD AUTOCLN(ON)
The drive cleaning process selects a cleaning cartridge in the LSM that is closest to the drive that needs cleaning. After the clean operation is completed, the ”float” option determines whether the cartridge is returned to its home cell (float off) or assigned a new home cell in the current LSM (float on). Setting float on reduces pass-thru operations and thus enhances performance:
MNTD FLOAT(ON)
Ejecting Cleaning Cartridges
The POOLPARM MAXCLEAN parameter specifies the maximum number of cleaning operations for a given set of cleaning cartridges. For ELS to automatically eject cleaning cartridges that have exceeded their MAXCLEAN value, enter:
MNTD EJCTAUTO(ON)
If you are running ExLM, you may prefer letting ExLM manage ejecting cleaning cartridges on a scheduled basis. In this case, set ”auto eject” off. This is very useful for a ”lights-out” datacenter.
Without ExLM, auto-ejection is the recommended technique, otherwise you have to manually schedule cleaning with the CLEAN command and manually eject the cartridge when it is used up (spent) as described in "Manually Ejecting Used Cleaning Cartridges." Auto-ejection requires an available CAP. If a CAP is not available, a manual eject is required.
Newer drives identify spent cleaning cartridges and notifies ELS regardless of the MAXCLEAN usage count. If ”auto eject” is on, the cartridge is ejected when the library detects the ”spent” condition. Otherwise, ExLM can be used to schedule the ejection of ”spent” cleaning cartridges.
After you eject a cleaning cartridge, you usually want to enter a new cartridge to replace the used one. If you want to enter a cleaning cartridge whose volser is not yet defined to ELS, see Configuring HSC and VTCS for information on defining cleaning cartridges.
Manually Ejecting Used Cleaning Cartridges
To replace used cleaning cartridges:
-
Verify that the LSM where you want to eject the cartridges is online.
For example, to see the status of LSM 00:00:
DISPLAY LSM 00:00
An SLS0054I message ”LSM 00:00 now online” indicates that the verification was successful. Otherwise, you have to figure out what the problem is and, at a minimum, enter a
MODIFY LSMaa:ccONLINEcommand to get it back online. -
Use
EJECTto start the eject operation.For example, to eject a range of 9840 cleaning cartridges:
EJECT (CLN300-CLN310) SEQ(YES)
WAITCAP(YES)is the default, and the volumes are placed in sequence in the CAP. -
When you get operator messages to empty the CAP, remove the cleaning cartridges from the CAP.
-
Check the CAP mode of the CAP where you want to enter the replacement cleaning cartridges:
For example, to see the status of the PCAP on LSM 00:00:
DISPLAY CAP 00:00:02
-
If the CAP mode is Manual, you have two choices, depending on your site's practices:
-
Change the CAP mode to Automatic.
For example, for the PCAP in step 4, to set the CAP preference to zero (always required for PCAPs) and mode to Automatic:
CAPPREF 0 00:00:02 AUTO
-
Use
ENTERto make the CAP ready for cartridge entry (mode stays Manual).For example, for the PCAP in step 4, to make the CAP ready for entry and set scratch status on for the entered cartridges:
ENTER 00:00:02 SCRATCH
-
Solving Problems
The following sections provide solutions to potential problems.
Recovering Errant Cartridges
A cartridge becomes errant when HSC is uncertain of the location of the volume in the LSM. The following conditions may cause a cartridge to become errant.
-
An operator modifies an LSM offline using the FORCE option.
-
The volume is not located in the cell location specified by the CDS.
-
An unrecoverable error occurs in the LMU.
-
An unrecoverable error occurs in the LSM.
Errant volume recovery is performed automatically:
-
Any time HSC attempts to use a cartridge that is marked as errant.
-
When an ACS is connected.
-
When an LSM is modified online.
-
When cross host recovery is performed.
HSC issues the following message:
... Attempting to locate errant volume VVVVVV
If the cartridge is located by checking its original source location or its destination location, HSC removes it from errant status.
If the cartridge cannot be located, the operator is prompted by the following message:
... Volume VVVVVV not found; Eject or Ignore (E|I)?
Respond with one of the following:
-
Reply "E" if you are certain that the cartridge is not in the library. The cartridge is deleted (logically ejected) from the CDS.
-
Reply "I" if you do not know the location of the cartridge, to leave the cartridge in errant status. An audit trail is maintained for the cartridge, which can be helpful if it becomes necessary to manually locate the cartridge.
If the cartridge is located at a later time, HSC recognizes it as errant and removes it from errant status. The cartridge is either returned to its home cell location, or marked selected for a request.
Entering Duplicate And Unreadable VOLSERS
The following discusses VOLSER-related issues.
Entering Duplicate Volumes
When you try to enter a volume that is already recorded in the CDS, HSC attempts to locate the original cartridge by checking its home cell location or destination location. If the volume is found, the duplicate cartridge is rejected by HSC.
If the volume is not found, the HSC response is determined by the OPTion ENTdup command setting.
-
If
OPTion ENTdupis set toAuto, HSC automatically deletes the original volume from the CDS, and enters the new volume. -
If
OPTion ENTdupis set toManual, HSC requests operator assistance by issuing the following message:
... ENTER of volume VVVVVV encountered missing duplicate volser;
(Logically) Delete, or Ignore (D,I)?
Reply "D" to delete the original volume from the CDS and enter the new volume.
Note:
Refer to OPTION Command and Control Statement in ELS Command, Control Statement, and Utility Reference for details on command syntax and parameters. You can enter duplicate volumes into a Streamline library as long as the library is partitioned and the duplicate volumes are entered into different partitions.Entering Cartridges With Missing or Unreadable External Labels
Tape cartridges with unreadable labels cannot be entered into a library through a CAP. If you attempt to enter a cartridge without a label, or with a label the robot cannot read, the following HSC message is issued:
... UnNamed Cartridge in CAP CELL AA:LL:RR:CC;
reply "V,volser" or "EJECT"
Do one of the following:
-
Reply "V,volser" to enter the cartridge by assigning it a VOLSER. The specified VOLSER is permanently assigned to the cartridge in the CDS.
Note:
If any unlabeled cartridges or cartridges with unreadable labels are manually entered into a library, they are ejected during an audit. Oracle recommends that users provide an external media label for all cartridges. -
Reply "EJECT" and remove the cartridge from the CAP when the CAP is unlocked.
Clearing Recovery Status On A CAP
When a CAP status is RECOVERY, use the following procedure to force CAP recovery.
Note:
If this procedure does not clear recovery status, try "Freeing An Allocated CAP."To clear recovery status on a CAP:
-
Issue the following command:
ENTER capidwhere capid is the CAP you want to recover.
The following occurs:
-
The LSM robot moves to the CAP and performs a CAP catalog.
-
If cartridges are detected in the CAP, HSC issues a message instructing the operator to remove the cartridges.
-
HSC issues the message:
... Open CAPid AA:LL:CC for entering when unlocked -
The CAP ENTER indicator lights up or Enter appears on the display panel.
-
-
Issue the DRAin command against that CAP.
The CAP is locked and the status is set to INACTIVE.
Freeing An Allocated CAP
Caution:
Use this procedure only if the CAP is not in use. Releasing a CAP from an active command or utility may produce unpredictable results. Examples of these are:-
CAP cleanup
-
Errant cartridges
-
Cartridges still in the CAP that are unknown to HSC
If a host terminates without performing recovery while an active process is using a CAP, the CAP remains allocated to the host and is unavailable to all other hosts. If HSC is brought back up on that host, it releases the CAP after initialization. Otherwise, you can free the CAP by issuing the following command from any connected host:
RELEASE capid
where:
capid specifies the CAP you wish to release.
HSC issues a message prompting you to confirm that the CAP is to be released.
-
Reply "N" to cancel the release.
-
To proceed with the release:
-
Verify that the CAP is not in use by visually inspecting the CAP, issuing the Display Cap command on other hosts, and checking with other personnel.
-
Reply "Y" to the message.
Another message confirms the CAP is released.
Restoring HostToHost Communications Services
The COMMPath command and control statement lets you define a tiered communications service between HSC hosts. With this type of service in place, HSC automatically performs a path switch if a host receives an error trying to send a message over the current communications path. Depending on the paths defined, an automatic switch can be to an equivalent path type (from one LMU path to another), or to a lower performance method (for example, from VTAM to LMU).
HSC notifies you when a switch occurs by issuing the following message to the console on both hosts:
... A communications path switched from XXXX1 to XXXX2; ...
where:
XXXX1 specifies the previous communications path.
XXXX2 specifies the current communications path.
The message also identifies the host that either initiated the switch or experienced the failure.
After HSC performs a downward switch, you can make an upward switch only with the COMMPath command.
To make an upward switch:
-
Find and correct the problem which prompted the switch.
-
Return to the previous communications method by issuing the command
COMMPATH HOSTID(hostid) METHOD(method)
where:
hostid specifies the host which the command affects.
method specifies the method you want to be made current.
Resolving Possible Lost Mount Requests
Mounts may be lost due to one of several reasons:
-
If SMC is inactive while HSC is active, then MVS and/or TMS messages are not intercepted.
-
If HSC is inactive while the SMC is active, then MVS and/or TMS messages are intercepted but there is no Automated Library Control system to receive the mount request.
-
A hardware LMU error can occur.
In general, to resolve these problems, use the SMC RESYNC command to redrive all lost mount requests.
Resolving Lost Mount Responses (ORH)
Occasionally a mount request gets stuck on one of the HSC queues due to a response not being received from the LMU. When this happens the volume is left in a selected status and the operator is notified by the Overdue Response Handler (ORH).
Overdue Response Handler
Every 30 seconds, the ORH scans all queues for each ACS to identify requests with sequence numbers whose response wait time intervals have expired. When a time interval expires, HSC issues the message
... ORH interval expired: ...
and the ORH checks the request type code. For all request type codes other than mount, dismount, move, and swap, the ORH automatically extends the request's wait time another increment of 3, 5, 10, or 60 minutes, and issues the message:
... ORH interval extended: ...
Operator Response Required For Mount, Dismount, Move, and Swap
For mount, dismount, move, and swap requests, the operator is prompted by the message:
... ORH: ABORT/EXTEND...
Respond with one of the following:
-
ABORT— the task that requested the operation is notified that the request has been abnormally terminated by ORH. This removes the volume from selected status and lets you issue HSC Mount or DISMount commands as necessary to keep the work moving. For transport related failures, the ABORT response should be used. Examples of these are Pass-Thru-Port, SL8500 elevator, robot, or transport failures. -
EXTEND— the ORH adds another ten minute increment to the request and leaves it on the same queue that it is currently on. There is no limit to the number of extensions you can request.
Using Software Diagnostics
Some problems are beyond your ability to resolve by yourself, and usually result in a call to Oracle Software Support, who may ask you to use one or more of the HSC software diagnostic tools described in Table 3-2.
Table 3-2 HSC Software Diagnostic Tools