9 Using Web Services
This chapter describes how to integrate a third-party web service into the ADF Mobile AMX application feature implementation.
This chapter includes the following sections:
9.1 Introduction to Using Web Services
Web services allow applications and their features to exchange data and information through defined application programming interfaces. Using web services you can expose business functionality irrespective of the platform or language of the originating application. For more information, see the "About Web Services in Fusion Web Applications" section in Oracle Fusion Middleware Fusion Developer's Guide for Oracle Application Development Framework.
In case of both an Oracle ADF web application and ADF Mobile application, some of the most typical reasons for using web services are:
-
To add functionality that is readily available as a web service, but which would be time-consuming to develop within the application.
-
To provide access to an application that runs on a different architecture.
ADF Mobile supports both SOAP and REST web services and allows you to integrate a third-party web service into your ADF Mobile AMX application feature.
Using web services in your ADF Mobile application enables you to do the following:
-
From a larger (enterprise) data store, provide either whole or a subset of data in which the end user of the mobile application is interested.
-
Provide functionality that is too computationally intensive for the mobile device's resources. This could be due to either the actual amount of work the device would need to perform, or the fact that the functionality is based on a much larger data set than the one that is locally available on the device.
The following scenarios of the web service usage demonstrate the data access (scenario 1) as well as computational and data-driven functionality (scenario 2 and 3):
-
Fetch a set of Opportunity data from the enterprise data store to enable the end user to manipulate it on the device, and then post changes back to the enterprise data store through the web service.
-
Request a report be generated on some enterprise data, and then fetch the report.
-
Obtain a map image of a route to a customer site.
9.2 Creating a Web Service Data Control
The most common way of using web services in an application feature developed with ADF Mobile is to create a data control for a web service.
For more information about web service data controls and their usage, see the following:
-
"What You May Need to Know About Web Service Data Controls" section in Oracle Fusion Middleware Fusion Developer's Guide for Oracle Application Development Framework
-
"Data Controls in Fusion Web Applications" appendix in Oracle Fusion Middleware Fusion Developer's Guide for Oracle Application Development Framework
-
"Using the Data Controls Panel" section in Oracle Fusion Middleware Fusion Developer's Guide for Oracle Application Development Framework
9.2.1 How to Create a Web Service Data Control Using SOAP
JDeveloper lets you create a data control for an existing SOAP web service using only the Web Services Description Language (WSDL) file for the service. You can either browse to a WSDL file on the local file system, locate one in a Universal Description, Discovery and Integration (UDDI) registry, or enter the WSDL URL directly.
Note:
If you are working behind a firewall and you want to use a web service that is outside the firewall, you must configure the Web Browser and Proxy settings in JDeveloper. For more information, see the "Setting Browser Proxy Information" section in Oracle Fusion Middleware Fusion Developer's Guide for Oracle Application Development Framework.
To create a SOAP web service data control:
-
In the Application navigator, right-click the application name, and then select File > New from the main JDeveloper menu.
-
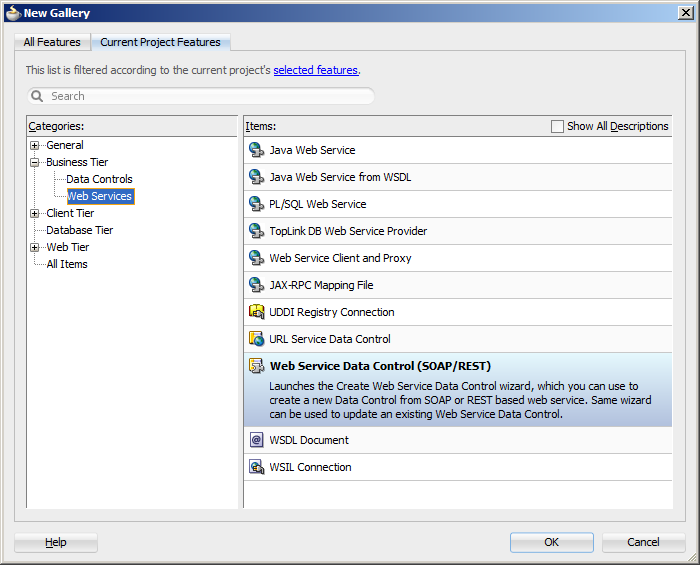
In the New Gallery dialog, expand the Business Tier node on the left and select Web Services. From the Items list on the right select Web Service Data Control (SOAP/REST) (see Figure 9-1), and then click OK.
-
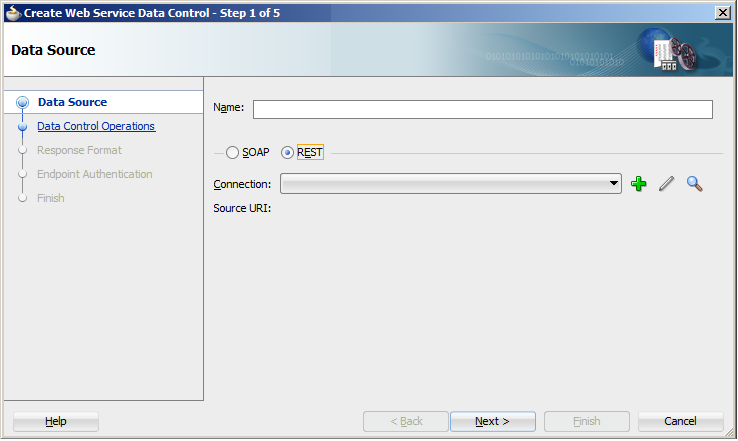
On the Data Source page of the Create Web Service Data Control wizard, select SOAP.
-
Follow the wizard instructions to complete creation of the data control.
Note:
ADF Mobile supports the following encoding styles for both SOAP 1.1 and 1.2 versions:
-
Document/literal
-
Document/wrapped
-
RPC
After the web service data control has been created, the web service operations and return values of the operations are displayed in the Data Control palette allowing you to drag and drop the objects returned by the web service operations as appropriate ADF Mobile AMX UI components in the page. For more information, see Section 6.3.2.4, "Adding Data Controls to the View." When data returned from a web service operation is displayed, the following object types are handled:
-
Collections.
-
Complex objects returned by a web service operation.
-
Nested complex objects returned by a web service operation.
Using a web service operation, both standard and complex data types can be updated and deleted.
9.2.2 How to Customize SOAP Headers in Web Service Data Controls
ADF Mobile allows you to specify a custom provider class in your DataControls.dcx file. This custom class extends oracle.adfinternal.model.adapter.webservice.provider.soap.SOAPProvider. You can use it to specify an implementation of the SoapHeader[] getAdditionalSoapHeaders() method
Example 9-1 shows how to extend the SOAPProvider and create a custom header demonstrated in Example 9-2
Example 9-1 Defining Custom SOAP Headers
package provider.ebs.soap;

import oracle.adfinternal.model.adapter.webservice.provider.soap.SOAPProvider;
import oracle.adfinternal.model.adapter.webservice.provider.soap.SoapHeader;

public class EBSSOAPProvider extends SOAPProvider {

public SoapHeader[] getAdditionalSoapHeaders() {
   SoapHeader header[] = new SoapHeader[2];
   SoapHeader token = null;
   SoapHeader user = null;
   SoapHeader pass = null;

   header[0] = new SoapHeader("http://xmlns.oracle.com/apps/fnd/soaprovider/plsql/fnd_user_pkg/",
                              "SOAHeader");
   header[0].addChild(new SoapHeader(
                              "http://xmlns.oracle.com/apps/fnd/soaprovider/plsql/fnd_user_pkg/",
                              "Responsibility",
                              "SYSTEM_ADMINISTRATOR"));
   header[0].addChild(new SoapHeader(
                              "http://xmlns.oracle.com/apps/fnd/soaprovider/plsql/fnd_user_pkg/",
                              "RespApplication",
                              "SYSADMIN"));
   header[0].addChild(new SoapHeader(
                              "http://xmlns.oracle.com/apps/fnd/soaprovider/plsql/fnd_user_pkg/",
                              "SecurityGroup",
                              "STANDARD"));
   header[0].addChild(new SoapHeader(
                              "http://xmlns.oracle.com/apps/fnd/soaprovider/plsql/fnd_user_pkg/",
                              "NLSLanguage",
                              "AMERICAN"));
   header[0].addChild(new SoapHeader(
                              "http://xmlns.oracle.com/apps/fnd/soaprovider/plsql/fnd_user_pkg/",
                              "Org_Id",
                              "0"));

   header[1] = new SoapHeader(
               "http://docs.oasis-open.org/wss/2004/01/oasis-200401-wss-wssecurity-secext-1.0.xsd",
               "Security");
   token = new SoapHeader(
              "http://docs.oasis-open.org/wss/2004/01/oasis-200401-wss-wssecurity-secext-1.0.xsd",
              "UsernameToken");
   user = new SoapHeader(
              "http://docs.oasis-open.org/wss/2004/01/oasis-200401-wss-wssecurity-secext-1.0.xsd",
              "Username",
              "sysadmin");
   pass = new SoapHeader(
              "http://docs.oasis-open.org/wss/2004/01/oasis-200401-wss-wssecurity-secext-1.0.xsd",
              "Password",
              "sysadmin");

   header[1].addChild(token);
   token.addChild(user);
   token.addChild(pass);

   return header;
   }
}
Example 9-2 shows the new custom header.
<soap:Header xmlns:ns1="http://xmlns.oracle.com/apps/fnd/soaprovider/plsql/fnd_user_pkg/">
   <ns1:SOAHeader>
      <ns1:Responsibility>SYSTEM_ADMINISTRATOR</ns1:Responsibility>
      <ns1:RespApplication>SYSADMIN</ns1:RespApplication>
      <ns1:SecurityGroup>STANDARD</ns1:SecurityGroup>
      <ns1:NLSLanguage>AMERICAN</ns1:NLSLanguage>
      <ns1:Org_Id>0</ns1:Org_Id>
   </ns1:SOAHeader>
   <wsse:Security xmlns:wsse=
      "http://docs.oasis-open.org/wss/2004/01/oasis-200401-wss-wssecurity-secext-1.0.xsd"
      xmlns="http://docs.oasis-open.org/wss/2004/01/oasis-200401-wss-wssecurity-secext-1.0.xsd"
      xmlns:env="http://schemas.xmlsoap.org/soap/envelope/"
      soap:mustUnderstand="1">
      <wsse:UsernameToken xmlns:wsse=
      "http://docs.oasis-open.org/wss/2004/01/oasis-200401-wss-wssecurity-secext-1.0.xsd"
      xmlns="http://docs.oasis-open.org/wss/2004/01/oasis-200401-wss-wssecurity-secext-1.0.xsd">
         <wsse:Username>sysadmin</wsse:Username>
         <wsse:Password Type=
          http://docs.oasis-open.org/wss/2004/01/
          oasis-200401-wss-username-token-profile-1.0#PasswordText">sysadmin</wsse:Password>
      </wsse:UsernameToken>
   </wsse:Security>
</soap:Header>

@return
Note:
You cannot specify dynamic SOAP headers using ADF Mobile.
9.2.3 How to Create a Web Service Data Control Using REST
JDeveloper lets you create a data control for an existing REST web service.
Note:
If you are working behind a firewall and you want to use a web service that is outside the firewall, you must configure the Web Browser and Proxy settings in JDeveloper. For more information, see the "Setting Browser Proxy Information" section in Oracle Fusion Middleware Fusion Developer's Guide for Oracle Application Development Framework.
You can associate a REST web service data control with one or more HTTP methods using the same connection. You should be able to access custom operations exposed by a REST service. These custom operations map to one of the HTTP methods and allow you to create a data control to expose these custom operations on the client.
To use security and notifications functionality on mobile devices, you can add custom headers and custom values to standard HTTP headers for use with specific operations exposed by the REST data control.
Ensure that you have access to the REST web service that the data control is to access.
To create a REST web service data control:
-
In the Application navigator, right-click the application name, and then select File > New from the main JDeveloper menu.
-
In the New Gallery dialog, expand the Business Tier node on the left and select Web Services. From the Items list on the right select Web Service Data Control (SOAP/REST) (see Figure 9-1), and then click OK.
-
On the Data Source page of the Create Web Service Data Control wizard, select REST, as Figure 9-2 shows.
-
Follow the Create Web Service Data Control wizard instructions to complete creation of the data control, keeping in mind the following:
-
ADF Mobile supports only basic authentication for web services (see Section 9.5, "Accessing Secure Web Services"). When creating a new connection, select Basic in the Authentication Type field on the Create URL Connection dialog.
-
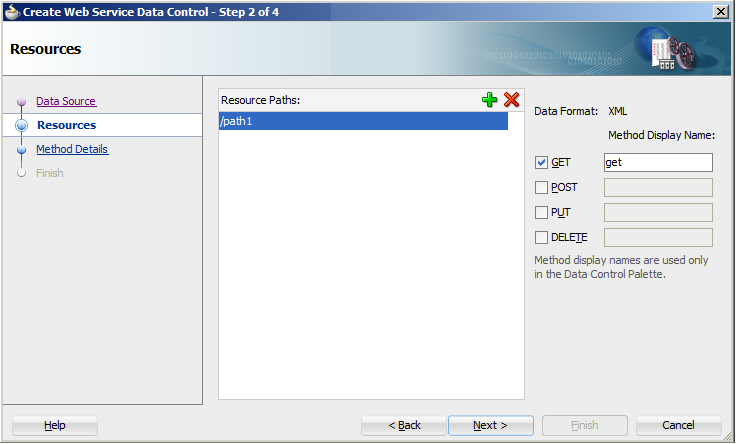
ADF Mobile supports all HTTP method types:
GET,POST,PUT, andDELETE. You can select any of these method types when completing the Method Display Name fields on the Resources page, as Figure 9-3 shows.Note:
You can include all four methods using the same connection and the same REST web service data control.
-
ADF Mobile does not support the delimiter separated values in the spread sheet data and the XSL for the XML data formats.
-
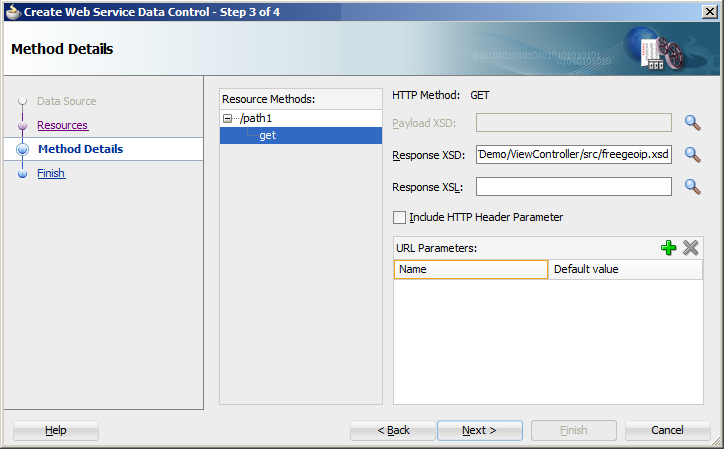
By specifying a local XSD file for the REST web service data control definition, you create a file URI reference for the fields that identify schema on the Method Details page, as Figure 9-4 shows.
Note:
Since ADF Mobile creates internal definitions for the XSD structures at compile time, the XSD should not change after the application has been compiled. Therefore, it is recommended to reference the XSD file locally. Using the remote XSD negatively affects performance because ADF Mobile retrieves the XSD with each run of the application.
-
After the REST web services data control has been created by following the preceding steps, it behaves identically to its Oracle ADF counterpart.
An ADF Mobile sample application called RESTDemo (located in the PublicSamples.zip file within the jdev_install/jdeveloper/jdev/extensions/oracle.adf.mobile/Samples directory on your development computer) demonstrates how to use REST web services in an ADF Mobile application.
For information on how to use REST web services through Java bypassing data controls, see Section 9.6.2, "How to Use REST Web Services Adapter."
9.3 Creating a New Web Service Connection
The connection information for the web service is stored in the connections.xml file along with the other connections in your application. You do not need to explicitly create this file, as it is generated in the.adf/META-INF directory by the New Web Service Data Control wizard at the time when the web service data control is created (see Section 9.2, "Creating a Web Service Data Control").
You modify the connection settings by editing the connections.xml file.
9.4 Adjusting the Endpoint for a Web Service Data Control
After creating a web service data control, you can modify the endpoint of the URI. This is useful in such cases as when you migrate the feature from a test to production environment.
You modify the endpoint by editing the connections.xml file.
9.5 Accessing Secure Web Services
ADF Mobile supports both secured and unsecured web services, as well as basic authentication (BASIC_AUTH) over HTTP and HTTPS.
For more information, see the following:
-
Section about configuring policies in Oracle Fusion Middleware Administering Web Services
To access secured web services from your ADF Mobile application, you may need to configure web service data controls included in the application.
9.5.1 How to Enable Access to SOAP-Based Web Services
The following security policies are supported for SOAP-based web services:
-
oracle/wss_http_token_client_policy -
oracle/wss_http_token_over_ssl_client_policy -
oracle/http_basic_auth_over_ssl_client_policy -
oracle/wss_username_token_client_policy -
oracle/wss_username_token_over_ssl_client_policy
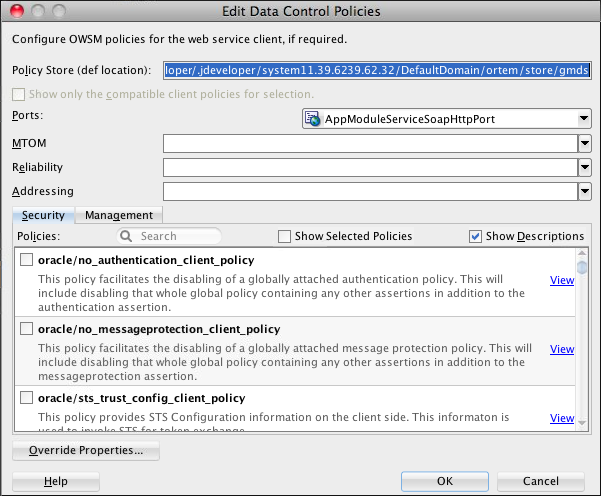
If a SOAP web service is secured, you can access it by configuring the web service data control with either oracle/wss_http_token_over_ssl_client_policy or oracle/wss_http_token_client_policy. To do so, use the Edit Data Control Policies dialog that Figure 9-5 shows. You can open this dialog as follows:
-
In the Navigator, select the
.dcxfile located in the application's View Controller project. -
In the Structure pane, right-click the web service data control that you would like to configure, and then select Define Web Service Security from the context menu.
9.5.2 How to Enable Access to REST-Based Web Services
Since only one security policy is supported for REST-based web services, ADF Mobile automatically adds oracle/wss_http_token_over_ssl_client_policy for REST web service over HTTPS, or oracle/wss_http_token_client_policy for REST web service over HTTP protocol to enable Oracle Web Services Manager (OWSM) Lite Mobile ADF Application Agent to inject a proper security header.
9.5.3 What You May Need to Know About Credential Injection
For secured web services, the user credentials are dynamically injected into a web service request at the time when the request is invoked. This process is similar for SOAP and REST web services.
ADF Mobile uses Oracle Web Services Manager (OWSM) Lite Mobile ADF Application Agent to create and configure proxies, as well as to request services through the proxies. The user credentials are injected into the OWSM enforcement context when proxies are configured. The credential injection is handled by OWSM proxies. For more information, see Oracle Fusion Middleware Java API Reference for Oracle Web Services Manager.
Before web services are invoked, the user must respond to an authentication prompt triggered by the user trying to invoke a secured ADF Mobile application feature or to start the application controlled by the access control service (ACS). In the latter case, the application must define a default login server with ACS URL, as well as to have at least one feature with a constraint that depends on the user.roles setting. The user credentials are stored in a credential store—a device-native and local repository used for storing credentials associated with the authentication provider's server URL and the user. At run time, ADF Mobile assumes that all credentials have already been stored in the IDM Mobile credential store before the time of their usage.
ADF Mobile supports authentication against the web service endpoint URL only. In the connections.xml file, you have to specify the login server connection's adfCredentialStoreKey attribute value in the adfCredentialStoreKey attribute of the web service connection reference in order to associate the login server to the web service security (see Example 9-3 and Example 9-4).
Note:
Since JDeveloper does not provide an Overview editor for the connections.xml file, you can use the Property editor to update the <Reference> element's adfcredentialStoreKey attribute with the name configured for the adfCredentialStoreKey attribute of the login server connection. Alternatively, you can add or update the attribute using the Source editor.
Example 9-3 shows the definition of the web service connection referenced as adfCredentialStoreKey="MyAuth", where MyAuth is the name of the login connection reference.
Example 9-3 Defining the Web Service Connection
<Reference name="URLConnection1"
           className="oracle.adf.model.connection.url.HttpURLConnection"
           adfCredentialStoreKey="MyAuth"
           xmlns="">
   <Factory className="oracle.adf.model.connection.url.URLConnectionFactory"/>
   <RefAddresses>
      <XmlRefAddr addrType="URLConnection1">
         <Contents>
            <urlconnection name="URLConnection1"
                           url="http://myhost.us.example.com:7777/
                                SecureRESTWebService1/Echo">
               <authentication style="challange">
                  <type>basic</type>
                  <realm>myrealm</realm>
               </authentication>
            </urlconnection>
         </Contents>
      </XmlRefAddr>
      <SecureRefAddr addrType="username"/>
      <SecureRefAddr addrType="password"/>
   </RefAddresses>
</Reference>
Example 9-4 shows the definition of the login connection, where MyAuth is used as the credential store key value in the login server connection.
Example 9-4 Defining the Login Connection
<Reference name="MyAuthName"
           className="oracle.adf.model.connection.adfmf.LoginConnection"
           adfCredentialStoreKey="MyAuth"
           partial="false"
           manageInOracleEnterpriseManager="true"
           deployable="true"
           xmlns="">
   <Factory className="oracle.adf.model.connection.adfmf.LoginConnectionFactory"/>
   <RefAddresses>
      <XmlRefAddr addrType="adfmfLogin">
         <Contents>
            <login url="http://172.31.255.255:7777/
                        SecuredWeb1-ViewController-context-root/faces/view1.jsf"/>
            <logout url="http://172.31.255.255:7777/
                    /SecuredWeb1-ViewController-context-root/faces/view1.jsf"/>
            <accessControl url="http://myhost.us.example.com:7777/
                           UserObjects/jersey/getUserObjects" />
            <idleTimeout value="10"/>
            <sessionTimeout value="36000"/>
            <cookieNames>
               <cookie name="JSESSIONID"/>
            </cookieNames>
            <userObjectFilter>
               <role name="testuser1_role1"/>
               <role name="testuser2_role1"/>
               <privilege name="testuser1_priv1"/>
               <privilege name="testuser2_priv1"/>
               <privilege name="testuser2_priv2"/>
            </userObjectFilter>
         </Contents>
      </XmlRefAddr>
   </RefAddresses>
</Reference>
If a web service request is rejected due to the authentication failure, ADF Mobile returns an appropriate exception and invokes an appropriate action (see Section 19.4, "Using and Configuring Logging"). If none of the existing exceptions correctly represent the condition, a new exception is added.
The connections.xml file is deployed and managed under the Configuration Service. For more information, see Chapter 10, "Administering Web Services."
connections.xml files in FARs are aggregated when the ADF Mobile application is deployed. The credentials represent deployment-specific data and are not expected to be stored in FARs.
9.5.4 Limitations of Secure WSDL File Usage
Since an ADF Mobile application must make a WSDL file accessible at run time without authentication, you cannot use a secure WSDL file with a SOAP web service secured by the basic authentication.
If your intention is to secure the WSDL, consider the following: since the WSDL file is fetched by the GET method of the web service, if you secure each web service method, except the GET method, you can use a secure WSDL. If you secure the GET method, you should not secure the WSDL.
9.6 Invoking Web Services From Java
In your ADF Mobile application, you can invoke the web services layer (both REST and SOAP) from the Java code and use the results in Java methods.
ADF Mobile provides the GenericTypeBeanSerializationHandler utility class that you can use to perform conversions between POJOs (JavaBeans objects) and ADF Mobile's GenericType objects based on the following set of conversion rules:
-
When converting from POJO to
GenericTypeobjects:-
Standard JavaBeans reflection rules are used for determining properties.
-
Transient properties are ignored in the conversion process.
-
Readable properties are converted into a
GenericTypeattribute. -
Array properties are represented as repeated attributes in the
GenericType. -
Map properties are represented as individual attributes in the
GenericType. -
Non-primitive properties are represented as nested
GenericTypeobjects.
-
-
When converting from
GenericTypeobjects to POJO:-
Standard JavaBeans reflection rules are used for determining properties.
-
Transient properties are ignored in the conversion process.
-
Writable properties are converted from
GenericTypeattributes. -
Repeated attributes in the
GenericTypeare converted into an array object. -
If the POJO implements the
Mapinterface, then any properties that cannot be set through standard accessors are set in the POJO through thesetmethod of theMap. -
Non-primitive attributes are represented as nested POJO objects.
-
The advantage of using this helper API is that it allows you to take the response received from a web service and convert it to a JavaBean in a single call.
For example, a web service passes back and forth an Employee object that needs to be reused throughout the business logic. This object has the following set of properties:
-
nameof typeString -
address: a complex object withstreet,city,state, andzipcodeattributes -
idof typelong -
salaryof typefloat -
phoneof typeString, and there could be more than one phone -
passwordof typeString, and the password should never be transmitted to the back-end web service
Example 9-5 shows a potential code for the Employee object.
public class Employee {

   protected String name;
   protected Address address;
   protected long id;
   protected float salary;
   protected String[] phone;
   protected transient String password;

   public String getName() {
      return name;
   }

   public void setName(String name) {
      this.name = name;
   }

   public Address getAddress() {
      return address;
   }

   public void setAddress(Address address) {
      this.address = address;
   }

   public long getId() {
      return id;
   }

   public void setId(long id) {
      this.id = id;
   }

   public float getSalary() {
      return salary;
   }

   public void setSalary(float salary) {
      this.salary = salary;
   }

   public String getPassword() {
      return password;
   }

   public void setPassword(String password) {
      this.password = password;
   }

   public void setPassword(String password) {
      this.password = password;
   }

   public String[] getPhone() {
      return phone;
   }

   public void setPhone(String phone) {
      this.phone = phone;
   }
Example 9-6 shows the potential code for the Address object of the Employee class.
public class Address {

   protected String street;
   protected String city;
   protected String state;
   protected String zipcode;

   public String getStreet() {
      return street;
   }

   public void setStreet(String street) {
      this.street = street;
   }

   public String getCity() {
      return city;
   }

   public void setCity(String city)  {
      this.city = city;
   }

   public String getState() {
      return state;
   }

   public void setState(String state) {
      this.state = state;
   }

   public String getZipcode() {
      return zipcode;
   }

   public void setZipcode(String zipcode)  {
      this.zipcode = zipcode;
   }
Keeping in mind the conversion rules, note the following:
-
Since the
passwordis defined as transient, it is ignored with respect to the conversion algorithm. -
Since
name,address,id, andsalaryall havegetandsetmethods, they will all be converted to and from theGenericType. -
Based on the property type, properties can be coerced between types, as defined in the
coerceToType(Object, Class)method of theoracle.adfmf.misc.Converterclass. -
Complex objects, such as
address, are recursed by the conversion algorithm to either build the childGenericTypeor to create and populate the POJO complex object depending on the direction of the conversion. -
Since
phoneis an array ofStringobjects each representing a unique phone number and since the cardinality of this element is greater than one, the conversion algorithm will find all matches of thephoneattribute in theGenericTypeobject, present them as an array, and invoke thesetPhonemethod on the bean. ThetoGenericTypemethod of the GenericTypeBeanSerializationHandler will take each array element and append it to thetoGenericTypeas an individualphoneattribute.
With the following defined:
final String EMPLOYEE_VIRTUAL_BEAN_NAME = "EmployeeDC.Types.Employee";
Employee emp = getEmployee();
GenericType gt = null;
-
The
Employeeobject is converted to theGenericTypeas:gt = GenericTypeBeanSerializationHelper.toGenericType (EMPLOYEE_VIRTUAL_BEAN_NAME, emp); -
The GenericType is converted to the
Employeeobject as:emp = GenericTypeBeanSerializationHelper.fromGenericType (Employee.class, gt, null);
For successful conversion, consider the following:
-
Typically, POJOs closely follow their associated
GenericTypestructure. -
When deviating from the
GenericTypestructure, one of the following strategies should be followed:-
Additional bean properties should be declared transient.
-
Optional properties can be excluded from the POJO, provided that the backing service can handle the missing data if used as an operation parameter.
-
-
The
GenericTypeis only exposed in SOAP data controls. The virtual types have an associated virtual bean name that is passed into thetoGenericTypemethod. You can access the virtual bean name by hovering over the virtual type in the Data Controls window of JDeveloper. The typical name format is<DCName>.Types.<methodName>.<argName>.
For more information, see Oracle Fusion Middleware Java API Reference for Oracle ADF Mobile.
9.6.1 How to Add and Delete Rows on Web Services Objects
ADF Mobile allows you to insert and delete rows from a web services object programmatically by accessing the iterator on that object. To do so, you use the createRow and deleteRow methods of the oracle.adfmf.bindings.iterator.BasicIterator class.
Example 9-7 shows how to add a row to a web services object.
String keyFieldNames[] = {"EMPLID","ACAD_CAREER","INSTITUTION"};
String keyFieldValues[] = {"SR12030","UGRD","PSUNV"};
AmxAccessorIteratorBinding  acIter =
   (AmxAccessorIteratorBinding)((AdfmfJavaUtilities.getValueExpression
                                ("#{bindings.KEYIterator}", Object.class))
                                .getValue(AdfmfJavaUtilities.getAdfELContext()));

BasicIterator iter = acIter.getIterator();
GenericType key = (GenericType)iter.getDataProvider();
key.setAttribute("FIELDNAME", keyFieldNames[0]);
key.setAttribute("FIELDVALUE", keyFieldValues[0]);

int totalRowCount = 0;
int currIndex = 0;

for (int i = 1; i < keyFieldNames.length; i++) {
   totalRowCount = iter.getTotalRowCount();
   currIndex = iter.getCurrentIndex();

   System.out.println("Starting to add rows.. \n\t Total Row Count: " +
                      totalRowCount + "\n\t Current Row Index: " + currIndex);

   // Create rows for key iterator
   iter.createRow();

   totalRowCount = iter.getTotalRowCount();
   System.out.println("\t Total Row Count after creating row: " + totalRowCount);

   if (iter.hasNext()) {
      iter.next();
   }

   currIndex = iter.getCurrentIndex();
   System.out.println("\t Current Row Index after setting current
                      index to newly added row: " + currIndex);

   GenericType key1 = (GenericType)iter.getDataProvider();
   key1.setAttribute("FIELDNAME", keyFieldNames[i]);
   key1.setAttribute("FIELDVALUE", keyFieldValues[i]);
}

// Execute method

// Add call to execute the action binding to execute the action.
// If this is a web service call, the modified GenericType object
// will be sent to the server and the server will respond appropriately
Note:
The createRow method signatures are available with and without a boolean input parameter. When this method is used without parameters, it produces the result identical to using the createRow with its boolean parameter value set to true: both createRow() and createRow(true) create a new row and insert it in the iterator.
9.6.2 How to Use REST Web Services Adapter
You can use the RestServiceAdapter interface to access data (that could be presented as JavaScript Object Notation, for example) sent across a REST call. The RestServiceAdapter interface lets you trigger execution of web service operations without the need to create a web service data control or interact with it directly.
To use the RestServiceAdapter interface in your ADF Mobile application, ensure that the connection exists in the connections.xml file (see Section 9.3, "Creating a New Web Service Connection"), and then add your code to the bean class, as the following examples show.
Example 9-8 demonstrates the use of the RestServiceAdapter for the GET request.
Example 9-8 Using RestServiceAdapter for GET Request
RestServiceAdapter restServiceAdapter = Model.createRestServiceAdapter();

// Clear any previously set request properties, if any
restServiceAdapter.clearRequestProperties();

// Set the connection name
restServiceAdapter.setConnectionName("RestServerEndpoint");

// Specify the type of request
restServiceAdapter.setRequestType(RestServiceAdapter.REQUEST_TYPE_GET);

// Specify the number of retries
restServiceAdapter.setRetryLimit(0);

// Set the URI which is defined after the endpoint in the connections.xml.
// The request is the endpoint + the URI being set
restServiceAdapter.setRequestURI("/WebService/Departments/100");

String response = "";

// Execute SEND and RECEIVE operation
try {
   // For GET request, there is no payload
   response = restServiceAdapter.send("");
}
catch (Exception e) {
   e.printStackTrace();
}
Example 9-9 demonstrates the use of the RestServiceAdapter for the POST request.
Example 9-9 Using RestServiceAdapter for POST Request
String id = "111";
String name = "TestName111";
String location = "TestLocation111";
RestServiceAdapter restServiceAdapter = Model.createRestServiceAdapter();

restServiceAdapter.clearRequestProperties();
restServiceAdapter.setConnectionName("RestServerEndpoint");
restServiceAdapter.setRequestType(RestServiceAdapter.REQUEST_TYPE_POST);
restServiceAdapter.setRetryLimit(0);
restServiceAdapter.setRequestURI("/WebService/Departments");

String response = "";

// Execute SEND and RECEIVE operation
try {
   String postData = makeDepartmentPost("DEPT", id, name, location);
   response = restServiceAdapter.send(postData);
}
catch (Exception e) {
   e.printStackTrace();
}
System.out.println("The response is:  " + response);

private String makeDepartmentPost(String rootName, String id,
                                  String name, String location) {
   String ret = "<" + rootName + ">";
   ret += "<DEPTID>" + id + "</DEPTID>";
   ret += "<NAME>" + name + "</NAME>";
   ret += "<LOCATION>" + location + "</LOCATION>";
   ret += "</" + rootName + ">";
   return ret;
}
Example 9-10 demonstrates the use of the RestServiceAdapter for the PUT request.
Example 9-10 Using RestServiceAdapter for PUT Request
String id = "111";
String name = "TestName111";
String location = "TestLocation111";
RestServiceAdapter restServiceAdapter = Model.createRestServiceAdapter();

restServiceAdapter.clearRequestProperties();
restServiceAdapter.setConnectionName("RestServerEndpoint");
restServiceAdapter.setRequestType(RestServiceAdapter.REQUEST_TYPE_PUT);
restServiceAdapter.setRetryLimit(0);
restServiceAdapter.setRequestURI("/WebService/Departments");

String response = "";

// Execute SEND and RECEIVE operation
try {
   String putData = makeDepartmentPut("DEPT", id, name, location);
   response = restServiceAdapter.send(putData);
}
catch (Exception e) {
   e.printStackTrace();
}
System.out.println("The response is:  " + response);

private String makeDepartmentPut(String rootName, String id,
                                  String name, String location) {
   String ret = "<" + rootName + ">";
   ret += "<DEPTID>" + id + "</DEPTID>";
   ret += "<NAME>" + name + "</NAME>";
   ret += "<LOCATION>" + location + "</LOCATION>";
   ret += "</" + rootName + ">";
   return ret;
}
Example 9-11 demonstrates the use of the RestServiceAdapter for the DELETE request.
Example 9-11 Using RestServiceAdapter for DELETE Request
RestServiceAdapter restServiceAdapter = Model.createRestServiceAdapter();

restServiceAdapter.clearRequestProperties();
restServiceAdapter.setConnectionName("RestServerEndpoint");
restServiceAdapter.setRequestType(RestServiceAdapter.REQUEST_TYPE_DELETE);
restServiceAdapter.setRetryLimit(0);
restServiceAdapter.setRequestURI("/WebService/Departments/44");

String response = "";

// Execute SEND and RECEIVE operation
try {
   // For DELETE request, there is no payload
   response = restServiceAdapter.send("");
}
catch (Exception e) {
   e.printStackTrace();
}

System.out.println("The response is:  " + response);
When you use the RestServiceAdapter, you should set the Accept and Content-Type headers to ensure that your request and response payloads are not deemed invalid due to mismatched MIME type.
Note:
The REST web service adapter only supports UTF-8 character set on mobile applications. UTF-8 is embedded in the adapter program.
9.6.2.1 Support for Non-Text Responses
You can use the RestServiceAdapter to handle binary (non-text) responses received from web service calls. These responses can include any type of binary data, such as PDF or video files. The RestServiceAdapter method to use is sendReceive.
Example 9-12 shows how to send a request for a file to a REST server, and then save the file to a disk (see Example 9-13).
Example 9-12 Sending Request for File
RestServiceAdapter restServiceAdapter = Model.createRestServiceAdapter();

restServiceAdapter.clearRequestProperties();
restServiceAdapter.setConnectionName("JagRestServerEndpoint");
restServiceAdapter.setRequestType(RestServiceAdapter.REQUEST_TYPE_GET);
restServiceAdapter.setRetryLimit(0);
restServiceAdapter.setRequestURI("/ftaServer/v1/kpis/123/related/1");

// Set credentials needed to access the REST server
String theUsername = "hr_spec_all";
String thePassword = "Welcome1";
String userPassword = theUsername + ":" + thePassword;
String encoding = new sun.misc.BASE64Encoder().encode(userPassword.getBytes());

restServiceAdapter.addRequestProperty("Authorization", "Basic " + encoding);

// Execute the SEND / RECEIVE operation.
// Since it is a GET request, there is no payload.
try {
   this.responseRaw = restServiceAdapter.sendReceive("");
}
catch (Exception e) {
   e.printStackTrace();
}
System.out.println("The response is:  " + this.responseRaw);

// Write the response to a file
writeByteArrayToFile(this.responseRaw);
Example 9-13 demonstrates a method that is called by the code from Example 9-12. This method saves a byte[] response to a file on disk:
Example 9-13 Saving File to Disk
public void writeByteArrayToFile(byte[] fileContent) {
   BufferedOutputStream bos = null;
try {
   FileOutputStream fos = new FileOutputStream(new File(fileToSavePath));
   bos = new BufferedOutputStream(fos);

   // Write the byte [] to a file
   System.out.println("Writing byte array to file");
   bos.write(fileContent);
   System.out.println("File written");
}
catch(FileNotFoundException fnfe) {
   System.out.println("Specified file not found" + fnfe);
}
catch (IOException ioe) {
   System.out.println("Error while writing file" + ioe);
}
finally {
   if(bos != null) {
      try {
         // Flush the BufferedOutputStream
         bos.flush();

         // Close the BufferedOutputStream
         bos.close();
      }
      catch (Exception e) {
      }
   }
}
9.6.3 How to Enable Strict Validation of REST Responses
Using the adfmf-config.xml file, you can specify how ADF Mobile is to behave when a REST response contains a child or attribute that is not expected or defined in the XSD:
-
If the strict validation is enabled, ADF Mobile throws an exception.
-
If the strict validation is disabled, the condition is logged and the execution continues without exceptions thrown.
Example 9-14 shows how to set the validated parameter. If you define the value of this parameter as true, the validation proceeds as strict. The value of false (default) means that the validation is not strict.
9.6.4 What You May Need to Know About Invoking Data Control Operations
You can use the invokeDataControlMethod method of the AdfmfJavaUtilities to invoke a data control operation which does not have to be explicitly added as a methodAction in a PageDef file.
For more information and examples, see Oracle Fusion Middleware Java API Reference for Oracle ADF Mobile.
