2 Working with TimesTen Objects
This chapter focuses on working with TimesTen objects in SQL Developer.
Topics include:
Locating a TimesTen database object
If you are unable to find a database object, right-click the node corresponding to the object type and select Refresh to refresh the list of objects of that type.
For example, to find a cache group, right-click the Cache Groups node and select Refresh to refresh the list of cache groups.
You can also check if the object appears under the Other Users node. Click the + to the left of the Other Users node to expand the node. Then click the + to the left of any of the users' nodes to expand that user's node.
Click the + to the left of the node corresponding to the object type to view the list of objects of that type owned by the user.
For example, to find a table, click the + to the left of the user's Tables node to view the list of tables owned by that user.
Specifying and displaying LOB data types
If you are using TimesTen release 11.2.2 or later, then you can specify and display LOB data types in your table definitions.
If you want to create a table with a LOB data type, then in the Create Table dialog, expand the Type column header. You see CLOB, NCLOB, and BLOB as valid data types.
Figure 2-1 Specifying LOB data types in the Create Table dialog
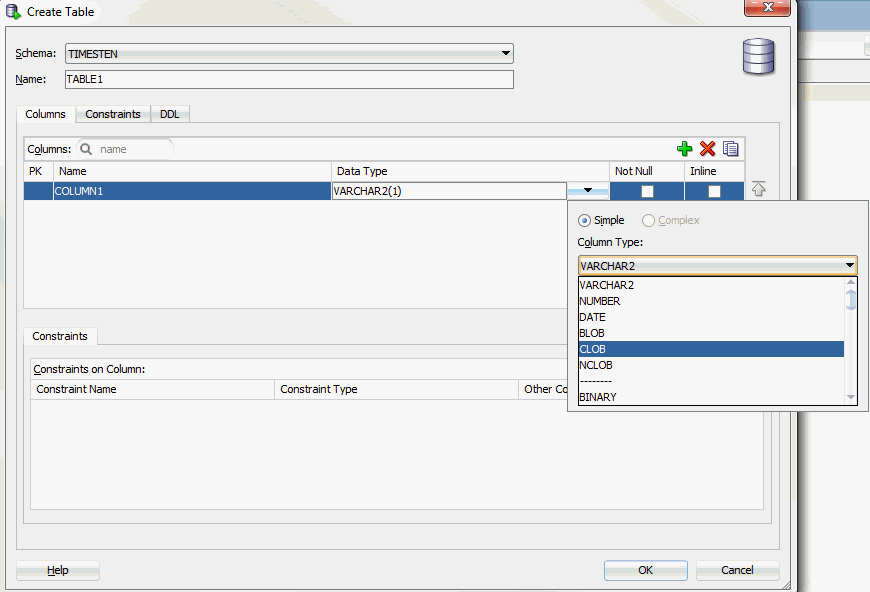
Description of "Figure 2-1 Specifying LOB data types in the Create Table dialog"
To view the data type for your columns, select the table and then choose the Columns tab. You see the LOB data type for your column.
If you want to add a column and specify a LOB data type, in the Add Column dialog, expand Data Type. You see CLOB, NCLOB, and BLOB among the possible choices.
Figure 2-3 Adding column and specifying a LOB data type
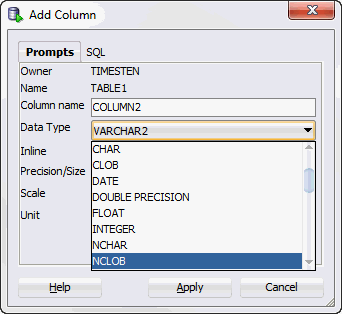
Description of "Figure 2-3 Adding column and specifying a LOB data type"
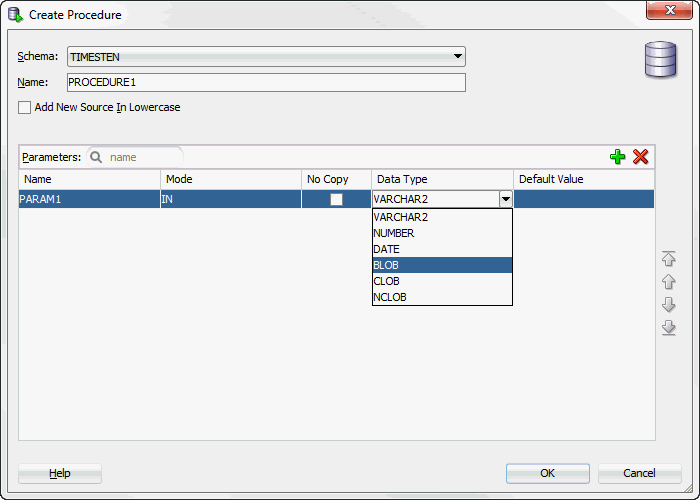
For PL/SQL objects, you can specify LOB data types as IN, OUT, and IN OUT parameters. In the PL/SQL edit dialogs, for parameter types, choose CLOB, NCLOB, or BLOB.
Specifying the INLINE attribute for columns
You can specify the INLINE attribute for columns of type VARCHAR2, NVARCHAR2, and VARBINARY.
In the Create Table dialog, locate the column header named Inline. Click in the check box to define the column with the INLINE attribute.
Figure 2-5 Viewing the Inline attribute in the Create Table dialog
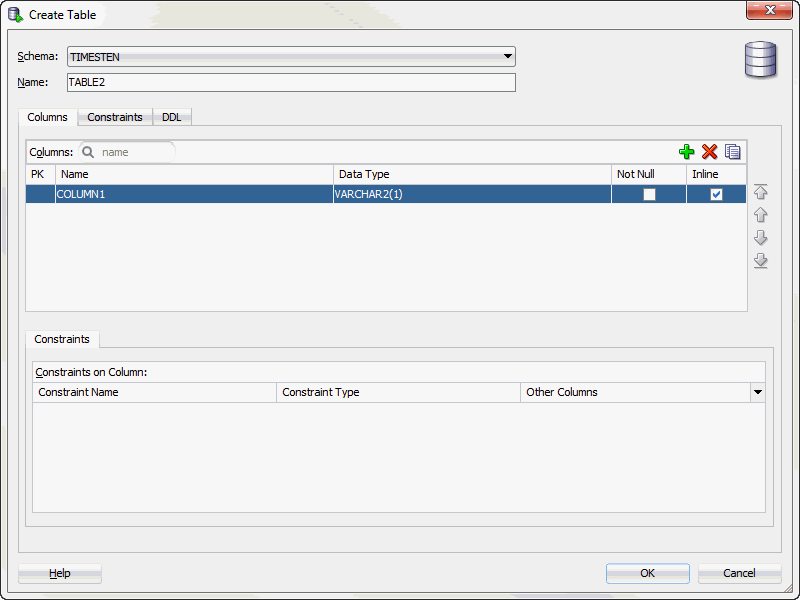
Description of "Figure 2-5 Viewing the Inline attribute in the Create Table dialog"
You can also specify the INLINE attribute when adding a column to a table. Right-click on the table, select Column, then select Add. The Add Column dialog appears. For columns of type VARCHAR2, NVARCHAR2, and VARBINARY, click in the Inline check box to add the column with the INLINE attribute.
Figure 2-6 Viewing the Inline attribute in the Add Column dialog
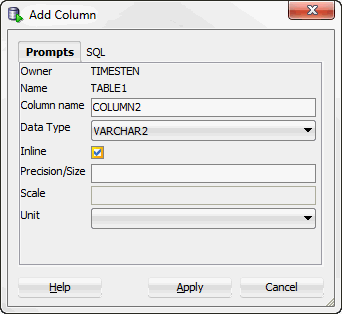
Description of "Figure 2-6 Viewing the Inline attribute in the Add Column dialog"
Computing table size information
If you are using TimesTen Release 11.2.2 or later, you can compute table size information.
To view table size information, you must first compute the table size:
-
Choose + to the left of the Tables node to view the list of tables.
-
Right-click the name of the table to compute table size information.
-
Select Table, then select Compute Size.
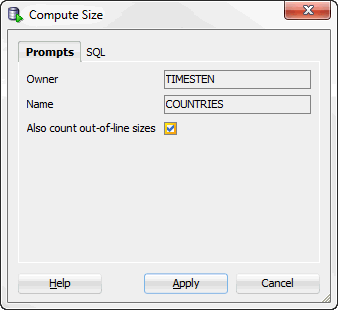
The Compute Size dialog appears. The owner and name of the table are displayed.
-
Click in the check box if you want to compute out-of-line sizes.
-
Choose Apply.
A Confirmation dialog appears.
-
Choose OK.
The table size statistics for the table are computed.
To view the SQL for computing the table size, choose the SQL tab in the Compute Size dialog. You see that a TimesTen built-in procedure called ttComputeTabSizes is executed. After this built-in is executed, you can review the table size information for your table. Note that this table size information is on a per table basis.
To compute table sizes for all tables in your database including materialized views, system tables, and tables that are part of cache groups, use the SQL Worksheet and execute the command: Call ttComputeTabSizes (NULL,0); or to include out-of-line data: Call ttComputeTabSizes (NULL,1);.
After you compute the table size for one or more tables, you can view the table size information:
-
Choose + to the left of the Tables node to view the list of tables.
-
Choose the table you want to review table size information.
-
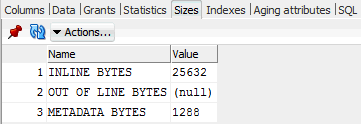
Choose the Sizes tab located among the tabs that display the attributes of the table.
Table size information is displayed. Specifically, values for
INLINE BYTES,OUT OF LINE BYTES, andMETADATA BYTESare shown.
Figure 2-8 Displaying table size information
Description of "Figure 2-8 Displaying table size information"
You can choose the Actions menu to generate or regenerate the table size. If you select the Actions menu, then Table, then select Compute Size. The Compute Size dialog appears allowing you to compute the table size information.
Choose Refresh to refresh the displayed table size data.
You can view table size information for all tables that you have computed table sizes. To view such information, select TimesTen Reports, then Table, then select Table Sizes. For more information on TimesTen reports, see "Generating TimesTen Reports".
For more information on the ttComputeTabSizes built-in procedure, see "ttComputeTabSizes" in Oracle TimesTen In-Memory Database Reference.
Using a REF CURSOR as an OUT parameter
You can test a PL/SQL function, procedure, or package by defining a REF CURSOR as an OUT parameter in your PL/SQL function, procedure, or package. After you define a REF CURSOR, compile and run your PL/SQL function, procedure, or package. The Run dialog appears and when you choose OK, the details of the run are displayed and the output from the execution of the function, procedure, or package is displayed in the Output Variables tab.
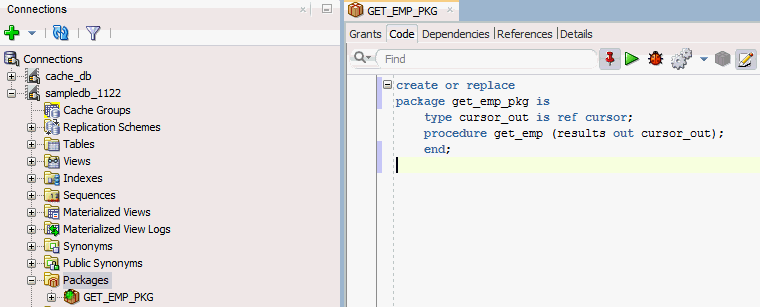
In the following example, create a package called get_emp_pkg. The get_emp_pkg package defines a REF CURSOR as an OUT parameter and defines a procedure that uses the REF CURSOR as an OUT parameter.
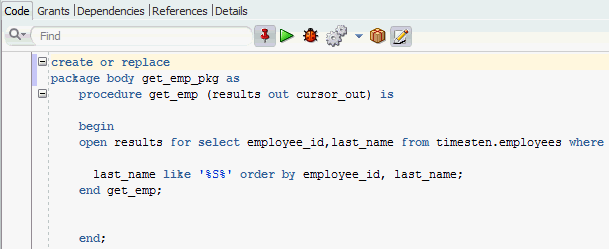
Next create a package body that defines the procedure get_emp. The procedure get_emp opens the REF CURSOR variable and performs a query on the employees table.
Figure 2-10 get_emp_pkg package body definition
Description of "Figure 2-10 get_emp_pkg package body definition"
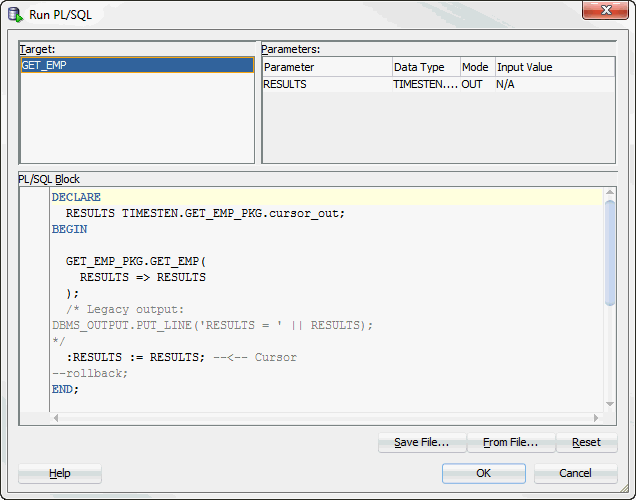
Compile the package and package body. Right-click on the get_emp_pkg and choose Run. The Run PL/SQL dialog displays allowing you to run the test wrapper. Choose OK to run the test wrapper.
Figure 2-11 Viewing the Run PL/SQL dialog
Description of "Figure 2-11 Viewing the Run PL/SQL dialog"
-
IdeConnections: Displays the status of your run including any errors encountered.
-
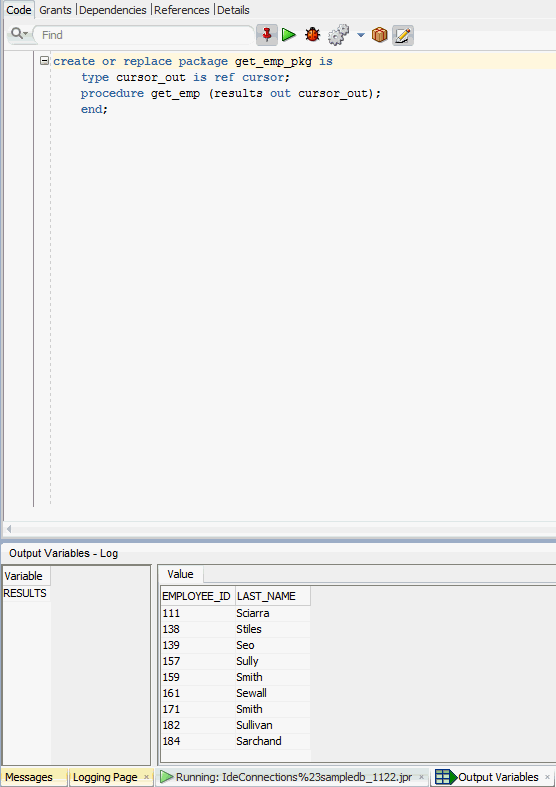
Output Variables: Shows the output from the execution of the function, procedure, or package.
Figure 2-12 Viewing the Output Variables tab
Description of "Figure 2-12 Viewing the Output Variables tab"
Viewing the characteristics of a table
After you have created a regular table, a global temporary table or a cache table, you can view the characteristics of the table itself such as its columns, indexes and aging policy.
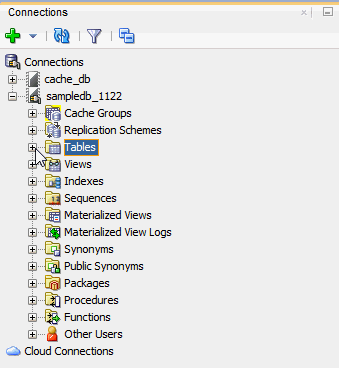
Click the + to the left of the Tables node to view the list of tables. Click the name of the table to view.
If you are unable to find the table that you are looking for, see "Locating a TimesTen database object".
Viewing the columns
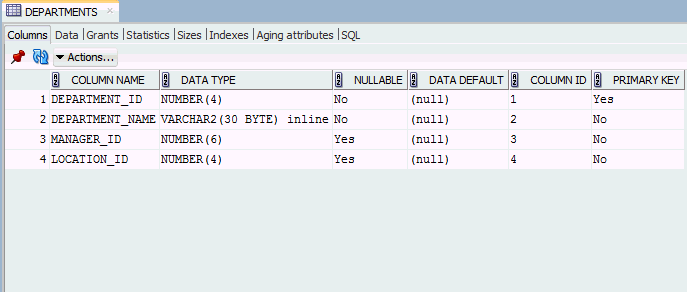
The Columns tab, located within the table's tab, shows information about the columns of a table. The name of the column, data type, nullability property and default value is displayed.
To view the list of columns in a table, locate the Tables node. Click the + to the left of the node that contains the name of the table.
Viewing the indexes
The Indexes tab, located within the table tab, shows information about the index for a table. The name of the index, type, uniqueness property, and the number and name of the columns are displayed.
Viewing the aging attributes
The Aging attributes tab, located within the table tab, shows information about the aging attributes for a table. The aging policy type, aging cycle, and aging state are displayed.
For tables that have an LRU aging policy defined, the TimesTen database memory usage thresholds are displayed. For information about how to change these thresholds and the LRU aging cycle, see "Specifying an aging policy".
For tables that have a time-based aging policy defined, the name of the non-nullable DATE or TIMESTAMP column used to store the timestamp value (indicating when each row was added or most recently updated) and the length of time non-updated data is not deleted from the table is displayed.
Figure 2-14 Viewing the aging attributes for a table

Description of "Figure 2-14 Viewing the aging attributes for a table"
Viewing the table definition
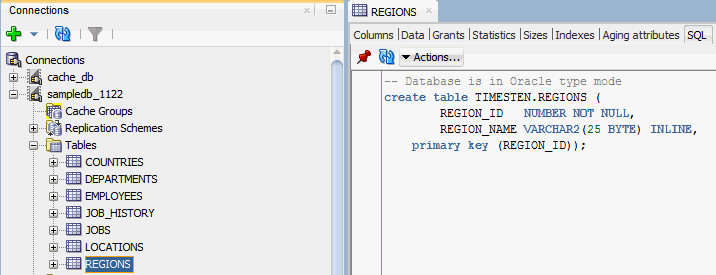
The SQL tab, located within the table tab, shows the CREATE TABLE statement that was used to create the table for a regular table or a global temporary table.
Since a cache table is created when its accompanying cache group is created, you can view a cache table's definition by viewing its cache group definition. See "Viewing the cache group definition".
Figure 2-15 Viewing the SQL for the table definition
Description of "Figure 2-15 Viewing the SQL for the table definition"
Creating an index on a table
You can create a range index or a bitmap index on a regular table or on a cache table.
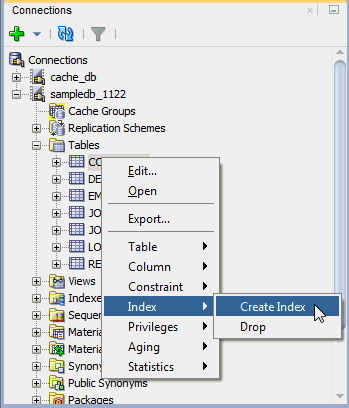
To create an index, click the + to the left of the Tables node to view the list of tables. Then right-click the name of the table to create an index on and select Index, then select Create Index.
Figure 2-16 Creating an index from Tables node
Description of "Figure 2-16 Creating an index from Tables node"
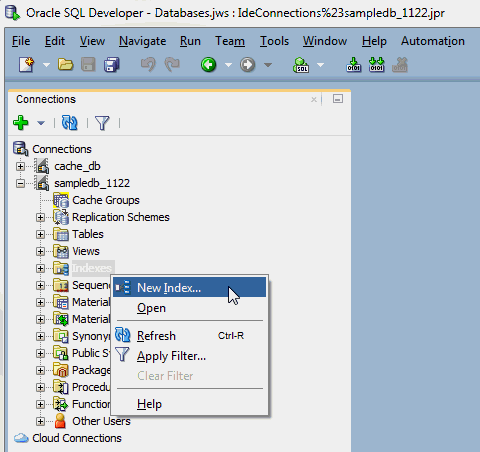
You can also right-click the Indexes node and select New Index.
Figure 2-17 Creating a new index from Indexes node
Description of "Figure 2-17 Creating a new index from Indexes node"
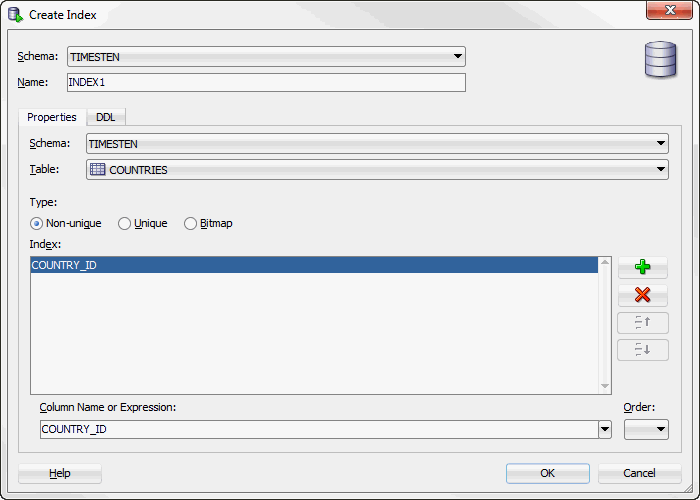
In the Properties tab of the Create Index dialog, locate the Table drop-down menu. From this menu, select the table for the index.
For Type:
-
To create a non-unique range index, choose Non-unique.
-
To create a unique range index, choose Unique.
-
To create a bitmap index, choose Bitmap.
For information about the different types of indexes supported in TimesTen, see "CREATE INDEX" in the Oracle TimesTen In-Memory Database SQL Reference.
In the Index section, specify the columns for the index. You can select the columns from the Column Name or Expression drop-down select list. For each indexed column, from the Order select list, you can specify whether the column is to be sorted in ascending or descending order. The default sort order is ascending.
To create a composite index, click + to add columns to the index definition. Click X to remove columns from the index definition.
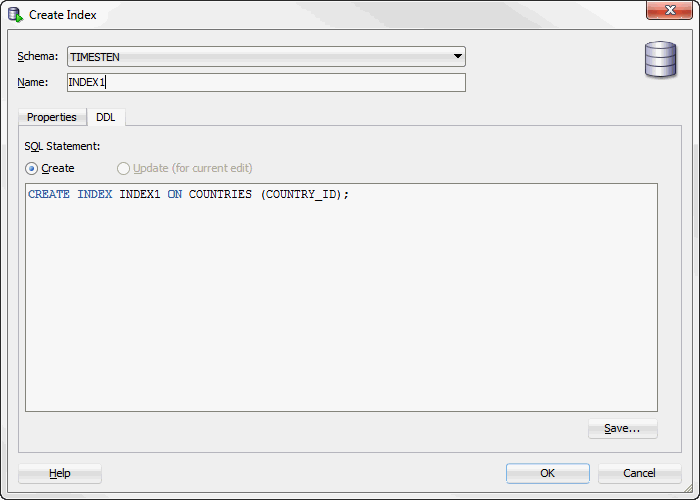
In the DDL tab of the Create Index dialog, you can view the CREATE INDEX statement used to create the index.
Click OK to create the index.
Figure 2-19 Viewing the DDL for create index
Description of "Figure 2-19 Viewing the DDL for create index"
Creating a primary key constraint
You can create a primary key constraint on a table that does not have a primary key defined. Follow these steps:
-
Click the + to the left of the Tables node to view the list of tables. Then right-click the name of the table to create a primary key constraint.
-
Select Constraint, then select Add Primary Key.
The Add primary key dialog appears.
-
In the key index type field choose either Use range to create a primary key using a range index or Use hash to create a primary key using a hash index.
If you choose Use hash, you see the text with number of followed by a drop-down list of either row or pages. Select either row or pages and in the box after the colon (:), enter the number of rows or pages. The default selection is row.
For more information on hash index sizing, see "Column Definition" in the Oracle TimesTen In-Memory Database SQL Reference.
-
In the Constraint Name field, enter the constraint name. The name cannot exceed 30 characters in length.
-
In the Column field(s), you see a drop-down list of column names. Choose the column name(s) to use for the primary key.
-
Click Apply.
The Confirm dialog box appears indicating that the primary key constraint has been added.
-
Click OK.
The primary key constraint has been added successfully.
To view the SQL statement used to create the primary key constraint, choose the SQL tab of the Add primary key dialog box.
For information about creating a primary key constraint, see "CREATE TABLE" in the Oracle TimesTen In-Memory Database SQL Reference or "ALTER TABLE" in the Oracle TimesTen In-Memory Database SQL Reference.
Changing the attributes of primary key
You can change the attributes of a primary key constraint after you have defined a primary key on a table. Follow these steps:
-
Click the + to the left of the Tables node to view the list of tables. Then right-click the name of the table on which to change the primary key attributes.
-
Select Constraint, then select Change Primary Key Parameters.
The Change parameters of a primary key dialog appears.
-
In the key index type field choose either Use range to change the primary key constraint from using a hash index to using a range index or Use hash to change the primary key constraint from using a range index to using a hash index.
If you choose Use hash, you see the text with number of followed by a drop-down list of either row or pages. Select either row or pages and in the box after the colon (:), enter the number of rows or pages. The default selection is row.
For more information on hash index sizing, see "Column Definition" in Oracle TimesTen In-Memory Database SQL Reference.
-
Click Apply.
The Confirm dialog appears indicating that the index(es) for the primary key constraint has been changed.
-
Click OK.
The index(es) for the primary key constraint has been changed successfully.
To view the SQL statement used to change the attributes of the primary key constraint, choose the SQL tab of the Change parameters of a primary key dialog.
For information about changing the attributes of a primary key constraint, see "ALTER TABLE" in the Oracle TimesTen In-Memory Database SQL Reference.
Creating a foreign key constraint
You can create a foreign key constraint on a table. Make sure you are on the main SQL Developer page and that your TimesTen connection is expanded.
-
Click the + to the left of the Tables node to expand the list of tables.
-
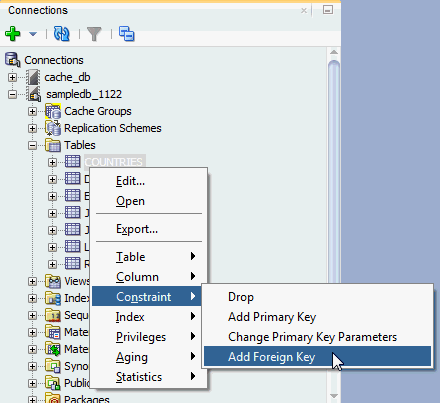
Right-click the name of the table and select Constraint, then select Add Foreign Key.
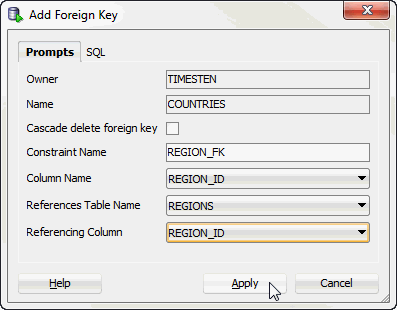
The Add Foreign Key dialog displays. The Owner and Name fields are auto-filled and you cannot edit these fields. Prepare to enter the Constraint Name.
-
To enable the
ON DELETE CASCADEreferential action, select the Cascade delete foreign key checkbox. If specified, when rows containing referenced key values are deleted from a parent table, rows in child tables with dependent foreign key values are also deleted. -
In the Constraint Name field, enter the name of the foreign key.
-
Select the column on which to apply the foreign key constraint from the Column Name drop-down list.
-
Select the table name that the foreign key references from the Referenced Table Name drop-down list.
-
Select the column that the foreign key references from the Referenced Column drop-down list.
To view the SQL statement that will be used to create the foreign key constraint, choose the SQL tab of the Add Foreign Key dialog box.
-
Click Apply.
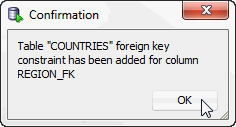
The Confirmation dialog box displays indicating that the foreign key constraint has been added.
-
Click OK.
The foreign key constraint has been added successfully.
For information about creating a foreign key constraint, see "CREATE TABLE" in the Oracle TimesTen In-Memory Database SQL Reference or "ALTER TABLE" in the Oracle TimesTen In-Memory Database SQL Reference.
Dropping a constraint
You can drop a constraint from a TimesTen table. Make sure you are on the main SQL Developer page and that your TimesTen connection is expanded.
-
Click the + to the left of the Tables node to expand the list of tables.
-
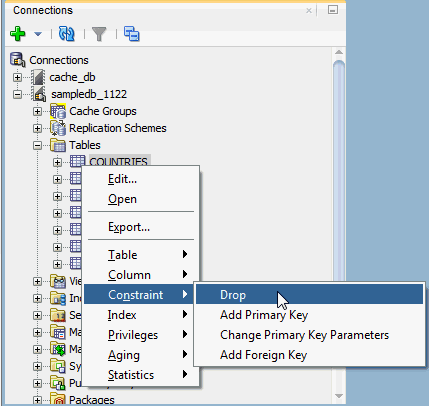
Right-click the name of the table and select Constraint, then select Drop.
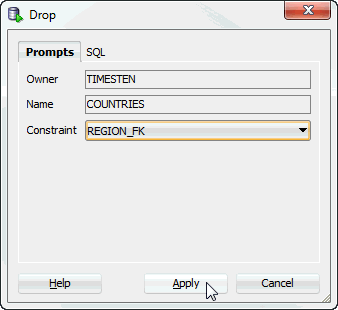
The Drop dialog displays. The Owner and Name fields are auto-filled and you cannot edit these fields. Prepare to select the Constraint.
-
Select the constraint that you want to drop from the Constraint drop-down list.
To view the SQL statement that will be used to drop the constraint, choose the SQL tab of the Drop dialog box.
-
Click Apply.
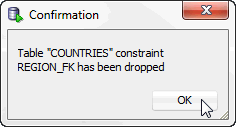
The Confirmation dialog box displays indicating that the constraint has been dropped.
-
Click OK.
The constraint has been successfully dropped.
Altering the aging properties of a table
You can add an aging policy to or drop an aging policy from a regular table or a cache table. You can also change the aging state for a table's existing aging policy, or change the lifetime and cycle for a table's existing time-based aging policy.
Adding an aging policy to a table
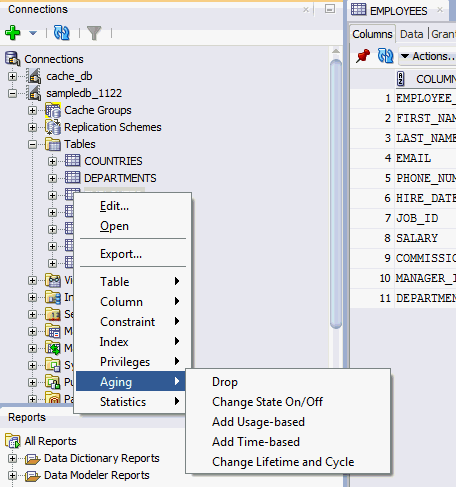
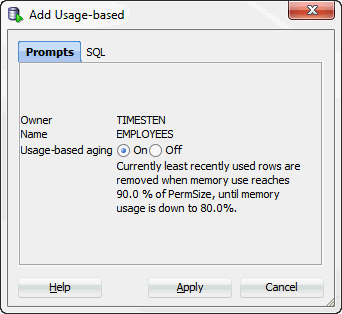
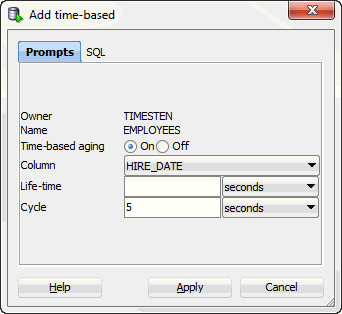
To add an aging policy to a regular table or a cache table, under the Tables node, right-click the name of the table to add an aging policy to and select Aging, then select Add Usage-based to add an LRU aging policy. To add a time-based aging policy select Aging, then select Add Time-based. An aging policy can be added to a cache table only if it is the root table of a cache group.
If you are unable to find the table that you are looking for, see "Locating a TimesTen database object".
To add an LRU aging policy to the table, in the Prompts tab of the Add Usage-based dialog box, specify an aging state by choosing either On or Off in the Usage-based aging field. The default aging state is on. Click Apply to add the LRU aging policy to the table.
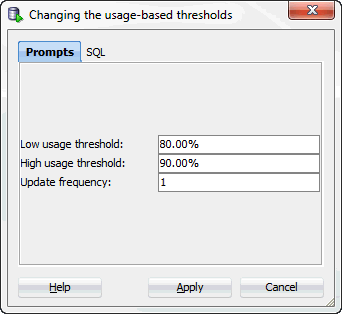
The TimesTen database memory usage thresholds determine when data starts and stops being deleted from the table. The default memory usage threshold that determines when data starts being deleted from the table is 90%. The default memory usage threshold that determines when data stops being deleted from the table is 80%. The default LRU aging cycle is 1 minute. For information about how to change these thresholds and the LRU aging cycle., see "Specifying an aging policy".
An LRU aging policy can be added to any regular table, and only to cache tables in an AWT, SWT or user managed cache group that does not have automatic refresh defined.
To add a time-based aging policy to the table, in the Prompts tab of the Add time-based dialog box, select the column name from Column to store the timestamp value indicating when each row was added or most recently updated.
In the Life-time field, indicate the length of time in which data that has not been updated is to be kept in the table by specifying a numeric value followed by a unit of minutes, hours or days in the drop-down menu.
In the Cycle field, indicate the frequency at which data is to be aged out of the table by specifying a numeric value followed by a unit of minutes, hours or days. The default time-based aging cycle is 5 minutes.
Specify an aging state by choosing either On or Off in the Time-based aging field. The default aging state is on. Then click Apply to add the time-based aging policy to the table.
A time-based aging policy can only be added to a table that contains a non-nullable DATE or TIMESTAMP column.
Dropping an aging policy from a table
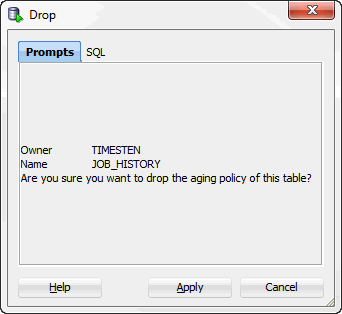
To drop an existing aging policy from a regular table or a cache table, under the Tables node, right-click the name of the table to drop an aging policy from and select Aging, then select Drop. See Figure 2-28, "Aging attributes".
If you are unable to find the table that you are looking for, see "Locating a TimesTen database object".
Click Apply to drop the aging policy from the table.
Changing the aging state of a table's aging policy
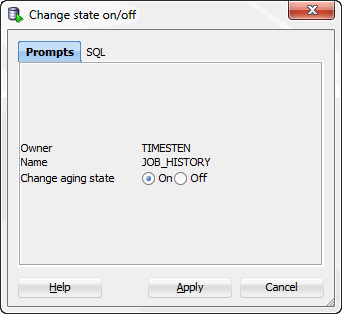
To change the aging state of a regular table's or cache table's existing aging policy, under the Tables node, right-click the name of the table to change the aging state of and select Aging, then select Change State On/Off. See Figure 2-28, "Aging attributes".
If you are unable to find the table that you are looking for, see "Locating a TimesTen database object".
In the Prompts tab of the Change state on/off dialog, change the aging state by selecting either On or Off in the Change aging state field. Click Apply to change the aging state of the table.
Changing the memory usage thresholds and LRU aging cycle
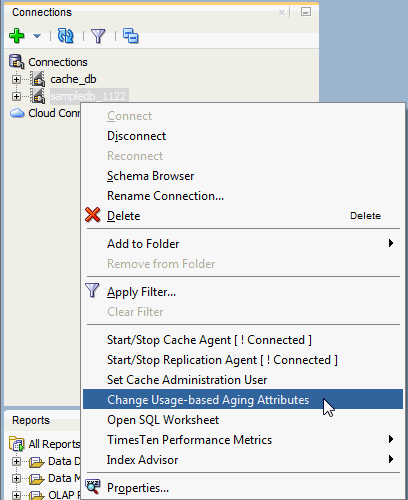
To change the memory usage thresholds and the LRU aging cycle, right-click the node of the connection name for the TimesTen database and choose Change Usage-based Aging Attributes.
Figure 2-33 Change usage-based aging attributes
Description of "Figure 2-33 Change usage-based aging attributes"
In the Prompts tab of the Changing the usage-based thresholds dialog box, specify the threshold that determines when data starts being deleted from the tables in the High usage threshold field. Specify the threshold that determines when data stops being deleted from the tables in the Low usage threshold field. Specify the LRU aging cycle in the Update Frequency field. Then click Apply to change the memory usage thresholds and the LRU aging cycle.
Figure 2-34 Usage-based aging thresholds dialog
Description of "Figure 2-34 Usage-based aging thresholds dialog"
The new settings apply to all tables that have an LRU aging policy defined.
Changing the lifetime and cycle of a table's time-based aging policy
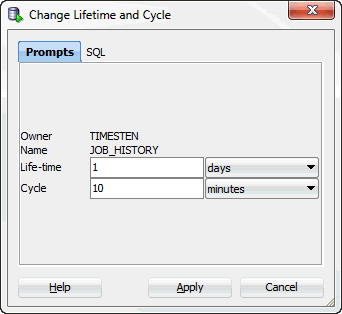
To change the lifetime and cycle of a regular table's or cache table's existing time-based aging policy, under the Tables node, right-click the name of the table to change the lifetime and cycle of and select Aging, then select Change Lifetime and Cycle. See Figure 2-28, "Aging attributes".
If you are unable to find the table that you are looking for, see "Locating a TimesTen database object" for information.
In the Life-time field within the Prompts tab of the Change Lifetime and Cycle dialog box, change the length of time in which data that has not been updated is to be kept in the table by specifying a numeric value followed by a unit of minutes, hours or days.
In the Cycle field, change the frequency at which data is to be aged out of the table by specifying a numeric value followed by a unit of minutes, hours or days.
Then click Apply to change the lifetime and cycle for the table.
Granting and revoking object privileges
You can grant privileges to and revoke privileges from the following database objects:
-
Regular and cache tables
-
Regular and materialized views
-
Sequences
-
PL/SQL packages, procedures and functions
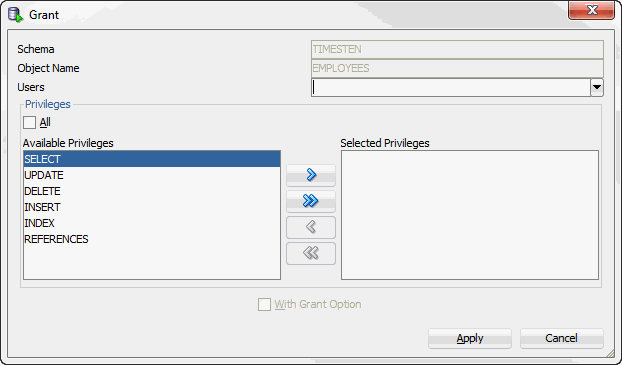
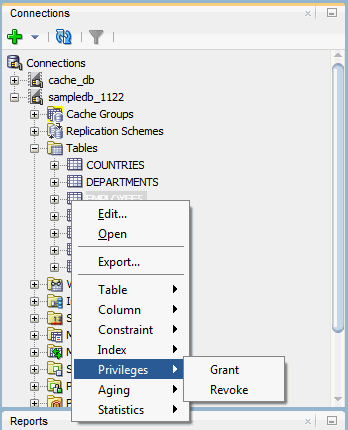
To grant privileges on an object, right-click the name of the object and select Privileges, then select Grant.
Figure 2-36 Granting and revoking privileges
Description of "Figure 2-36 Granting and revoking privileges"
In the Users drop-down menu of the Grant dialog box, select the user to grant object privileges to the object. In the Privileges section, select the All check box or click >> to grant all available object privileges on the object to the selected user. Otherwise, select the individual privileges from the Available Privileges list for the privileges to grant to the selected user and then click > to move those privileges into the Selected Privileges list. To select multiple privileges, press and hold the CTRL key, and click the desired privileges. Click Apply to grant the selected object privileges on the object to the selected user.
For a particular object type, only the available object privileges are shown. For example, DELETE, INDEX, INSERT, REFERENCES, SELECT and UPDATE privileges can be granted on a table. However, only INDEX, REFERENCES and SELECT privileges can be granted on a materialized view.
Only users with the ADMIN system privilege or the owner of an object can grant object privileges on the object.
For more information about the set of privileges available to each type of object, see "Object privileges" in the Oracle TimesTen In-Memory Database SQL Reference.
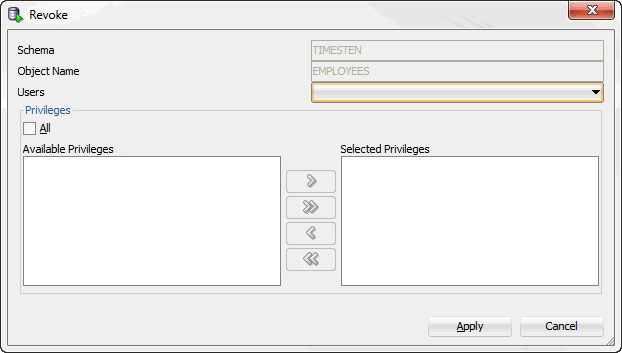
To revoke privileges from an object, right-click the name of the object and select Privileges, then select Revoke. See Figure 2-36, "Granting and revoking privileges".
In the Users drop-down menu of the Revoke dialog box, select the user to revoke object privileges from the object. In the Privileges section, select the All check box or click >> to revoke all granted object privileges on the object from the selected user. Otherwise, select the individual privileges from the Available Privileges list for the privileges to revoke from the selected user and then click > to move those privileges into the Selected Privileges list. To select multiple privileges, press and hold the CTRL key, and click the desired privileges. Click Apply to revoke the selected object privileges on the object from the selected user.
The Users drop-down menu shows only users that have object privileges on the object. For a particular user, only the object privileges that they have been granted are shown.
Only users with the ADMIN system privilege or the owner of an object can revoke object privileges from the object.
Viewing the privileges granted on a database object
You can view the object privileges granted to all users on a particular object such as a regular table or a cache table, a regular view or a materialized view, a sequence, or a PL/SQL package, procedure or function.
For example, to view the privileges granted on a regular table, click the + to the left of the user's Tables node to view the list of tables owned by that user and then click the name of the desired table.
The Grants tab, located within the table tab, shows the users who have privileges on the table, what privileges they have been granted, and the user who granted the privileges.
Loading data into tables
You can load data into your table using Import Data. Before you can load your data, you must export the data into a file. To export the data, right-click on the name of the table and choose Export. After successfully exporting your data, you can import the data.
-
Choose + to the left of the Tables node to view the list of tables.
-
Right-click on the table name.
-
Select Table, then select Import Data.
An Open dialog appears. Locate the data file to import. This file is the file you previously exported.
-
Choose Open.
The data is loaded into the table.
ttIsql commands in SQL worksheet
The following ttIsql commands are supported in the SQL Worksheet:
-
autocommit
-
desc
-
dssize
-
version
For more information, see "ttIsql" in the Oracle TimesTen In-Memory Database Reference.

