19 Upgrading Oracle Privileged Account Manager High Availability Environments
This chapter describes how to upgrade Oracle Privileged Account Manager high availability environments to 11g Release 2 (11.1.2.2.0) on Oracle WebLogic Server.
Note:
Before proceeding, check if your existing Oracle Privileged Account Manager version is supported for high availability upgrade. For more information on supported starting points for high availability upgrade, see Section 1.5, "Supported Starting Points for Upgrading High Availability Environments".This chapter includes the following sections:
-
Section 19.1, "Understanding Oracle Privileged Account Manager High Availability Upgrade Topology"
-
Section 19.3, "Shutting Down all Servers on OPAMHOST1 and OPAMHOST2"
-
Section 19.10, "Optional: Configuring Oracle Privileged Account Manager Session Manager"
-
Section 19.11, "Optional: Configuring Oracle Identity Navigator for WLS_OPAM1 and WLS_OPAM2"
19.1 Understanding Oracle Privileged Account Manager High Availability Upgrade Topology
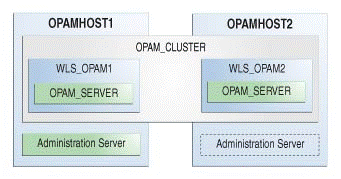
Figure 19-1 shows the Oracle Privileged Account Manager cluster set up that can be upgraded to 11.1.2.2.0 by following the procedure described in this chapter.
Figure 19-1 Oracle Privileged Account Manager High Availability Upgrade Topology
Description of "Figure 19-1 Oracle Privileged Account Manager High Availability Upgrade Topology"
The host OPAMMHOST1 has the following installations:
-
An Oracle Privileged Account Manager instance in the
WLS_OPAM1Managed Server. -
A WebLogic Server Administration Server. Under normal operations, this is the active Administration Server.
The host OPAMMHOST2 has the following installations:
-
An Oracle Privileged Account Manager instance in the
WLS_OPAM2Managed Server. -
A WebLogic Server Administration Server. Under normal operations, this is the passive Administration Server. You make this Administration Server active if the Administration Server on
OPAMHOST1becomes unavailable.
The instances in the WLS_OPAM1 and WLS_OPAM2 Managed Servers on OPAMHOST1 and OPAMHOST2 are configured as the cluster named OPAM_CLUSTER.
19.2 Upgrade Roadmap
Table 19-1 lists the steps to upgrade Oracle Privileged Account Manager high availability environment illustrated in Figure 19-1 to 11.1.2.2.0.
Table 19-1 Oracle Privileged Account Manager High Availability Upgrade Roadmap
| Task No | Task | For More Information |
|---|---|---|
|
1 |
Review the Oracle Privileged Account Manager high availability upgrade topology, and identify |
See, Understanding Oracle Privileged Account Manager High Availability Upgrade Topology |
|
2 |
Shut down the Administration Server, Oracle Privileged Account Manager Managed Servers, and the Node Manager on |
|
|
3 |
Back up the Middleware Home, the Oracle Home, and the Database schemas on |
|
|
4 |
Update the binaries of WebLogic Server and Oracle Privileged Account Manager on |
|
|
5 |
Upgrade the OPAM and OPSS schema on |
|
|
6 |
Start the WebLogic Administration Server and all the Managed Servers on |
See, Starting Administration Server, Node Manager, and Managed Servers on OPAMHOST1 and OPAMHOST2 |
|
7 |
Redeploy the Oracle Identity Navigator application |
|
|
8 |
Verify the domain upgrade. |
|
|
9 |
If you wish to configure Oracle Privileged Account Manager session manager which is newly introduced in 11.1.2.2.0, you can do so by running the WLST command This step is optional. |
See, Optional: Configuring Oracle Privileged Account Manager Session Manager |
|
10 |
If you wish to configure Oracle Identity Navigator for the Oracle Privileged Account Manager Managed Servers This step is optional. |
See, Optional: Configuring Oracle Identity Navigator for WLS_OPAM1 and WLS_OPAM2 |
19.3 Shutting Down all Servers on OPAMHOST1 and OPAMHOST2
Before you begin the upgrade process, you must stop the WebLogic Administration Server, Oracle Privileged Account Manager Managed Servers, and Node Manager on OPAMHOST1 and OPAMHOST2 in the following order:
-
Stop the Oracle Privileged Account Manager Managed Servers on both
OPAMHOST1andOPAMHOST2. -
Stop the WebLogic Administration Server on
OPAMHOST1. -
Stop the Node Manager on
OPAMHOST1andOPAMHOST2.
For information about stopping the Managed Server, see Section 2.8.1, "Stopping the Managed Server(s)".
For information about stopping the Administration Server, see Section 2.8.2, "Stopping the WebLogic Administration Server".
For information about stopping the Node Manager, see Section 2.8.3, "Stopping the Node Manager".
19.4 Backing Up the Existing Environment
After stopping all the servers, you must back up the following before proceeding with the upgrade process:
-
MW_HOMEdirectory (Middleware home directory), including the Oracle Home directories inside Middleware home on bothOPAMHOST1andOPAMHOST2. -
Oracle Privileged Account Manager Domain Home directory on both
OPAMHOST1andOPAMHOST2. -
Following Database schemas:
-
Oracle Privileged Account Manager schema
-
Oracle Platform Security Services schema
For more information about backing up schemas, see Oracle Database Backup and Recovery User's Guide.
-
19.5 Updating Binaries of WebLogic Server and Oracle Privileged Account Manager on OPAMHOST1 and OPAMHOST2
After You must update the binaries of Oracle WebLogic Server and Oracle Privileged Account Manager to 10.3.6 and 11.1.2.2.0 versions respectively on OPAMHOST1 and OPAMHOST2 by completing the following tasks:
-
Updating Oracle WebLogic Server Binaries to 10.3.6 on OPAMHOST1 and OPAMHOST2
-
Updating Oracle Privileged Account Manager Binaries to 11.1.2.2.0 on OPAMHOST1 and OPAMHOST2
19.5.1 Updating Oracle WebLogic Server Binaries to 10.3.6 on OPAMHOST1 and OPAMHOST2
Oracle Identity and Access Management 11.1.2.2.0 is certified with Oracle WebLogic Server 11g Release 1 (10.3.6). Therefore, if your existing Oracle Identity Manager environment is using Oracle WebLogic Server 10.3.5 or the previous versions, you must update the Oracle WebLogic Server binaries to 10.3.6 by completing the following steps:
-
Download the WebLogic 10.3.6 Upgrade Installer from Oracle Technology Network.
For more information, see "Downloading an Upgrade Installer From My Oracle Support" in the Oracle Fusion Middleware Installation Guide for Oracle WebLogic Server.
-
Run the Upgrade Installer in graphical mode to upgrade your WebLogic Server.
For more information, see "Running the Upgrade Installer in Graphical Mode" in the Oracle Fusion Middleware Installation Guide for Oracle WebLogic Server.
19.5.2 Updating Oracle Privileged Account Manager Binaries to 11.1.2.2.0 on OPAMHOST1 and OPAMHOST2
To update the existing Oracle Privileged Account Manager binaries to Oracle Privileged Account Manager 11.1.2.2.0, you must use the Oracle Identity and Access Management 11g Release 2 (11.1.2.2.0) Installer. During the procedure, specify the location of your existing Middleware Home. This upgrades the Oracle Privileged Account Manager binaries to 11.1.2.2.0.
For information about updating Oracle Privileged Account Manager binaries to 11.1.2.2.0, see Section 2.4, "Updating Oracle Identity and Access Management Binaries to 11g Release 2 (11.1.2.2.0)".
19.6 Upgrading Database Schemas on OPAMHOST1
On OPAMHOST1, you must upgrade the following schemas by running the Patch Set Assistant:
-
OPAM schema
-
OPSS schema - OPSS schema is selected as a dependency when you select OPAM.
For information about upgrading schemas using Patch Set Assistant, see Section 2.6, "Upgrading Schemas Using Patch Set Assistant".
After you upgrade the OPAM and OPSS schemas, the version of the OPAM schema will be 11.1.2.2.0.
19.7 Starting Administration Server, Node Manager, and Managed Servers on OPAMHOST1 and OPAMHOST2
After upgrading the database schemas on OPAMHOST1, you must start the WebLogic Administration Server, Node Manager, and the Oracle Privileged Account Manager Managed Servers on OPAMHOST1 and OPAMHOST2 in the following order:
-
On
OPAMHOST1. start the WebLogic Administration Server, Node Manager, and Oracle Privileged Account Manager Managed Server. -
On
OPAMHOST2, start the Node Manager, and the Oracle Privileged Account Manager Managed Server.
For more information about starting the WebLogic Administration Server, see Section 2.9.2, "Starting the WebLogic Administration Server".
For more information about starting the Node Manager, see Section 2.9.1, "Starting the Node Manager".
For more information about starting the Managed Servers, see Section 2.9.3, "Starting the Managed Server(s)".
19.8 Redeploying Applications on OPAMHOST1
After you start the servers, you must redeploy Oracle Identity Navigator and Oracle Privileged Account Manager applications on OPAMHOST1 namely oinav.ear and opam.ear. You can do this using either the WebLogic Administration console or the WebLogic Scripting Tool (WLST).
For more information about redeploying Oracle Identity Navigator and Oracle Privileged Account Manager applications, see Section 7.9, "Redeploying the Applications".
19.9 Verifying the Domain Upgrade
Verify that the Oracle Privileged Account Manager domain was upgraded successfully by doing the following:
-
Log in to the Oracle Privileged Account Manager 11.1.2.2.0 console using the following URL:
http://adminserver_host:adminserver_port/oinav/opam -
Verify that the pre-upgrade data, targets, accounts, grants are present, and working as expected.
19.10 Optional: Configuring Oracle Privileged Account Manager Session Manager
The Oracle Privileged Account Manager session manager application named opamsessionmgr is introduced in 11.1.2.2.0. If you wish to configure the Oracle Privileged Account Manager session manager application, you must run the WebLogic Scripting Tool (WLST) command configureSessionManager.py on OPAMHOST1, and target it to the OPAM_CLUSTER.
For more information about configuring Oracle Privileged Account Manager session manager, see Section 7.13, "Optional: Configuring the Oracle Privileged Account Manager 11.1.2.2.0 Session Manager".
After you configure Oracle Privileged Account Manager session manager, start all the servers on OPAMHOST1 and OPAMHOST2. For more information about starting all the servers, see Starting Administration Server, Node Manager, and Managed Servers on OPAMHOST1 and OPAMHOST2.
19.11 Optional: Configuring Oracle Identity Navigator for WLS_OPAM1 and WLS_OPAM2
If you wish to configure Oracle Identity Navigator that hosts Oracle Privileged Account Manager console, to run on the Oracle Privileged Account Manager Managed Servers WLS_OPAM1 and WLS_OPAM2 in order to achieve high availability use cases for the Oracle Privileged Account Manager console, complete the steps described in Section 7.14, "Optional: Configuring Oracle Identity Navigator Application on OPAM Managed Server".
After configuring Oracle Identity Navigator successfully, you can access Oracle Identity Navigator on WLS_OPAM1 and WLS_OPAM2 at the non-SSL port using the following URL:
http://opamserver_host:opamserver_nonssl_port/oinav/opam
The default non-SSL port is 18101. Oracle Identity Navigator will still run on the WebLogic Administration Server. After you configure Oracle Identity Navigator for Oracle Privileged Account Manager Managed Server, you must update the Oracle HTTP Server configuration for Oracle Identity Navigator on OPAMHOST1, to achieve high availability. For more information, see "Update the Oracle HTTP Server Configuration" in the Oracle Fusion Middleware High Availability Guide.
After you configure Oracle Identity Navigator for Oracle Privileged Account Manager Managed Servers, start all the servers on OPAMHOST1 and OPAMHOST2. For more information about starting all the servers, see Starting Administration Server, Node Manager, and Managed Servers on OPAMHOST1 and OPAMHOST2.