5 Software Libraries
The following information is included:
5.1 Introduction to Software Libraries and Repositories
Oracle Enterprise Manager Ops Center uses libraries to store and manage cached data, images, packages, and metadata. A library that stores images for provisioning operations is a Software Library. At least one software library always exists on the Enterprise Controller.
A Software Library accepts the following types of images:
-
OS images that install an operating system
-
Branded images that install a specialized version of an operating system
-
Firmware images and the supporting metadata to update existing firmware on service processors, RAID controllers, and disks
Another type of library is a storage library. See Chapter 16, "Storage Libraries for Virtualization" for information about this type of library.
5.2 Roles for Software Libraries
Table 5-1 lists the tasks and the role required to complete the task. Contact your administrator if you do not have the necessary role or privilege to complete a task. See the Oracle Enterprise Manager Ops Center Administration Guide for information about the different roles and the permissions they grant.
Table 5-1 Software Libraries Tasks and Roles
| Task | Role |
|---|---|
|
Set Enterprise Controller Storage Library |
Ops Center Admin |
|
Create Library |
Storage Admin |
|
Delete Library |
Storage Admin |
|
Associate Library |
Storage Admin |
|
Import image |
Storage Admin |
|
Upload image |
Storage Admin |
|
View details of an image |
Storage Admin |
|
Moving an image |
Storage Admin |
|
Edit Attributes |
Storage Admin |
|
Associate Library to Server Pool |
Cloud Admin |
5.3 Actions for Software Libraries
Perform the following actions, depending on the requirements:
-
Designate a default software library
-
View details of an image
-
Create Library
-
Delete Library
-
Associate Library
-
Import Image
-
Upload Image
-
Download an OS image
-
Moving an image
-
Edit Attributes
-
Create a library of OS images and manage content
5.4 Location of Software Library Information in the User Interface
Table 5-2 shows where to find information.
5.5 Knowledge Base and Parent Repository
By default, Oracle Enterprise Manager Ops Center operates in Connected mode. In this mode, the Enterprise Controller uses the Internet to download images and metadata from the Oracle Knowledge Base and the Oracle Solaris 11 Package Repository.
-
The Oracle Knowledge Base (KB) contains metadata for Oracle Solaris 10, 9, and 8 and Oracle Linux OS components.
-
The Oracle Solaris 11 Package Repository includes packages of images in IPS format for Oracle Solaris 11.
To use the Oracle Enterprise Manager Ops Center software without Internet access, your site can maintain a local version of the Knowledge Base or Repository on your site's network. In this case, the Enterprise Controller connects to the local network location to get the latest information.
5.5.1 EC Library
The Enterprise Controller must have at least one Software Library to store the new versions of images that are downloaded from the Oracle Knowledge Base. Oracle Enterprise Manager Ops Center updates this library each week, by default.
In addition to the routine download operations, you can create jobs to update assets. When you submit an update job for specific target assets, the Agent Controllers on the targets send a request to the KB through the Enterprise Controller to download the latest information.
The product installation procedure creates the Initial EC Library. At any time, you can specify a different software library to accept the automatic download operations from the Knowledge Base. A badge identifies the current active library. Figure 5-1 shows the badge, a white down arrow on a green background.
Figure 5-1 Badge Identifying the Current Default Library
Description of "Figure 5-1 Badge Identifying the Current Default Library"
To Change EC Software Libraries
To specify a different software library as the default software library:
-
Create a software library, as described in Creating a Software Library.
-
Expand Administration in the Navigation pane. An alternative is to expand Libraries in the Navigation pane.
-
Click Set Enterprise Controller Storage Library in the Action pane. The window lists all libraries with the current library highlighted.
-
Click the new software library.
-
Click Apply.
When the job is completed, the Library section of the Navigation pane shows the software library you selected as the default library.
When the product software is updated, the schedule of download is interrupted. Use the Set Enterprise Controller Storage Library to restore the schedule.
5.5.2 Publishers and Parent of the Oracle Solaris 11 Repository
The Oracle Solaris 11 Package repository is similar to the Knowledge Base but is only for Oracle Solaris 11 images and updates. The Oracle Solaris 11 Package Repository resides at the Oracle site: http://pkg.oracle.com/solaris/release.
The Support Repository Updates (SRUs) for Oracle Solaris 11 contains bug fixes or minor feature enhancements and is released monthly. This repository, https://pkg.oracle.com/solaris/support, is available to users with an Oracle support agreement.
Both repositories have the role of Publisher and Parent for your local repository.
Other parent repositories, such as Oracle Solaris Cluster, are available. For a list of available Oracle repositories and to download the key-certificate pair, see the https://pkg-register.oracle.com site.
5.6 Using Software Libraries
In addition to the EC Library, you can create more Software Libraries and organize their content, according to your site's purposes. You can use a file system on the Enterprise Controller's system or a shared file system on an NFS server that the Enterprise Controller mounts. The file system on the Enterprise Controller is called a local software library. The file system on the NFS server is called a NAS software library. See Types of Storage for Libraries.
When Oracle Enterprise Manager Ops Center provisions target systems with an operating system or firmware, it copies the images files from the designated Software Library to the Proxy Controller that manages the target. The Proxy Controllers handle the provisioning operations. When Oracle Enterprise Manager Ops Center provisions target systems with an update to an operating system, it uses the software library named Linux and Oracle Solaris 8-10 Software Update Library or the Oracle Solaris 11 Software Update Library.
5.6.1 Viewing the Contents of a Software Library
You can display the contents of the software library, its associations, and details about the disks in the software library. You can also see how Oracle Enterprise Manager Ops Center monitors the library and any problems.
To View the Contents of a Software Library
-
Expand Libraries in the Navigation pane.
-
Click a software library.
The details of the selected library are displayed in the center pane in a set of tabs.
The Summary tab displays information about the entire software library:
-
URL – File for a local library and NFS for a NFS share
-
Size – Total storage capacity of the library
-
Used Space – Percentage of used space as compared to available space
-
State – Status of the library
-
Access – Read-Write
The Library Contents table lists all the images in the library, organized by type, and includes the size and the date the image was modified. The other tables on the Summary tab describe the types of images: Service Processor Firmware, Component Firmware, and BIOS Configuration Snapshots
-
-
To see the results of monitoring the software library, click the Incidents tab.
-
To see the attributes and values that are being monitored, click the Monitoring tab.
5.6.2 Creating a Software Library
You can create a software library that uses space on a file system on the Enterprise Controller's system, which is a Local Software Library. You can also create a software library that uses space on a shared file system on an NFS server. This type of library is a NAS Software Library.
Note:
When you use both local and NAS software libraries, do not use the same name for the library.Creating a Local Software Library
-
Expand Libraries in the Navigation pane.
-
Click New Local Software Library in the Action pane.
-
Enter a unique name and description.
-
In the URL field, enter the location of the file system.
-
Click Create.
Creating a NAS Software Library
-
Expand Libraries in the Navigation pane.
-
Click New NAS Software Library in the Action pane.
-
Enter a unique name and a description.
-
Select one or more server pools to use this storage library.
-
Choose the type of service:
-
To use a storage device, select the storage device and specify the exported share to use.
-
To use an NFS server, enter the host name, port, and path.
-
-
Click Create.
5.7 Libraries for Oracle Solaris 11
The Oracle Solaris 11 Image Packaging System (IPS) contains the packages that you need to install, provision, and update your Oracle Solaris 11 operating system. Each IPS package has an associated manifest that describes how the package is assembled. The package manifest provides basic metadata about the package (such as name, description, version, and category), what files and directories are included, and the package dependencies. Packages might specify the services to restart to refresh some configuration on the system, specify the aliases to update for a given hardware driver, or the users and groups to create as part of the package installation process. A package repository holds all software packages and systems must connect to the repository to install software updates.
5.7.1 Oracle Solaris 11 Software Update Library
The Enterprise Controller can maintain a repository for the Oracle Solaris 11 Image Packaging System (IPS). The repository, called the Oracle Solaris 11 Software Update Library, provides the images for provisioning assets with the Oracle Solaris 11 operating system.
Note:
The host system for the Enterprise Controller must use the Oracle Solaris 11 operating system. Do not attempt to initialize an Oracle Solaris 11 Software Update Library on a different Oracle Solaris operating system.5.7.1.1 Options for Configuring the Oracle Solaris 11 Software Update Library
You have several options for when and how you configure the Oracle Solaris 11 Software Update Library:
-
If your site already maintains an Oracle Solaris 11 IPS Repository, direct Oracle Enterprise Manager Ops Center to use it, instead of initializing a new one. Specify the location of the existing repository during the product installation or after the product is installed. See Using an Alternate IPS Repository.
-
At any time, you can create an Oracle Solaris 11 IPS repository at your site and use it as the Oracle Solaris 11 Software Update Library. See the Copying and Creating Oracle Solaris 11 Package Repositories at http://docs.oracle.com/cd/E23824_01/html/E21803/toc.html
-
During installation of the product software, initialize the library. This library downloads content from the
https://pkg.oracle.com/solaris/supportrepository and continues to sync with the repository routinely. However, the initialization of the library can take many hours, depending on your site's access. -
After installation, initialize the library using the Initialize Oracle Solaris 11 Software Update Library action. This action performs the same operation as the installation option with the same time requirements.
To connect to https://pkg.oracle.com/solaris/support, either at installation or at a later time, you must provide a key file and a certificate file to authenticate the connection. If these files are missing or have expired, provide a new key and certificate, using the procedure in the Oracle Enterprise Manager Ops Center Administration Guide.
5.7.1.2 Library States
The Oracle Solaris 11 Software Update Library has the following states:
-
Unconfigured – Oracle Solaris 11 Software Update Library was not created at installation. The Initialize Oracle Solaris 11 Software Update Library action is available in the Actions pane.
-
Configuring – The Oracle Solaris 11 Software Update Library is in the process of being configured. The process of initializing the library takes many hours. When complete, the new library appears in the Libraries section.
-
Syncing – The Oracle Solaris 11 Software Update Library is in the process of updating its contents with the parent IPS repository or is in the process of being reconfigured. The Oracle Solaris 11 Software Update Library is locked and unavailable for use when in this state.
-
OK – The Oracle Solaris 11 Software Update Library is ready to use.
5.7.2 Summary of Oracle Solaris 11 Software Update Library
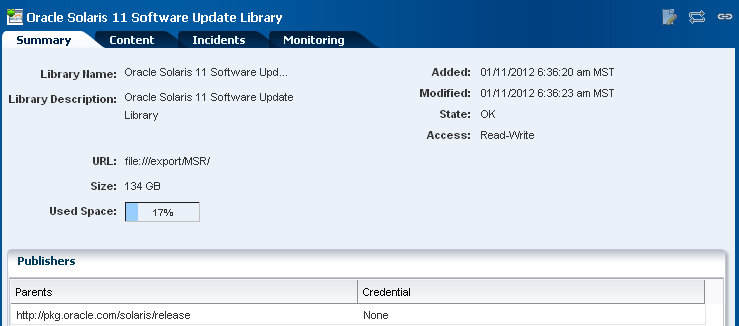
When the Oracle Solaris 11 Software Update Library is configured, its Summary tab, shown in Figure 5-2, provides an overview of the health, status, and last update. The URL listed on the Summary is the location of the Oracle Solaris 11 Software Update Library. The size is the amount of space allocated to the file system, and the used space shows the amount of space used by the packages that are located in the library.
The Publishers table shows each Parent Repository and its credentials. The URL is the location of the Parent Repository for Oracle Solaris 11 packages and content located in the Image Packaging System (IPS). Oracle Enterprise Manager Ops Center uses these URLs to synchronize the information in the Oracle Solaris 11 Software Update Library with the Image Packaging System. The Parents list is created when you use the Configure Parent Repositories Wizard. If your site has its own local repository for Oracle Solaris 11 packages, update Oracle Enterprise Manager Ops Center's library from that location.
Figure 5-2 Oracle Solaris 11 Software Update Library Summary
Description of "Figure 5-2 Oracle Solaris 11 Software Update Library Summary"
5.7.3 Content of the Oracle Solaris 11 Software Update Library
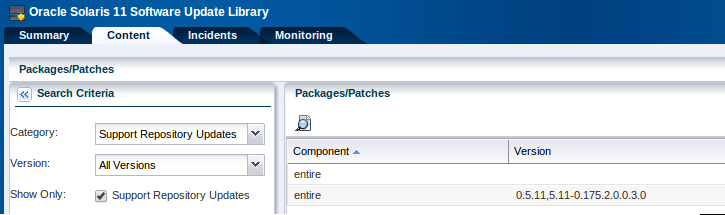
The Content tab, shown in Figure 5-3, displays a list of the packages in the Oracle Solaris 11 Software Update Library with a brief description of each package. You can filter the list of packages by selecting a category or version. The Support Repository Update check box is a quick way to filter the list of packages in the Oracle Solaris 11 SRU releases. You can also search for a specific package.
Figure 5-3 Oracle Solaris 11 Software Update Library Content
Description of "Figure 5-3 Oracle Solaris 11 Software Update Library Content"
5.7.4 Configuring Parent Repositories to Synchronize
Use the Configure Parent Repositories action to manage publishers for the parent repository. After the library has been configured and the content has been downloaded the first time, create a recurring schedule to synchronize the Oracle Solaris 11 Software Update Library with its parent repository.
In the Configure Parent Repositories Wizard, create a list of parent repositories with their credentials that you use to update the Oracle Solaris 11 Software Update Library. During the synchronization operation, all the content in the parent repository is compared to the existing content in the Oracle Solaris 11 Update Software Library and new or updated content is downloaded.
5.7.5 Using an Alternate IPS Repository
Oracle Enterprise Manager Ops Center synchronizes with a parent repository to maintain the Oracle Solaris 11 Software Update Library, that is, the Oracle Solaris 11 Software Update Library is a child of the parent repository. If your site already has an Oracle Solaris 11 IPS repository for other purposes, you have the option of declaring that repository as the Oracle Solaris 11 Software Update Library. Operations that use IPS content retrieve the content from your IPS repository. Because it is not a parent-child relationship, no synchronization is performed.
When you install Oracle Enterprise Manager Ops Center or when you initialize the Oracle Solaris 11 Update Software Library, identify your IPS repository as the Oracle Solaris 11 Update Software Library. All operations that use this software library will retrieve content from the IPS repository.
Note:
Oracle Enterprise Manager Ops Center does not maintain the content of the IPS repository. You must maintain this repository manually.To Use an IPS Repository as the Oracle Solaris 11 Software Update Library
-
Locate your site's Oracle Solaris 11 IPS repository or create one.
-
Expand Libraries in the Navigation pane.
-
Click Software Libraries.
-
Click Initialize Solaris 11 Software Update Library in the Action pane.
-
In the Specify Library Location field, enter the location of your IPS repository.
-
In the URL field for the parent repository, do not enter any text. Leave this field blank.
-
Click OK.
5.7.6 Adding Content
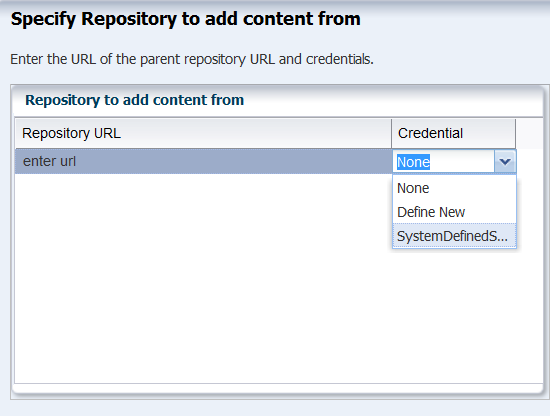
Use the Add Content action to specify a parent repository and add ISO image files to the Oracle Solaris 11 Software Update Library manually. The parent repository URL and credentials are not saved when you use this action. To save a list of repositories, use the Configure Parent Repository action.
For each repository, enter its complete URL in HTTP protocol. If credentials are required, specify the system's credentials, SystemDefinedSupportCredential, or create new key and certificate identifiers to access the repository. When you select Define New, show in Figure 5-4, the Create Credential Wizard is displayed.
5.8 Libraries for Oracle Solaris 10, 9, 8 and Linux
Update Profiles and any profiles you create that provision an OS or firmware image rely on the contents of a software library. For Oracle Solaris 10, 9, and 8 and for Oracle Linux, a dedicated software library called Linux, Solaris 8-10 Software Update Library contains the packages, updates, and site-specific scripts and configuration files for these operating systems.
You create the Linux, Solaris 8-10 Software Update Library when you install Oracle Enterprise Manager Ops Center, or use the Create Update Library action to create the library after installation. When the Create Update Library action is not available, the library has been created.
For each OS, this software library organizes its contents in the following categories:
-
Clusters (groups of Oracle Solaris packages)
-
Configuration files
-
Hardware
-
Local
-
Local Packages
-
Local RPMs
-
Notifications
-
Packages
-
Patches
-
Post-actions
-
Pre-actions
-
Probes
-
Recommended Software Configurations
-
Oracle Solaris Baselines
You can change the display of the contents of the library according to the OS distribution, the category, the type of view, and the version.
See Images for information about managing the content in the library.
See Local Content for information about managing the content of the local categories.
5.9 Images
In most cases, all the images you need are downloaded from the Oracle Knowledge Base or the Oracle Solaris 11 Package Repository. You can also create images within Oracle Enterprise Manager Ops Center or obtain them from a location external to Oracle Enterprise Manager Ops Center and then import or upload them.
An operating system can be in ISO format or FLAR format. Firmware can have various formats, depending on the vendor.
-
ISO image – The image, also called a disk image, contains uncompressed directories and files of any type: application or data or both. This type of image can reside on removable media.
-
FLAR image – The image is a flash archive of an Oracle Solaris 10, 9, or 8 operating system and other software. You can use a FLAR to install or restore a system to a specific configuration. Differential FLAR images are not supported. FLAR files must have the
.flarfile name extension.
Note:
Another type of image is a virtualization image. This type of image is stored in a Storage Library and contains the configuration information for a guest, its operating system, and the applications that the guest uses.5.9.1 Images for OS Provisioning
An OS image contains an entire operating system in either ISO format or FLAR format. A subset of OS images are branded images, which install an operating system that is optimized for a specific purpose and can also include applications. OS images provision the operating system on both hardware servers and virtualization hosts. Table 5-3 shows the location of OS images.
Table 5-3 Location of Images for Each Operating System
| Operating System | Location of Images |
|---|---|
|
Oracle Solaris 11 |
Oracle Solaris 11 Software Update Library |
|
Oracle Solaris 10, 9, 8 |
Linux and Oracle Solaris 8-10 Software Update Library |
|
Oracle Linux |
Linux and Oracle Solaris 8-10 Software Update Library |
In addition to being grouped as packages and updates, Oracle Solaris OS images are also grouped into baselines.
-
An OS image must be in a single image file. For example, on an Oracle Solaris system, the following command collects all OS component files on the auto-mounted file system into an ISO file.
# mkisofs -o <name_of_OS.iso> -J -R /cdrom/<name_of_OS>
-
The Oracle Enterprise Manager Ops Center software uploads or imports one ISO file per operation. If you are loading an ISO file from physical media and the file spans more than one CD, combine the content on one DVD.
-
An ISO file cannot be made from Oracle Solaris installation CDs.
5.9.2 Images for Firmware Updates
Firmware images provision hardware assets. A firmware image is a copy of the vendor's firmware file and metadata for the firmware, such as the platform it is used on and any software dependencies. You obtain the images by downloading them from vendor websites or uploading them from their product media. Firmware images are stored in Software Libraries. The maximum size of a firmware image is 20 MB.
The following firmware types are supported:
-
Service Processor firmware
-
Chassis firmware
-
Power distribution unit firmware
-
Storage Component firmware updates firmware on RAID Controllers, Expanders and Disks.
When you import a firmware image, you might be required to provide metadata to complete the image file. You can usually find the information in the image's README file. You must provide the firmware type, the systems that the firmware supports, the version of the firmware, and any other firmware images that this firmware image depends on.
Example 5-1 Example of Firmware Metadata
The following is an example of a README file for ALOM-CMT firmware, where a single binary is deployed to the Service Processor.
-
To determine the type and version of the firmware update:
Latest Sun System Firmware(6.1.2): ---------------------------------- System Firmware 6.1.2 Sun Fire[TM] T2000 2006/01/20 18:19 ALOM-CMT v1.1.2 Jan 20 2006 18:06:10 VBSC 1.1.1 Jan 20 2006 17:56:19 Reset V1.0.0 Hypervisor 1.1.0 2005/12/15 11:10 OBP 4.20.0 2005/12/15 16:48 Sun Fire[TM] T2000 POST 4.20.0 2005/12/15 17:19 -
To determine the models supported:
This README is intended for users who wish to
upgrade the firmware in their Sun Fire T2000.
-
To determine if the system must be powered off before updating the firmware:
a)To update the Sun System Firmware, the system must be powered off (i.e. in standby mode).
From this README file, identify the following metadata:
-
Available platforms – Sun Fire T2000
-
Type – VBSC
-
Version – 1.1.1
-
Require power off – Yes
For this example, the VBSC firmware subcomponent/type with version 1.1.1 was used. You can use any of the other types such as ALOM-CMT:1.1.2 or OBP:4.20.0. However, you must ensure that the version specified is always the firmware subcomponent/type.
5.9.3 Uploading or Importing Images
To provision firmware or an OS, you use a deployment plan to direct Oracle Enterprise Manager Ops Center to retrieve the images from the appropriate software library and install them on the targeted assets.
Starting in Release 12.2.2.0.0, you must create a profile for each image and then include the profile in a deployment plan. If you prefer to create profiles by default, you must change Enterprise Controller's configuration by editing the property file. See Default Profiles and Plans.
To use an image in a deployment plan, the image must be in one of the Oracle Enterprise Manager Ops Center's software libraries. You upload an image or import an image, depending on where the image resides. In both cases, you are moving the image from a location external to Oracle Enterprise Manager Ops Center's management into one of its libraries.
-
If the image resides on the Enterprise Controller's system, import the image.
-
If the image does not reside on the Enterprise Controller's system, upload the image. This operation relies on the browser to transfer the image file. The maximum size of an image that you can transfer using browser operations is 2 GB. If the image is larger than 2 GB, move the file manually to the Enterprise Controller's system and then import it.
5.9.3.1 Importing an Image
-
Expand Libraries in the Navigation pane.
-
Click Software Libraries or Storage Libraries to expand.
-
Click the library.
-
Click Import Image in the Actions pane.
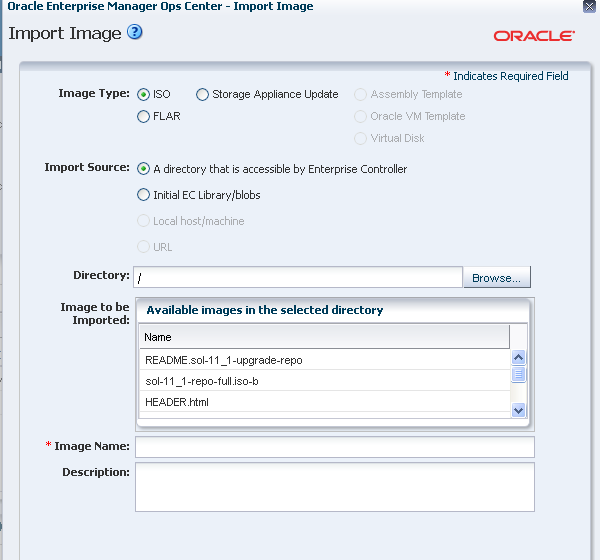
The Import Image window is displayed.
-
Identify the type of format for the image.
-
Identify the current location of the image file. For an ISO image file, the available source locations are the Initial EC Library or another location that is accessible to the Enterprise Controller.
If the image file is located in an accessible location, enter the name of the directory or use the Browse button to navigate to the location.
-
Select the image you want to import.
-
Enter a name for the image and a description. Image names must be unique, can consist of up to 100 characters, and can include numbers, letters, and some special symbols. The following special symbols are prohibited: comma, asterisk, single quote, double quote, parenthesis, question mark, equal sign, and newline.
-
Click Import Image to copy the image to the library.
5.9.3.2 Uploading an Image
Although the action name is Upload ISO Image, you can use the action to upload a FLAR file. However, the original OS image, the image that the FLAR is based on, must also be in the same library.
-
Expand Libraries from the Navigation pane.
-
In Software Libraries, select the library in which you want to store the image.
-
Click Upload ISO Image in the Actions pane.
The Upload ISO Image window is displayed.
-
Click the name of the file in the Source of ISO File field or click Browse to navigate to the image.
-
Enter the name and description of the image.
-
Click Upload Image.
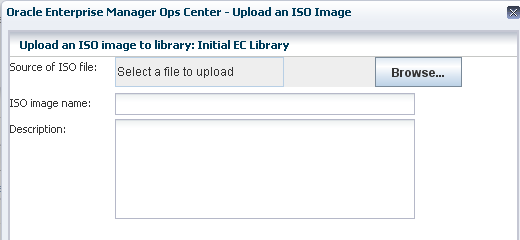
The progress of the upload to the Enterprise Controller is displayed. When the job is completed, the image is in the software library.
5.9.4 Uploading Firmware Images
The Upload Firmware action can be directed to retrieve firmware images from either the Enterprise Controller's file system or a local file system. Use the procedures in Keeping Your Firmware Up-to-Date at http://docs.oracle.com/cd/E40871_01/nav/operatehowto.htm to upload firmware.
5.9.5 Working with Firmware for Power Distribution Units
The firmware for a PDU consists of two files, one for the firmware and one for the management software of the PDU. Each firmware image must be imported or uploaded and then a profile created that includes both images. The firmware images must have metadata, which is not always included in the image. In that case, you specify the metadata during the import or upload operation.
5.9.5.1 Uploading Firmware With Metadata
Use the procedures in Keeping Your Firmware Up-to-Date at http://docs.oracle.com/cd/E40871_01/nav/operatehowto.htm to upload firmware. At the step for Select Firmware Components, select both firmware components:
-
MKAPP_V
firmware_version.DL -
HTML_V
firmware_version.DL
5.9.5.2 Uploading Firmware Without Metadata
Use the procedures in Keeping Your Firmware Up-to-Date at http://docs.oracle.com/cd/E40871_01/nav/operatehowto.htm to upload firmware. At the step for Select Firmware Components, select the firmware component, MKAPP_Vfirmware_version.DL, and click Upload. To define the metadata for the firmware:
-
For the target type click PDU.
-
For the platform, click Sun Rack II PDU.
-
Enter the version of the firmware.
-
Choose Depends On None and accept the remaining default options.
After the job is completed, repeat the procedure with the other firmware image, HTML_Vfirmware_version.DL, with one difference: At Step4, specify that this firmware image depends on the MKAPP_Vfirmware_version.DL image.
5.9.5.3 Creating a Firmware Profile for PDU Firmware Updates
-
Click Create Firmware Profile in the Actions pane.
-
Enter a name and description for the profile.
-
For subtype, click Power Distribution Units.
-
For target type, click Power Distribution Units. Click Next.
-
For Firmware Configuration, accept the default options and values. Click Next.
-
Select both images:
MKAPP_V<firmware_version>.DLandHTML_V<firmware_version>.DL. Click Next. -
Review the summary of the new profile and click Finish to submit the job.
5.10 Local Content
Note:
This section does not apply to Oracle Solaris 11. To add custom content for Oracle Solaris 11, usepkg commands to add the content to a local IPS repository and then import the repository into Oracle Enterprise Manager Ops Center. To use custom scripts, use an operational profile with either the Execute Operation action or an operational plan. See Operational Plans and Profiles.The Linux and Oracle Solaris 8-10 Software Update Library also stores and gives access to site-specific configuration files and scripts used in deployment plans. This local content can also include data files, executable files, or binary files. For example, you might develop a script to test servers before running a provisioning job.
You can view details such as distribution, version, release, group, size URL, when the file was added or edited, any summary and description information, host, RPM, and vendor.
5.10.1 Local Categories
The Local categories of the Updates Library have no connection to the Knowledge Base. You upload local content to the software library, directed into one of the categories, and then maintain the files throughout their life cycle.
Local content is organized into the following default categories: local RPMs or PKGs, configuration files, macros, pre-actions, post-actions, and probes. You can create subcategories to further organize your local content. The type of local content allowed in a subcategory depends on its parent category.
-
Expand Libraries in the Navigation pane.
-
Click Linux and Oracle Solaris 8-10 Software Update Library.
-
Click Add Local Category in the Actions pane.
-
Enter a name for the new subcategory.
-
Enter a brief description for the new subcategory such as its purpose.
-
Click Distribution to assign to the subcategory.
-
Click Parent Category to select one of the system-defined categories for the subcategory.
-
Click Apply. The new subcategory is created under the selected default category.
You can now upload software packages and files into the new subcategory.
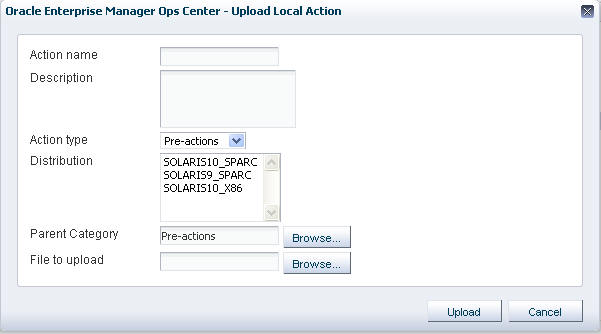
5.10.2 Uploading a Local Action
An action is a script, binary file, or executable file that makes changes to the managed host. To use the uploaded script or file, create an Update profile and include the profile in the deployment plan that installs or upgrades the OS. The following actions are available:
-
Pre-Actions – Script that runs on a managed host before the provisioning step starts. When you create the deployment plan, you select the Execute Pre-Install step and then select the profile that includes the script.
-
Post-Actions – Script that runs on a managed host after a job is completed. When you create the deployment plan, you select the Execute Post-Install step and then select the profile that includes the script.
-
Probes – Script that runs on a managed host to verify that a job can be performed.
-
Macros – Script that modifies a generic configuration file to make it specific for a managed host. Use macros to apply a single configuration file across multiple hosts by customizing the configuration file for each host's environment. The script outputs a single line that replaces a macro sign in a configuration file.
-
Expand Libraries in the Navigation pane.
-
Click Linux and Oracle Solaris 8-10 Software Update Library.
-
Click Upload Local Action in the Actions pane.
The Upload Local Action window is displayed in Figure 5-7.
-
Enter a name for the action.
-
Enter text to describe the purpose of the script or executable file.
-
Select the type of action such as Pre-Action, Post-action, Macros, or Probes.
-
Click the name of the distribution that is appropriate for the script or executable file.
-
The Parent Category field shows the category you specified as the type of Action. If your site uses subcategories, click the Browse button to navigate to the specific subcategory.
-
Click Browse to locate and select the script or executable file.
-
Click Upload. The file is uploaded to the Linux, Solaris 8-10 Software Update Library in the category you specified.
You can now create a profile for the script and then use the profile in a deployment plan.
5.10.3 Uploading a Local Software Package
You can upload software in the following formats:
-
pkg -
rpm -
tar -
zip -
gzip -
compress
If the file is in compressed format, the file is uncompressed after it is uploaded.
-
Expand Libraries in the Navigation pane.
-
Click the operating system's Software Update Library.
-
Click Upload Local Software Packages in the Actions pane.
-
Select Yes if the package is a security fix for a previous version of the software. Otherwise, select No.
-
Click the name of the distribution to which you want to add this package.
-
In the Parent Category section, click Local PKGs or click Browse to locate a subcategory.
-
In the Files section, click Add to see the list of files. Select at least one software package.
-
Click Upload. The file is uploaded to the Linux, Solaris 8-10 Software Update Library in the category you specified.
You can now include the package or RPM in an provisioning profile.
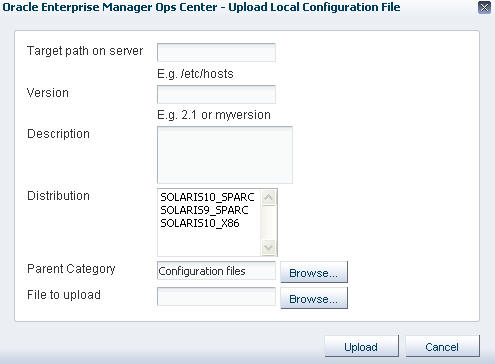
5.10.4 Uploading a Local Configuration File
A configuration file is a text file, binary file, or non-RPM application that contains the settings and values for an asset type. To use the uploaded file, create an Update profile and include the profile in the deployment plan that installs or upgrades the OS.
Uploading a Local Configuration File
-
Expand Libraries in the Navigation pane.
-
Click Linux and Oracle Solaris 8-10 Software Update Library.
-
Click Upload Local Configuration File in the Actions pane.
The Upload Local Configuration File window is displayed in Figure 5-8.
Figure 5-8 Upload Local Configuration File
Description of "Figure 5-8 Upload Local Configuration File"
-
In Target path on server, type the full path to the configuration file.
-
In Version, type a character string to identify this version of the file. The string is appended to the file name when it is displayed in a Components list.
-
Enter a brief description of the file.
-
Select the Distribution to which this file is applied. You can choose multiple distributions.
-
In Parent Category, accept the Configuration Files category or click Browse to locate a subcategory.
-
Click Browse to locate and select the configuration file.
-
Click Upload. The file is uploaded to the Linux, Solaris 8-10 Software Update Library in the category you specified.
5.10.5 Uploading Software in Bulk
You can upload multiple files or an entire directory in one operation. For example, you can upload the contents of a DVD. All components in the directory and subdirectories are uploaded.
The files must be in the following formats:
-
pkg -
rpm(for Linux RPMs) -
tar -
zip -
gzip -
compress
If files are compressed, the software extracts the files after it uploads them.
-
Verify that the files have the supported file types.
-
Verify that the file size does not exceed 2 GB. If the file is larger than 2 GB, copy the file manually to a file system on the Enterprise Controller's system.
-
If you are uploading from removable media, insert the media.
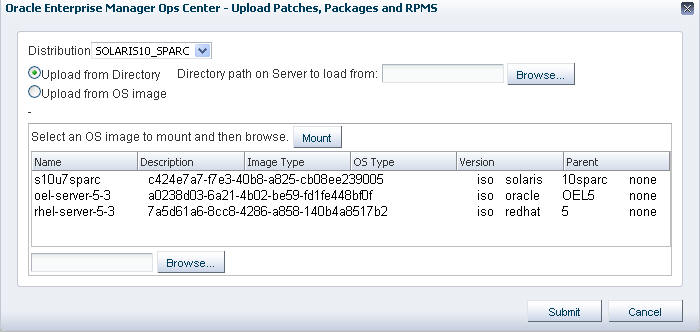
5.10.5.1 Uploading Local Software in Bulk
-
Expand Libraries in the Navigation pane.
-
Click Linux and Oracle Solaris 8-10 Software Update Library.
-
Click Bulk Upload Packages and Patches in the Actions pane.
The Upload Packages, Patches, and RPMS window is displayed in Figure 5-9.
-
Click Distribution to select the distribution that applies to these files.
-
Select either Upload from OS Image or Upload from Directory.
-
Specify the path to the OS image or directory or click Browse to locate and select it. If you specify a directory, all files in the directory and its subdirectories are uploaded. If you specify an OS image, you must mount the OS image and select the files.
-
Click one of the OS images and click Mount.
-
Click Browse to locate and select the files.
-
-
Click Submit. The upload job is created.
To view the status of the upload job, select Bulk Upload Results.
To view the certified packages in the software update library, click the Content tab in the center pane and select Patches in the Category list. To view non-certified packages, click Local PKGs or Local RPMs in the Category list.
5.10.5.2 Viewing Results of a Bulk Upload Operation
You can view a detailed history of all the local components that were uploaded in bulk.
-
Expand Libraries in the Navigation pane.
-
Click Linux and Oracle Solaris 8-10 Software Update Library.
-
Click Bulk Upload Results in the Actions pane. The uploaded components list displays the name, description, status, and date for each component.
-
Select a component and click View Results. The details of the uploaded components are displayed.
5.10.6 Using Local Content
The local content that you uploaded to the software library is used in profiles and deployment plans to guide and complete provisioning operations. For example, a local configuration file can be modified by the output of a macro so that each target gets the appropriate configuration file.
-
Create the macro named
mymacroand upload it to the software library.# cat /var/tmp/runme.sh #!/bin/bash hostname
-
Create the local configuration file and upload it.
### This configuration file changes
### the following line to the output of "mymacro"
### Include this configuration file in the profile.
<^AM^>mymacro<^AM^>
-
Create an Update profile and deployment plan to include the local configuration file.
-
Deploy the plan. The resulting configuration file on a particular server, for example
mymachine1, has the following content:### This configuration file changes ### the following line to the output of "mymacro" ### Include this configuration file in the profile. mymachine1
5.10.7 Editing Local Content
You can edit files in the Local Categories. For example, if you uploaded a file that contained IP addresses and determined that there was an incorrect IP address in the file, you can edit the file to correct the IP address. You can also use this procedure to replace the file with a corrected file.
-
Expand Libraries in the Navigation pane.
-
Click Linux and Oracle Solaris 8-10 Software Update Library.
-
Click Edit Local Component File in the Actions pane.
-
To specify the file, type its name or click the Browse button to navigate to the file. If the file is not found, click Distribution to select the correct distribution. Only files in the selected distribution are displayed.
-
Select either Edit existing file or Replace existing file.
-
If you choose to edit the file, make changes to the file and click Save.
-
If you choose to replace the file, browse for the replacement file and click Upload.
-
5.10.8 Deleting Local Content
You can remove your site's local content or added categories. You cannot remove the default categories.
Note:
Deleting content does not require confirmation and cannot be undone. Verify you are deleting the correct local component.-
Expand Libraries in the Navigation pane.
-
Click Linux and Oracle Solaris 8-10 Software Update Library.
-
Click Delete Local Component in the Actions pane.
-
Expand the category to display the component you want to delete. To change the distribution, click Distribution.
-
Select the file or a subcategory to delete.
-
Click Delete.
To remove a subcategory and its components, do not attempt to remove each component and then remove the subcategory. When there are no components in a subcategory, the subcategory creates a placeholder component, which you cannot delete. Repeat the procedure and select the subcategory itself to delete. The placeholder component is also removed.
5.11 Backing Up Images and Local Content
The ecadm backup command does not back up the software libraries. As a good practice, create the software library for OS images on networked storage (NAS) and include the network storage device in your site's backup plan. As an alternative, back up the Enterprise Controller's directory manually.
-
Move the archive to another server, file-share facility, or a location outside of the
/var/opt/sundirectory, according to your site's disaster recovery plan. -
If it is necessary to rebuild the Enterprise Controller, restore the Enterprise Controller and then restore the
/var/opt/sun/xvm/images/oshierarchy.
5.12 Related Resources for Software Libraries
For instructions in performing actions or to learn more about the role of this feature, see the following resources:
-
In the Operate How To library at http://docs.oracle.com/cd/E40871_01/nav/operatehowto.htm:
-
Keeping Your Firmware Up-to-Date
-
Update Oracle Solaris 10 OS Workflow
-
Update Oracle Solaris 11 Workflow
-
-
Deploy Software Libraries Workflow in the Deploy How To library at http://docs.oracle.com/cd/E40871_01/nav/deployhowto.htm