| Oracle Virtual Operator Panel User's Guide Release 2.1 E48640-01 |
|


 Previous |
 Next |
This chapter describes how to use the 9XXX Virtual Operator Panel (VOP) with a single T9840B, T9840C, T9940A, or T9940B tape drive.
Designed for ease of use, the 9XXX VOP Graphical User Interface (GUI) allows you to do the following:
Monitor tape drive status
View or change tape drive configuration settings
Perform tape drive operation utilities
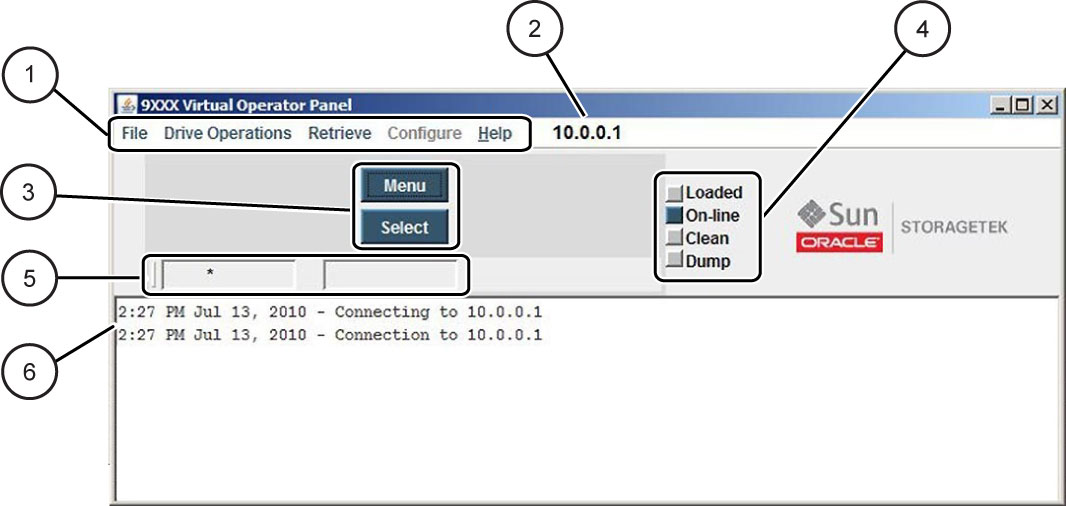
Figure 12-1 shows the 9XXX VOP main interface:
Legend:
1. Menus
2. Drive IP
3. Menu and Select Switches
4. Primary and Secondary Message Windows
5. Status Indicators
6. Transcript Pane
As shown in Figure 12-1, the 9XXX VOP interface includes the following:
Menus
Use menus to issue 9XXX VOP commands. See "Using 9XXX VOP Menus" for more information.
Drive IP
Displays the IP address of the tape drive loaded.
Menu/Select Switches
Use these switches to access the tape drive menu system. See "Using Menu and Select Switches" for more information.
Tape Drive Status Indicators
These indicators show the current drive state:
The Empty/Loaded status indicator indicates whether a tape cartridge is loaded in the tape drive. When you load a cartridge in the tape drive, this status indicator changes from grey to blue, and indicates Loaded.
The Online/Offline status indicator indicates whether the Ethernet adapter card is online. When you bring a tape drive online, this status indicator changes from grey to blue, and indicates Online.
The Clean status indicator indicates that the tape drive needs to be cleaned.
The Dump status indicator indicates that a dump is present for retrieval.
Primary and Secondary Message Windows
Display status messages during 9XXX VOP processing.
Transcript Pane
Displays a transcript of 9XXX VOP actions and prompts for additional input or actions.
9XXX VOP includes the following menus:
|
Note: Certain menus require the tape drive to be offline. |
File menu commands are available when the tape drive is either online or offline. The File menu includes the following commands:
Clears the entire 9XXX VOP transcript pane and closes the file menu.
Connects 9XXX VOP to the tape drive. When the authentication dialog box appears, enter the tape drive IP address and click OK.
|
Note: Optionally, you can use the SHIFT+C keyboard shortcut from the File menu to issue this command. |
Displays tape drive logs from a specified file.
Disconnects 9XXX VOP from the tape drive and closes the application. Allow a few seconds for the shutdown operation to complete.
To open the Drive Operations menu, click Drive Operations in the menu bar or use the ALT+D keyboard shortcut.
Refer to the T9x40 Tape Drive User's Reference Manual for additional information regarding the tape drive, use of a cartridge tape, and general operating procedures.
The Drive Operations menu includes the following commands:
|
Note: The tape drive must be encryption-enabled for some commands to appear. |
Rewinds and unloads a loaded cartridge. A text pane message indicates that the tape cartridge is unloaded.
You must physically remove an unloaded cartridge from the tape drive by library robotics, or manually, from the rack mount configuration. Otherwise, the cartridge remains in the loading slot but is not loaded in the tape drive.
|
Note: Optionally, you can use the SHIFT+U keyboard shortcut to issue this command from the Drive Operations menu. |
Performs a tape drive initial program load (IPL).
If the tape drive is online, a confirmation dialog box appears. During the IPL, VOP loses communication with the tape drive. Once the IPL is successfully completed, VOP automatically reconnects with the tape drive.
Dumps the current contents of various drive registers to a file.
The tape drive stores the dump to internal memory, and the dump status indicator changes to orange. The forced dump operation causes a tape drive IPL, during which VOP loses connection with the tape drive. Once the IPL is successfully completed, FFFA appears in the secondary drive message window.
To open the Retrieve menu, click Retrieve in the menu bar or use the ALT+R keyboard shortcut.
The Retrieve menu includes the following commands:
Retrieves diagnostic dumps that are currently stored in the drive memory, and allows you to save the dumps in a specified location. After you save the dump file, an entry is displayed in the VOP transcript pane. For example:
8:55 AM Aug 2, 2010 - DUMP AVAILABLE: fffa:Dmp 1
8:55 AM Aug 2, 2010 - DUMP AVAILABLE: fffa:DMP 1
9:00 AM Aug 2, 2010 - Retrieve Dumps in Progress
9:00 AM Aug 2, 2010 - Dumps RETRIEVED to D:\T9840B_dump_aug2
Retrieves event logs that are currently stored in the tape drive memory, and allows you to save the event logs in a specified location.
Retrieves all the permanent errors that are currently stored in the tape drive memory, and allows you to save the error log in a specified location.
Retrieves a log containing non-dump events.
Retrieves and displays event logs that are currently stored in the tape drive memory.
Deletes all diagnostic dumps from the tape drive.
Deletes all event logs from the tape drive.
Deletes all permanent errors from the tape drive.
|
Note: It is recommended that you save logs before deleting them, as they can help in troubleshooting tape drive issues. |
With the exception of the Set Clock command, these commands are only available when the tape drive is offline. The tape drive should not be available to the host when you exercise any change that results in the tape drive performing an Initial Program Load (IPL) to implement the configuration change.
The Configure menu includes the following commands:
Sets the tape drive's internal clock to the current time in your computer. Once the clock is set, an entry is displayed in the VOP transcript pane.
Loads firmware from a user-specified file to a tape drive. See "File Menu" for more information.
Use 9XXX VOP menus, 9XXX VOP controls, and the tape drive menu system to load drive firmware.
From the 9XXX interface, click the Menu button to enter the tape drive menu system.
The primary message window displays Online, and the status indicator is blue.
Click the Select button to place the tape drive in an Offline state.
The primary message window displays Offline, and the status indicator changes to grey.
Click the Configure menu and select Code Load from File.
The Open dialog box appears.
Locate the firmware file and click the Open button.
The 9XXX transcript pane displays START Code Load from File. As the process continues, the transcript displays additional messages regarding the code load, IPL, and re-connection to 9XXX VOP.
|
Note: The code load process may take several minutes |
Click the Menu button to display the code version in the primary message window.
Use the Menu and Select buttons to exit the drive menu system.
Click the File menu and select Exit.
Disconnect the crossover Ethernet cable from the tape drive Ethernet port.
Set your PC to obtain an IP address automatically.
To open the Help menu, click Help in the menu bar or use the ALT+H keyboard shortcut. Help menu commands are available when the tape drive is either online or offline.
The Help menu includes the following commands:
Displays a dialog box that provides the following information about the 9XXX application and environment.
Role level access
VOP Version (single tape drive application)
VOP Build Date (single tape drive application)
Drive Name (if a tape drive is connected)
Drive Type (if a tape drive is connected)
Java Version
License Agreement
|
Note: Optionally, you can use the SHIFT+A keyboard shortcut to issue this command from the Help menu. To close the dialog, click OK or use the ALT-O keyboard shortcut. |
Opens the FSC Look Up dialog box, used to perform a lookup in the Fault System Code (FSC) Dictionary. The FSC Dictionary is available with or without a tape drive connection.
When the FSC Look Up dialog box appears, enter an FSC number, select the dictionary for the tape drive model, and click the LOOKUP button. The fault system code description is displayed in the VOP transcript pane. For example:
FSC: A33A |NO TAPE IS |LOADED | ***
MIM Code: NONE
FRU: OPER. ERROR CONF: 100%
Field Text:
The user requested motion operation that requires a tape to be installed, however, a tape has not been loaded.
The portion on the 9XXX interface between the menu bar and transcript pane contains elements designed to mimic the physical operator panel on a 9x40 tape drive.
Use the Menu and Select buttons to access the tape drive's menu system.
It is assumed that you fully understand the tape drive menu system. Refer to the T9x40 Tape Drive Service Reference Manual for a detailed description of the drive menu system.
Click the Menu button to enter the drive menu system or advance to the next portion of the drive menu system. Menu options and values display in the primary message window.
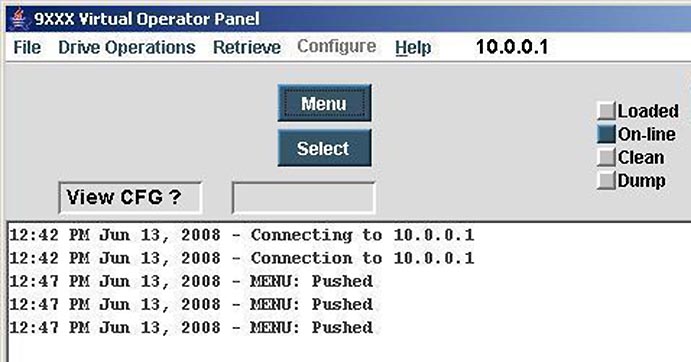
Figure 12-2 shows an example:
As shown in Figure 12-2, the Menu button has been clicked several times and View CFG? appears in the primary message window.
Click the Select button to advance to the next available menu option or value, to enter a submenu (such as View CFG?), or to exit from either a submenu or the main menu system.
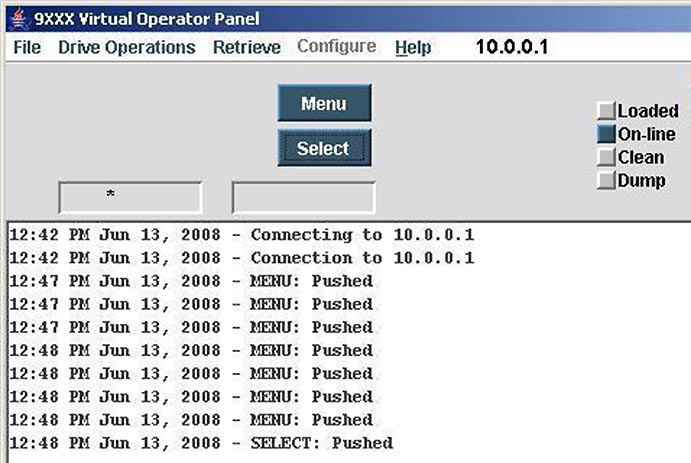
Figure 12-3 shows an example:
As shown in Figure 12-3, the Select button has been clicked, resulting in an exit from the main menu system. An asterisk (*) appears in the primary message window.
|
 Copyright © 2014, Oracle and/or its affiliates. All rights reserved. Legal Notices |
|