| Oracle Argus Safety Installation Guide Release 7.0.3 E40575-02 |
|

 Previous |
 Next |
This chapter describes the steps required to install and configure the Axway Synchrony EDI Gateway so it can operate correctly with Interchange. This chapter includes instructions on the following topics:
|
Note: You can install EDI Gateway and Interchange Service in any order. |
Use the following procedure to create an Axway Synchrony database instance.
To create a database instance for Axway Synchrony:
Log on to the database server as an Admin user.
Create a blank Axway Synchrony instance, if it does not already exist.
Connect to the Axway Synchrony Instance created in Step 2.
Create an Axway Synchrony DB User identified by the Axway Synchrony DB password.
Provide the following grants to the Axway Synchrony DB user:
Grant CREATE PROCEDURE
Grant CREATE SESSION
Grant CREATE TABLE
Grant CREATE VIEW
Grant UNLIMITED TABLESPACE (Optional)
Grant CREATE SEQUENCE
Alter user Axway Synchrony DB User default tablespace USERS.
Grant connect, resource, unlimited tablespace to Axway Synchrony DB User.
Log in to cyclone schema and create the following indexes to improve the interface performance between Argus Interchange and Cyclone:
create index fbi_mes_confilename on messageeventsnapshots (direction, upper(consumptionfilename));
create index fbi_mes_coreid on messageeventsnapshots (upper(coreid), messageid)
Before starting and configuring Axway Synchrony Interchange, you must install Axway Interchange. For more information, see the Axway Interchange installation documentation.
To start the Axway Synchrony Server:
Log on to the computer as an Admin user.
Go to the Services directory for the local machine.
Locate the GatewayInterchageService for the local machine.
Double click to display the GatewayInterchageService Properties dialog box.
When the system opens the GatewayInterchageService Properties dialog box:
Click Start to start the service if the Service Status is not Started.
Once Service Status is set to Started, Click OK to close the dialog box.
An alternative way of starting the Axway Synchrony server is to use the Command Prompt.
To use the Command Prompt to start the Axway Synchrony Server:
Select Start=> Programs=> Axway Synchrony=> Start Server.
The system displays the Start Server dialog box.
|
Note: The first time you perform this task, the system creates tables in the database. This dialog is different on subsequent executions. Do not close this dialog box until the system displays Server Startup Complete. |
Use the following procedure to configure Axway Synchrony Interchange.
To configure Axway Synchrony Interchange:
Log on to a client computer.
Open Internet Explorer.
Go to the following URL: (Sender or Receiver) http://<Axway SynchronyServer>:6080/ui/.
When the system opens the Axway Synchrony Login window:
Click Login.
Type the Axway Synchrony Password in the Password field.
Type the Axway Synchrony User ID in the User ID field.
When the system opens the Getting Started window:
Place the mouse over the Trading Configuration icon.
Select Recent Communities=> Manage Trading Configuration from the menu.
When the system opens the Pick a community window:
Click Add a community.
When the Add community wizard opens the Choose the source window:
Click Next >> to continue.
Click the Manually create a new community profile option button.
Type the name of the Community in the Community name field.
Click Finish.
Type the routing ID in the Routing ID field.
Type the e-mail address in the E-mail address field.
Type the phone number in the Phone number field.
Type the contact name in the Contact name field.
Click Yes to add a certificate.
|
Note: This information is entered for both the sender and the receiver, but initially for the sender. |
When the wizard opens Add a certificate window:
Click Next >> to continue.
Click Create a self-signed certificate.
When the wizard opens the Enter the certificate information window:
Click Next >> to continue.
The wizard opens the Review request window:
Click Next >> to continue.
When the wizard opens the View certificate details window:
Click Finish.
Click Make this the default encryption certificate.
Click Make this the default signing certificate.
When the wizard opens the Pick a community window:
Click the community name link for the newly created community.
When the Summary window opens:
Click the Set up a delivery exchange for receiving messages from partners link.
When the Choose message protocol window opens:
Click Next >> to continue.
Click the EDIINT AS2 (HTTP) option button.
When the Choose HTTP transport type window opens:
Click Next >> to continue.
When the Configure URL window opens:
Click Finish.
When the Summary window opens:
Click the Set up a delivery exchange for routing received messages to integration link.
When the Choose transport protocol window opens:
Click Next >> to continue.
Click the File system option button.
When the Configure the file system settings window opens:
Click Finish.
Type the Axway Synchrony Password in the Password field.
This section provides a procedure for configuring transmission for binary files such as PMDA zip files and E2B attachments.
To configure Axway Synchrony for binary file transmission:
Log on to a client computer.
Open the following URL (Sender or Receiver): http://<Axway SynchronyServer>:6080/ui.
When the Axway Synchrony Login window opens:
Type the Axway Synchrony Password in the Password field.
Click Login.
Type the Axway Synchrony User ID in the User ID field.
When the Getting Started window opens:
Place the mouse over the Trading Configuration icon.
Select Recent Communities=> <community> from the menu.
When the Summary screen opens:
Click the Integration Pickup icon.
When the Pick an integration pickup exchange window opens:
Click the Other (Plaintext) from File system link.
When the Change this integration pickup exchange window opens:
Click the Message attributes tab.
When the Message attribute directory mapping tab opens:
The system moves them to the Selected attributes list.
Select From routing ID and To routing ID and click Add.
Locate the Available Attributes list.
Click the From address tab.
When the From address tab opens:
Click the To address tab.
Click the Address determined by message attribute configuration option button.
Click Save Changes.
When the To address tab opens:
Click the Address determined by message attribute configuration option button.
Click Save Changes.
On the Sender's Axway Synchrony Server, locate Common/Out folder and create the following folder structure:
Common\Out\Sender's Routing ID\Receiver's Routing ID
|
Note: This completes the folder configuration for outgoing binary transmissions. Since binary file transmission configuration is based on these folder names, each combination of Sender and Receiver Routing ID must be unique for binary file transmission to different trading partners.The Binary file should be dropped in the RECEIVER's Routing ID Folder which is the last folder. Although in the Axway Synchrony GUI the Integration Pickup folder will show up only ..\common\out. |
For incoming binary transmissions, repeat steps 5 - 8 for Integration Delivery.
Repeat steps 1 - 12 for setting up the Receiver Axway Synchrony.
Configuring the Axway Synchrony Community includes the following:
Use the following procedure to register with the Axway Synchrony Community.
To register with the Axway Synchrony Community:
Open this URL: http://<Receiver Axway SynchronyServer>: 6080/ui/.
When the Axway Synchrony Login window opens.
Type the Axway Synchrony Password in the Password field.
Type the Axway Synchrony User ID in the User ID field.
Click Login.
When the Getting started window opens:
Place the mouse over the Trading Configuration icon.
Select Recent Communities=> <community> from the menu.
When the Summary page opens:
Click the Export this community as a partner profile link at the bottom of the page.
Save the file to your local hard drive and close the Save dialog.
Click the Logout button in the upper right corner of the page.
Open Internet Explorer.
To add a partner to the Axway Synchrony Community:
Open the following URL: http://<Sender Axway SynchronyServer>: 6080/ui/.
When the Axway Synchrony Login window opens:
Type the Axway Synchrony User ID in the User ID field.
Type the Axway Synchrony Password in the Password field.
Click Login.
When the Getting started page opens:
Place the mouse over the Trading Configuration icon.
Select Recent Communities=> <community> from the menu.
When the Summary page opens.
Click the Add a Partner to this community link.
When the Partner Wizard opens the Choose the source window:
Click the Import the profile information from a file option.
Click Next >> to continue.
When the wizard opens the Enter profile path page:
Click Browse to navigate to the saved file.
Click Finish.
When the Successful profile import page opens:
Click Close.
|
Note: If you receive a summary where the Routing ID is not displayed, you must add the sender's Routing ID manually, as listed from Steps 9 - 12. |
When the Summary page opens:
Click the Partners menu item and select the newly imported partner.
Place the mouse over the Trading Configuration icon.
Click Set up a routing ID.
When the Change routing IDs page opens:
Click Add.
Type the partner (sender) routing ID in the Routing ID field.
Verify that the partner does not have a routing ID.
The system adds the new routing ID to the page.
Place the mouse over the Trading Configuration icon.
Select Recent Communities=> <community> from the menu.
When the Summary page opens:
Select the sender partner.
When the Summary: Sender page opens:
Click the Default delivery exchange link.
When the Change this delivery exchange page opens:
Verify that the URL is correct and that the correct routing ID for the send is appended to the end of the URL.
Click the HTTP Settings tab.
Repeat the procedures in sections Creating an Axway Synchrony Database Instance and Starting the Axway Synchrony Server to register the Receiver's community on Sender Server.
Use the following procedure to add a node.
To add a node:
Open Internet Explorer.
Go to the following URL: http://< Sender Axway SynchronyServer>:6080/ui/.
When the Axway Synchrony Login window opens:
Type the Axway Synchrony User ID in the User ID field.
Type the Axway Synchrony Password in the Password field.
Click Login.
When the Getting started page opens.
Click the System Management icon to open the System Management page.
When the System Management page opens:
Click Add a node.
When the Add a node page opens:
Click Add.
Select the machine to add the node to from the Computer name drop-down list.
Click the Trading Engine option button.
When the System management page opens with the newly created node:
Click Start to start the node.
The system updates System management page.
The status of the node changes to Starting.
The system updates the System management page.
Click Home.
The status of the node changes to Running.
When the Welcome page opens:
Verify that the node status is Running.
Repeat the preceding steps to set up the Receiver Axway Synchrony.
You can configure Axway Synchrony Certificates on the following:
Use the following procedure to configure Axway Synchrony Certificates on the Receiver Axway SynchronyServer.
To configure Axway Synchrony Certificates on the Receiver Axway Synchrony Server:
Open Internet Explorer.
Go to the following URL: http://< Receiver Axway SynchronyServer>:6080/ui/.
When the Axway Synchrony Login page opens:
Type the Axway Synchrony User ID in the User ID field.
Type the Axway Synchrony Password in the Password field.
Click Login.
When the Getting Started page opens:
Place the cursor on the Trading Configuration icon.
Select Manage trading configurations from the menu.
When the Pick a community page opens:
Click the Community name.
When the Summary page opens:
Click the Certificates link.
When the Pick a certificate page opens:
Click the Certificate listed on the Personal certificates tab.
|
Note: Click the Trusted root certificates tab to verify that no certificates exist for the Sender or Receiver Axway Synchrony.Skip this section if a valid trusted root certificate already exists in the Name section on the Trusted root certificates tab. |
When the View certificate page opens:
Locate the Or pick a task section and click Export this certificate.
When the Choose the format you want to use for the certificate export page opens:
Click Export certificate.
Click the Include all certificates in the certification path if possible check box.
Click the Cryptographic Message Syntax Standard PKCS #7 option button.
Save the file to the Sender's local hard drive and click Logout in the upper right corner of the page.
Use the following procedure to configure Axway Synchrony Certificates on the Sender Axway SynchronyServer.
To configure Axway Synchrony Certificates on the Sender Axway Synchrony Server
Open Internet Explorer.
Go to the following URL: http://< Sender Axway SynchronyServer>:6080/ui/.
When the Axway Synchrony Login page opens:
Click Login.
Type the Axway Synchrony Password in the Password field.
Type the Axway Synchrony User ID in the User ID field.
When the Getting Started page opens:
Place the cursor on the Trading Configuration icon.
Select Manage trading configurations from the menu.
When the Pick a community page opens:
Click the Community name.
When the Summary page opens:
Click the Certificates link.
When the Pick a certificate page opens:
Click the Trusted root certificates tab.
|
Note: It is possible that the Trusted Root Certificates for the Receiver Axway Synchrony Server may already be on the Sender Axway Synchrony Server |
When the list of trusted root certificates opens.
Click the Add a trusted root certificate link.
|
Note: It is possible that the Trusted Root Certificates for the Receiver Axway Synchrony Server may already be on the Sender Axway Synchrony Server |
When the Add a certificate page opens in a new window:
Click Next >> to continue.
When the Locate the certificate file page opens:
Click Browse to locate the P7B certificate file saved for the Receiver Axway Synchrony Server.
Click Next >> to continue.
When the View certificate details page opens:
Click Finish.
When the Pick a certificate page opens in the original window:
Click the Trusted root certificates tab.
When the list of Trusted root certificates opens:
Verify that the certificate you added appears on the list.
Log out of the Sender Server.
Repeat the preceding steps to register the Sender's certificate on the Receiver Server as a Trusted Root Certificate.
Use the following procedure to configure EVENTS.XML.
To configure EVENTS.XML
Log on to a client computer.
Using Windows Explorer, go to the local directory containing the Argus Safety installation files and navigate to ..\DBInstaller\Cyclone.
Locate and double-click the cyclone_schema_Oracle11g.bat file to open a DOS command prompt window.
When the Oracle SQL+ window opens:
Type the Axway Synchrony instance in the TSNAMES entry.
Type the Axway Synchrony DB User Name in the Axway Synchrony User Name.
Type the Axway Synchrony Schema User in the [USERS].
Type the Axway Synchrony User Password in the Password for User Axway Synchrony_USER.
When SQL+ connects to the specified database:
Enter the log file name in log file name.
Enter the log directory name in Directory.
Once the process is complete, the SQL+ window and DOS command prompt window close.
Log on to the Receiver Server.
Using Windows Explorer, navigate to <Axway Synchrony Install Folder>\build\conf folder\.
Backup the Events.xml file and rename it Events.xml.bak.
Right-click the Events.xml file and select Edit to display Notepad.
Locate the <EventRouters> section and add the following code:
<EventRouter id="ARGUS Events" class = "com.cyclonecommerce.relsys.router.GetEventInfo" active="true">
<Parameters file="../logs/ARGUS.log" rollOnStart= "true" autoFlush="true" maxFileSize="2M" maxBackupFiles="5"/>
<MetadataProcessorListRef ref="Messaging"/>
<EventFilterRef ref="ARGUS"/>
</EventRouter >
Add the following section in the Events.xml file in the <EventFilters> section:
<EventFilter id="ARGUS">
<OrFilter>
<EventFilterRef ref="Message Milestones"/>
<EventLevelFilter level="Warning"/>
<EventLevelFilter level="Error"/>
<EventLevelFilter level="High"/>
</OrFilter>
</EventFilter>
In order to re-enable logging to the MESSAGEEVENTSNAPHOTS table, the following event filter needs to be un-commented in the events.xml. This used to be enabled by default in Axway Synchrony versions prior to Axway Synchrony v5.4.
<EventRouter id="Message Events to Database" class="com.cyclonecommerce.events2.router.PersistenceRouter" active="true" priority="2147483647">
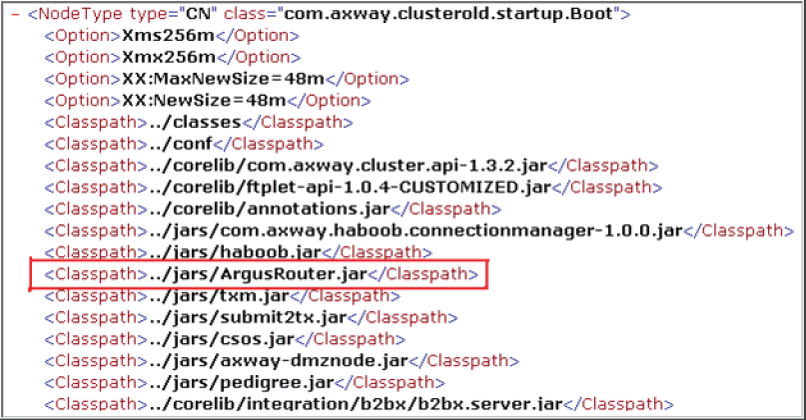
Copy the ArgusRouter.jar file from Argus [local directory] \ SUPPORT \ Axway Synchrony \ Axway Synchrony 5x to Axway Synchrony directory: <Axway Synchrony Install Folder>\build\jars\.
The following file ”<Axway Interchange Installation Path>\Synchrony\Interchange\conf\jvmArguments.xml” on the cyclone server must be edited to add the ArgusRouter.jar file entry, as displayed in the following image:
Open Internet Explorer.
Open the following URL: http://<Receiver Axway SynchronyServer>: 6080/ui/.
When the Axway Synchrony Login page opens:
Type the Axway Synchrony User ID in the User ID field.
Click Login.
Type the Axway Synchrony Password in the Password field.
When the Getting started page opens:
Place the cursor on the Trading Configuration icon.
Select Recent Communities=> Community from the menu.
When the Summary page appears.
Click the Integration Pickup icon.
When the Pick an integration pickup exchange page opens:
Click the link in the Type column.
When the Change this integration pickup exchange page opens:
Click the Inline Processing tab.
When the Inline processing rules appear:
Type com.cyclonecommerce.relsys.router.GetMessageInfo in the Class name field.
Enter Relsys Argus in the Parameter field.
Enter GetMessagesInformation in the Description field.
Click Save changes.
When the Pick an integration pickup exchange page opens.
Click Logout.
Repeat the preceding steps for the Sender Server.
Use the following procedure to test communication for Axway Synchrony Interchange.
To test communication for Axway Synchrony Interchange:
From the Sender Axway Synchrony Server, configure an XML file to transmit from the Sender server to the Receiver server.
|
Note: The file must be an E2B file that contains the correct routing IDs for the sender and the receiver. |
Ensure that the Axway Synchrony servers on both sender and receiver are running.
Drop the E2B XML file into the out bound folder of the Axway Synchrony Sender server.
Log on to a machine where Axway Synchrony is installed.
Open Internet Explorer.
Open this URL: http://<Sender Axway SynchronyServer>:6080/ui/.
When the Axway Synchrony Login page opens:
Click Login.
Type the Axway Synchrony Password in the Password field.
Type the Axway Synchrony User ID in the User ID field.
When the Getting started page opens:
Place the cursor on the Message Tracker icon.
Select Message Searches=> All Messages from the menu.
When the Search results page opens verify that the transmission is in progress by locating the Custom Search section and clicking Find until Delivered appears on the screen.
|
Note: The system does not display this screen if it has already transmitted the file. |
After the system transmits the file it opens the Search results for page:
Click Logout.
Go to the Axway Synchrony Receiver server and verify that the E2B file has been received.
To verify that the file has been transmitted:
Log in to the receiver Axway Synchrony server.
Select the All Messages option.
View the message payload.
Compare the E2B file on the receiving machine (payload version displayed) with the file from the sending machine. These files should be identical.
Repeat the preceding steps to verify delivery on the Receiver Server.
Verify that the E2B XML file is configured with proper routing IDs for both the send and the receiver before dropping the file into the Axway Synchrony outbound folder.
|
 Copyright © 2013, 2015, Oracle and/or its affiliates. All rights reserved. Legal Notices |
|