Release 1.2
Part Number E36380-01
Contents
Previous
Next
| Oracle Pedigree and Serialization Manager Installation Guide Release 1.2 Part Number E36380-01 | Contents | Previous | Next |
Some components are only needed if you are using serial destinations functionality. Not all components will be needed. The set up of each component is based on the functionality being used. It does not hurt to set them all up, even if all of them are not going to be used.
This appendix covers the following topics:
To support user-configurable setup of serial destinations, composites were created within Oracle SOA Suite to manage the business process flow of transmitting serials. Since these serial destinations are truly user-defined (for example, sending serials to a third-party FTP server, and so on), the SOA composites need to be modified to configure these destinations. To modify the SOA composites for transmitting serials, Oracle JDeveloper must be installed and the appropriate SOA projects extracted.
If you do not already have Oracle JDeveloper installed, you can download a free copy at: http://www.oracle.com/technetwork/developer-tools/jdev/overview/index.html.
Use the Installation Guide for JDeveloper that is available through the above link to install Oracle JDeveloper.
Once the install has completed, run Oracle JDeveloper.
Use the Check for Updates wizard that is available under the Help menu to find and install the Oracle SOA Composite Editor extension. This extension is required to create and modify SOA composite applications.
Within the "pas.zip" file that is included as part of the Oracle Pedigree and Serialization Manager download, there is a file called PasSerializationManagerSoa.zip. Unzip this file and extract the following files to the same machine that includes the Oracle JDeveloper installation:
sca_PasTransmitSerialsViaFileComposite_rev1.0.jar
sca_PasTransmitSerialsViaWebComposite_rev1.0.jar
Open Oracle JDeveloper.
Create a new SOA Application and name it: PasSerializationManagerSoa.
Create a new SOA project and name it: PasTransmitSerialsViaFileComposite.
Select Empty Composite.
Click on the new project.
Select File > Import.
Select SOA Archive into SOA Project.
Click Browse and select sca_PasTransmitSerialsViaFileComposite_rev1.0.jar that was unzipped.
Click Finish.
Repeat steps 3 - 9 for the PasTransmitSerialsViaWebComposite.
To deploy from JDeveloper, an application server must be created. It records information about the standalone WebLogic server so the SOA composite can be deployed to it.
Open the Application Server Navigator.
Create a new Application Server:
Standalone Server.
Connection Name.
Username and password.
WebLogic Host Name, Port, and Domain.
Test the connection. Make sure all tests are successful.
Finish the creation of the application server.
If the method of communication for a serial destination is to be used with a JMS Queue, then a JMS Queue must be created.
A new database user/schema should be created to support the persistence of JMS messages in the database. Create a new database user using the following SQL commands:
-- USER SQL
CREATE USER <databaseuser> IDENTIFIED BY <databasepassword>
DEFAULT TABLESPACE USERS
TEMPORARY TABLESPACE TEMP;
-- ROLES
GRANT "RESOURCE,CONNECT" TO <databaseuser>; -- SYSTEM PRIVILEGES
GRANT UNLIMITED TABLESPACE TO <databaseuser>; Important: Replace <databaseuser> and <databasepassword> with your own values.
Log onto the Oracle WebLogic Server Administration Console.
Navigate to Services > Data Sources
Oracle WebLogic Server Administration Console
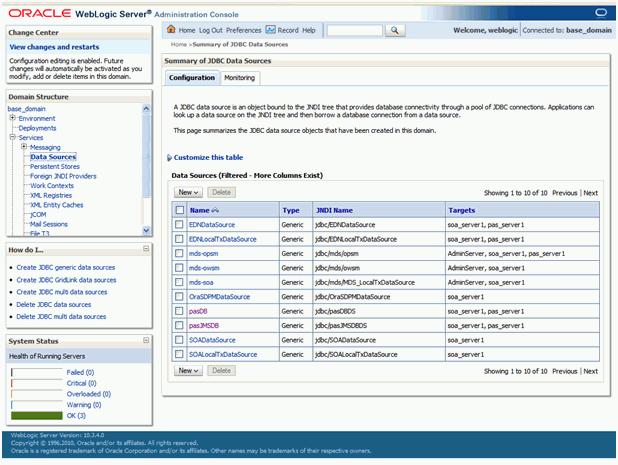
Click the New button and then click the Generic Data Source.
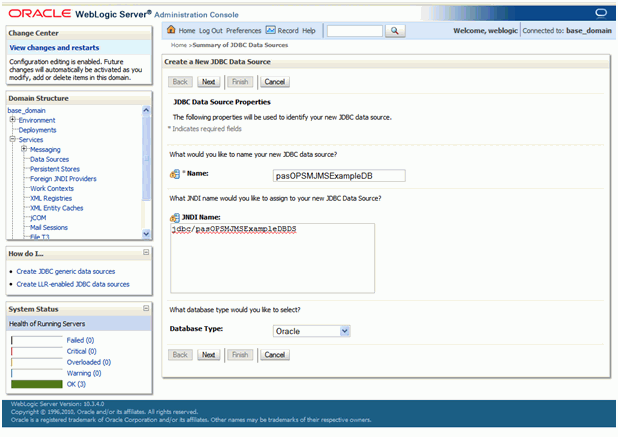
Enter the following:
Enter pas%BusinessObjectName%DB as the Name for the Data Source.
Enter jdbc/pas%BusinessObjectName%DBDS as the JNDI Name.
Click the Next button.
Oracle WebLogic Server Administration Console
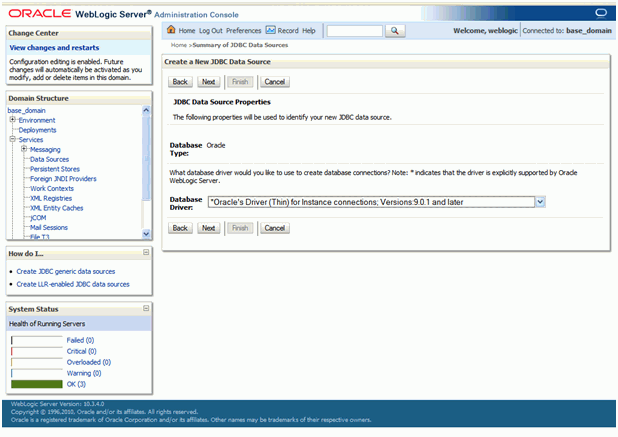
Select the appropriate database driver, and then click the Next button.
Oracle WebLogic Server Administration Console
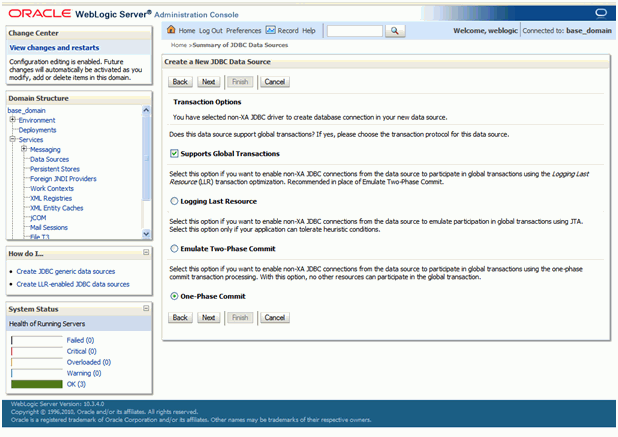
Click the Next button on the Transaction Options page.
Oracle WebLogic Server Administration Console
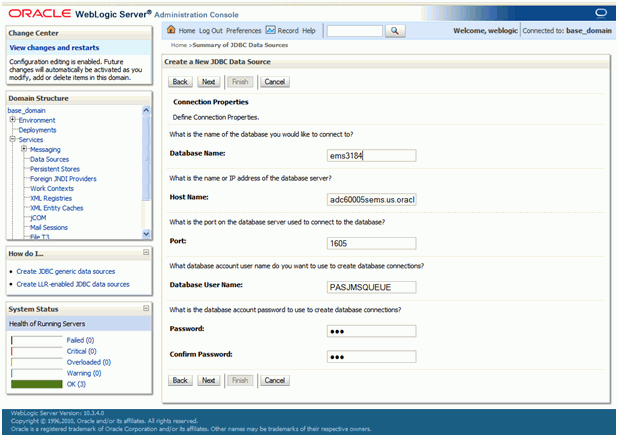
Enter your database connection details, and then click the Next button.
The Database User Name and Credentials were previously created using the "To Create a Database User for the JMS Persistent Store" procedure.
Oracle WebLogic Server Administration Console
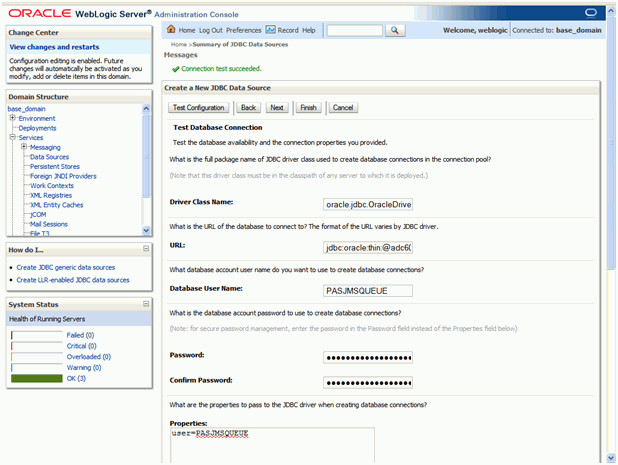
Click the Test Configuration button to verify the connection is successful. Once verified, click the Next button.
Oracle WebLogic Server Administration Console
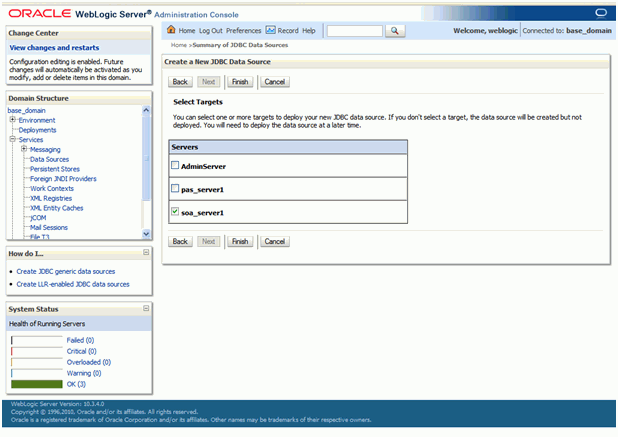
Select soa_server1 as the Target.
Oracle WebLogic Server Administration Console
Click the Finish button.
Log onto the Oracle WebLogic Server Administration Console.
Navigate to Services > Persistent Stores
Oracle WebLogic Server Administration Console
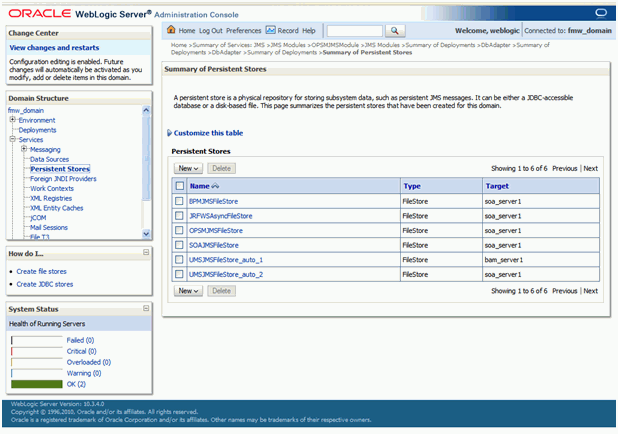
Click the New button and then click the Create JDBCStore.
Enter the following:
Enter %BusinessObjectName%JDBCStore as the Name for the Data Store
Select soa_server1 as the Target.
Select pas%BusinessObjectName%DB as the Data Source.
The Data Source value was previously created using the "To Create a JMS Persistent Store Data Source" procedure.
Oracle WebLogic Server Administration Console
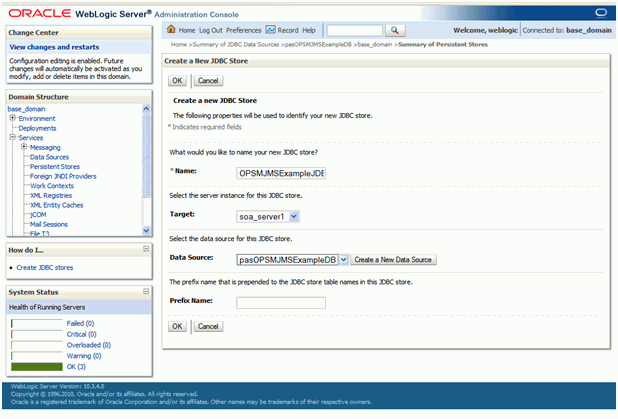
Click the OK button.
Log onto the Oracle WebLogic Server Administration Console.
Navigate to Services > Messaging > JMS Servers
Oracle WebLogic Server Administration Console
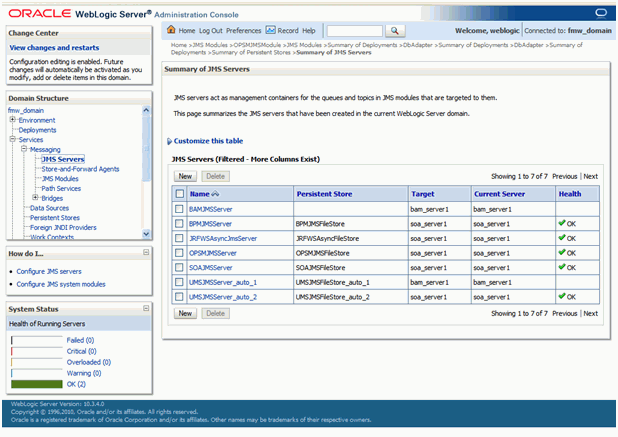
Click the New button.
Enter the following:
Enter %BusinessObjectName%JMSServer as the Name for the JMS Server.
Select the Persistent Store that you previously created.
The Persistent Store was previously created using the "To Create a Persistent Store" procedure.
Oracle WebLogic Server Administration Console
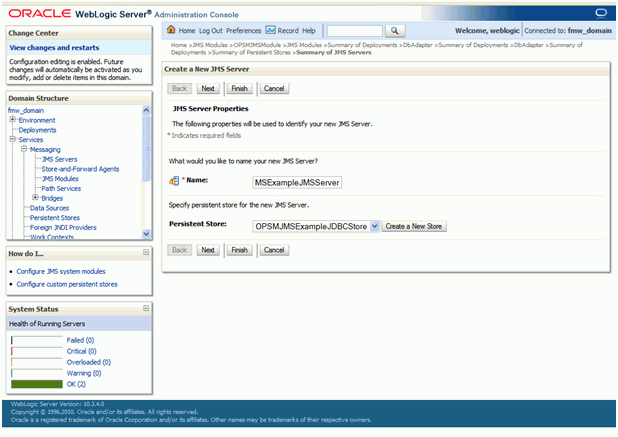
Click the Next button.
Select soa_server1 as the Target.
Oracle WebLogic Server Administration Console
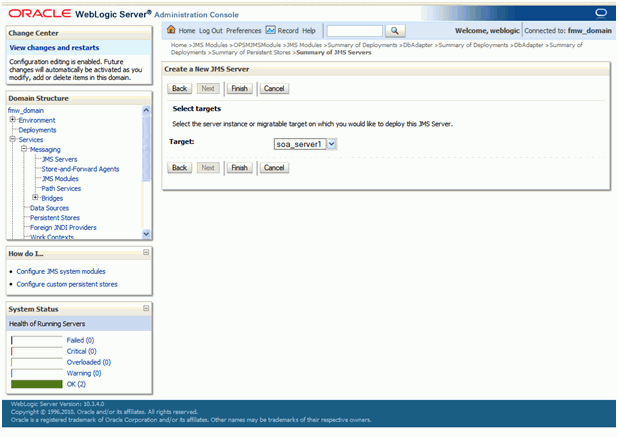
Click the Finish button.
Log onto the Oracle WebLogic Server Administration Console.
Navigate to Services > Messaging > JMS Modules
Oracle WebLogic Server Administration Console
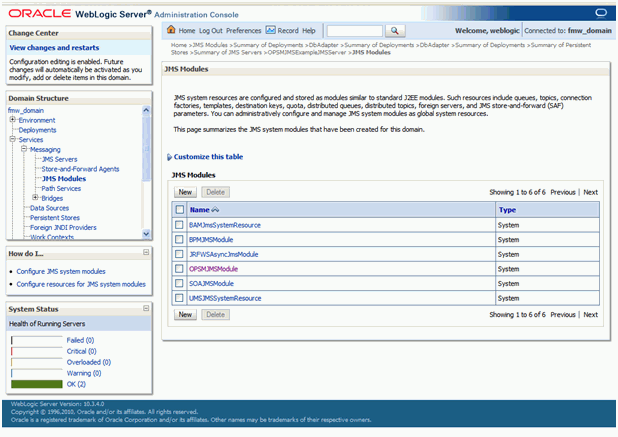
Click the New button.
Enter %BusinessObjectName%JMSModule as the Name of the JMS Module.
Oracle WebLogic Server Administration Console
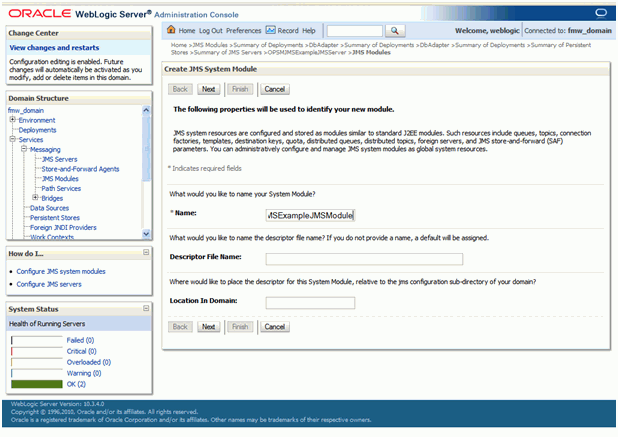
Click the Next button.
Select soa_server1 as the Target.
Oracle WebLogic Server Administration Console
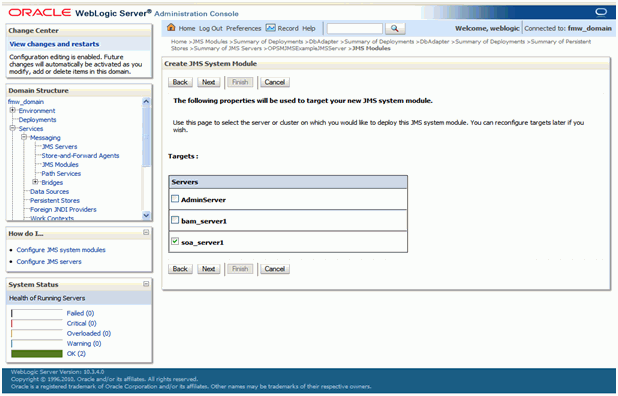
Click the Next button.
Click the Finish button.
Oracle WebLogic Server Administration Console
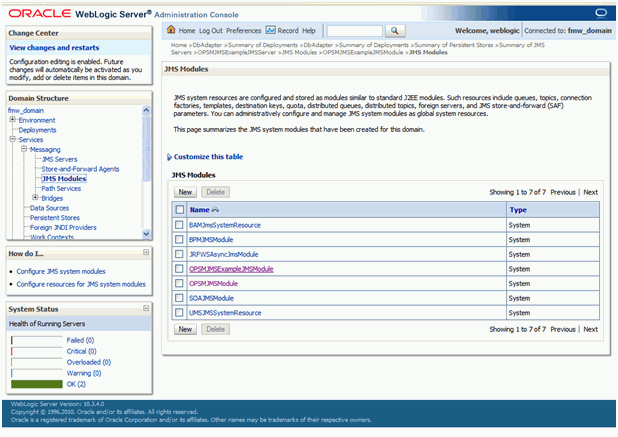
Select the JMS Module just created by clicking on its name.
Oracle WebLogic Server Administration Console
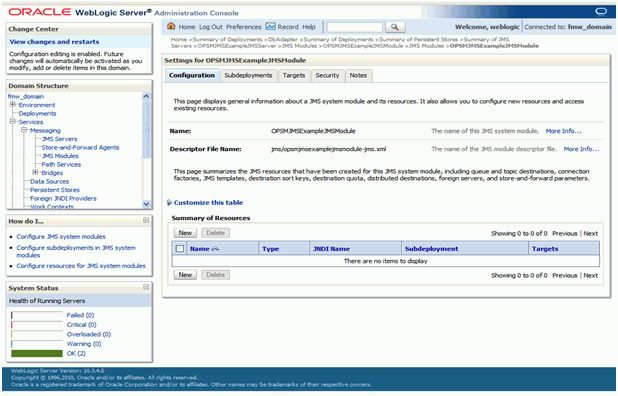
Click the New button.
Select Connection Factory.
Oracle WebLogic Server Administration Console
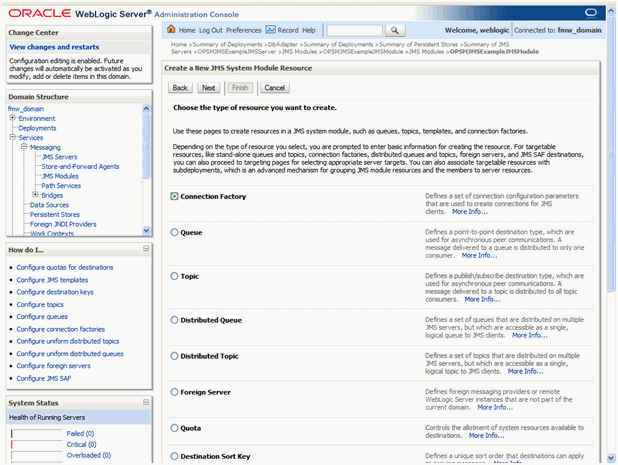
Click the Next button.
Enter the following:
Enter %BusinessObjectName%CF as the Name of the JMS Connection Factory.
Enter jms/%BusinessObjectName%CF as the JNDI Name.
Oracle WebLogic Server Administration Console
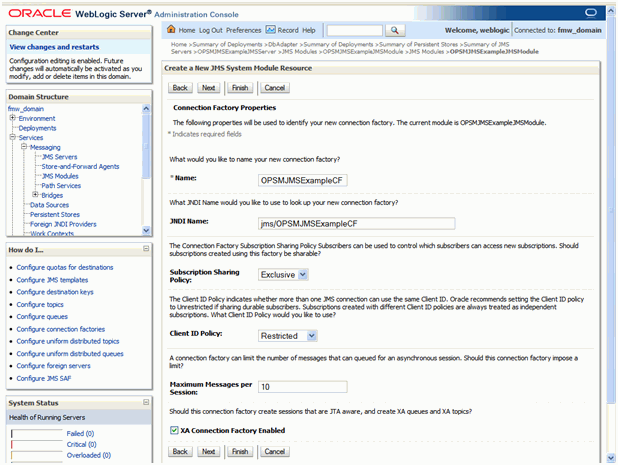
Click the Next button.
Oracle WebLogic Server Administration Console
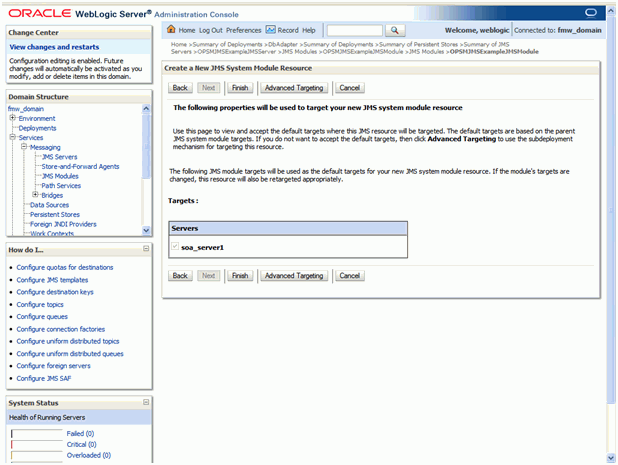
Click the Finish button.
Oracle WebLogic Server Administration Console
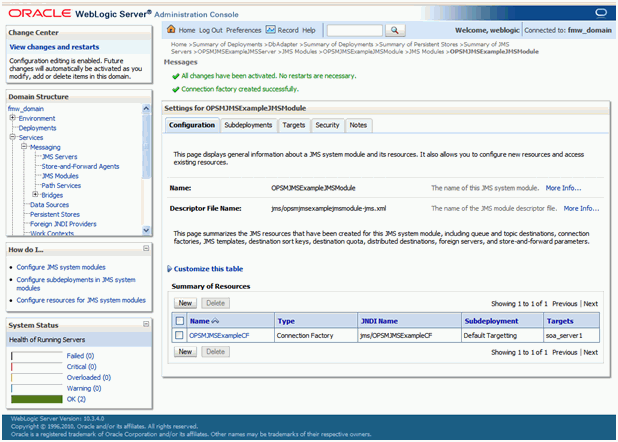
Click the New button.
Select Queue.
Oracle WebLogic Server Administration Console
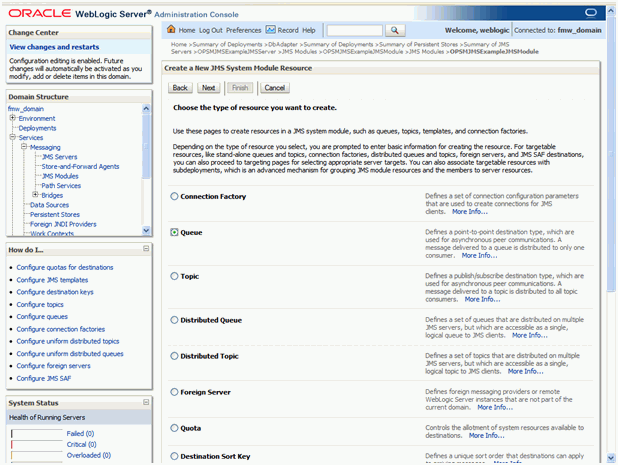
Click the Next button.
Enter the following:
Enter the name for the Queue in the Name field.
Enter the JNDI name for the Queue in the JNDI Name field.
Important: This name must be the same as the JNDI name used in the JMS Queue adapter in the PasTransmitSerialsViaWeb composite.
Oracle WebLogic Server Administration Console
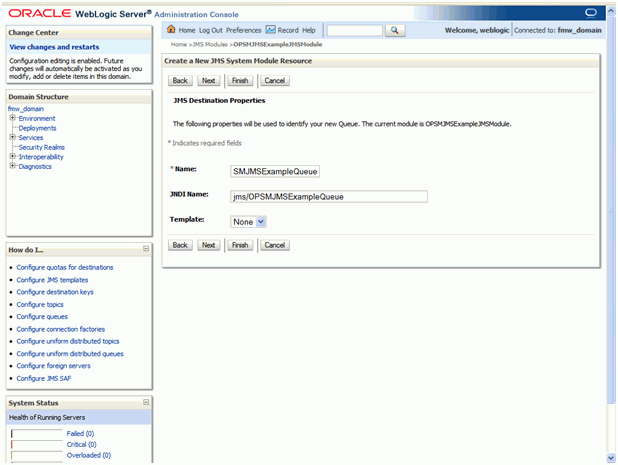
Click the Next button.
Oracle WebLogic Server Administration Console
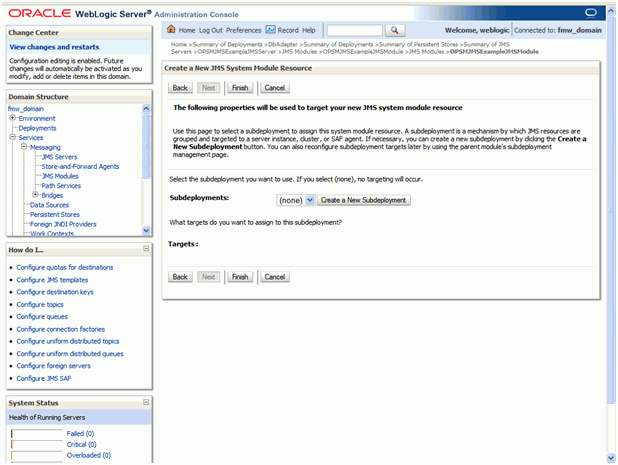
Click the Create a New Subdeployment button.
Oracle WebLogic Server Administration Console
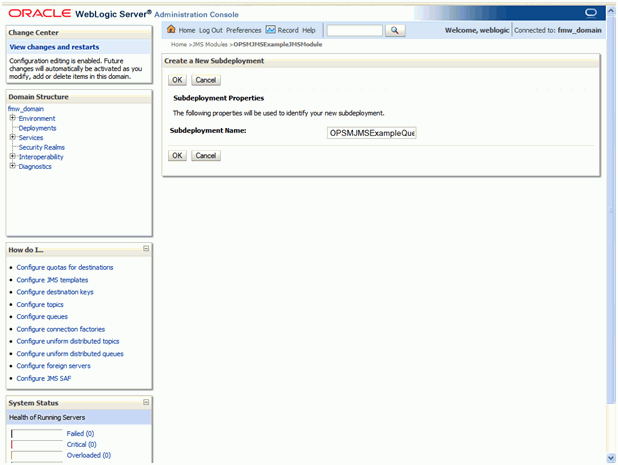
Click the OK button.
Select the JMS Server previously created using the "To Create a JMS Server" procedure.
Oracle WebLogic Server Administration Console
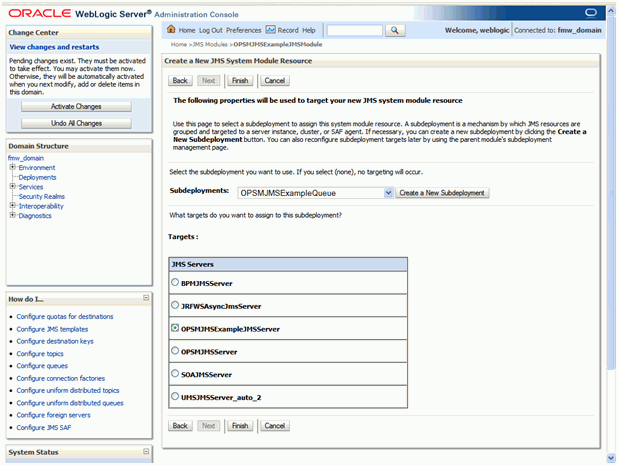
Click the Finish button.
Log onto the Oracle WebLogic Server Administration Console.
Navigate to Deployments > JMSAdaptor > Configuration > Outbound Connection Pools
Oracle WebLogic Server Administration Console
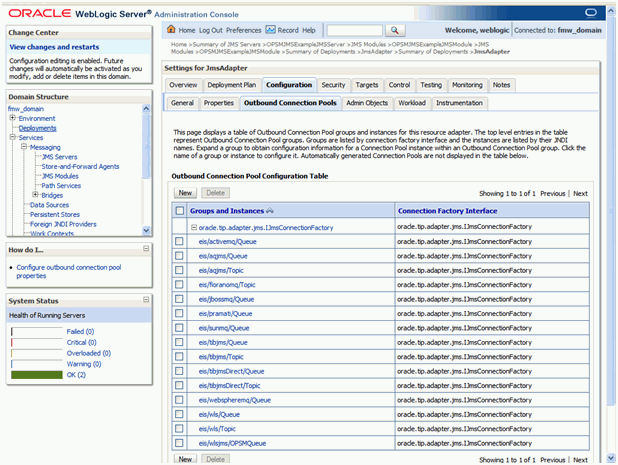
Click the New button.
Select oracle.tip.adapter.jms.IJmsConnectionFactory as the Outbound Connection Group.
Oracle WebLogic Server Administration Console
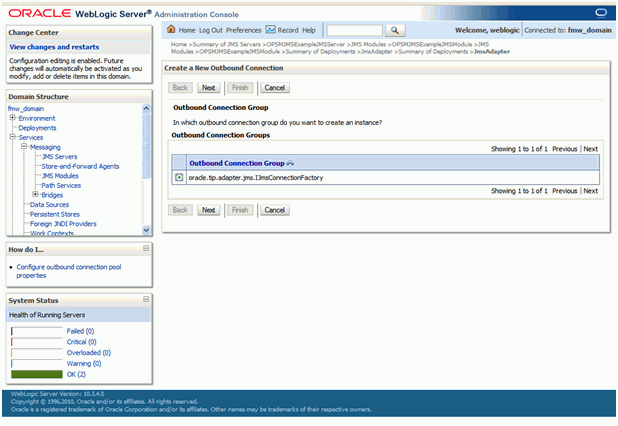
Click the Next button.
Enter a value for the JNDI Name.
For example, eis/wls/%BusinessObjectName%)
Important: This name must be the same as the JNDI name used for the JMS destination in the JMS Queue adapter of the PasTransmitSerialsViaWeb composite.
Oracle WebLogic Server Administration Console
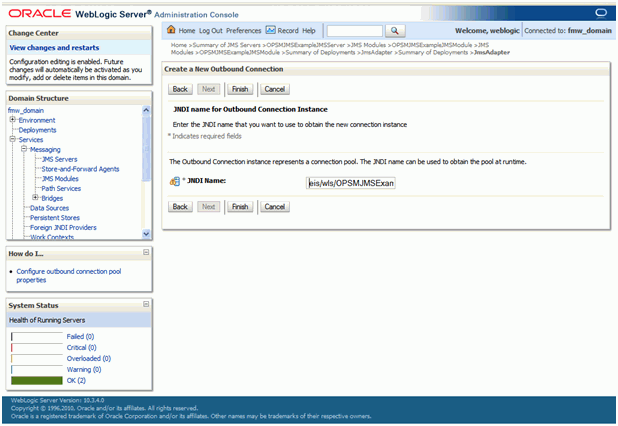
Click the Finish button.
Navigate back to Deployments > JMSAdapter > Configuration > Outbound Connection Pools
Oracle WebLogic Server Administration Console
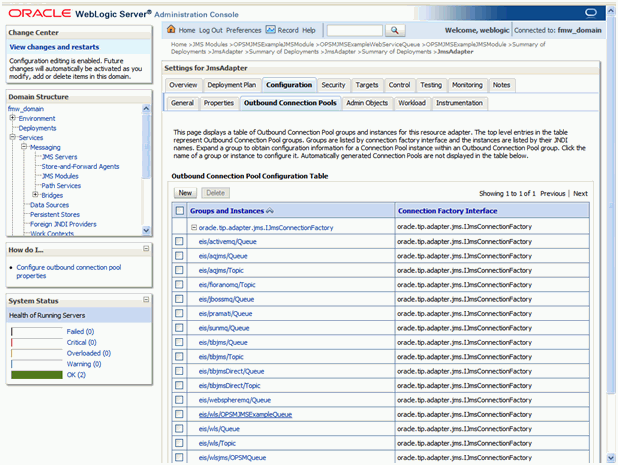
Click the JNDI Name that was created previously.
For example, eis/wls/%BusinessObjectName%)
In the ConnectionFactoryLocation property value field, enter the JNDI name of the connection factory that was used when creating the connection factory resource in the JMS Module, and then press Enter.
Oracle WebLogic Server Administration Console
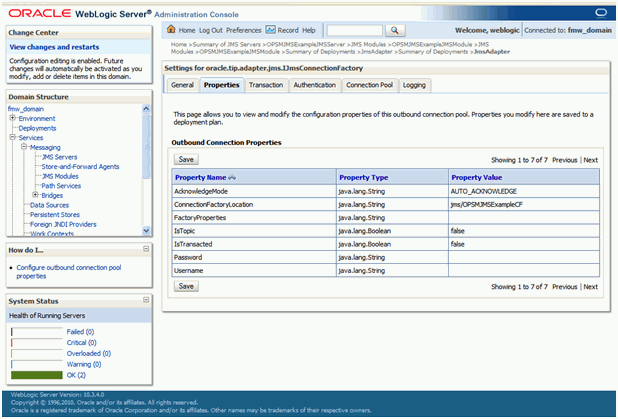
Click the Save button.
Important: Remember to update the JMSAdapter’s deployment using the updated deployment plan for the above changes to take effect.
Now that you have a JMS Queue, you have to define a destination and set that destination up in SOA. You will need a development environment with Oracle JDeveloper to complete this task.
Navigate to the Maintain Serial Destinations page and create a new destination. Make sure to select a communication method of Web Service.
Add a serial destination rule for the new destination.
For more information on creating serial destinations and destination rules, see Maintaining Serial Destinations and Destination Rules, Oracle Pedigree and Serialization Manager Process Guide.
Navigate to your development environment and start up Oracle JDeveloper.
Open the SOA application that you created in the above procedure "To Create an Application in JDeveloper".
Navigate to the project PasTransmitSerialViaWebComposite and open the Composite.xml.
PasTransmitSerialsViaWeb\Composite.xml
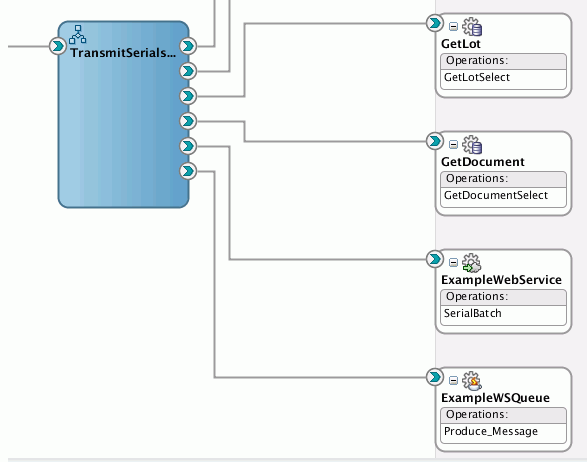
Notice that there is already a JMS Adapter called ExampleWSQueue.
Add another JMS Adapter (similar to the ExampleWSQueue) and have it point to the JMS Queue that you created earlier. Make sure to create a wire from the TransmitSerialsViaWeb BPEL to your new JMS Adapter:
Open the TransmitSerialViaWeb.bpel and scroll to the bottom. You should see something like this:
PasTransmitSerialsViaWeb\PasTransmitSerialsViaWeb.bpel
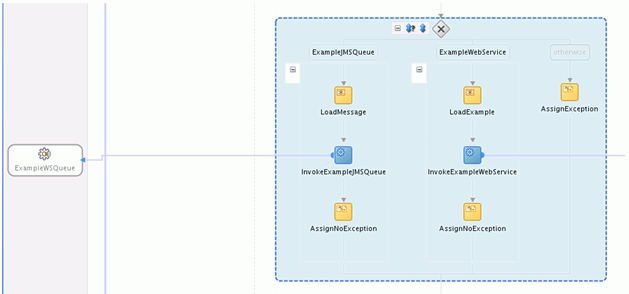
Add a case to the switch conditioning it on the name of the new destination you created earlier (use the case named ExampleJMSQueue as an example).
Add an Invoke in your new case connecting it to your new JMS Adapter
Add an Assign to load the payload
Add another Assign under your new invoke to assign no exception (use one of the existing AssignNoException to copy from).
If not already done, create a Configuration Plan for the composite using the machine address and port that the database server is on. You can use as an example the existing configuration plan PasTransmitSerialsViaWebComposite_cfgplan.xml, and see how it is replacing "http://my-prod-server" and "8889".
Deploy PasTransmitSerialViaWebComposite using the configuration plan created in the previous step and you are ready to use your new destination.
If you want to send serials to a web service, you have to configure a web service adapter in SOA. You will need a development environment with Oracle JDeveloper to complete this task.
Navigate to your development environment and start up Oracle JDeveloper.
Open the SOA application that you created in the above procedure "To Create an Application in JDeveloper".
Navigate to the project PasTransmitSerialViaWebComposite and open the Composite.xml.
PasTransmitSerialsViaWeb\Composite.xml
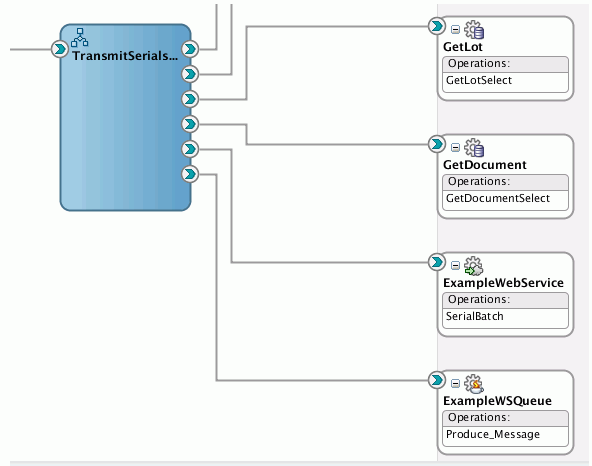
Notice that there is already a Web Service Adapter called ExampleWebService. Use it as an example.
Import the WSDL and schema for the web service you are adding. The directory where the schemas are kept is PasTransmitSerialViaWebComposite/XSD.
Add another Web Service Adapter (similar to ExampleWebService) using your newly added WSDL. Make sure to create a wire from the TransmitSerialsViaWeb BPEL to your new Web Service Adapter:
Open the TransmitSerialViaWeb.bpel and scroll to the bottom. You should see something like this:
PasTransmitSerialsViaWeb\PasTransmitSerialsViaWeb.bpel
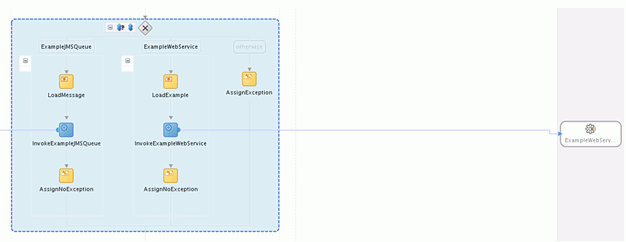
Add a case to the switch conditioning it on the name of the new destination you created earlier (use the case named ExampleWebService as an example).
Add an Invoke in your new case connecting it to your new JMS Adapter.
Add an Assign to load the payload.
Add another Assign under your new invoke to assign no exception (use one of the existing AssignNoException to copy from).
If not already done, create a Configuration Plan for the composite using the machine address and port that the database server is on. You can use as an example the existing configuration plan PasTransmitSerialsViaWebComposite_cfgplan.xml, and see how it is replacing "http://my-prod-server" and "8889".
Deploy PasTransmitSerialViaWebComposite using the configuration plan created in the previous step and you are ready to use your new destination.
If you want to send serials to a web service, you have to define a destination.
Navigate to the Maintain Serial Destinations page and create a new destination. Make sure to select a communication method of Web Service.
Add a serial destination rule for the new destination.
For more information on creating serial destinations and destination rules, see Maintaining Serial Destinations and Destination Rules, Oracle Pedigree and Serialization Manager Process Guide.
If the method of communication for the serial destination is File Exchange, then a connection factory must be created for the FTP Adapter.
Log onto the Oracle WebLogic Administration Console.
Navigate to Deployments > FTPAdapter > Configuration > Outbound Connection Pools
Oracle WebLogic Server Administration Console
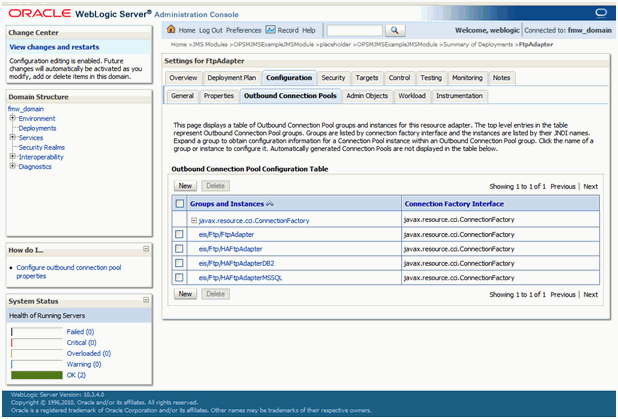
Click the New button.
Select javax.resource.cci.ConnectionFactory as the Outbound Connection Group.
Oracle WebLogic Server Administration Console
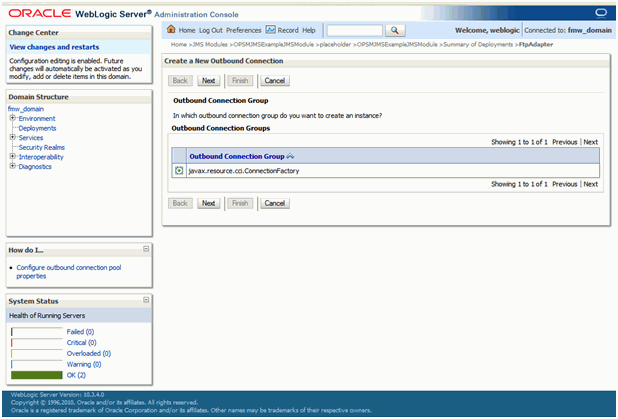
Click the Next button.
Enter eis/Ftp/FileExchange as the JNDI Name.
Oracle WebLogic Server Administration Console
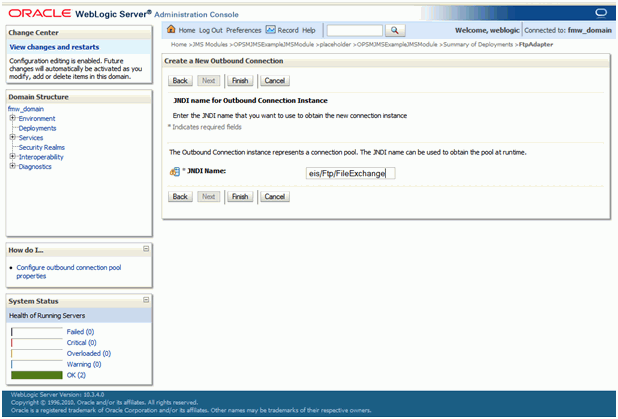
Save the deployment plan.
Click the Finish button.
Navigate back to Deployments > FTPAdapter > Configuration > Outbound Connection Pools
Oracle WebLogic Server Administration Console
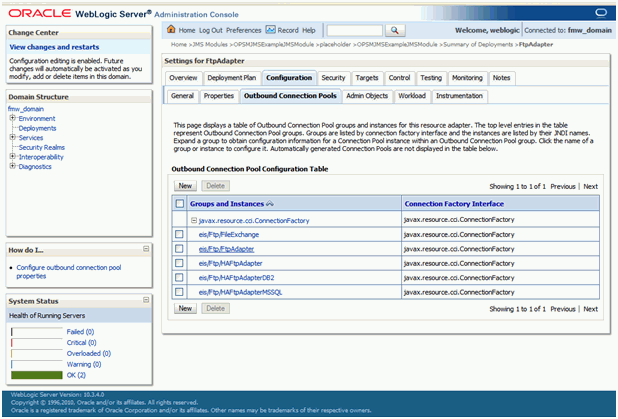
Click eis/Ftp/FileExchange instance that was created previously.
Oracle WebLogic Server Administration Console
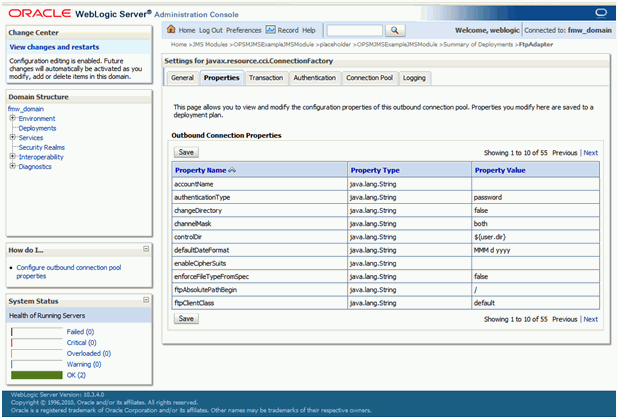
Click the Next link until the host property can be viewed.
Enter the machine name of the FTP Server as the Property Value field for the host and press Enter.
Oracle WebLogic Server Administration Console
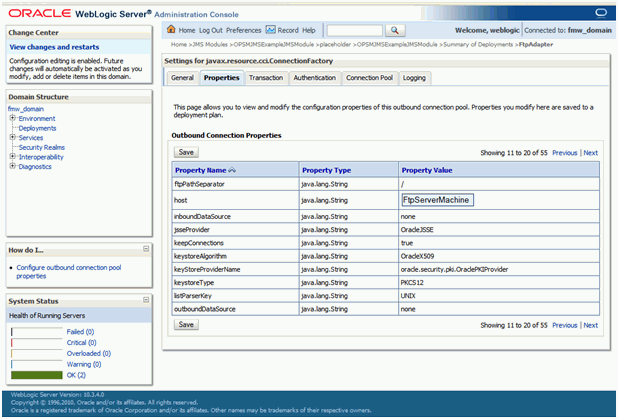
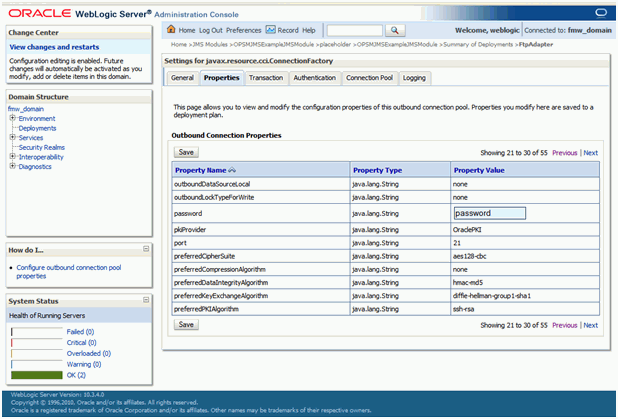
Click the Next link until the password property can be viewed.
Enter the password for the FTP Server in the Property Value field for the password and press Enter.
Oracle WebLogic Server Administration Console
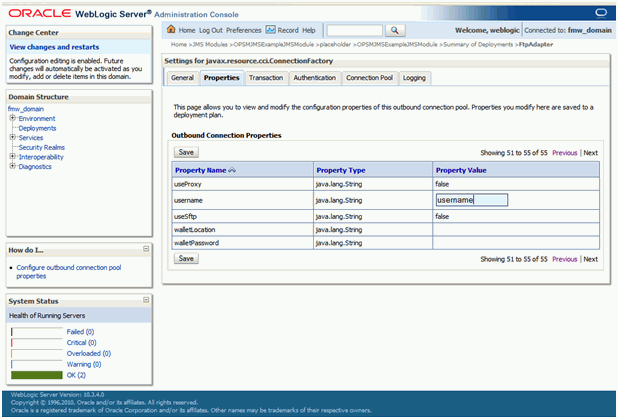
Click the Next link until user name property can be viewed.
Enter the user name for the FTP Server in the Property Value field for the user name and press Enter.
Oracle WebLogic Server Administration Console
Click the Save button.
Important: Remember to update the FTP Adapter’s deployment using the updated deployment plan for the above changes to take effect. You may need to bounce the WebLogic server for this change to take effect.
Now that you have an FTP Adapter configured in WebLogic, you have to define a destination and set that destination up in SOA. You will need a development environment with Oracle JDeveloper to complete this task.
Navigate to the Maintain Serial Destinations page and create a new destination. Make sure to select a communication method of File Exchange.
Add a serial destination rule for the new destination.
For more information on creating serial destinations and destination rules, see Maintaining Serial Destinations and Destination Rules, Oracle Pedigree and Serialization Manager Process Guide.
Navigate to your development environment and start up Oracle JDeveloper.
Open the SOA application that you created in the above procedure "To Create an Application in JDeveloper".
Navigate to the project PasTransmitSerialViaFileComposite and open the Composite.xml.
PasTransmitSerialsViaFile\Composite.xml
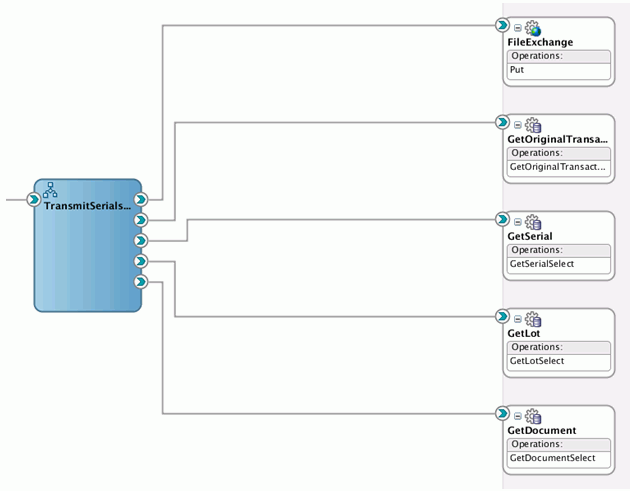
Notice that there is already a FTP Adapter called FileExchange. Use it as an example.
Add another FTP Adapter (similar to FileExchange) pointing to the FTP Adapter you created earlier. Take care in setting the physical directory. Make sure to create a wire from the TransmitSerialsViaFile BPEL to your new FTP Adapter.
Open the TransmitSerialViaFile.bpel and scroll to the bottom. You should see something like this:
PasTransmitSerialsViaFile\ PasTransmitSerialsViaFile.bpel
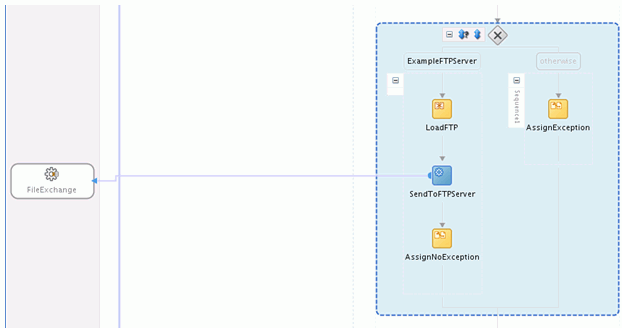
Add a case to the switch conditioning it on the name of the new destination you created earlier (use the case named ExampleFTPServer as an example).
Add an Invoke in your new case connecting it to your new FTP Adapter.
Add an Assign to load the payload.
Add another Assign under your new invoke to assign no exception (use one of the existing AssignNoException to copy from).
If not already done, create a Configuration Plan for the composite using the machine address and port that the database server is on. You can use as an example the existing configuration plan PasTransmitSerialsViaWebComposite_cfgplan.xml, and see how it is replacing "http://my-prod-server" and "8889".
Deploy PasTransmitSerialViaFileComposite using the configuration plan created in the previous step and you are ready to use your new destination.
![]()
Copyright © 2013, Oracle and/or its affiliates. All rights reserved.