7 Managing Oracle Key Vault Virtual Wallets and Security Objects
A virtual wallet stores security objects, such as Oracle wallets, keystores, certificates, and other objects that hold sensitive data, on the Oracle Key Vault server. After you create a virtual wallet, you can check its details, add or remove items to and from it, and control who has access to the virtual wallet.
Topics:
About Virtual Wallets
Virtual wallets are groups of security objects that can be shared between users and endpoints.
These security objects are typically public and private keys, TDE master encryption keys, passwords, credentials, certificates, and so on.
In the Wallets & Keys tab of the Oracle Key Vault management console, you can view the virtual wallets that you are authorized to access. You can create, modify, and delete wallets, and add or remove items from wallets.
Viewing Virtual Wallets
You can view the contents of a virtual wallet by using the Oracle Key Vault management console.
-
Log in to the Oracle Key Vault management console as a user who has the Manage Wallet permission on any virtual wallet or as a user with the Key Administrator role.
-
Click the Keys & Wallets tab.
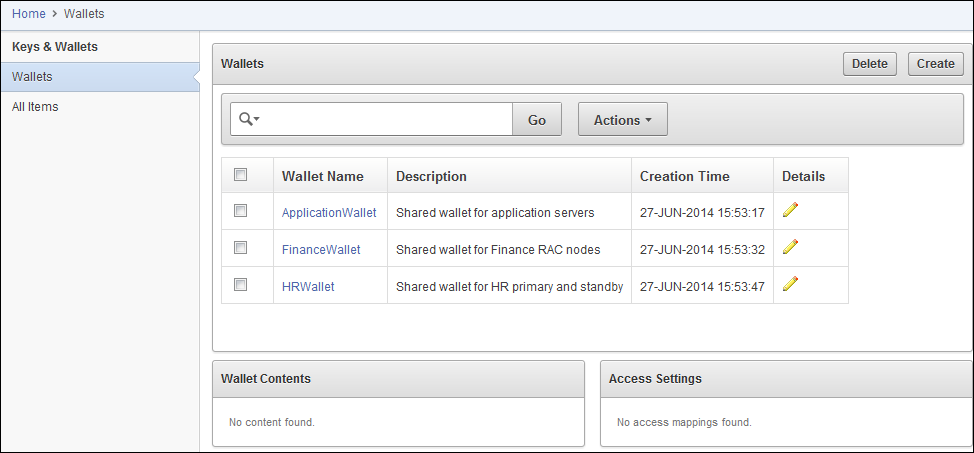
The Wallets page appears with the Wallets table, if there are any existing wallets.
-
In the Wallets table, find the wallet needed and double-click the wallet name. Use the Search bar or the Actions menu, if necessary.
The Wallets table remains visible, and the page then displays sublists for the wallet contents and access settings specific to that wallet.
-
To view the Item Details for Wallets from the Wallet Contents sublist, click the edit pencil icon for the item.
See the graphic in "Viewing, Adding, and Modifying Security Object Details".
Description of the illustration ''okv_007.png''
Creating Virtual Wallets
After you create a virtual wallet, you can manage its contents and control who has access to it.
Topics:
About Creating Virtual Wallets
A user who has the Key Administrator role can create a virtual wallet.
The user who creates the virtual wallet is automatically granted the Read, Read and Modify, and Manage Wallet access on the virtual wallet. To perform actions on the virtual wallet, this user must have the Manage Wallet permission on the wallet, or the Key Administrator role. Users can only add items to the wallet if the user has the Read or Read and Modify privilege on the item.
Creating a Virtual Wallet
You can create a virtual wallet by using the Oracle Key Vault management console.
-
Log in to the Oracle Key Vault management console as a user who has the Key Administrator role.
See "Logging In to the Oracle Key Vault Management Console."
-
Select the Keys & Wallets tab.
-
Select the Wallets menu.
-
On the Wallets page, click Create.
-
Enter name for the virtual wallet and, optionally, a description.
Virtual wallet names are case-sensitive. For example,
wallet1andWallet1are two different wallets. Oracle recommends that you enter a description for the wallet for future reference and ease of identification.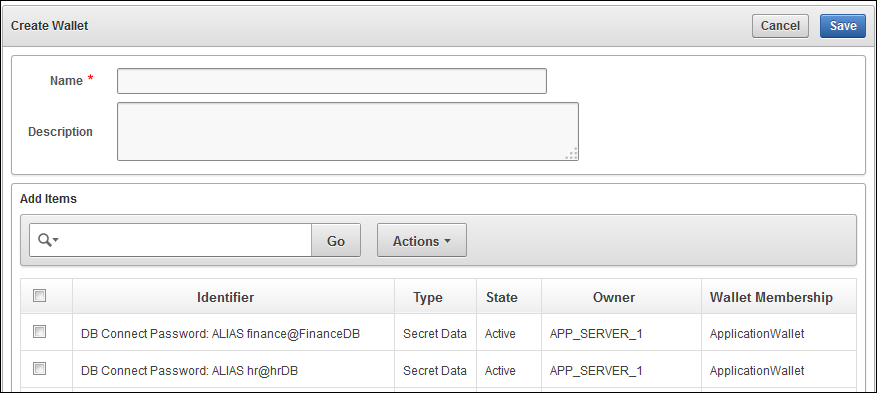
Description of the illustration ''okv_007a.png''
-
In the Add Items pane, select the check box beside the name of any items that you want to add to the wallet.
The security objects in this list are the items to which you have Read and Modify access.
You can filter this list to find the items that you want by using the Search bar or the Actions menu, as described "Performing Actions and Searches".
After you add security objects to the virtual wallet, you can modify the contents, as described in "Managing Details of Security Objects".
-
Click Save.
A message appears indicating that the virtual wallet has been successfully created, and the new wallet name appears in the Wallets table.
-
Grant the necessary access to users, user groups, endpoints, and endpoint groups to the virtual wallet.
As part of the access control settings for a virtual wallet with an endpoint, you must select Read and Modify and Manage Wallet if the user plans to use this virtual wallet as part of the
okvutil uploadanddownloadcommands.See "Managing Virtual Wallet Access" for more information.
Managing Details of Security Objects
After you create a virtual wallet, you can manage its details, such as searching for a specific security object item and then modifying the wallet contents.
Topics:
Searching for Security Object Items
The term item refers to any single security object managed by Oracle Key Vault, such as a key, certificate, password, or opaque object.
-
Log in to the Oracle Key Vault management console as a user who has access to this wallet or has been granted the Key Administrator role.
-
Search as described in "Search Bars".
-
Select a search choice, from the following: All Columns, Type, Identifier, Creation Time, Owner, Wallets, and State.
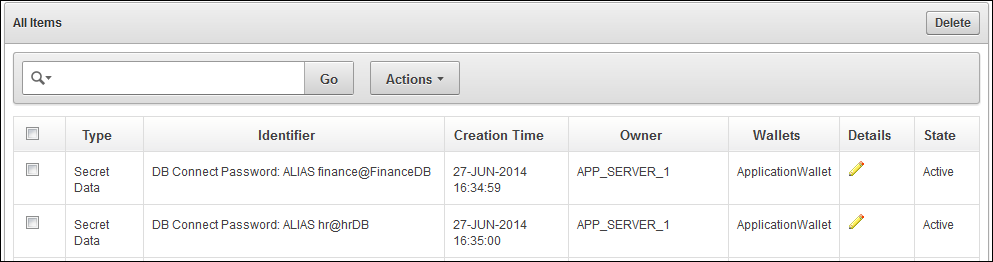
The All Items page of the Keys & Wallets tab contains all items in Oracle Key Vault, in a table with their names and other information, such as the virtual wallets that contain the security objects. You can click the row heading to sort in ascending and descending order, hide columns, or create control breaks. Also, you can filter this list using the Actions menu. See "Actions Menus".
Description of the illustration ''okv_006.png''
Table headings are as follows:
-
Type: Indicates the object type of the item. Valid values are Symmetric Key, Private Key, Template, Opaque Object, Certificate, and Secret Data.
-
Identifier: Lists the identifier for the item and includes a prefix that helps identify a subtype for the item.
-
Creation Time: Date and time that the item was added to Oracle Key Vault.
-
Owner: The endpoint that owns the item.
-
Wallets: Indicates the virtual wallet membership.
-
Details: Link to the Item Details page.
-
State: Indicates the state of items. See "Item Details Page: Basic Attributes Pane".
-
Viewing, Adding, and Modifying Security Object Details
The details of security objects can include information such as the description, item identifier, and type.
Topics:
About Viewing, Adding, and Modifying Security Object Details
Users who have been granted the Key Administrator role can view, add, and modify item details in the Item Details page.
Users who have been granted the Audit Manager role can view the Item Details page. Item details are generally attributes relevant to the security object specified, and may include description, item identifier, and type. To access this page, select the Keys & Wallets tab, and then select All Items. You can respond to queries using the check boxes and fields provided.
To view an Item Details page, from the All Items page, click the edit pencil icon of the item that you need to examine or modify.
To modify these attributes you must have Read and Modify access for the security object, or you must have the Key Administrator role.
As a user or endpoint, you are granted the Read and Modify access privileges in one of two ways:
-
You are the owner of the object.
-
You have the Read and Modify access on a wallet that contains the object. See "Granting User and Endpoint Access to Virtual Wallets" for information about granting users and endpoints access to wallets and items.
Item Details Page: Basic Attributes Pane
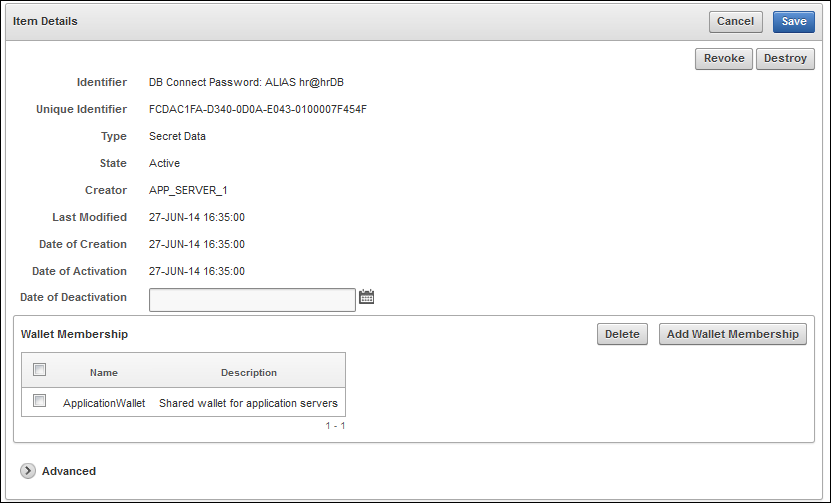
The Basic Attributes pane of the Item Details page provides information such as an identifier, a unique identifier, the type of security object, whether it is active, and so on.
The beginning pane of the Item Details page includes the Cancel and Save buttons. In some instances, the Item Details page contains buttons and fields to change the item state depending on the item type. See "Changing the State of a Key or Other Security Object Item" for examples.
This section of the Item Details page also enables you to add or delete wallet membership.
Description of the illustration ''okv_008.png''
This pane of the Item Details page contains additional information or queries for the following attributes:
-
Identifier: A summary description to help identify the item to the user. For example, if the item is a TDE master key, the Identifier shows the prefix TDE Master Key followed by the identifier used by the database to identify the key.
-
Unique Identifier: This is a globally unique ID that identifies an item.
-
Type: Indicates the object type of the item. Valid values are Symmetric Key, Private Key, Template, Opaque Object, Certificate, and Secret Data.
-
State: Indicates the state of items. Values are as follows:
-
Pre-active: The object exists but is not yet usable for any cryptographic purpose.
-
Active: The object is available for use. Endpoints should examine the Cryptographic Usage Mask attribute to determine which uses are appropriate for this object.
-
Deactivated: The object is no longer active and should not be used to apply cryptographic protection (for example, encryption or signing). It may still be appropriate to use for decrypting or verifying previously protected data.
-
Compromised: The object is believed to be compromised and should not be used.
-
Destroyed: The object is no longer usable for any purpose.
-
Destroyed Compromised: The object was compromised and subsequently destroyed. It is no longer usable for any purpose.
See Also:
Key Management Interoperability Protocol Specification Version 1.1 for complete definitions -
-
Creator: The endpoint that created the security object.
-
Last Modified: The date last modified.
-
Date of Creation: The date created.
-
Date of Activation: The date of activation.
-
Date of Deactivation: The date of deactivation. After this date, security objects should not be used.
Item Details Page: Advanced Pane
The Advanced pane of the Item Details page contains additional information or queries.
The Advanced pane appears similar to the following:
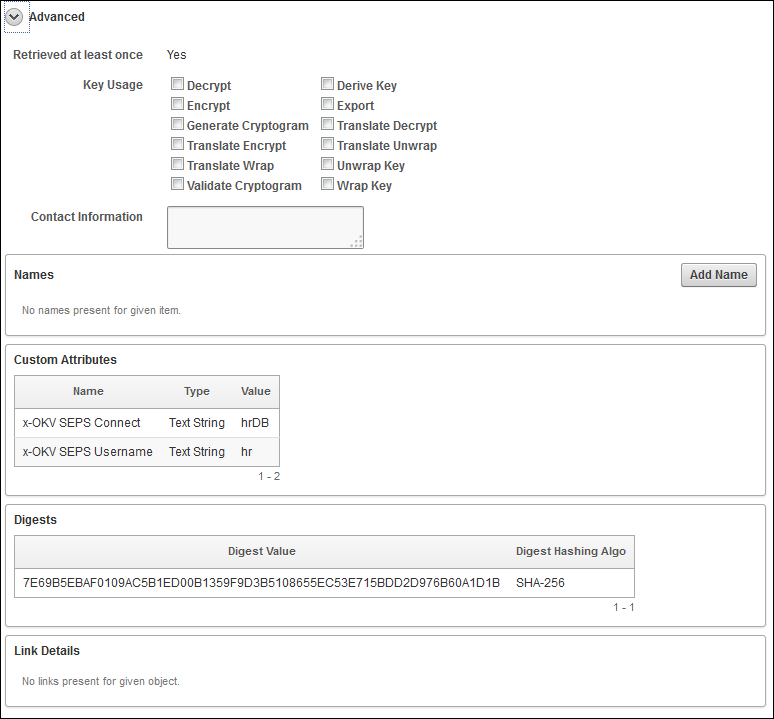
Description of the illustration ''okv_009.png''
Attribute information and queries may vary depending on the item type. These are some attributes:
-
Cryptographic Algorithms: The encryption algorithm used by the item
-
Key Usage: Operations that the key can be used for
-
Names: Labels attached by a user or endpoint to identify the key
-
Custom attributes: Additional attributes defined by the endpoint and not interpreted by Oracle Key Vault
-
Cryptographic Parameters: Optional parameters for the encryption algorithm used by the item, such as block cipher mode and padding method
-
Digests: Digest values of the security object
-
Link Details: Links to related objects
Changing the State of a Key or Other Security Object Item
You can activate or deactivate a key or other security object item.
Topics:
About Changing the State of a Key or Other Security Object Item
You can change the state of some virtual wallet items, such as keys, in the main section of the All Items page.
You can do the following to a key or other item:
-
Activate: The state automatically changes to active on the specified date. If the date has passed, the state is also active. To activate an item, set the Activation date to any date.
-
Destroy: Destroys an item. Click Destroy.
-
Revoke: To mark as not valid to use. Click Revoke. See "Revoking a Key".
-
Deactivate: Expires a key based on the Date of Deactivation. See "Deactivating a Key".
Deactivating a Key
A key deactivates or expires when it passes the date that has been set for deactivation.
-
Log in to the Oracle Key Vault management console as a user who has the Read and Modify access on this key.
See "Logging In to the Oracle Key Vault Management Console."
-
Select the Keys & Wallets tab.
-
Select the All Items menu and then click the edit pencil icon beside the item to be deactivated.
-
On the Item Details page for the item, set the Protect Stop Date to the date by which you want the key to be deactivated.
-
Click Save.
Revoking a Key
When you revoke a key, the key no longer can be downloaded but it can still be examined by the endpoints.
-
Log in to the Oracle Key Vault management console as a user who has the Read and Modify access on this key.
See "Logging In to the Oracle Key Vault Management Console."
-
Select the Keys & Wallets tab.
-
Select the All Items menu and then click the edit pencil icon beside the item to be changed.
-
On the Item Details page, click Revoke.
The Revoke Key page appears.
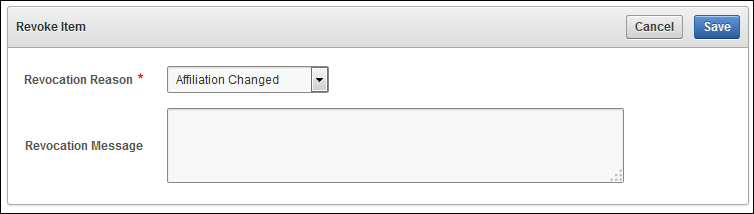
Description of the illustration ''okv_010.png''
-
(Optional) Select a Revocation Reason and write a Revocation message.
-
Click Save.
A message appears, indicating that the revocation succeeded.
Adding or Removing Items to and from Virtual Wallets
You can add items to wallets or remove items from wallets. You can also add items while creating the wallet.
-
Log in to the Oracle Key Vault management console as a user who has the Manage Wallet access on the virtual wallet or as a user with the Key Administrator role.
See "Logging In to the Oracle Key Vault Management Console."
-
Select the Keys & Wallets tab, and then select Wallets.
-
From the Wallets table, click the edit pencil icon in the Details column beside the wallet name.
The Wallet Overview page appears.
-
Do one of the following:
-
To add items: In the Wallet Contents pane, click Add Items. On the Add Wallet Contents page, you can see a list of the security objects for which you have both the Read and Modify permissions. Select the items that you want to add, and then click Save.
-
To remove items: In the Wallet Contents list, select the check box beside each item that you want to remove from the wallet. Then click Remove Items.
For both of these methods, use the Search bar or the Actions menu to locate the items, if necessary.
-
-
After you add items to a virtual wallet, ensure that users, user groups, endpoints, and endpoint groups have the appropriate access to it.
As part of the access control settings for a virtual wallet with an endpoint, you must select Read and Modify and Manage Wallet if the user plans to use this virtual wallet as part of the
okvutil uploadanddownloadcommands.
Managing Virtual Wallet Access
Managing virtual wallet access enables you to control which users have access to the virtual wallet and the kinds of actions they can perform on the virtual wallet.
Topics:
Granting User and Endpoint Access to Virtual Wallets
You can add access settings to a virtual wallet in the Select Access Level pane.
This gives the specified endpoint groups, endpoints, user groups, or users access to the virtual wallet and the objects in it. The access settings are Read Only, Read and Modify, and Manage Wallet.
-
Log in to the Oracle Key Vault management console as a user who has the Manage Wallet access on the virtual wallet or as a user with the Key Administrator role.
See "Logging In to the Oracle Key Vault Management Console."
-
Select the Keys & Wallets tab, and then select Wallets.
-
On the Wallets page, from the Wallets table, next to the wallet being accessed, click the edit pencil icon in the Details column.
The Wallet Overview page appears.
-
In the Wallet Access Settings pane, click Add.
-
On the Add Access to Wallet page, under Select Endpoint/User Group, select the Type of subject.
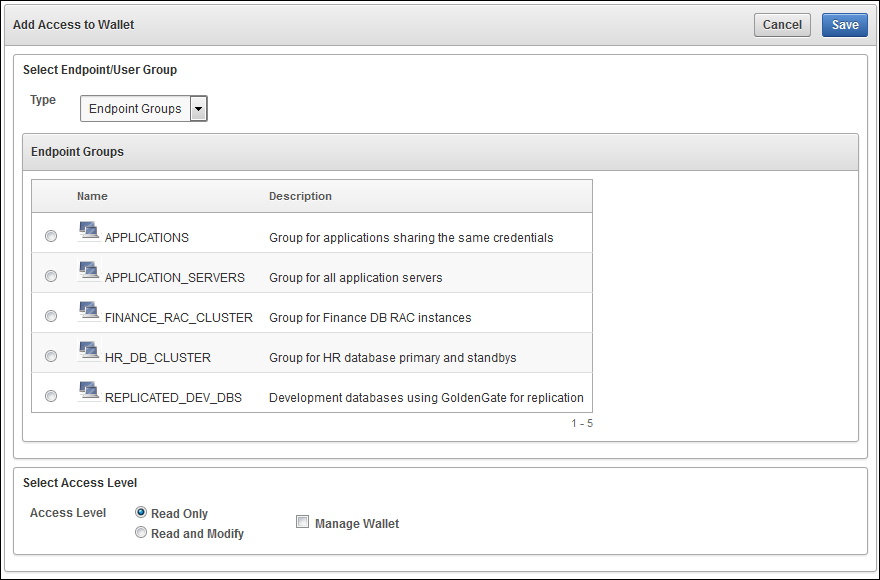
Description of the illustration ''okv_42a.png''
Possible values are Endpoint Groups, Endpoints, User Groups, and Users depending on the subject types currently existing in Oracle Key Vault.
-
Select an Access Level:
-
Read Only: The selected subject only has read access on the virtual wallet and items in the wallet.
-
Read and Modify: The selected subject has read and modify access on the wallet and the items in the wallet.
-
-
(Optional) Select the check box next to Manage Wallet.
This option enables the selected subject to do the following:
-
Add or remove objects from the wallet.
-
Grant others access to the wallet.
-
-
Click Save.
Setting Access for an Individual User to a Virtual Wallet
You can add access for a user to a virtual wallet or remove this access, after the virtual wallet has been created.
Topics:
Adding Individual User Access to a Virtual Wallet
You can add access to a virtual waller for an individual user by using the Oracle Key Vault management console.
-
Log in to the Oracle Key Vault management console as a user who has the Manage Wallet permission on the virtual wallet, or as a user with the Key Administrator role.
-
Select the Users tab, then select Manage Users, and in the User Name column, click the user's name.
-
In the Access to Wallets pane, click Add.
-
On the Add Access to User page, select a virtual wallet from the available list.
-
Select the desired access levels.
-
Click Save.
A message appears, indicating that the access mapping has been saved. The access will appear in the User Details page.
Removing Individual User Access to a Virtual Wallet
You can remove access to a virtual wallet for an individual user by using the Oracle Key Vault management console.
-
Log in to the Oracle Key Vault management console as a user who has the Manage Wallet access on the virtual wallet, or as a user with the Key Administrator role.
-
Select the Users tab, then select Manage Users, and in the User Name column, click the user's name.
-
Check the box next to the virtual wallet name.
-
Click Remove.
-
In the confirmation dialog box, click OK.
A message appears, indicating that the access mapping has been removed.
Controlling User Group Access to Virtual Wallets
With the Key Administrator role, you can set access for a user group to a virtual wallet or remove this access, after the virtual wallet has been created.
Topics:
Adding User Group Access to a Virtual Wallet
You can add user group access to a virtual wallet by using the Oracle Key Vault management console.
-
Log in to the Oracle Key Vault management console as a user who has the Key Administrator role.
-
Select the Users tab, and then select Manage Access.
-
In the User Groups page, click the edit pencil icon in the details column next to the user group name.
-
In the Access to Wallets pane, click Add.
-
Select a virtual wallet from the available list in the Add Access to User Group page.
-
Select the desired access levels. See "Access Control Options".
-
Click Save.
A message indicates that the access mapping was successfully added.
Removing User Group Access from a Virtual Wallet
You can remove user group access from a virtual wallet by using the Oracle Key Vault management console.
-
Log in to the Oracle Key Vault management console as a user who has the Key Administrator role.
-
Select the Users tab, and then select Manage Access.
-
On the User Groups page, click the edit pencil icon in the details column next to the user group name.
-
In the Access to Wallets pane, select the check box next to the virtual wallet name.
-
Click Remove.
-
In the confirmation dialog, click OK.
A message indicates that the user group access was successfully dropped.
Revoking Access Settings of a Virtual Wallet
You can revoke the access settings of a virtual wallet by using the Oracle Key Vault management console.
-
Log in to the Oracle Key Vault management console as a user who has the Manage Wallet permission on the virtual wallet or as a user with the Key Administrator role.
See "Logging In to the Oracle Key Vault Management Console."
-
Select the Keys & Wallets tab, and then select Wallets.
-
On the Wallets page, from the Wallets table, next to the wallet, click the edit pencil icon in the Details column.
-
In the Wallet Contents pane, select the check box next to the access setting being removed, and then click Remove.
-
In the Wallet Overview pane, click Save.
Deleting Virtual Wallets
Deleting a virtual wallet removes the wallet but does not delete the objects that are part of it, and for endpoints that have downloaded this wallet, it does not delete their local copy.
-
Log in to the Oracle Key Vault management console as a user who has the Manage Wallet permission on the virtual wallet or as a user with the Key Administrator role.
See "Logging In to the Oracle Key Vault Management Console."
-
Select the Keys & Wallets tab, and then select Wallets.
-
On the Wallets page, from the Wallets table, select the check box next to the name of the wallet name that you want to delete.
Use the Search bar or the Actions menu, if necessary.
The Wallet Overview appears.
-
Click Delete.
-
In the Confirmation dialog box, click OK.