25.10 Defining Authorization Policy Conditions
The mechanism to add a condition is the same regardless of the type you choose.
You use conditions in an authorization policy to:
-
Identify the users by user name, role, or an LDAP filter whose criteria the user must satisfy.
-
Stipulate the computers where users can access resources.
-
Set a time period when the rule applies.
-
Specify attributes that enforces evaluation of request context, user session state, and user attributes
A dialog box pops up where you define the name and type to create the condition container. Afterward you are presented with controls to define the specifics of the condition.
This section is divided as follows:
25.10.1 Choosing a Condition Type
This section provides the following topics:
25.10.1.1 Condition Window and Elements
You can have more than one instance of a given type of condition within a policy.
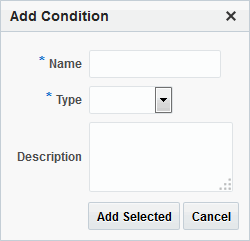
When an Administrator adds a condition to an authorization policy, a window (Figure 25-17) appears where you enter capture the Name, Type, and optional Description. When submitted, this information is used to create a container for condition details that must be also specified.
Table 25-12 describes the Add Condition elements.
Table 25-12 Add Condition Window Elements
| Element | Description |
|---|---|
|
Name |
A unique name for this condition. |
|
Type |
Only one Type can be specified:
|
|
Description |
Optional. |
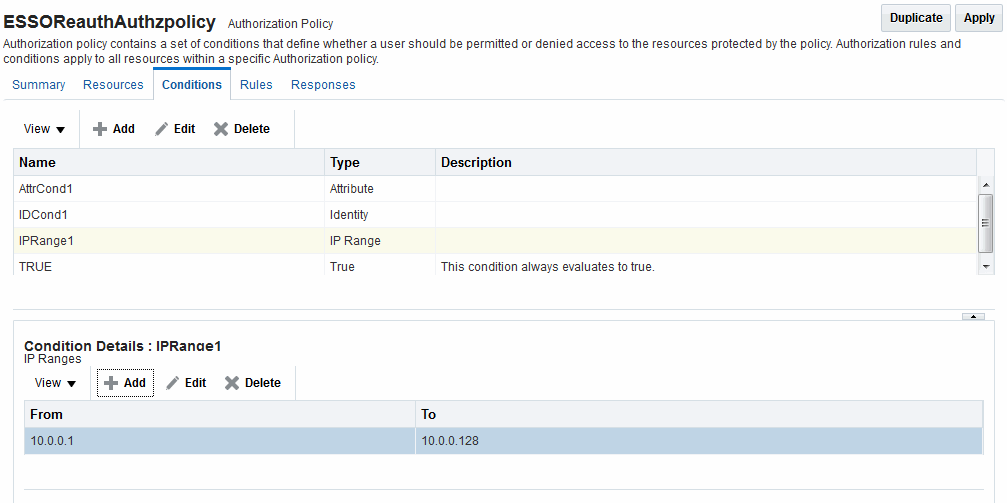
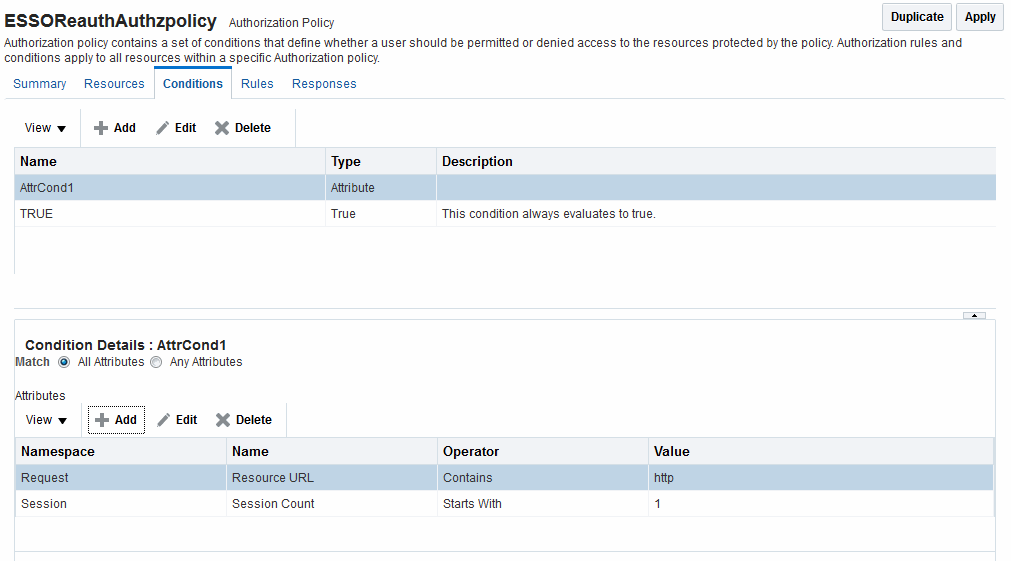
After the container is added it is displayed on the Condition tab as shown in Figure 25-18. The Name, Type, and Description are displayed in the Results table at the top of the tab. The lower panel contains the details of the condition
Figure 25-18 Condition Containers on the Authorization Policy Page

Description of "Figure 25-18 Condition Containers on the Authorization Policy Page"
See Also:
"Defining Authorization Policy Conditions" for information and procedures
25.10.1.2 Choosing a Condition Type
Users with valid Administrator credentials can choose a condition class for the authorization policy.
Note:
You can have more than one instance of a given class of condition in a policy.
Prerequisites
The Application Domain must exist.
See Also:
To choose a condition class
25.10.2 Defining Identity Conditions
This section provides all information about Identity Conditions in the following topics:
25.10.2.1 About Identity Conditions
When defining an Identity Condition, you must add one or more members of a user population from one or more User Identity Stores.
You can add the user population as a list of users or groups. Alternatively, you can add LDAP search filters to be used at runtime to identify the user population. LDAP search filters provide a simple way to specify a target identity population without having to reorganize or create new groups in the identity store (directory server). For details see:
25.10.2.1.1 Identity Conditions and User Populations
After opening the condition container, any defined user population is displayed. As with the other condition types, the Identity type can be used in conjunction with identity and temporal conditions.
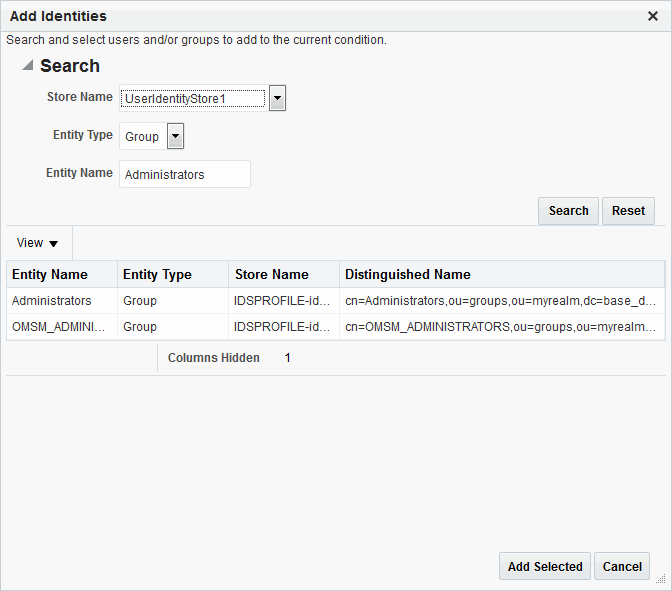
When adding an identity condition, you open the popup menu beside the Add (+) button (labeled 1 in Figure 25-19), choose to Add Users and Groups or Add Search Filter (2). Figure 25-19 shows the popup menu and the Add Identities window that appears (3). After locating the desired identities, select the desired Identities and click Add Selected (4).
Table 25-13 describes the Add Identities elements.
Table 25-13 Add identities Elements
| Element | Description |
|---|---|
|
Store Name |
Select the desired LDAP store for this search from the list of registered LDAP stores. |
|
Entity type |
Choose either Users, Groups, or All to define your search criteria. |
|
Entity Name |
Enter information to further refine your search criteria. |
|
Search |
Click this button when your search criteria are defined. |
|
Results table |
Displays the results of your search. |
|
Add Selected |
Click to add the selected users or groups from the results table to the Condition's Details. |
After selecting one or more identities and clicking the Add Selected button, your Conditions tab might look something like Figure 25-20.
Figure 25-20 Identity Condition and Details

Description of "Figure 25-20 Identity Condition and Details"
To save these details as a condition, click the Save button in the upper-right corner of the tab.
25.10.2.1.2 LDAP Search Filter Support in Identity Conditions
Access Manager 11g authorization conditions accept a list of users, groups, and LDAP search filters as part of allowed or denied identities. An LDAP filter is a text string that expresses specific criteria for the search operation. LDAP search filters provide a simple way to specify a target population without reorganizing or creating new groups in the identity store (directory server).
Access Manager 11g accepts LDAP search filter data for the following conditions and resource types:
-
Identity Conditions
-
Token Requestor Identity Conditions
-
All resource types (HTTP, TokenServiceRP, and other custom resource types)
When a user tries to access a resource protected by a condition containing an LDAP search filter, Access Manager performs a directory lookup (LDAP search) on the identity domain (identity store) specified as a part of the filter. Search results are cached to avoid repeated directory server lookups.
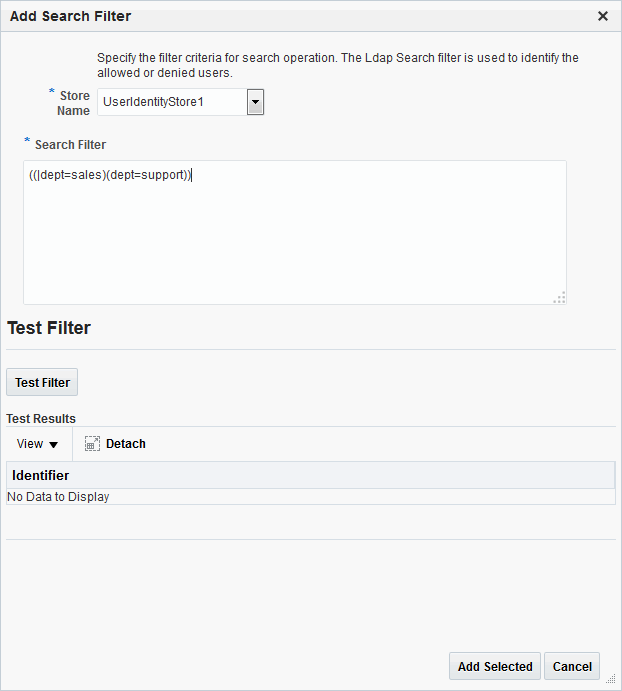
If you choose Add Search Filter ..., the controls shown in Figure 25-21 appear. You can add more than one LDAP Search Filter in an authorization rule for evaluation at runtime. The field where you enter your LDAP search filter is used to identify allowed/denied users.
Table 25-14 describes elements associated with adding a Search Filter.
Table 25-14 Add Search Filter Elements
| Element | Description |
|---|---|
|
Domain |
The Identity Domain (registered user identity store) in which the search should be conducted during runtime. Each filter must be associated with a specific user identity store. With Access Manager 11g, a directory lookup (LDAP Search) is performed only on the specified identity domain (identity store). |
|
Search Filter |
The field where you enter your LDAP search filter. For example: ((|dept=sales)(dept=support)) See Also: "LDAP Search Filter Syntax" |
|
Test Filter |
This button enables you to test your LDAP Search Filter to ensure it returns the expected result. |
|
Test Results |
The results of your filter test are displayed with your own designations for:
|
|
Add Filter |
Click to Add the filter to this identity condition. |
|
Cancel |
Click to dismiss the Add Search Filter dialog without adding a filter. |
Figure 25-22 shows the Identity Conditions: Details page, displayed after adding an LDAP Search Filter.
Figure 25-22 Identity Conditions: Details

Description of "Figure 25-22 Identity Conditions: Details"
See Also:
25.10.2.1.3 LDAP Search Filter Syntax
Only standard LDAP attributes can be used when defining an LDAP search filter. Exact syntax depends on your identity store; see your vendor documentation.
Table 25-15 illustrates LDAP Search Filter examples for Access Manager.
Table 25-15 LDAP Search Filter Examples for Access Manager
| Filter Type and Operators | Description | Syntax Example |
|---|---|---|
|
Static LDAP Search Filters |
When you implement a static search filter, all search results must match a fixed value. For example, you can restrict a search to return only people whose directory profiles show an organizational unit of Sales. As an example of a simple static filter, suppose you want to provide Selector searches for the seeAlso attribute. The filter returns search results that show only people whose directory profiles contain a businessCategory value of dealership. |
(attribute=value) For example: (businessCategory=dealership) |
|
Static Searches Using Wild Cards |
As an example of a static filter that uses wild cards, suppose you want only people with the word Manager in their title to be returned on a search using the Selector. You can create a filter that searches for the string Manager with the asterisk (*) wildcard. |
(attribute=*value*) For example: (title=*manager*) |
|
Dynamic LDAP Search Filters |
A dynamic filter allows a search to return results that are based on a user profile. A dynamic filter is a conventional LDAP search filter with filter substitution syntax. |
(attribute=$attribute$) |
|
Substitution syntax |
Substitution syntax is evaluated dynamically, according to the person executing a task. For instance, you can enter substitution syntax where the attribute value for the source DN (the person logged into the application) is substituted and evaluated against the target DN (the entry you are trying to view). Note: Setting a searchbase can present significant administrative overhead. A filter-based approach accomplished by substitution syntax can provide the same functionality in a more scalable and simplified design. Using substitution syntax, you can create a function that starts searches higher in the directory structure, but filters the search data by comparing an attribute of information from the search initiator's record (for example, using the substitution Note: For the selected searchbase, users can search only for entries from the same |
(attribute=$attribute$) For example: The following filter finds all those in the same organizational unit as the person logged in to the application: (ou=$ou$) |
|
Dynamic Searches Using Wild Cards |
Wildcards are supported in a dynamic filter. For example, suppose you want to supply a contactPerson attribute in an organizationalUnit object. The contactPerson attribute should return people in same Zip code as the organizationalUnit object. If the organizationalUnit profile contains an attribute zipCode, and the Zip code is specified at the end of a postalAddress directory attribute. |
(attribute=*$attribute$) For example: (postalAddress=*$zipCode$) |
|
Searches Using the Not Operator: (!) |
The Not operator is supported when constructing a filter. The optimized algorithm causes the filter (!(sn=white)) to not give the expected result. |
((!(sn=white))(objectclass=personOC)) |
See Also:
During migration to Access Manager 11g (from 10g), each LDAP Rule maps to corresponding 11g identity domains (user identity stores) based on Oracle Access Manager 10g directory profiles. Access Manager 11g identity domains (user identity stores) must be associated with each LDAP search filter.
See Also:
25.10.2.2 Specifying Identity Type Conditions
Users with valid Administrator credentials can add identity type conditions to an Application Domain.
Note:
You must save each condition definition individually, before adding or selecting another condition.
Prerequisites
The Application Domain must exist.
To add identity conditions to an authorization policy
25.10.3 Defining IP4 Range Conditions
This section provides the following information:
25.10.3.1 IP4 Range Condition Types
With the IP4 Range condition type, Administrators can specify a list of IP address ranges that will either be allowed or denied access. Like the other authorization conditions, IP4 Range condition types can be used in conjunction with identity and temporal conditions.
Explicit Addresses: Each IP address you specify must be an explicit, valid address (format nnn.nnn.nnn.nnn): 192.2.2.2, for example.
Note:
Oracle Access Manager 10g accepts a wildcard as the last entry (192.2.2.* or 192.2.*, for example). IP4 Ranges with no wildcards can be easily ported to 11g by creating a Condition containing multiple IP4 Range values. However, 10g IP4 Ranges with wildcards are expanded by upgrade tooling into multiple ranges relevant to the wildcard.
IP4 Range: You define a range by entering From (start) and To (end-range) address values. Each IP address you specify must be an explicit, valid address (format nnn.nnn.nnn.nnn): 192.2.2.2, for example. The address specified in the To field should be greater than the address specified in the From field. During authorization, Access Manager checks to ensure that the client IP address falls between the From (start)) and To (end-range) addresses specified. If multiple overlapping ranges are specified, and the client's IP address falls within even one of the ranges, the condition evaluates to "true" and allows (or denies) access based on the condition that was set for the condition.
If multiple overlapping ranges are specified, and the client's IP address falls within any one of the ranges, the condition evaluates to "true" and allows (or denies) access based on the condition.
Note:
If the From IP address is greater than the To address, the condition cannot match any client IP address.
Figure 25-23 illustrates the IP4 Range Conditions table with a sample starting and ending IP4 Range. If you enter an invalid range, you are notified and unable to save it.
25.10.3.2 Defining IP4 Range Conditions
Users with valid Administrator credentials can add IP4 Range type conditions to an Application Domain. You must save each condition definition individually, before adding or selecting another condition.
Note:
If the user's IP address falls outside the range of denied addresses, this by itself is not enough for authorization to be successful. For authorization to be successful, the user must specifically be granted access based on an Allow rule.
Prerequisites
The Application Domain must exist.
See Also:
To add IP4 Range type conditions to an authorization policy
25.10.4 Defining Temporal Conditions
This section provides the following topics:
25.10.4.1 Temporal Conditions
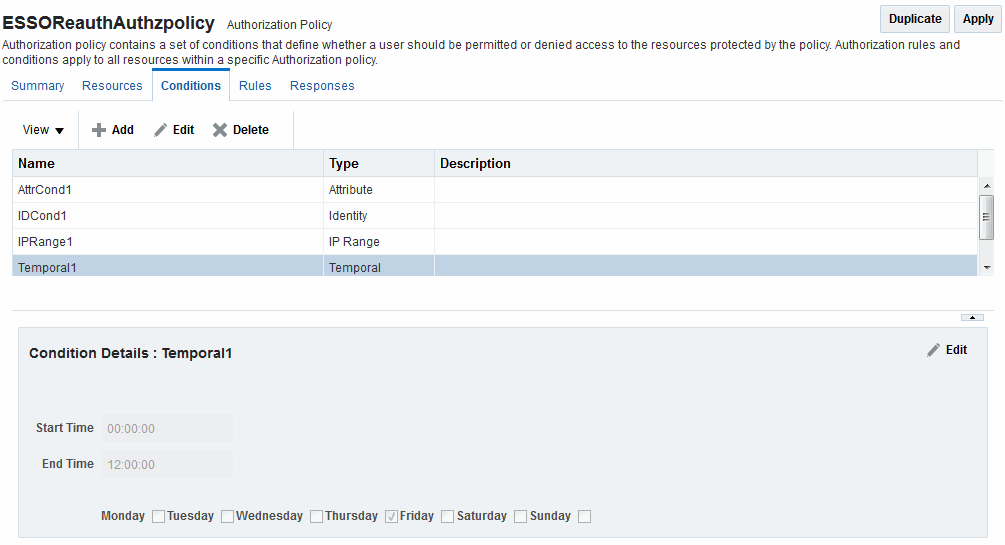
With the Temporal condition type, Administrators must add the start and end time and the range of days. Like the other conditions, this one can be used in conjunction with identity and IP4 Range conditions.
By default, all days in the range are enabled (though none are checked in the form as shown in Figure 25-24.
Figure 25-24 Temporal Condition Type Details Page
Description of "Figure 25-24 Temporal Condition Type Details Page"
Time periods must be specified in the HH:MM:SS (hour, minute, and second) format based on a 24-hour clock based on Greenwich Mean Time (GMT). Midnight is specified as 00:00:00 (start). The day ends at 24:59:59.
Table 25-16 Temporal Condition Details
| Elements | Description |
|---|---|
|
Start Time Notes: Time is specified using a full 24-hour range. For instance, midnight is specified as 00:00:00 and 11:00 PM is specified as 23:00:00. |
Specifies the hour, minute, and second that this condition begins. Notes: Time is based on Greenwich Mean Time (GMT). GMT is the same all year with no adjustments for daylight savings time or summer time. |
|
End Time |
Specifies the hour, minute, and second that this condition concludes. |
|
Days |
Specifies the days where this policy is active. Default: All Days (even though these are not checked). |
Save the details before closing this page.
See Also:
25.10.4.2 Defining Temporal Conditions
Users with valid Administrator credentials can add temporal type conditions to an Application Domain.
Note:
You must save each condition definition individually, before adding or selecting another condition.
Prerequisites
The Application Domain must exist.
See Also:
To add temporal conditions to an authorization policy
25.10.5 Defining Attribute Conditions
This section provides the following topics:
25.10.5.1 Attribute-Type Conditions
An attribute-type condition enforces the evaluation of request context, user session state and user attributes for Allow or Deny access pertaining to all resource types and authorization policies in the Application Domain.
With an attribute-type condition defined, access is based on a list of name-value pairs scoped by the:
-
Request context: Information on the requested resource, the client making the request, and the policy that was matched during evaluation.
-
Session: User Session details (pre-defined session attributes or a reference to an arbitrary session attribute) when the user has an established session.
-
User: User attribute information (reference to a LDAP attribute). This condition is used to define a condition on a reference to a user's arbitrary LDAP attribute only. However, conditions based on userID or groupID are defined using Identity Conditions.
Attribute type conditions are required when access is based on one of the situations described in Table 25-17.
Table 25-17 Access Conditions that Require Attribute-Type Conditions
| When Access is based on ... | Description |
|---|---|
|
Session attribute |
A user is authorized to access the resource if the session attribute "Authentication level" is xx and Session Attribute "s1" = "v1" and Session Start Time = "xxxx". See: Table 25-20 |
|
Requested resource |
hostname and port number See: Table 25-19 |
|
User details |
A user is authorized to access the resource if its "Empno" = "xxxx" (department=sales, for example) See: Table 25-21 |
|
Token Issuance based on a session attribute |
The Requester Partner can issue a token to the Relying Party if the claim contains an attribute "SessionActiveTime" = "15000". You define claims-based conditions of the Token Issuance policy based on the assertions created using session data. |
An Administrator defining attribute type conditions enters data into fields for built-in attributes and known attributes. The attribute name can be entered in a text field or selected from a list of values. The condition to be executed is constructed using "AND" or "OR" conjunctions on the condition. Figure 25-25 illustrates the Attribute Conditions page.
Figure 25-26 shows the Add Attribute Condition dialog box. Each attribute condition is defined by the fields described in Table 25-18.
See Also:
Figure 25-26 Add Attribute Condition Dialog
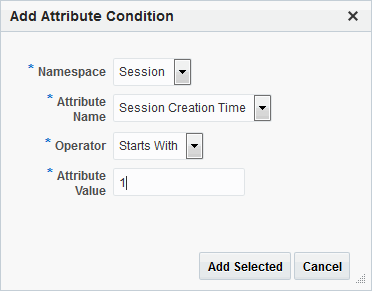
Description of "Figure 25-26 Add Attribute Condition Dialog "
Table 25-18 Attribute Condition Elements
| Condition | Description |
|---|---|
|
Namespace |
Supported namespaces:
|
|
Name |
Attribute name, which can be added as follows, depending on the:
|
|
Operator |
Allowed operators:
|
|
Value |
Literal value with no special wildcard characters. |
Request Built-ins
Table 25-19 identifies the list of built-in attribute names for Request Built-ins:
Table 25-19 Attribute Names for Request Built-ins
| Attribute Name | Description |
|---|---|
|
agent_id |
Name of the requesting agent. |
|
client_ip |
IP address of the user browser. |
|
Policy_appdomain |
Name of the Application Domain holding the policy matched for the request. |
|
Policy_res |
Resource host ID and URL pattern matched for the request. |
|
policy_name |
Name of the specific policy matched for the request. |
|
res_host |
Requested resource's hostname. |
|
res_port |
Requested resource's port number. |
|
res_type |
Requested resource's type. |
|
res_url |
Requested resource URL. |
Session Built-ins
Table 25-20 identifies the list of attribute names for Session-based attribute-type conditions.
Table 25-20 Attribute Names for Session Built-ins
| Attribute Name | Description |
|---|---|
|
Authentication Level |
Current authentication level for the session. |
|
Authentication Scheme |
Name of the authentication scheme executed to achieve the current authentication level. |
|
Session Count |
Session count for the user bound to this session. |
|
Session Creation Time |
Session creation time. |
|
Session Expiry Time |
Session expiration time. |
Example: Attribute Condition Data (Aggregation of Conditions)
Table 25-21 illustrates sample condition data for each allowable namespace.
Table 25-21 Attribute Condition Data (Aggregation of Conditions)
| Namespace | Name | Operator | Value |
|---|---|---|---|
|
Request-Builtins |
Res_host |
Equals |
7777 |
|
Session-Builtins |
Authn_level |
Equals |
2 |
|
Session |
Sessionattr1 |
Contains |
Foo |
|
User |
department |
Equals |
sales |
25.10.5.2 Defining Attribute Type Conditions
Users with valid Administrator credentials can add attribute type conditions to an Application Domain.
Note:
You must save each condition definition individually, before adding or selecting another condition.
Prerequisites
The Application Domain must exist.
See Also:
To add attribute type conditions to an authorization policy
