59.6 Setting Up Microsoft Windows Impersonation
If you want to use a directory server other than Active Directory, use LDAP Membership provider. The OAMCustomMembership provider leverages the functionality of LDAP Membership provider.
This section describes how to set up impersonation, whether for SharePoint Server integration or for use by some other application.
Note:
Skip this section if you are integrating Microsoft SharePoint Server configured with LDAP Membership Provider. Windows impersonation is not used with the LDAP Membership Provider.
Task overview: Setting up impersonation
- Create a trusted user account for only impersonation in the Active Directory connected to SharePoint Server, as described in "Creating Trusted User Accounts".
- Give the trusted user the special right to act as part of the operating system, as described in "Assigning Rights to the Trusted User".
- Bind the trusted user to the WebGate by supplying the authentication credentials for the trusted user, as described in "Binding the Trusted User to Your WebGate".
- Add a header variable named IMPERSONATE to the Authorization Success Action in the Application Domain for impersonation, as described in "Adding an Impersonation Response to an Authorization Policy".
- Configure IIS by adding the
IISImpersonationModule.dllto your IIS configuration, as described in "Adding an Impersonation DLL to IIS". - Test impersonation, as described in "Testing Impersonation".
59.6.1 Creating Trusted User Accounts
You can create trusted user accounts. The special user should not be used for anything other than impersonation.
The example in the following procedure uses Impersonator as the New Object - User. Your environment will be different.
To create a trusted user account:
Note:
Oracle recommends that you chose a very complex password, because your trusted user is being given very powerful permissions. Also, be sure to check the box marked Password Never Expires. Since the impersonation module should be the only entity that ever sees the trusted user account, it would be very difficult for an outside agency to discover that the password has expired.
Figure 59-1 Setting up a Trusted User Account for Windows Impersonation
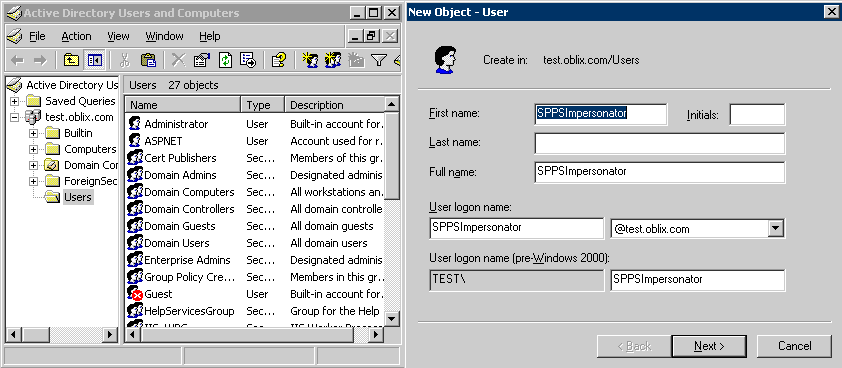
Description of "Figure 59-1 Setting up a Trusted User Account for Windows Impersonation"
59.6.2 Assigning Rights to the Trusted User
You need to give the trusted user the right to act as part of the operating system.
To give appropriate rights to the trusted user:
Figure 59-2 Configuring Rights for the Trusted User in Windows Impersonation
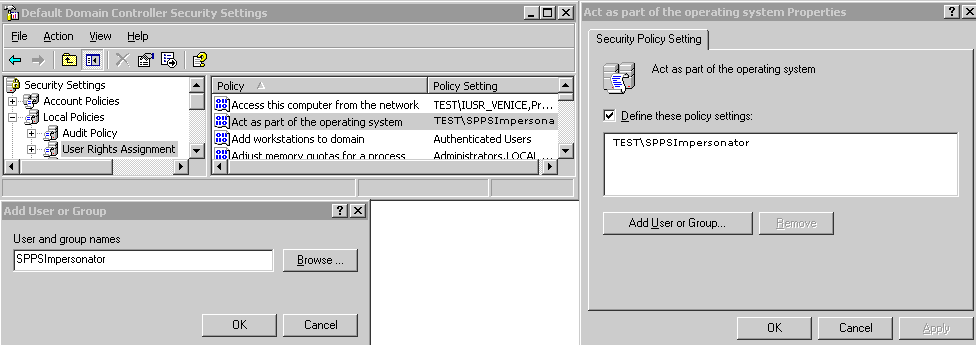
Description of "Figure 59-2 Configuring Rights for the Trusted User in Windows Impersonation"
59.6.3 Binding the Trusted User to Your WebGate
You need to bind the trusted user to the 10g WebGate that communicates with Access Manager by supplying the authentication credentials for the trusted user.
The following procedure presumes that you have not yet registered a 10g WebGate with Access Manager. Values in the following procedure are provided as an example only. Your environment will be different.
To bind your trusted user to your WebGate
-
Go to the Oracle Access Management Console.
For example:
http://hostname:port/oamconsolewhere hostname is the fully-qualified DNS name of the computer hosting the Oracle Access Management Console; port is the listening port configured for the OAM Server; oamconsole leads to the Oracle Access Management Console.
-
Click Application Security at the top of the window.
-
In the Launch Pad tab, click SSO Agent Registration in the Quick Start Wizards section.
-
Select WebGate as the agent type and click Next..
-
Set the version to 10g and enter required details (those with an *) to register this WebGate.
-
Protected Resource List: In this table, enter individual resource URLs to be protected by this OAM Agent, as shown in Table 14–9.
-
Public Resource List: In this table, enter individual resource URLs to be public (not protected), as shown in Table 14–9.
-
Auto Create Policies: Check to create fresh policies (or clear and use the same host identifier as another WebGate to share policies (Table 14–9)).
-
Click Apply to submit the registration.
-
Check the Confirmation window for the location of generated artifacts, then close the window.
-
In the navigation tree, open the Agent page.
-
SharePoint Requirements: Enter trusted user credentials in the Sharepoint Impersonator fields and click Apply.
-
Copy the artifacts as follows (or install the WebGate and then copy these artifacts):
-
On the Oracle Access Management Console host, locate the updated OAM Agent ObAccessClient.xml configuration file (and any certificate artifacts). For example:
$DOMAIN_HOME/output/$Agent_Name/ObAccessClient.xml
-
On the computer hosting the agent, copy the artifacts. For example
- 10g WebGate/AccessClient: $WebGate_install_dir/oblix/lib/
- ObAccessClient.xml
-
Proceed to "Adding an Impersonation Response to an Authorization Policy".
-
59.6.4 Adding an Impersonation Response to an Authorization Policy
IMPERSONATE, with the Response value of $user.userid: "samaccountname" for a single-domain Active Directory installation or "userPrincipalName" for a multi-domain Active Directory forest.To add an impersonation response to your Authorization Policy:
59.6.5 Adding an Impersonation DLL to IIS
You can add an impersonation DLL to IIS.
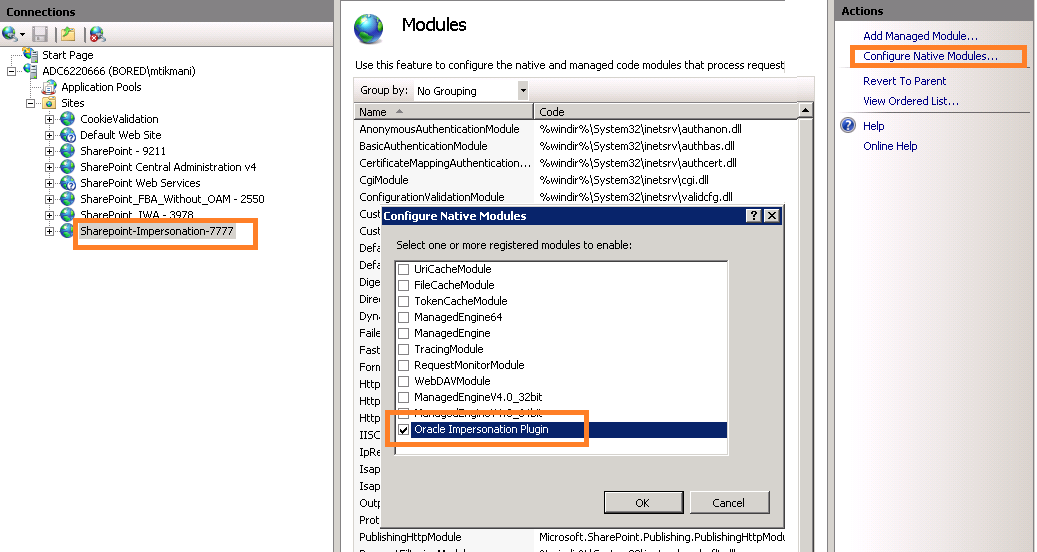
You can configure IIS Web server for the integration by registering and configuring the IISImpersonationModule.dll across all sites including central administration and web services.
Alternatively, if you have multiple Web sites, where some are integrated with Access Manager while others are not, you might want to enable impersonation only for those Web sites that are integrated with Access Manager. To do this, you must configure the Native Module only at those sites that require integration. See:
59.6.5.1 Configuring and Registering ImpersonationModule to IIS.
You can configure and register ImpersonationModule to IIS
To configure and register ImpersonationModule to IIS
Figure 59-3 Registering the Impersonation Module
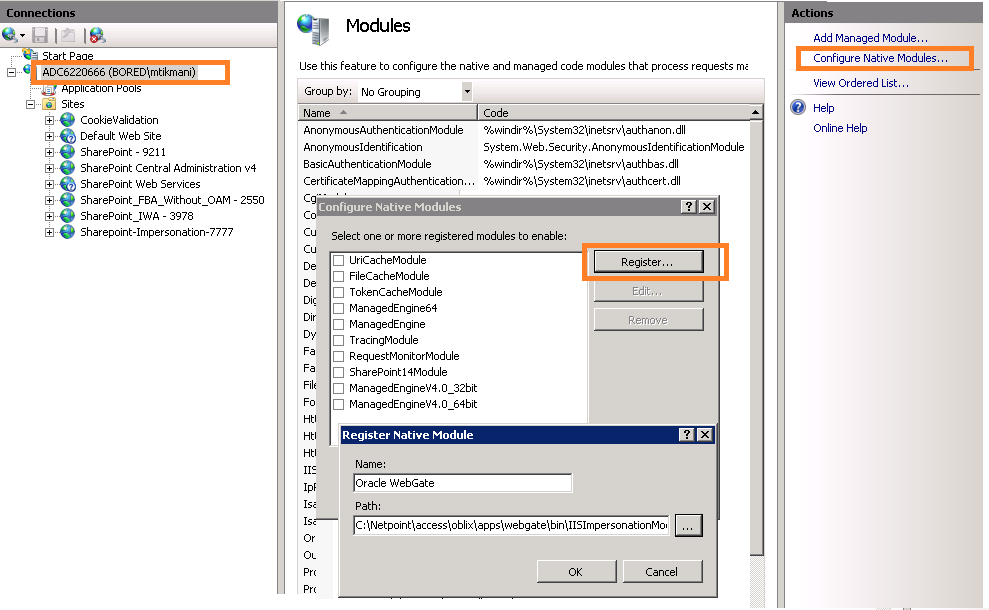
Description of "Figure 59-3 Registering the Impersonation Module"
59.6.6 Testing Impersonation
You can test to ensure that impersonation is working properly before you complete the integration.
Following are the ways to test impersonation:
-
Outside the SharePoint Server context or test single sign-on, as described in "Creating an IIS Virtual Site Not Protected by SharePoint Server"
-
Using the Event Viewer, as described in "Testing Impersonation Using the Event Viewer"
-
Using a Web page, as described in "Testing Impersonation using a Web Page"
-
Using negative testing as described in "Negative Testing for Impersonation"
See Also:
"Completing the SharePoint Server Integration" after confirming impersonation configuration is working properly
59.6.6.1 Creating an IIS Virtual Site Not Protected by SharePoint Server
To test the impersonation feature outside the SharePoint Server context or to test single sign-on, you will need a target Web page on an IIS virtual Web site that is not protected by SharePoint Server.
You create such a virtual Web site by completing the following task.
To create an IIS virtual site not protected by SharePoint Server
- Select Start, Administrative Tools, Internet Information Services (IIS) Manager.
- Click the plus icon (+) to the left of the local computer icon on the tree in the left pane.
- Right-click Web Sites on the tree in the left pane, then navigate to New, Web Site on the menu.
- Respond to the prompts by the Web site creation wizard.
- After you create the virtual site, you must protect it with policies in an Application Domain.
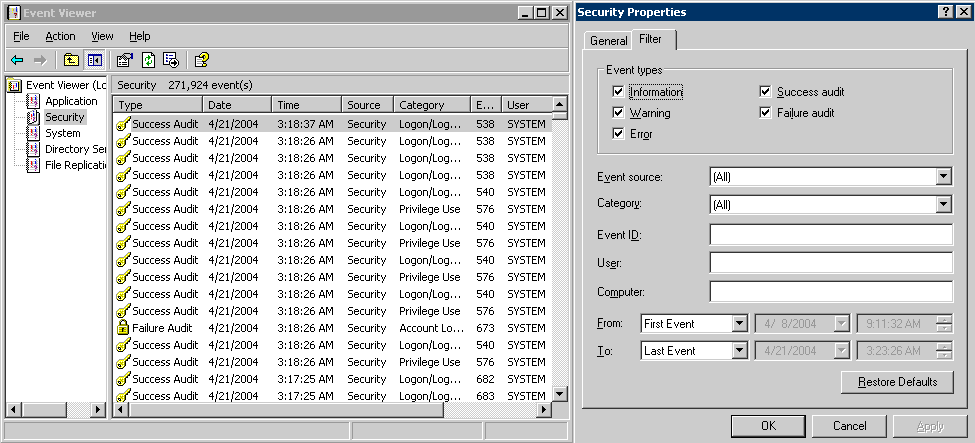
59.6.6.2 Testing Impersonation Using the Event Viewer
When you complete impersonation testing using the Windows 2003 Event Viewer, you must configure the event viewer before conducting the actual test.
To test impersonation through the Event Viewer:
If impersonation is working correctly, the Event Viewer will report the success of the access attempt.
59.6.6.3 Testing Impersonation using a Web Page
You can also test impersonation using a dynamic test page, such as an .asp page or a Perl script, that can return and display information about the request.
To test impersonation through a Web page that displays server variables
59.6.6.4 Negative Testing for Impersonation
To conduct negative testing for impersonation, you need to unbind the trusted user from the WebGate.
To unbind the trusted user from your WebGate:
- In the Oracle Access Management Console, locate the WebGate.
- Open the desired WebGate registration page and remove the credentials for the trusted user.
- Click Apply to save the change.
- Restart the IIS server and in a browser window, go to a protected code page (previously accessible to the trusted user).
- Confirm that you receive an message page should appear. Values for AUTH_USER and IMPERSONATE are necessary for impersonation credentials to be bound to a WebGate.
- Restore the trusted user to the WebGate registration page.
