4 Adding Oracle Exalytics In-Memory Machine to Your Network
This chapter describes how to connect the Oracle Exalytics In-Memory Machine to your existing network. It also describes how to configure the Oracle Exalytics In-Memory Machine using the exalytics_configure_network.sh script.
Note:
You must download theexalytics_configure_network.sh script from the edelivery site. Create directories named exalytics/bin in the /opt directory on your Oracle Exalytics In-Memory Machine and copy the script to this location. Run the script from this location.It contains the following topics:
-
Section 4.3, "Transceiver and Optical Modules for 10 GbE Connectivity"
-
Section 4.6, "Connecting Exalytics In-Memory Machine to Your Network"
-
Section 4.7, "Configuring the Network for Oracle Exalytics In-Memory Machine"
4.1 Before You Begin
Before connecting the Oracle Exalytics In-Memory Machine to your data center's existing network, ensure that the following prerequisites are satisfied:
4.1.1 Switch Requirements
Before connecting the Oracle Exalytics In-Memory Machine to your data center's network, complete the following preparatory tasks:
-
Identify the network switch or connector that you will use to connect the Oracle Exalytics In-Memory Machine to your network.
-
Identify the IP subnet and the address range associated with the network switch.
4.1.2 Cable Requirements
The following Ethernet cables are included in the Oracle Exalytics In-Memory Machine package:
-
One 10-feet (CAT5/CAT5E) red cable (part number: 530-4433-01)
-
One 10-feet (CAT5/CAT5E) black cable (part number: 530-4435-01)
You can use these cables to connect the Oracle Exalytics In-Memory Machine to your data center's network.
4.2 Overview of Network Ports
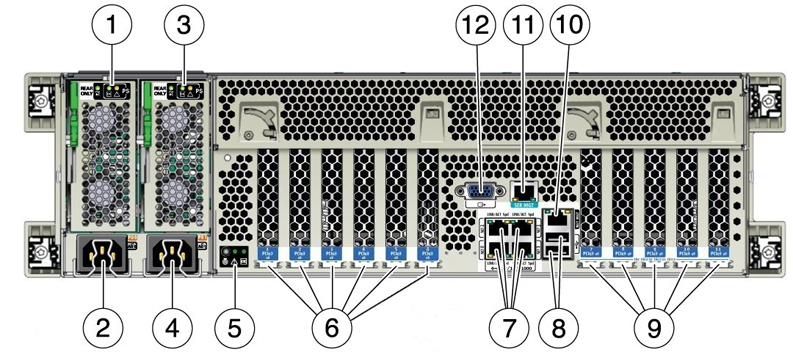
Figure 4-1 shows the network ports available on the Oracle Exalytics In-Memory Machine X4-4.
Figure 4-1 Network Ports on the Back of the Oracle Exalytics In-Memory Machine X4-4
Description of "Figure 4-1 Network Ports on the Back of the Oracle Exalytics In-Memory Machine X4-4 "
Table 4-1 lists out the ports called out in Figure 4-1.
Table 4-1 Back Panel of Oracle Exalytics In-Memory Machine X4-4
| Call out | Description |
|---|---|
|
1 |
Power supply unit (PSU) 0 indicator panel |
|
2 |
PSU 0 AC inlet |
|
3 |
PSU 1 indicator panel |
|
4 |
PSU 1 AC inlet |
|
5 |
System status indicator panel |
|
6 |
PCIe card slots 1–6 |
|
7 |
Network (NET) 10 GbE ports: NET0–NET3 |
|
8 |
USB 2.0 ports (2) |
|
9 |
PCIe card slots 7–11 |
|
10 |
Service processor (SP) network management (NET MGT) port |
|
11 |
Serial management (SER MGT)/RJ-45 serial port |
|
12 |
DB-15 video port |
Figure 4-2 and Figure 4-3 show the network ports available on the Oracle Exalytics In-Memory Machine X3-4, and Oracle Exalytics In-Memory Machine X2-4, respectively.
Figure 4-2 Network Ports on the Back of the Oracle Exalytics In-Memory Machine X3-4
Description of "Figure 4-2 Network Ports on the Back of the Oracle Exalytics In-Memory Machine X3-4 "
Figure 4-3 Network Ports on the Back of the Oracle Exalytics In-Memory Machine X2-4
Description of "Figure 4-3 Network Ports on the Back of the Oracle Exalytics In-Memory Machine X2-4"
In Figure 4-3 and Figure 4-2, the four 10/100/1000 Gb Ethernet ports located on the rear of the Oracle Exalytics In-Memory Machine are shown in a red circle of dashed line. They are named NET 0, NET 1, NET 2, and NET 3.
Note:
Although you can use any of these Gb Ethernet ports, Oracle recommends that you useNET 0.The ILOM 10/100 Ethernet port is shown in a blue circle of solid line. This port is named NET MGT.
4.3 Transceiver and Optical Modules for 10 GbE Connectivity
To use the 10 GbE network ports, you must provide Small Form-factor Pluggable Plus (SFP+) transceivers and/or cables (either optical or copper) to connect the network ports to your existing 10 GbE network infrastructure. The Oracle Exalytics In-Memory Machine does not ship with SFP+ transceivers or 10 GbE cables. You must purchase them separately.For copper cables, you can purchase the following cables from Oracle. These cables have built-in SFP+ transceivers, and there is no need to purchase separate SFP+ transceivers for the network ports on the Oracle Exalytics In-Memory Machine.
| Name | Length | Oracle Part Number |
|---|---|---|
|
TwinAx 1m |
1m |
X2130-1M |
|
TwinAx 3m |
3m |
X2130-3M |
|
TwinAx 5m |
5m |
X2130-5M |
|
TwinAx 10m |
10m |
X2130-10M |
For optical cables, you must purchase SFP+ transceivers (either Short Range (SR) or Long Range (LR)) for each of the network ports, and then plug in the appropriate optical cable. Currently Oracle sells both the SR and LR SFP+ transceivers.
| Name | Part Number |
|---|---|
|
10 GbE Transceiver SR (SFP+) |
X2129A-N |
|
10 GbE Transceiver LR (SFP+) |
X5562A-Z |
In addition to these transceivers, you must purchase the appropriate LC-LC terminated fiber optic cables from a third party vendor.
4.4 Universal Host Bus Adapter (HBA) for Fibre Channel (FC) and Fibre Channel over Ethernet (FCoE) Connectivity
Use the Universal Host Bus Adapter to connect to a FC and FCoE networks. The universal HBA is a configurable board that enables you to change its operating protocol mode from a two-port 16 Gb FC HBA to a two-port 10 GbE Fibre Channel over Ethernet (FCoE) Converged Network Adapter. The universal HBA has four possible configurations:
-
10 GbE FCoE Copper — This configuration provides twin-ax copper cable connectivity and 10 GbE FCoE HBA functionality. No optical transceiver modules are installed in, nor provided with, this configuration of the universal HBA.
-
16 Gb FC SW (shortwave) Optical — This configuration requires installing 16 Gb FC shortwave optical transceiver modules in the SFP+ connector of the universal HBA, enabling 16 Gb Fibre Channel HBA functionality.
-
10 GbE FCoE SR (short-range) Optical — This configuration requires installing 10 GbE short-range optical transceiver modules in the SFP+ connectors of the universal HBA, enabling 10 GbE FCoE Converged Network Adapter functionality.
-
16 Gb FC LW (longwave) Optical—This configuration requires installing 16Gb FC long-range optical transceiver modules in the SFP+ connectors of the universal HBA, enabling 16 Gb FC HBA functionality.
4.4.1 Installing the Universal Host Bus Adapter
To install the Universal Host Bus Adapter for connectivity, complete the following steps:
-
Prepare for installation.
If you choose to configure the universal HBA so that the HBA is connected to SFP+ optical transceiver modules, you must install the optical transceiver modules before you install the universal HBA into the system. See Preparing for Installation for the detailed steps.
-
Install the Universal HBA hardware. See Installing the Hardware for detailed steps.
-
Install the Universal HBA software. See Software Installation for detailed steps.
4.5 Default ETH0 IP Address
When an Exalytics In-Memory Machine is delivered, the default IP address that is configured for the eth0 (physical NET0 port) interface of the machine might vary. It can be any IP address in the class C subnet 192.168.1.0.
To determine the eth0 IP address of an Exalytics In-Memory Machine, connect to the ILOM of that machine through SSH using the default IP address 192.168.1.200. After logging in, run the following command to view the network configuration information:
show /SP/network
4.6 Connecting Exalytics In-Memory Machine to Your Network
To connect the Oracle Exalytics In-Memory Machine to your data center's network, complete the following steps:
-
Attach one end of the network cable to a Gb Ethernet port, such as
NET 2(see Figure 4-3). -
Connect the other end of the cable to a network connector or switch, if the network is already set up in your building; or to a hub, for a client/server network.
-
Ensure that you have a laptop with functional USB and network ports.
-
Ensure that you have a Category 5E patch cable of maximum length 25 feet and a serial cable of maximum length 15 feet.
-
Connect the network port of your laptop into an unused input port in the network connector or switch. Do not connect to any management ports on the network connector or switch.
-
If you have not booted the operating system on your laptop, start the operating system now.
-
If you are using the Windows operating system on your laptop, do the following:
-
Go to Control Panel > Network Connections. Select your wired network adapter in the list of network connections, right-click and select Properties. The network properties screen is displayed.
-
Click the General tab, and select Internet Protocol (TCP/IP). Click Properties. The Internet Protocol (TCP/IP) Properties screen is displayed.
-
Select the Use the following IP address: option, and enter a static IP address for your laptop. Although a default gateway is not necessary, enter the same IP address in the Default Gateway field. Click OK to exit the network connections screen.
Note:
This static IP should be on the same subnet and address range as the network on which your data center's network switch or connector resides.
-
-
If you are using a Linux operating system on your laptop, do the following:
-
Log in as a
rootuser. -
At the command prompt, enter the following command to display the network devices, such as
ETH0, attached to the Oracle Exalytics In-Memory Machine:# ifconfig -aThe list of network devices or adapters attached to the Oracle Exalytics In-Memory Machine is displayed.
-
To set up the desired network interface, run the
ifconfigcommand at the command prompt, as in the following example:# ifconfig eth0 192.0.2.10 netmask 255.255.255.0 upIn this example, the
ifconfigcommand assigns the IPv4 address192.0.2.10, with a network mask of255.255.255.0, to theeth0interface.
-
-
4.7 Configuring the Network for Oracle Exalytics In-Memory Machine
This section describes how to use the exalytics_configure_network.sh script, to configure the network for Oracle Exalytics In-Memory Machine.
It contains the following topics:
4.7.1 Overview
The exalytics_configure_network.sh script is used to configure the Oracle Exalytics In-Memory Machine after the initial operating system image is installed.
This script verifies the following:
-
When started, the script verifies that the user is
root. Users other thanrootare not allowed to run the script. -
It verifies that the Oracle Exalytics In-Memory Machine is installed with a 10 GbE card. If the card is not installed or the drivers are not configured, the script stops its execution.
-
It verifies connectivity to all gateways and hostnames configured in the session.
You can run the script to configure the following multiple interfaces:
Note:
You cannot configure Fiber Channel using theexalytics_configure_network.sh script.4.7.1.1 InfiniBand
The exalytics_configure_network.sh script optionally configures the InfiniBand network interface by bonding two InfiniBand interfaces. This interface is for IPoIB communication (bond0) intended for Oracle Exalytics In-Memory Machine's connectivity with Exalogic machine or Oracle Exadata Database Machine. You must specify an IP address and netmask for the script. A gateway address for this InfiniBand interface is not necessary.
When you configure InfiniBand using the exalytics_configure_network.sh script, the following files are updated:
/etc/sysconfig/network-scripts/ifcfg-ib*
/etc/sysconfig/network-scripts/ifcfg-bond0
/etc/modprobe.conf
Note:
The script keeps a copy of these files in the/tmp/exalytics.save/ directory and creates a flat backup for the files that may be modified.4.7.1.2 10 GbE Interfaces
The exalytics_configure_network.sh script verifies whether bonding is required on the 10 GbE interfaces. If you opt for bonding, the script configures the bonded interfaces using bond1 on all 10 GbE interfaces. For bond1 interface, the script requires an IP address, netmask, and gateway address.
If you do not opt for a bonded interface, the script verifies whether you want to configure each interface separately. You are prompted to enter an IP address, netmask, and gateway address for each individual interface configured.
When you configure 10 GbE interfaces using the exalytics_configure_network.sh script, the following files are updated:
/etc/sysconfig/network-scripts/ifcfg-eth*
/etc/sysconfig/network-scripts/ifcfg-bond1
/etc/modprobe.conf
Note:
The script keeps a copy of the interface files in the/tmp/exalytics.save/ directory and creates a flat backup for the files that may be modified.4.7.1.3 1 GbE Interfaces
The exalytics_configure_network.sh script verifies whether bonding is required on the 1 GbE interfaces. If you opt for bonding, the script configures the bonded interfaces using bond2 on all 1 GbE interfaces. For bond2 interface, the script requires an IP address, netmask, and gateway address.
If you do not opt for a bonded interface, the script verifies whether you want to configure each interface separately. You are prompted to enter an IP address, netmask, and gateway address for each individual interface configured.
When you configure 1 GbE interfaces using the exalytics_configure_network.sh script, the following files are updated:
/etc/sysconfig/network-scripts/ifcfg-eth*
/etc/sysconfig/network-scripts/ifcfg-bond2
/etc/modprobe.conf
Note:
The script keeps a copy of the interface files in the/tmp/exalytics.save/ directory and creates a flat backup for the files that may be modified.4.7.1.4 Host Name
The exalytics_configure_network.sh script optionally configures a host name and a domain name for your Oracle Exalytics In-Memory Machine. You cannot configure a domain name without configuring a host name.
The configured host name maps to an IP address in the following sequence:
-
The Last IP configured in this session.
-
If no IP configured, it will take the IP from first active interface from:
bond1,bond2, …,eth5. -
If no IP is found, then no IP is configured in the
/etc/hostsfile.
When you configure host name using the exalytics_configure_network.sh script, the following files are updated:
/etc/sysconfig/network
/etc/hosts
Note:
The script keeps a copy of the interface files in the/tmp/exalytics.save/ directory and creates a flat backup for the files that may be modified.4.7.1.5 Time
The exalytics_configure_network.sh script optionally configures the time zone using the tzselect script. This script guides you to select a continent, country, and city using numbered menu selection. The script verifies whether a network time server should be configured. If you choose to configure a server, the script prompts you to enter the server name and other required information.
If you do not opt for time server configuration, the script prompts you to set time and date.
For network time server configuration, the script modifies the /etc/ntp.conf file, and it starts the ntpd daemon and adds it to start at boot.
For time zone selection, the script creates a new soft link to /etc/localtime.
Note:
The script keeps a copy of the interface files in the/tmp/exalytics.save/ directory and creates a flat backup for the files that may be modified.4.7.1.6 Domain Name Server (DNS)
The exalytics_configure_network.sh script optionally configures one or more domain name servers that you specify.
When you configure domain name servers using the exalytics_configure_network.sh script, the following file is updated:
/etc/resolv.conf
Note:
The script keeps a copy of the interface files in the/tmp/exalytics.save/ directory and creates a flat backup for the files that may be modified.4.7.2 State of the Oracle Exalytics In-Memory Machine Before Running the Script
Before running the exalytics_configure_network.sh script, your Oracle Exalytics In-Memory Machine is not configured with the following:
-
10 GbE and 1 GbE network interfaces
-
Optional InfiniBand network interfaces
-
Host name, domain name, and time zone
-
Time server and domain name servers
4.7.3 Running the exalytics_configure_network.sh Script
Run the exalytics_configure_network.sh script, and choose your configuration option, as described in Table 4-4.
Table 4-4 exalytics_configure_network.sh Properties
| Question/Parameter | Description |
|---|---|
|
|
Enter |
|
|
Enter a |
|
|
Verify the |
|
|
Enter a |
|
|
Verify the |
|
|
Depending on your configuration option, enter |
|
|
Depending on your configuration option, enter |
|
|
Depending on your configuration option, enter |
|
|
Enter an |
|
|
Verify the |
|
|
Enter a netmask for the |
|
|
Verify the |
|
|
Enter the |
|
|
Verify the |
|
|
Depending on your configuration option, enter |
|
|
Depending on your configuration option, enter |
|
|
Depending on your configuration option, enter |
|
|
Depending on your configuration option, enter |
|
|
Depending on your configuration option, enter |
|
|
Enter an |
|
|
Verify the |
|
|
Enter a netmask for the |
|
|
Verify the |
|
|
Enter an |
|
|
Verify the |
|
|
Depending on your configuration option, enter |
|
|
Depending on your configuration option, enter |
|
|
Depending on your configuration option, enter |
|
|
Depending on your configuration option, enter |
|
|
Depending on your configuration option, enter |
|
|
Depending on your configuration option, enter |
|
|
Depending on your configuration option, enter |
|
|
Enter a hostname for the machine. For example, |
|
|
Verify the hostname you specified, and enter |
|
|
Enter a domain name. For example, |
|
|
Verify the domain name you specified, and enter |
|
|
Depending on your configuration option, enter |
|
Please select a continent or ocean. |
Enter your location. For example, if your location is Americas, enter |
|
|
Enter your country. For example, if your country is United States, enter |
|
|
Enter your time zone. For example, if your time zone is Pacific time, enter |
|
|
If the information is correct, enter |
|
|
If you want to configure a time server, enter |
|
|
If you want to configure one or more domain name servers, enter |
|
|
To confirm your configuration options and values, enter |
4.7.4 Verifying the Configuration
After the exalytics_configure_network.sh script runs successfully, you can verify the network configuration for your Oracle Exalytics In-Memory Machine machine as follows:
-
Ping 10 GbE network addresses to verify the 10 GbE network interfaces
-
Ping 1 GbE network addresses to verify the 1 GbE network interfaces
-
Run the
ibstatcommand on the Oracle Exalytics In-Memory Machine to verify the InfiniBand network interface -
Ping the gateway addresses
-
Ping an IP address of a machine that is in the same subnet as Oracle Exalytics In-Memory Machine for each of the interfaces
-
Verify the log file (
/var/log/init-exalytics/init-exalytics.log) -
Run the
ifconfig -acommand to verify the network configuration
4.8 What Next?
After configuring network for the Oracle Exalytics In-Memory Machine, you can proceed to install the Oracle Business Intelligence software on the machine. For more information, see the Oracle Exalytics In-Memory Machine Installation and Administration Guide for Linux.
For information about installing Oracle Essbase, see Oracle Hyperion Enterprise Performance Management System Installation and Configuration Guide.