Oracle Server X5-4 Getting Started Guide
This document describes the basic steps to install an Oracle Server X5-4. For more detailed information, refer to the Oracle Server X5-4 Installation Guide.
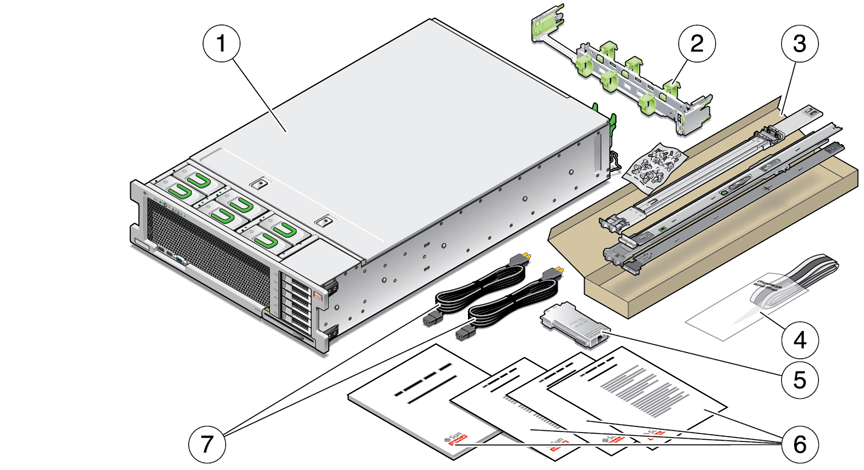
Step 1: Check the Contents of the Ship Kit
The following illustration and table show the items that are included in the server ship kit.
|
Step 2: Inspect the Server and Install Optional Components
-
Remove the server cover and ensure that replaceable components and cables are properly connected and secured. For more information, see Replaceable Components.

Caution - Component damage from electrostatic discharge (ESD). Components inside the server are sensitive to ESD. Use an antistatic mat and wear an antistatic wrist strap when handling components and working inside the server.

-
Before installing the server in the rack, install any optional components (such as DIMMs or PCIe cards).
For component installation procedures, refer to the Oracle Server X5-4 Service Manual.
Note - Optional components might be packaged and shipped separately from the server.
Step 3: Install the Server in the Rack
| Caution - Bodily injury and equipment damage. The server is heavy. Do not attempt to lift the server without the assistance of a mechanical device. |
For rackmounting instructions, refer to the documents included with the rail kit, the service label attached to the server, or the Oracle Server X5-4 Installation Guide.

Step 4: Connect Cables and Devices to the Server
Connect cables and devices to the server, so you can power on the server, connect it to your network, and access Oracle System Assistant. Oracle System Assistant helps you set up the server and install an operating system (OS).
-
Connect a VGA monitor to the VGA connector on the front of the server.

-
Connect a USB keyboard and mouse to the USB ports.
-
For network access, connect an Ethernet cable to a NET port (NET 0-3) on the server back panel.
-
Connect the power cords to the two server power supplies (PSUs).
The power for each PSU must come from separate sources. For power specifications, see Oracle Server X5-4 Installation Guide.
Power Modes
When active AC power cables are connected to the server PSUs, the server boots to standby power mode. While booting, the service processor (SP) indicator [1] blinks at the fast blink rate. Once the server enters standby power mode, the SP indicator is on steady, and the OK indicator [2] blinks at the slow blink rate. To power on the server to full power mode, press and release the Power button [3].

Step 5: Start Oracle System Assistant and Set Up the Server
Use Oracle System Assistant to set up the server and install an OS. The attached monitor, keyboard, and mouse allow you to respond to system prompts and navigate the Oracle System Assistant interface.
-
To power on the server to full power mode, press and release the front panel Power button.
The front panel OK indicator blinks at the fast blink rate, and BIOS boot messages appear on the monitor.
-
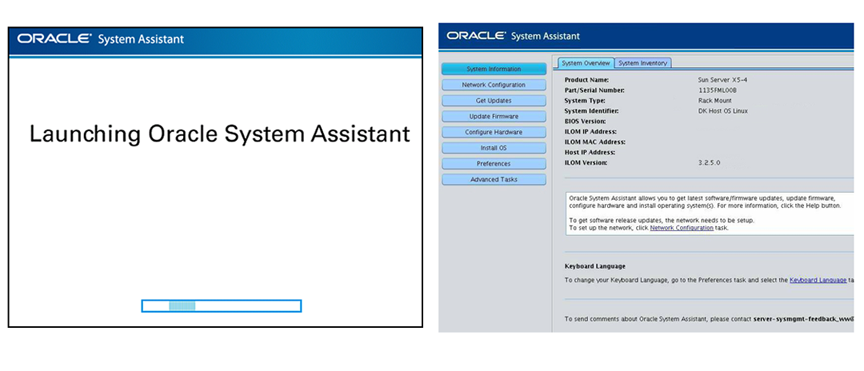
To start Oracle System Assistant, watch the monitor for the following message and when it appears, press the F9 key:
Press F9 to start Oracle System Assistant (CTRL + O on serial keyboard)
The Oracle System Assistant application launches. When it starts, the System Overview screen appears.
-
To set up the server, perform the tasks in the order shown in the following table.
To do this taskClick this buttonSet up the server's network connection.Configure NetworkDownload the latest server firmware and software.Get UpdatesUpdate the Oracle ILOM, BIOS, host bus adapter (HBA), and PCIe card firmware on the server.Update FirnwareConfigure Oracle ILOM.Configure Hardware > Service Processor ConfigurationConfigure drives into RAID volumes.For information about drive configuration, refer to the Oracle Server X5-4 Installation Guide.
(If the server has a preinstalled OS, skip this task.)Configure Hardware > RAID Configuration -
To install an OS, do one of the following:
Note - For minimum supported OS version information, refer to the Oracle Server X5-4 Product Notes.-
For servers with a preinstalled OS, refer to the Oracle Server X5-4 Installation Guide.
-
For servers without a preinstalled OS, do one of the following:
-
For automated updates and assisted OS installation, use Oracle System Assistant (recommended).
-
For unassisted manual installation, refer to the Installation Guide for the OS.
-
-
System Management Options
|
 Oracle System Assistant
allows you to set up the server, install the OS,
and update server and component firmware.
Oracle System Assistant
allows you to set up the server, install the OS,
and update server and component firmware. Oracle ILOM enables full
out-of-band management with remote access
capability and server configuration and set-up
options.
Oracle ILOM enables full
out-of-band management with remote access
capability and server configuration and set-up
options. Oracle Hardware Management
Pack provides cross-platform tools to help you
manage and configure Oracle servers from the OS
level.
Oracle Hardware Management
Pack provides cross-platform tools to help you
manage and configure Oracle servers from the OS
level.Replaceable Components

|