Associating a Common Attribute to a Record
After configuring the record with Application Designer and creating the attributes, extend the record with these attributes.
|
Page Name |
Definition Name |
Navigation |
Usage |
|---|---|---|---|
|
Record Context |
SCC_CAF_REC_ATTRIB |
|
Associate an attribute with a record. Later on, you can modify or delete this association. |
|
Secondary Page Options |
SCC_CAF_SECPG_OPTN |
|
Set up the secondary page if you are using SCC_CAF_LAUNCH_SBP subpage. |
Access the Record Context page ().
Image: Record Context page
This example illustrates the fields and controls on the Record Context page. You can find definitions for the fields and controls later on this page.
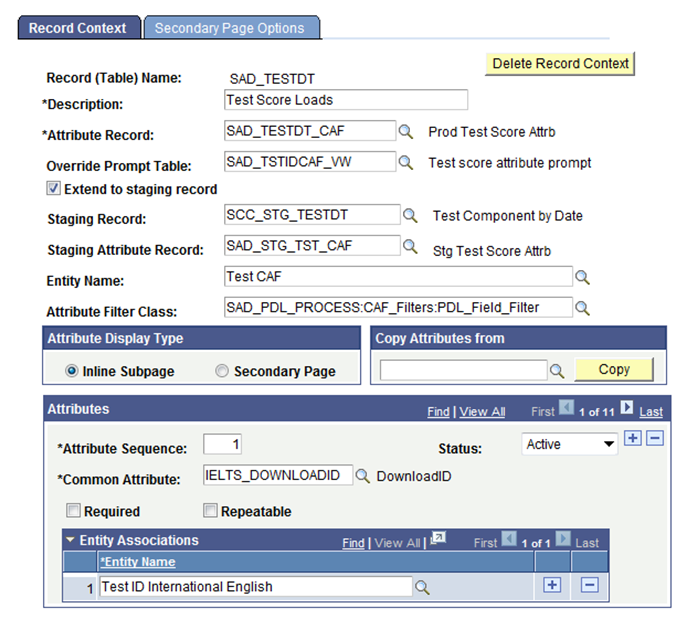
Continuing with the GENL_MATERIALS record example that was discussed in the Application Designer section: After we use the Common Attribute page to create the common attributes—Passport Number and Primary Institution—we use the Record Context page to associate the GENL_MATERIALS record with these two attributes.
Note: Extending a record with an attribute is similar to adding a new field to that record. The advantage of extending a record with an attribute is that there is no impact on any existing functionality in the system that uses this record. Additionally, it is possible to change the number and order of attributes at runtime dynamically without having any impact on existing extensions to this record.
Warning! For performance reasons, Oracle recommends that you limit the number of attributes for a given record context to no more than 25.
|
Field or Control |
Definition |
|---|---|
| Record (Table) Name |
Displays the record that you are extending (that is, displays the record in context). You specify this record when you access the page in Add mode. |
| Delete Record Context |
Available only after you save a record in context. |
| Description |
This field is informational only and is not used in any processing. |
| Attribute Record |
Specify the record that contains the SCC_CAF_SBR subrecord. The framework uses this mapping to store the attribute data, entered at runtime, in this record. This record should be a child record of the record in context. |
| Override Prompt Table |
This field enables consumers of Common Attribute Framework who choose to deploy their own user interface (UI) – rather than the delivered subpage or secondary page – to use a regular edit box rather than the default behavior of a drop-down list box that lists all attribute values. This enables consumers to filter the available values using a custom view to implement their own filtering logic. For example, assume that you have an ABC list box. For user M, the ABC list box should display a different list of values. For user N, the ABC list box should display a different list of values. In such a case, you should use the Override Prompt Table field. |
| Extend to Staging Record |
Select to indicate that any common attributes assigned to this record context is valid for its staging record. This enables consumers to share attributes rather than having to keep separate record context definitions in sync. When you select this check box, the Staging Record and Staging Attribute Record fields become available for edit. A staging record defines a table to store data that is brought into the system through some kind of import process or interface, before the data is moved into actual production tables. Here is an example of when you need to select this check box and use its two associated fields (Staging Record and Staging Attribute Record): Assume that user 1 uses 123 attribute with record context ABC. Record ABC is populated via a data import into staging record XYZ. In such a case, attribute 123 would need to be associated with both record contexts — ABC and XYZ. By selecting this check box and providing the staging record name (XYZ), user 1 can enable the attribute 123 (and all other attributes defined for record context ABC) for the staging record without creating a separate record context definition. |
| Entity Name |
Use this field to map a record context definition to its corresponding common attributes entity in the Entity Registry. The Entity Registry framework uses this mapping internally, to create, retrieve, update and delete data in the attribute record (SAD_TESTDT_CAF is the attribute record in the example graphic titled Record Context page). This field is used when attributes are exposed as properties of associated entities in the Entity Registry. |
| Attribute Filter Class |
Specify a class that implements SCC_COMMON_ATTRIBUTE_FW:Interfaces:iAttributeFilter. This class provides an entity ID at runtime which is used by the framework to limit (filter) the available attributes on the transaction page at runtime. For information about creating an Attribute Filter class, see “Attribute Filter Class.” |
Attribute Display Type
|
Field or Control |
Definition |
|---|---|
| Inline Subpage |
When you save the page and more than twenty five attributes are present in the Attributes scroll area, the system displays a warning message. Select the Inline Subpage option if you do not want the system to display this message. The inline subpage (SCC_CAF_SBP) can display any number of attributes in the transaction component. So, this limit of twenty five attributes is not applicable to the inline subpage. |
| Secondary Page |
When you select this option:
|
Copy Attributes from
To populate the list of attributes in the Attributes scroll area from another record context, specify the record name and click the Copy button. This clears any existing data in the Attributes scroll area and inserts all the attributes from the other record context.
Attributes
Use this scroll area to specify a list of attributes that you would like the record to be extended with. Remember, this is similar to adding fields to the record.
|
Field or Control |
Definition |
|---|---|
| Attribute Sequence |
Determines the order of display of the attributes. |
You can mark the attributes as required and repeatable. There is a small variation in the way the framework implements this feature in the two delivered subpages, as described in the following table:
|
SCC_CAF_LAUNCH_SBP |
SCC_CAF_SBP |
|---|---|
|
Implication if you select the Required check box: The user must enter a value for this attribute before save. If the user does not enter a value and clicks the Save button, the system displays an error message: Field is required. |
Implication if you select the Required check box: With this subpage, the user selects the attribute from a down-down list and then enters the value (refer to the example screenshot titled Attributes on the primary page in the "Using Application Designer to Configure the Record" section). The system inserts the attributes identified as required into the subpage at run time and the user must enter a value in order to save the component. A user cannot delete a required attribute because the system disables the delete button for the required rows. Also, the user cannot change the required attribute to a non-required attribute. |
|
Implication if you select the Repeatable check box: This feature is not applicable here. |
Implication if you select the Repeatable check box: The user can enter multiple instances of this attribute and its corresponding values in the scroll area. If you do not select the Repeatable check box and the user tries to enter multiple instances of this attribute in the scroll area, the system displays an error message. |
|
Field or Control |
Definition |
|---|---|
| Entity Association |
Enter the entities for which the attribute is valid. If the Attribute filter class provides an entity at runtime that matches an entity entered here, then the system displays this attribute on the runtime page. Conversely, if the Attribute filter class provides an entity at runtime that does not match an entity entered here, then the system does not display the attribute on the runtime page. If an attribute’s entity association grid is blank, then the system does not filter the attribute and the attribute is always available on the runtime page irrespective of the entity provided by the attribute filter class at runtime. |
Access the Secondary Page Options page ().
Image: Secondary Page Options page
This example illustrates the fields and controls on the Secondary Page Options page. You can find definitions for the fields and controls later on this page.
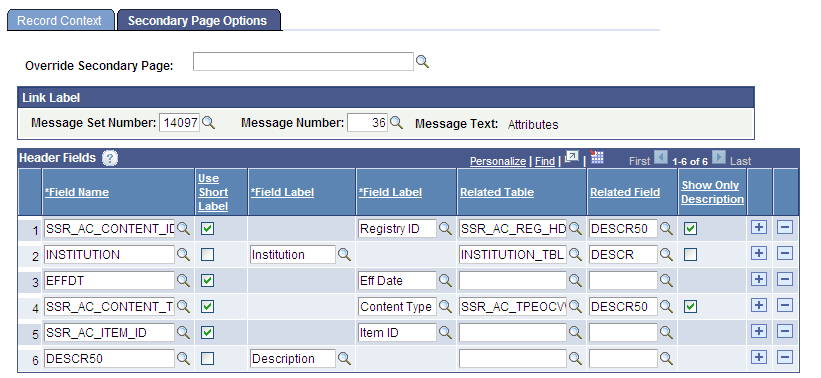
Note: The fields on this page are available for edit only if you have selected the Secondary Page option on the Record Context page.
Link Label
The default hyperlink label in the subpage SCC_CAF_LAUNCH_SBP is Attributes. If you want a different label, specify the message catalog entry of the required text in this group box and that label will be displayed on the page.
See PeopleTools: System and Server Administration, Message Catalog.
Header Fields
Optionally, you can use this grid to define header fields for the CAF_LAUNCH_SBP subpage. The fields you enter here display as read-only fields on the header region of the subpage.
|
Field or Control |
Definition |
|---|---|
| Field Name |
Select the field you want to display on the header region of CAF_LAUNCH_SBP. The prompt lists all of the fields in the record context (GENL_MATERIALS in the example). |
| Use Short Label |
Select this check box to use the default short name as the field label. |
| Field Label |
Indicates the field label that the system will display on the header region of CAF_LAUNCH_SBP. When you select a Field Name, the Field Label field is automatically populated with the default long name. If you select the Use Short Label check box, the Field Label field is automatically populated with the default short name. If more names are available and you do not want to use the default value, you can select a different value as the field label. Note: If the Header Fields grid contains rows where Use Short Label is selected for at least one but not all field names, then the grid displays two Field Label columns. The left column lists the long names, while the right column lists the short names. |
| Related Table |
The prompt lists all tables where the selected field (Field Name) exists. This enables you to add a related display field to the header. For example, if the field INSTITUTION is added to the header, there might be a need to display the description from the INSTITUTION_TBL. |
| Related Field |
Prompts against the selected related table. The field you select here will display on the header. Continuing with the previous example, if you select INSTITUTION_TBL as the related table, then to display the institution's description you must select DESCR, DESCRFORMAL, or DESCRSHORT as the related field. |
| Show Only Description |
This check box is available only when you select a related field. When this check box is selected, the subpage header displays only the related field value's description (rather than both the field value and the related field value's description). For example, suppose you select this check box for the EMPLID field name, select ID as the field label, select PERSONAL_DATA as related table, and select FIRST_NAME as related field. In such a case, if you select the Show Only Description check box, only the first name is displayed next to the ID label (for example, the header displays ID: Arlene). If you do not select the Show Only Description check box, both the ID number and first name are displayed (for example, ID: 3765 Arlene). |