Creating and Managing APT Instances Using the APT Request Process
As previously mentioned, an APT instance can be generated after an applicant has been activated, or directly from the Student Program/Plan component when you add a new program stack or when a change is made to an existing program stack. The APT Request process allows you to create new instances for groups of students and to maintain those instances by adding and activating new program nodes as they progress through a program of study.
The process of generating an APT instance can, depending on the processing action, involve two main steps:
The creation of a header record, which creates the keys of the instance and the academic item ID for the assigned program.
The population of the instance with the academic items or program requirements for a selected program item.
For detailed information about each of the operations performed by the APT API, refer to the APT API Detail documentation.
See APT API Detail
This section discusses how to run the APT Request process.
|
Page Name |
Definition Name |
Navigation |
Usage |
|---|---|---|---|
|
APT Request |
SSR_APT_REQ_RUNCNT |
|
Run the APT Request process. |
Access the APT Request page ().
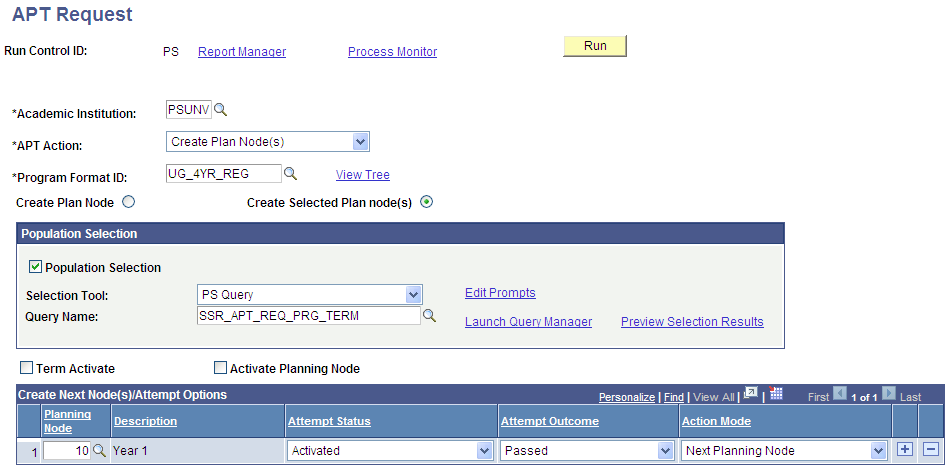
Image: APT Request page
This example illustrates the fields and controls on the APT Request page. You can find definitions for the fields and controls later on this page.
|
Field or Control |
Definition |
|---|---|
| APT Action |
These actions determine how the APT Request process (SSR_APT_REQ) builds a new APT instance or interacts with an existing instance. Select an action:
|
| Program Format ID |
This field prompts against the Program Format Table for the selected institution. Use the View Tree link to view the Program Format definition. The value that is selected here serves as a high level control for the run control. Only students (identified by the population selection or entered manually) in programs with a matching program format ID are considered for processing. |
| Create Plan Node |
When this option is selected, the APT request process sequentially identifies which planning node should be created for a student. For example, if the student's program format has four planning nodes, 10, 20, 30 and 40 and the action is Create Ins and Plan Node Attempt, the process creates the lowest planning node ID, 10. This option is selected by default. |
| Create Selected Plan Node(s) |
If this option is selected, the user must identify which plan node (within a Program Format) should be created for the run. This allows planning nodes to be created in a user defined order when necessary. For example, you could define a Program Format where it is necessary to create and activate multiple planning nodes at the same time. Refer to the following example. |
Image: Program Format example Create Selected Plan Node(s)
This example shows a dual major program format, where planning nodes (years) are defined under each major:
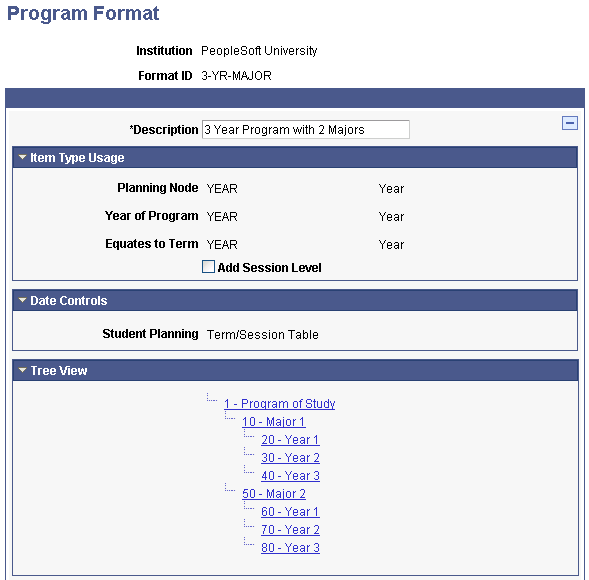
The Create Selected Plan Node(s) option can be used to identify, create and activate each year for each major. To activate the student in Year 1 for both Majors, Node IDs 20 and 60 would be specified.
Population Selection
The Population Selection group box is a standard group box that appears on run control pages when the Population Selection process is available or required for the transaction. Selection tools are available based on the selection tools that your institution selected in the setup of the Population Selection process for the application process and on your user security. Fields in the group box appear based on the selection tool that you select. The fields behave the same way from within the group box on all run control pages and application processes. If your institution uses a specific delivered selection tool to identify IDs for a specific transaction, you must use it.
|
Field or Control |
Definition |
|---|---|
| Selection Tool |
Select External File or PS Query. |
| Query Name |
The following queries are delivered as samples:
When you create queries for use with APT Request, you must use the bind record SSR_APT_PROG_VW. |
Manual Selection
Image: APT Request page Manual Selection grid
The Manual Selection grid is available if you do not select the Population Selection check box. Use the grid to enter a list of students for processing:

|
Field or Control |
Definition |
|---|---|
| Academic Career |
Enter a valid academic career for the institution/student combination. |
| Student Career Nbr |
Prompts against a view of the student’s program stack for the selected ID/Academic Career. |
| Academic Program |
Enter a valid academic program value for the student. |
| APT Instance |
If the APT Action is Create Instance or Create Instance and Plan Node Attempt, this field is not displayed and defaults to 0. For other actions (where the process acts on an existing instance) the APT instance number attached to the selected Student Career Number will default. |
Activating Terms and Planning Nodes
|
Field or Control |
Definition |
|---|---|
| Term Activate |
When this check box is selected, the process term activates (that is, creates student term/STDNT_CAR_TERM rows) for all terms within the planning node. This check box is available for all APT actions except Create Instance. |
| Activate Planning Node |
When this check box is selected, the process activates the planning node (and any child program format tree nodes) as they are created. This check box is available when the APT Action is Create Ins and Plan Node Attempt or Create Plan Node(s). |
Create Next Node(s)/Attempt Options
When the APT Action is Create Plan Node(s), the Create Next Node(s)/Attempt Options grid becomes available (as in the page example above).
|
Field or Control |
Definition |
|---|---|
| Planning Node |
Available only when the Create Selected Plan Node option has been selected. Select a planning node from the prompt values for the Program Format. The value that you select here is used in one of two ways, depending on the value selected in the Action Mode field (see below). The value represents either the node ID of the planning node to be created in this run or it represents the student(s) current planning node and the process should create the next planning node in the sequence. |
| Attempt Status |
The value that you select here is the Attempt Status of the current planning node for the students being processed. The values are: Activated, Completed, and Finalized. Only students with the attempt status that you select are processed. |
| Attempt Outcome |
The value that you select here is the Attempt Outcome of the current Planning node for the students being processed. The values are: Passed and Not Passed. Only students with the attempt outcome that you select are processed. |
| Action Mode |
Determines whether the process should create a specified planning node or the next planning node or a new attempt against the current planning node. The values are:
|