Managing Student Activities
This section discusses the IAM where the activities for a course are assigned to a student. There are three methods by which an IAM can be created: adding the record manually, creating it in a batch process, or having student enrollment create it automatically. There is also a batch process to assign optional activities to a student when the IAM already exists. This section specifically discusses how to:
Add an IAM for an individual student.
Review activity status.
Review activity detail.
Establish IAM common attributes for activity details.
Enter activity results for an individual student.
Establish IAM common attributes for activity results.
Understand reassessment.
Create IAMs automatically.
Create IAMs in batch using student enrollment.
Create IAMs in batch using Academic Progress Tracker (APT).
Create an IAM student block.
Generate an IAM activity block.
Use the IAM batch generator.
Review IAM requests.
Review the IAM activity request log.
You can create IAMs for groups of students in batch. Two components are delivered to support this creation. The IAM Batch Generator using Student Enrollment page creates IAMs for students based on their enrollment in classes. The IAM Batch Generator using APT (EOC) page creates IAMs for students taking EOCs. Each method provides users multiple mechanisms for generation: population selection, filtered selection, or manual selection.
The IAM Block Generator allows users to mass assign optional activities to multiple students. Three components make up this feature: the IAM Students Block, the IAM Activities Block, and the IAM Batch Generator Using Block Process. The block process is designed to assign optional nonmandatory activities to students who are already assigned to a course root. Nonmandatory activities include optional activities where students have a choice between activities, extra credit activities, and individual content activities.
See Generating an IAM Student Block
|
Page Name |
Definition Name |
Navigation |
Usage |
|---|---|---|---|
|
Individual Activity Manager |
SSR_IAM_ACT_PAGE1 |
|
Create, review, and update details of a student's enrollment in a course and the associated activities of that course. |
|
Individual Activity Manager - Activity Detail |
SSR_IAM_ACT_DTL |
Click the Activity ID on the Individual Activity Manager page. |
View and edit activity detail populated from the Activity Manager for an individual student. |
|
Attributes |
SCC_CAF_DYN_SEC |
Click the Attributes link on the Individual Activity Manager - Activity Detail page or the Individual Activity Manager - Activity Result page. |
Review common attributes set up in the IAM for either activity details or activity results. |
|
Individual Activity Manager - Activity Result |
SSR_IAM_ACT_RESULT |
Click the Add Activity Result icon or the Show Activity Results icon on the Individual Activity Manager page. |
Manually enter activity results for an individual student. |
|
Result Scale Table |
SSR_IAM_SCALE_SP |
Click the Show Result Scale link on the Individual Activity Manager - Activity Result page. |
Review the result scale being used for an activity result. |
|
IAM Batch Generator using Student Enrollment |
SSR_IAM_ENR_GEN |
|
Generate IAMs for students based on their class enrollment. |
|
IAM Batch Generator using APT (EOC) |
SSR_IAM_APT_GEN |
|
Generate IAMs for students enrolled in EOCs. |
|
IAM Students Block |
SSR_IAM_STDBLK_ID |
|
Create a block of students to whom activities will be assigned. |
|
IAM Activities Block |
SSR_IAM_ACTBLK_CRS |
|
Create a block of course roots against which activities will be selected. |
|
IAM Batch Generator using Block Process |
SSR_IAM_BLK_GEN |
|
Merge the student and activities blocks and assign the selected activities to students. |
|
IAM Activity Request |
SSR_IAM_REQUEST |
|
Review IAM processing requests generated from the IAM Enrollment Event, the batch IAM jobs, and the AM-to-IAM sync. |
|
IAM Request Message Log |
SSR_IAM_REQ_MSGLOG |
Click the Messages link on the IAM Activity Request page. |
Review any generated messages. |
|
IAM Resit Evaluation |
SSR_IAM_RESIT_EVAL |
|
Select the resit candidate population to evaluate for resit eligibility. |
Access the Individual Activity Manager page ().
Image: Individual Activity Manager page – Activity tab
This example illustrates the fields and controls on the Individual Activity Manager page – Activity tab. You can find definitions for the fields and controls later on this page.
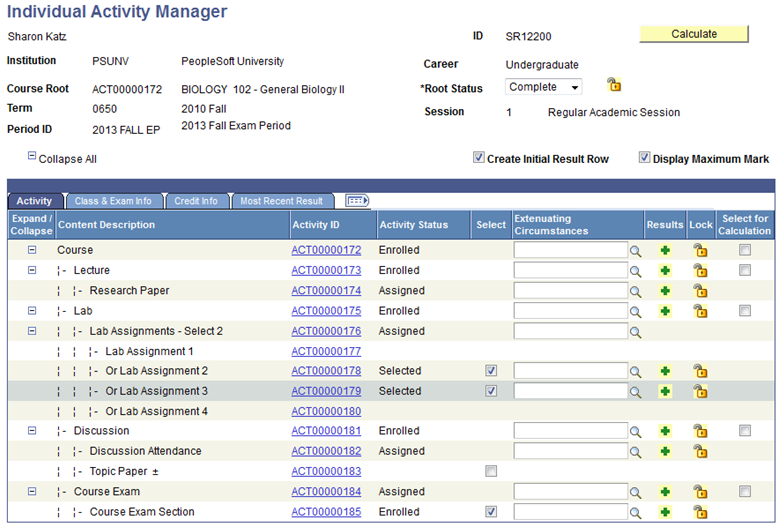
Image: Individual Activity Manager page – Class & Exam Info tab
This example illustrates the fields and controls on the Individual Activity Manager page – Class & Exam Info tab. You can find definitions for the fields and controls later on this page.
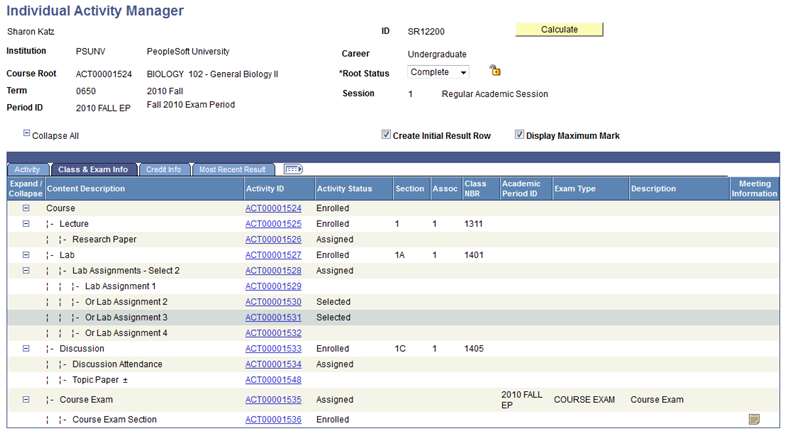
Image: Individual Activity Manager page – Credit Info tab
This example illustrates the fields and controls on the Individual Activity Manager page – Credit Info tab. You can find definitions for the fields and controls later on this page.
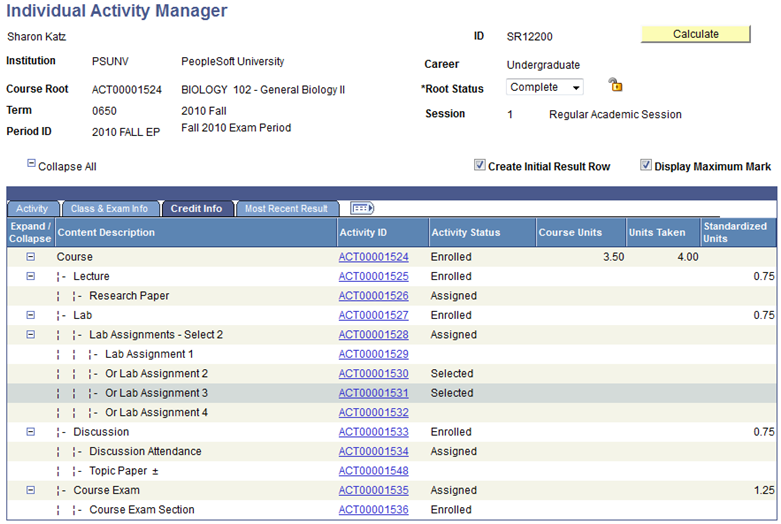
Image: Individual Activity Manager page – Most Recent Result tab
This example illustrates the fields and controls on the Individual Activity Manager page – Most Recent Result tab. You can find definitions for the fields and controls later on this page.

The IAM component captures a student's enrollment in a course and the associated activities of that course. This method of creating the IAM is to add the student and select the appropriate root activity based upon the student's class enrollment (STDNT_ENRL) or select from a list of courses designated as an EOC. When the record is added, a status is populated for each mandatory activity. These statuses are based upon a student's enrollment and upon settings defined in the Activity Registry and organized in the Activity Manager.
|
Field or Control |
Definition |
|---|---|
| Root Status |
This status concerns the assignment of the activities to the student. The delivered statuses are Action Required, Completed, and Incomplete. The status remains Action Required until all activities achieve an activity status which indicates all activities have been assigned. Once all eligible activities are associated with the student, the status changes to Completed. If a student drops or withdraws from the course the status changes to Inactive. Once the status is Inactive, you can no longer update results for the student. |
| Calculate |
Select this button to calculate the primary result for the activities selected in the grid below. This button calls the IAM Result Entity coding and the rules engine for processing. At this time, using the calculation process to calculate an exam result will not allow users to manipulate the exam row for resits. See Understanding the Delivered Rules in Activity Management |
Lock  |
This icon locks the IAM record from further updates. |
| Display All Attempts |
This check box appears when reassessment rows exist in the structure. Reassessment rows normally display within the horizontal scroll. Selecting this check box displays all rows individually. |
| Create Initial Result Row |
This check box appears by default from the Student Admin Installation setup page. If selected, a result row with an undetermined status is automatically inserted for each assessed activity ID assigned to a student. This creates a result row prior to a result being entered or calculated. This row is visible in the IAM. If not selected, a result row will not be created until a result is entered or calculated. The field can be overridden in the IAM prior to the page being saved. |
| Activity tab |
This tab indicates the status of the activity assignment and is used to select and confirm activities, assign resits, and link to activity and result details. |
| Valid Attempt |
Appears only on reassessed rows; this field is inserted and selected by default. Manually clear it to indicate that the attempt should not be considered a valid attempt. |
| Activity ID |
The activity assigned to the student links to the Activity Detail page. |
| Activity Status |
When a student is enrolled in a class or an EOC, the system automatically sets a status or an action for the activities in the tree. It sets a status of Enrolled or Assigned for those activities that do not require any additional action by a student. For those activities that do require action by the student, the system leaves them blank. Once the required action (selection or confirmation) is completed, the system updates the status. The delivered statuses include: Assigned, Assigned – confirmed, Assigned – requires confirmatn, Dropped, Enrolled, Enrolled – Confirmed, Enrolled – confirmation req'd, Resit Allowed, Resit Candidate, Resit Not Allowed, Reassessed, Selected, Selected – confirmed, Selected by Default, Selected as Resit, Withdrawn, and Waitlisted. |
| Select |
This check box appears when the user is required to select an optional activity. Users have the selection option when an activity is not mandatory or is associated with a condition. An exam section that requires selection aside from the class or EOC enrollment can also be selected. When you select the check box, the activity status changes to Selected. |
| Confirm |
The confirm check box is available for those schedulable activities (exam sections) where the Confirmation Required check box was selected in the Activity Manager or the Section Manager. An activity requiring confirmation has an Enrolled – Confirmation – Req'd status. Once confirmed, the status changes to Enrolled – Confirmed. |
| Extenuating Circumstances |
Use this field to record institutionally defined circumstances against this activity. These are defined on the Extenuating Circumstances Table. An example of an extenuating circumstance may be a student illness, which indicates why the student was given an extended due date for the activity. |
Add Activity Result  |
Select this icon to add results to the Activity Result page for the given activity. |
Show Activity Results  |
This icon appears when results exist for a given activity. Selecting it will transfer the user to the Activity Result page. |
| Resits Allowed |
This field is populated for those activities which have had resit options created. It indicates the maximum number of resits allowed based on the Maximum Resit Limits setup in the Resit Options. If only one Resit Time Period is indicated, the field is listed as Max [Nbr]. If multiple Resit Time Periods are defined, the link field displays as Limit Grid. If no Maximum Resit Limit is defined the link field will display No Limit. Regardless of the link that appears, select the link to access the Individual Activity Manager – Resit Limit secondary page. |
| Select for Calculation |
This check box indicates at which level you want the primary result calculation to occur. The check box appears at the parent activity level. When you select the check box, all child items that are eligible to be used in the calculation are also selected. Eligibility for assessment items is based on the due date or the extended due date, whichever is later. Clear any check box for an item that you do not want to use in the calculation. Consider an example in which all marks are entered for a course except the exam, which has not yet occurred. If you select the Select for Calculation check box for the course activity, all child items will also be selected. To exclude the exam, clear the exam activity check box. After making all your selections, click the Calculate button at the top of the page to begin the calculation process. See Understanding the Delivered Rules in Activity Management |
| Lock |
This icon locks the activity from further updates. |
| Legend |
This box appears when any of the items in the content tree are designated as Extra Credit, Individualized Content, or a Supplemental Resit. Individualized Activity (*) – This symbol appears for an activity when the activity was set up as individualized content in the Activity Manager. Extra Credit (±) – This symbol appears for an activity when the activity was set up as an extra credit activity. Supplemental Resit (^) – This symbol appears for an activity when the activity was set up as a supplemental resit. |
| Class & Exam Info tab |
This tab displays the class section, class association, class number of any classes in the content tree, and the academic period and the exam type for any exam. |
| Credit Info tab |
This tab displays the course units and the standardized units of an activity. |
| Result Info tab |
This tab displays the current result row for the activity including the Result Number, Result Type, Result Source, Result Scale, Mark, Grade, and Outcome. Detail result information is available under the Show Activity Results icon. Click the Add Activity Result icon to add new results. The system displays results on the Result Info tab based on the following order:
Note: The Primary Result Type is set on the Academic Institution 9 page. |
When the IAM is added to the student, based on either class or EOC enrollment, the following occurs:
Class components and course root activities status will be set to Enrolled. No further action is required.
All non component/course activities which do not require a selection or confirmation will have a status set to Assigned. No further action is required.
Those activities requiring selection or confirmation may not have a status set automatically, but will require further action as follows:
Any activity requiring selection will have a check box displayed in the Select column. Once selected, the status will be set to Selected or Enrolled (for exam sections).
Those activities requiring confirmation will have a check box displayed in the Confirm column and the status will be set to Enrolled – Confirmation Req'd. Once confirmed, the status will be set to Enrolled - Confirmed.
While administrative and instructional users can select optional activities or confirm exam attendance for students at any point in time, students making the selection for themselves in self service can be restricted to a certain point in time. Define student access on the Action Dates component.
The logic utilized to set the statuses, actions, and restrictions when the IAM is first created is as follows:
|
Scenario |
Initial Status |
Action |
Restrictions |
|---|---|---|---|
|
1. All component activities (based on STDNT_ENRL) and their course root and related component activities 2. Exam Section where only one section exists (or multiple sections with "AND" connector type) under a mandatory parent and Confirmation not required |
Enrolled |
Not applicable (NA) |
Not applicable (NA) |
|
3. All non-course/non-component/non-exam section activities where Mandatory = Yes 4. All child activities of (1 & 3) where no enrollment rule exists |
Assigned |
NA |
NA |
|
5. Conditional activities when there exists an established default |
Assigned |
Remove/Select |
Action Dates control student access |
|
6. Conditional activities (could include exam sections) |
[Blank] |
Select/Remove |
Action Dates control student access |
|
7. Confirmable activities where no selection required |
Enrolled – Confirmation Req'd |
Confirm/UnConfirm |
Action Dates control student access |
|
8. Any activity defined as Individualized Content 9. Any activity defined as Extra Credit |
[Blank] |
Select/Remove |
Selection is restricted to the IAM, Activity Roster, and the AMWC components |
This table lists specific statuses that are inserted during the reassessment evaluation.
|
Status |
Description |
|---|---|
|
Reassessed |
The status inserted on the attempt being reassessed. |
|
Resit Allowed |
A status that can be manually assigned to insert a resit row. |
|
Resit Candidate |
The status inserted on the current attempt row when the result entered was resit eligible and the coursework item was identified as a resitable item. This is the status that will be picked up and analyzed by the resit evaluation rule. |
|
Resit Not Allowed |
This status is automatically inserted by the evaluation rule when the student is no longer eligible for an attempt. |
|
Selected as Resit |
This status is automatically inserted by the evaluation rule when the student is eligible for an additional attempt. |
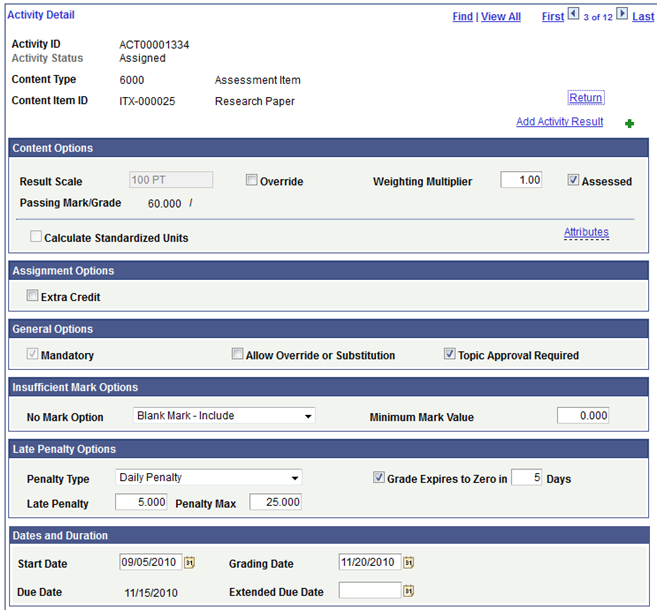
Access the Individual Activity Manager - Activity Detail page (click the Activity ID on the Individual Activity Manager page).
Note: Values here are inherited from the Activity Manager. Only those items that can be overridden for an individual student are editable on this page.
Image: Example: Content Type = Assessment Item Detail
This example illustrates the Individual Activity Manager - Activity Detail page (Content Type = Assessment Item Detail).
|
Field or Control |
Definition |
|---|---|
| Extended Due Date |
This field is available only at the student level. Its’ purpose is to override a due date for an individual student. When an extended due date exists, the system displays it to the student and uses it in late penalty processing. |
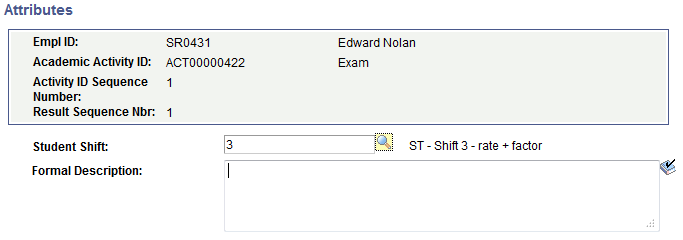
Access the Attributes page (click the Attributes link on the Activity Detail page).
Image: Attributes page (for Activity Details)
This example illustrates the fields and controls on the Attributes page (for Activity Details).

The screenshot above provides an example of common attributes set up for the course content item in the IAM. The fields that appear on the Attributes page are customer-specific and are defined on the Common Attributes and Record Context pages. The record context used for the IAM is the Individual Activities (SSR_IAM_CONTITM) record. The entity names used for the IAM have an “IAM” prefix.
Access the Individual Activity Manager - Activity Result page (click the Add Activity Result icon or the Show Activity Results icon on the Individual Activity Manager page).
Image: Individual Activity Manager – Activity Result page
This example illustrates the fields and controls on the Individual Activity Manager – Activity Result page. You can find definitions for the fields and controls later on this page.
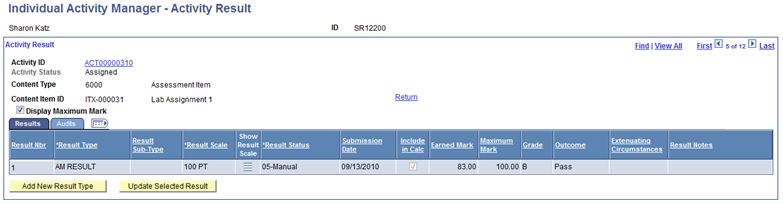
See ”Managing Course Rosters” to apply results to all students for an activity.
|
Field or Control |
Definition |
|---|---|
| Select |
This column appears after an initial result has been saved. To insert a new value against an existing Result Type, select the check box and then select the Update Selected Result button. This will insert a new row for the Result Type where values can be updated. |
| Delete |
The Delete icon is available on a row that has not been saved. |
| Result Nbr (number) |
This number is incremented for each result entered for the activity. |
| Result Type |
This value defaults from the Primary Result Type on the Academic Institution Table. It can be overridden as necessary. |
| Result Sub-Type |
This value reflects the type of mark: Insuff Mark (insufficient mark) – this value is inserted on a calculated row automatically during the primary result calculation when the insufficient rule is invoked. This requires setup of the of insufficient mark option. Late Pen (late penalty) – this value is inserted on a calculated row automatically when the late penalty rule is invoked. This requires setup of the of late penalty option. Mand Fail (mandatory fail) – this value is inserted on a calculated row automatically when the mandatory pass rule is invoked. This requires flagging the Mandatory Pass flag and setting up a Mandatory Fail result on the Result scale. Resit Calc (resit calculation) – this value should be manually inserted on a row that is entered as a resit result. This value will be automatically inserted via the rules engine in a future release. |
| Result Scale |
The result scale defaults from the Activity Manager as long as the result scale is represented on the Result Type table. It can be overridden as necessary. Note: When grades are used in the result scale, the grading basis must match the grading basis associated with the student's enrollment record. |
| Show Result Scale |
Click this link to access the Result Scale Table, which displays the result scale being used for the row. |
| Result Status |
When the Create Initial Result Row is selected, the Result Status defaults to 00-Undetermined. When the status is changed to a different value the Include in Calc, Earned Mark, Grade, and Outcome fields appear as applicable. When the Create Initial Result Row option is cleared, the Result Status defaults to 05-Submitted. The delivered translate (SSR_IAM_RSLT_STAT) values are: 00-Undetermined 05-Manual 07-Imported 10-Calculated 20-Awaiting Approval 30-Approved 40-Overridden 50-Final |
| Submission Date |
For assessment items, the due date appears by default, but you can override it as needed. If the submission date is later than the due date and late penalty criteria is defined on the Activity Manager, then the system automatically calculates and inserts a row with a penalty mark. See Understanding the Delivered Rules in Activity Management |
| Include in Calc |
The system automatically inserts this field value based on the scenario:
|
| Earned Mark |
Enter the student earned mark for this activity. This mark should be in the range of the minimum and maximum mark defined on the Result Scale. |
| Maximum Mark |
This column appears if the Display Maximum Mark is selected on the Student Admin Installation page. The maximum value defined on the Result Scale will display. |
| Grade |
Enter the student grade for this activity. This value will populate automatically based on the Earned Mark (result scale mapping), but can be overridden. |
| Outcome |
Enter the student outcome for this activity. This value will populate automatically based on the Earned Mark (result scale mapping), but can be overridden. |
| Result Notes |
Enter any comments applicable to the activity result. |
| Add New Result Type |
This button will insert a new result row for users to enter a new Result Type. |
| Update Selected Result |
This button will insert a new result row for a selected Result Type. |
Access the Attributes page (click the Attributes link on the Activity Results page).
Image: Attributes page (for Activity Results)
This example illustrates the fields and controls on the Attributes page (for Activity Results). You can find definitions for the fields and controls later on this page.
The screenshot above provides an example of common attributes set up for the activity result in the IAM. The fields that appear on the Attributes page are customer-specific and are defined on the Common Attributes and Record Context pages. The record context used for the IAM is the Activity Results (SSR_IAM_RESULT) record. The entity names used for the IAM have an “IAM” prefix.
See Defining a Common AttributeAssociating a Common Attribute to a Record
Reassessment, or resits, are supported in Activity Management. Resits are defined in the Resit Option inclusion record for content items in the Activity Registry and carried forward to the Activity Manager, where they can be overridden as necessary. Users will define the number of times a piece of coursework can be attempted during a specific time period and how it is reassessed. Users will also define on the result scale which result rows are eligible for a resit.
Coursework can be reassessed in one of two ways. Students can be reassessed in the same piece of coursework or they may be required to undertake a supplemental piece of coursework. Regardless of the method of reassessment, the characteristics of the resit defined in the Activity Manager will be associated with the student who enrolls in the course root. Student progress in these reassessed activities will be tracked in the IAM.
Currently the determination of a student's resit eligibility is done using integration with the Rules Engine, while calculation of a resit result is a manual process. The calculation of a resit result will be an handled automatically in a future release.
A result that is entered is deemed resit eligible when the result row on the Result Scale is identified as resit eligible. The activity itself must also be identified with the Resit Allowed flag on the Resit Option. When both these conditions are met, the activity status for the attempt is automatically updated to Resit Candidate. This status change can also be performed manually if a student is given permission to resit even with a result that is not indicated as resit eligible.
Once the activity status is set to Resit Candidate users will run the IAM Resit Evaluation. This process uses a Population Selection process to identify specific resit candidate populations and calls the Rules Engine where a number of evaluations are performed to determine whether the students meet the attempt allowed criteria defined for the specific activity. If a student does meet the criteria, the current attempt row is changed to Reassessed and a new row is inserted (for supplemental resits, this row already exists). The inserted row has assigned the status Resit Selected.
See Understanding the Delivered Rules in Activity Management
Once the resit activity is initially assessed, the user must perform the following actions manually until such time as a resit calculation rule is delivered:
Manually calculate the resit rule.
Schools have varying requirements - average the attempt result , use the most recent attempt result, use the highest result attempt.
Insert an additional result row for the resit activity.
Be mindful that you enter the result on the correct attempt. Enter the Sub-type Resit Calc and enter the result that will be identified as the resit result. Inserting a new row is critical for the primary result row calculation to operate correctly.
Note: These steps will not be required once the resit calculation rule is delivered.
Access the IAM Resit Evaluation page ().
Image: IAM Resit Evaluation page
This example illustrates the fields and controls on the IAM Resit Evaluation page. You can find definitions for the fields and controls later on this page.
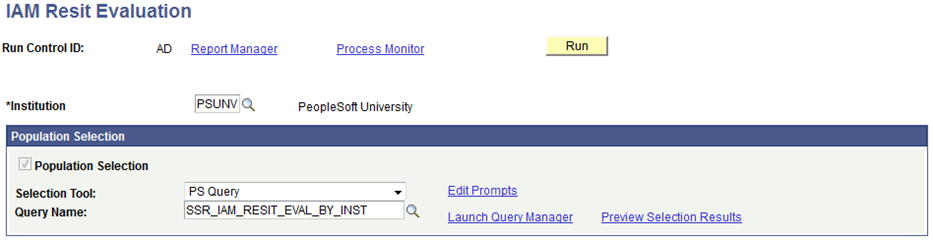
Use the IAM Resit Evaluation process to analyze activities set with the Resit Candidate status to determine if the students are allowed an additional attempt. Running the process calls the rules engine where attempts allowed are analyzed and resit rows and/or resit statuses is inserted
|
Field or Control |
Definition |
|---|---|
| Population Selection |
Population Selection is a method for selecting the IDs to process for a specific transaction. The Population Selection group box is a standard group box that appears on run control pages when the Population Selection process is available or required for the transaction. Selection tools are available based on the selection tools that your institution selected in the setup of the Population Selection process for the application process and on your user security. Fields in the group box appear based on the selection tool that you select. The fields behave the same way from within the group box on all run control pages and application processes. If your institution uses a specific delivered selection tool (such as PS Query) to identify IDs for a specific transaction, you must use it. The delivered queries include the following: SSR_ACO_GEN_BY_SUBJECT evaluates all resit candidates for the institution. Prompts users to enter the institution. SSR_ACO_GEN_BY_COURSE evaluates all resit candidates for a given course. Prompts users to enter the institution and the course ID. SSR_ACO_GEN_BY_SUBJECT evaluates all resit candidates within a given subject. Prompts users to enter the institution and the academic subject. You can create additional queries as needed. |
Resit Example 1 – Exam Resit
The exam activity is identified as resit allowed and the student is allowed two attempts to pass the exam.
Image: Exam resit allowed
This example illustrates a course exam with two attempts allowed. Note the Limit 2 link displayed in the Attempts Allowed column.
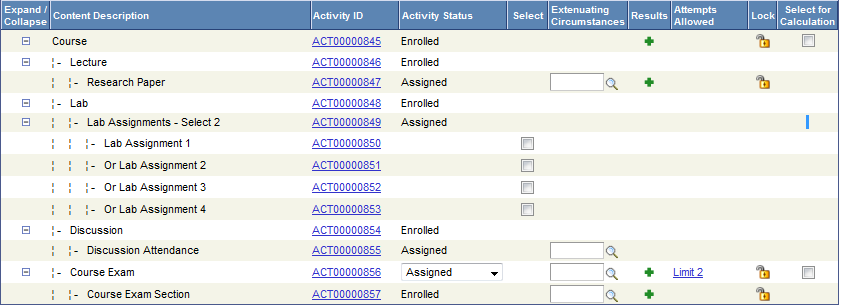
Image: Attempts allowed
The attempts allowed link displays the resit limits defined for the activity. The attempts limit section indicates the student is allowed two attempts while enrolled in their academic program. For later reference note the resit period assignment indicates when re-sitting the exam the student will be assigned to the Next Exam Period.
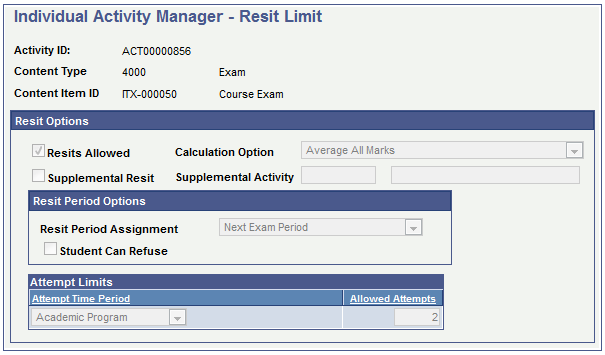
Image: Resit candidate
Once the exam is graded and the mark entered is indicated as resit eligible, the activity status is updated to Resit Candidate.

Users will use the IAM Resit Evaluation process to evaluate the students’ attempts against the Attempt Time Period. As indicated on the Resit Limit page indicated above, the student can attempt the exam twice during their enrollment in their academic program.
Image: Insert attempt
The result of the evaluation indicates the student is eligible to attempt the exam again. The Rules Engine will change the initial attempt activity status to Reassessed and insert an additional attempt. The second attempt is assigned the status Selected as Resit. As part of the Rules Engine evaluation it was determined that the student should be assigned to the next available exam period. Once the new exam period is assigned, a horizontal scroll appears to allow navigation between the multiple attempts. Users can select the Display All Attempts flag in the IAM header to display both attempts in the content tree. Record 1 of 2 is the initial attempt with a status of Reassessed, while the second attempt (2 of 2) has been selected as a resit but has not yet had results assigned.

Image: Assignment of academic period
This example illustrates the exam period assigned. This data is visible on the Class & Exam Info tab of the IAM.

Note: A standard resit can also be applied to non-exam activities. The difference for non-exams is that users would not select an exam period for the reassessment activity. An exam period is not assigned for a non-exam resit, but users can define a due date for reassessed assessment items.
Image: Assigning the resit result
Once the resit is graded and the manual calculation of the resit result is defined, it should be entered as a new row on the IAM Results page for the most recent attempt. You must add the subtype Resit Calc to the added row. In the example shown below the result is the average of the first (55.00) and second attempt (65.00). Adding this row requires that the primary result will be calculated correctly.

Resit Example 2 – Supplemental Resit
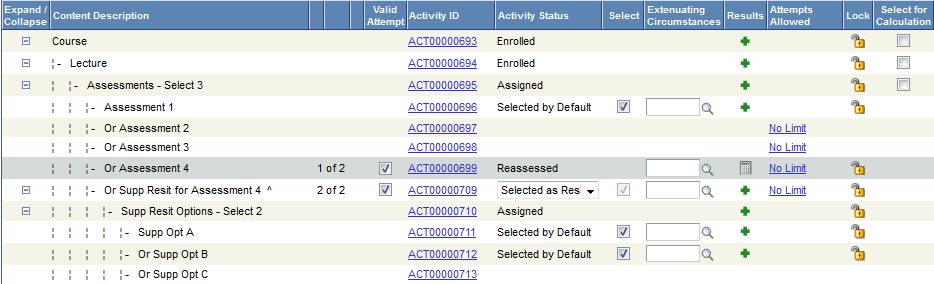
The following example walks a user through a supplemental resit option. Again the resit limit is visible in the Resit Allowed column displaying the No Limit link. The ^ symbol indicates the oral presentation is a supplemental resit. It cannot be assigned until the original attempt is denoted as failed
A supplemental resit works identical to a nonsupplemental in that the statuses are assigned the same way and for exams the exam period is assigned. The only difference is that the supplemental is created in the tree initially and when it is selected as a resit the supplemental activity will physically be moved into the tree display right under the previous attempt.
Image: Example of a supplemental resit activity
This example illustrates a supplemental resit activity.
Note: Currently when recalculating a result that utilized a supplemental resit, both the initial result and the supplemental resit result retain the Include in Calc flag, thus averaging the two results. Users can manually alter the Include in Calc flag as necessary. In a future release, users will have the ability to define how the resit calculation will work.
You can trigger IAM creation automatically on the Academic Institution 9 page. The fields in the Create/Remote Individual Activity Manager group box enable you to choose IAM trigger options.
Access the IAM Batch Generator using Student Enrollment page ().
Image: IAM Batch Generator using Student Enrollment page: example using Population Selection
This example illustrates the fields and controls on the IAM Batch Generator using Student Enrollment page (Population Selection).
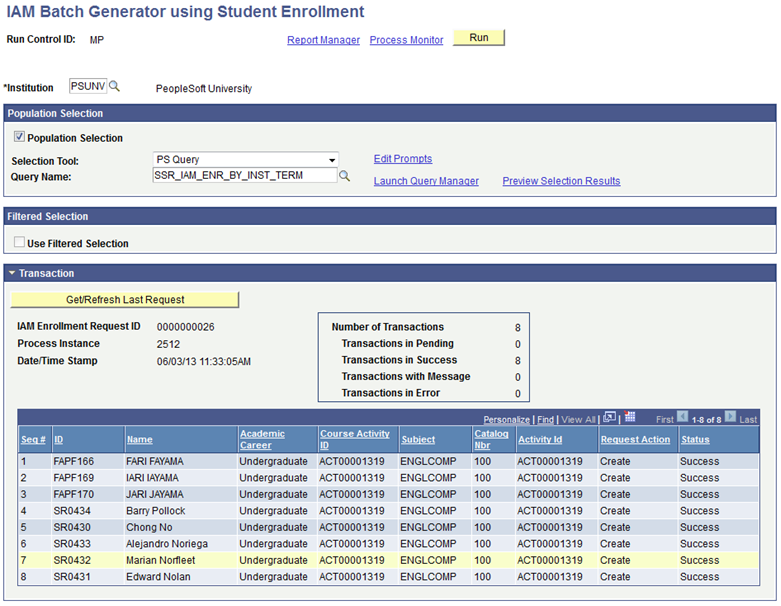
Image: IAM Batch Generator using Student Enrollment page: example using a filtered selection
This example illustrates the fields and controls on the IAM Batch Generator using Student Enrollment page (a filtered selection).
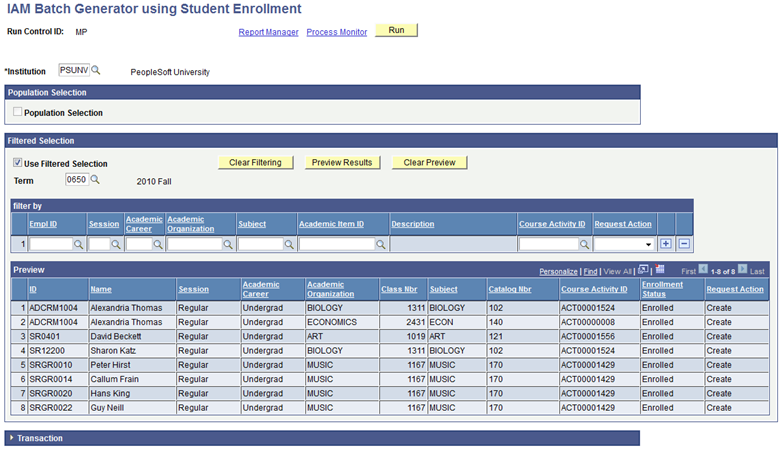
This page changes depending on the batch generation method you select. This component enables you to generate IAMs for students based on their class enrollment. The process identifies the student population and creates and processes the request to create the student IAM. The component offers two methods to identify the student population.
Population Selection
Population selection is a method for selecting the IDs to process for a specific transaction. The Population Selection group box is a standard group box that appears on run control pages when the Population Selection process is available or required for the transaction. Selection tools are available based on the selection tools that your institution selected in the setup of the Population Selection process for the application process and on your user security. Fields in the group box appear based on the selection tool that you select. The fields behave the same way from within the group box on all run control pages and application processes. If your institution uses a specific delivered selection tool (such as PS Query) to identify IDs for a specific transaction, you must use it.
The delivered query, SSR_IAM_ENR_BY_INST_TERM, prompts users to enter the institution and the term. You can create additional queries as needed.
Filtered Selection
A second method of generation is the Filtered Selection. Here you can filter the selection within the Institution and Term boundaries by EmplID, Session, Academic Career, Academic Organization, Subject, Academic Item ID (if Program Enrollment is enabled), and Course Activity ID. Select the appropriate Request Status, Create (to create the IAM) or Delete (to delete the IAM). Once again, you can preview results before actually running the process.
Transaction
Regardless of method, you can view data from the last transaction by clicking the Get/Refresh Last Request button.
Access the IAM Batch Generator using APT (EOC) page ().
Image: IAM Batch Generator using APT (EOC) page
This example illustrates the fields and controls on the IAM Batch Generator using APT (EOC) page. You can find definitions for the fields and controls later on this page.
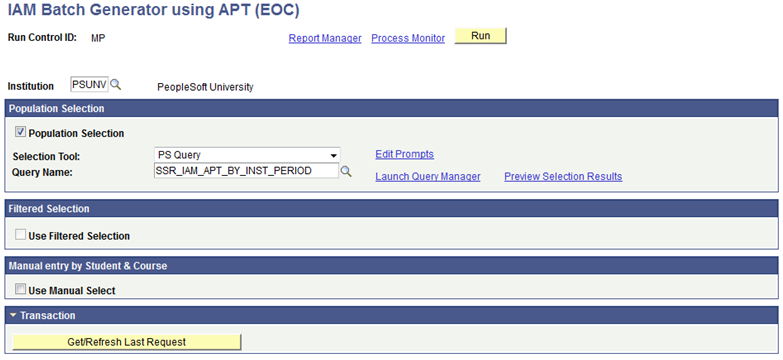
This component enables you to generate IAMs in batch for students enrolled in EOCs. This process is based on courses that are identified as Exam Only on the student’s Academic Progress Tracker (APT). The process identifies the student population and creates and processes the request to create the student IAM. Adding EOCs not defined on an APT must be done manually in the IAM component.
Because the Academic Period is not required on the APT for an EOC, you should associate a term with an academic period on the Academic Period setup table. In this way the system can tie together the term with which the course is associated on the APT to the appropriate academic period. The term used from the APT will be the term associated with the individual student on the Academic Item Attempt Schedule or the term extrapolated from the study period based on the enrollment cohort. However, if a term is associated with multiple academic periods and course roots for the EOC exist in multiple academic periods, the system will not be able to determine the academic period. In this instance, the batch process will provide an error on those students. We recommended that you add those students manually to the batch process or add the academic period directly onto the student’s APT for the course.
Note: To add non-Program Enrollment students to an EOC you must manually add an IAM record on the Individual Activity Manager component.
Population Selection
Population selection is a method for selecting the IDs to process for a specific transaction. The Population Selection group box is a standard group box that appears on run control pages when the Population Selection process is available or required for the transaction. Selection tools are available based on the selection tools that your institution selected in the setup of the Population Selection process for the application process and on your user security. Fields in the group box appear based on the selection tool that you select. The fields behave the same way from within the group box on all run control pages and application processes. If your institution uses a specific delivered selection tool (such as PS Query) to identify IDs for a specific transaction, you must use it.
The delivered Population Selection query, SS_IAM_ENR_BY_INST_PERIOD, prompts users to enter the institution and the academic period into which the students will be assigned. You can create additional queries as needed.
Filtered Selection
In this group box, you can filter the selection within the Institution boundary with Term, Session, Academic Period ID, Academic Career, Academic Organization, Academic Program, Academic Item ID, Subject, Enrollment Category, Advisor Approval Status, Year of Program, Academic Year, and Progress Level. The latter five filters are specific to Program Enrollment.
Manual entry by Student & Course
The final method of generation is by manually entering individual students.
Access the IAM Students Block page ().
Image: IAM Students Block page
This example illustrates the fields and controls on the IAM Students Block page. You can find definitions for the fields and controls later on this page.
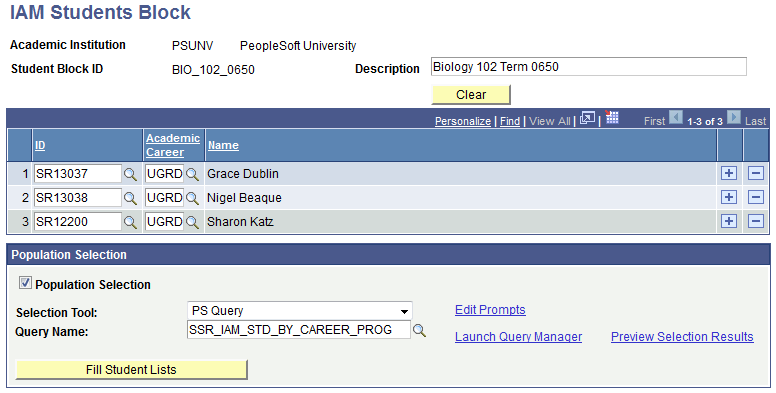
This component enables you to create a block of students to whom activities will be assigned. Two methods are delivered: student manual entry or population selection.
|
Field or Control |
Definition |
|---|---|
| Student Block ID |
Displays the unique identifier of the student block. |
| Description |
Enter a description of the student block. |
| ID |
Enter the EmplID of the student. |
| Academic Career |
Enter the student's academic career. |
Population Selection
Population selection is a method for selecting the IDs to process for a specific transaction. The Population Selection group box is a standard group box that appears on run control pages when the Population Selection process is available or required for the transaction. Selection tools are available based on the selection tools that your institution selected in the setup of the Population Selection process for the application process and on your user security. Fields in the group box appear based on the selection tool that you select. The fields behave the same way from within the group box on all run control pages and application processes. If your institution uses a specific delivered selection tool (such as PS Query) to identify IDs for a specific transaction, you must use it.
The delivered Population Selection query, SSR_IAM_STD_CAREER_PROG, prompts users to enter the institution, career, and academic program. You can create additional queries as needed.
Access the IAM Activities Block page ().
Image: IAM Activities Block page
This example illustrates the fields and controls on the IAM Activities Block page. You can find definitions for the fields and controls later on this page.
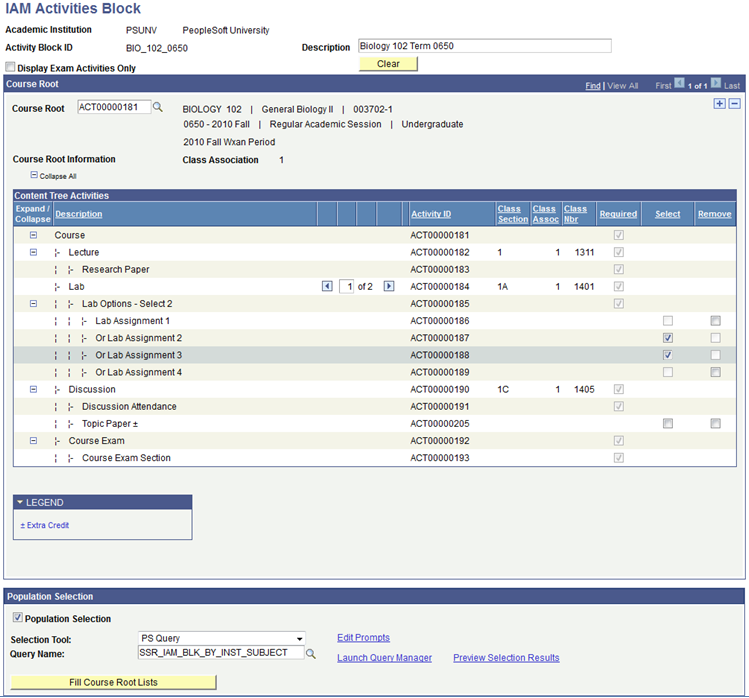
This component enables you to create a block of course roots against which you can select optional activities. The system displays course roots and their associated coursework. Users can enter individual course roots or use Population Selection to identify a group of course roots.
|
Field or Control |
Definition |
|---|---|
| Activity Block ID |
Displays the unique identifier of the activity block. |
| Description |
Enter a description of the activity block. |
| Display Exam Activities Only |
Select this check box to display only the course roots' exams and exam sections. |
| Course Root |
Enter the Activity ID for the course root to display the specific content tree. |
Population Selection
Population selection is a method for selecting the IDs to process for a specific transaction. The Population Selection group box is a standard group box that appears on run control pages when the Population Selection process is available or required for the transaction. Selection tools are available based on the selection tools that your institution selected in the setup of the Population Selection process for the application process and on your user security. Fields in the group box appear based on the selection tool that you select. The fields behave the same way from within the group box on all run control pages and application processes. If your institution uses a specific delivered selection tool (such as PS Query) to identify IDs for a specific transaction, you must use it.
The delivered Population Selection query, SSR_IAM_BLK_BY_INST_SUBJECT, prompts users to enter the institution, term, and subject. You can create additional queries as needed.
Access the IAM Batch Generator using Block Process page ().
Image: IAM Batch Generator using Block Process page
This example illustrates the fields and controls on the IAM Batch Generator using Block Process page. You can find definitions for the fields and controls later on this page.

This component enables you to merge the student and activities blocks and assign the selected activities to the students. Users can opt to not set up a student block and use Population Selection on this page instead.
|
Field or Control |
Definition |
|---|---|
| Activity Block ID |
Select the activity block ID. |
| Transaction Violation Action |
Indicate how the system should handle overrides of previous selections. If a student already meets the selection requirement (for example, they have already had two of four lab assignments selected), decide whether the system should Remove previous selections and replace them with the process results or generate an Error for the given student. |
| Student Block Selection |
If you choose not to use Population Selection, select the Student Block ID. |
| Student Block ID |
Select the student block ID. |
Population Selection
Population selection is a method for selecting the IDs to process for a specific transaction. The Population Selection group box is a standard group box that appears on run control pages when the Population Selection process is available or required for the transaction. Selection tools are available based on the selection tools that your institution selected in the setup of the Population Selection process for the application process and on your user security. Fields in the group box appear based on the selection tool that you select. The fields behave the same way from within the group box on all run control pages and application processes. If your institution uses a specific delivered selection tool (such as PS Query) to identify IDs for a specific transaction, you must use it.
The delivered Population Selection query, SSR_IAM_BLK_BY_CAR_AND_PROG, prompts users to enter the institution, career, and academic program. You can create additional queries as needed.
Access the IAM Activity Request page ().
Image: IAM Activity Request page
This example illustrates the fields and controls on the IAM Activity Request page.
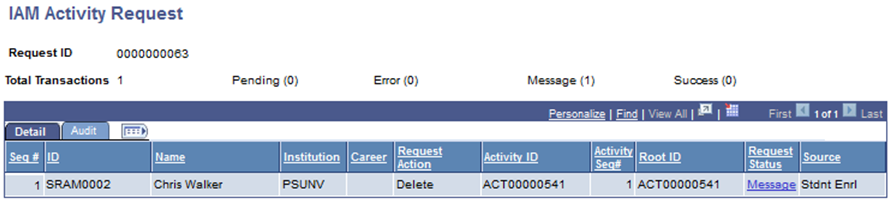
Use this component to troubleshoot IAM requests generated from the creation of the IAM from the Enrollment Event, from the IAM batch processes, and from the AM-to-IAM sync process.
The page is accessed using the Request ID from the above processes. Users can view transaction statuses and view any messages generated.
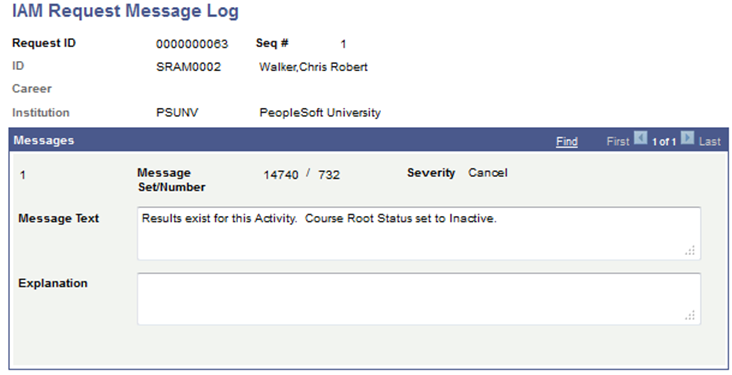
Access the IAM Request Message Log page (click the Messages link on the IAM Activity Request page).
Image: IAM Request Message Log page
This example illustrates the fields and controls on the IAM Request Message Log page.