Reviewing or Defining Student Records Installation Settings
To review or define Student Records installation settings, use the Student Records Installation component (SSR_INSTALLATION). The following topics discuss:
How to review or define Student Records default installation settings.
How to review or define Enrollment Requirement Roster default installation settings.
How to review or define Enrollment Requirement Processing default installation settings.
|
Page Name |
Definition Name |
Navigation |
Usage |
|---|---|---|---|
|
Student Records Installation |
SSR_INSTALLATION |
|
Review or define Student Records default installation settings for general options, class searches, and enrollment requirement / requisite checking. |
|
Enrollment Requirement Roster |
SSR_INSTALLATION2 |
|
Review or define default installation settings for the enrollment requirement roster. |
|
Enrollment Requirement Processing |
SSR_INSTALLATION3 |
|
Review or define default installation settings for enrollment requirement processing. |
Access the Student Records Installation page ().
Image: Student Records Installation page
This example illustrates the fields and controls on the Student Records Installation page. You can find definitions for the fields and controls later on this page.
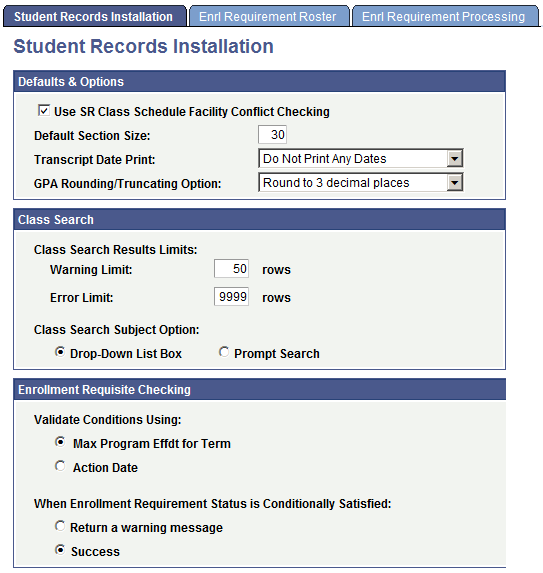
Defaults & Options
|
Field or Control |
Definition |
|---|---|
| Use SR Class Schedule Facility Conflict Checking |
Select to enable facility conflict checking when scheduling classes. The check box value migrates from the Installation page to the Academic Institution 2 page to the Campus Table page. The system uses the value on the Campus Table page during processing. Clear this check box on the Campus Table page to use an external facility conflict checking process. Note: This check box has no relation to the Check for Facility Conflict check box on the Facility Table page, which controls whether you can schedule multiple events in the same facility. |
| Default Section Size |
Enter a number to use as a default for class size. This value is used in the creation of new class sections. The value is originally rolled into the Catalog record when it is created, and then it is used to enter the number by default into the ENRL_CAP field in the CLASS_TBL. |
| Transcript Date Print |
Select the date on which you want the system to print when printing student transcripts. Select a value to be the default value when a row is entered. Select one value per term. Values are: Print Class Dates: Prints the valid start and end dates for each class on a transcript. Print Session Dates: Prints the valid start and end dates for a session within a term on a transcript. Print Term Dates: Prints the valid start and end dates for the term on a transcript. Do Not Print Any Dates: No dates print on the transcript. |
| GPA Rounding/Truncating Option (grade point average rounding/truncating option) |
Enter a value to indicate the number of decimal places to which you want to round or truncate the grade point average displayed for a student throughout the system. The maximum allowed is three decimal places. |
Class Search
|
Field or Control |
Definition |
|---|---|
| Class Search Results Limits |
Enter a value in the Warning Limit and Error Limit fields to indicate the number of classes for the system to display when a student searches for a class.
|
| Class Search Subject Option |
Select to indicate whether the Course Subject field on the Search for Classes page appears as a drop-down list box or as a select subject button. Note: Regardless of the option setting, the Course Subject field dynamically changes to a select subject button if the selected institution has more than 300 course subjects. |
Enrollment Requisite Checking
Use this group box to select how the requisite checking process validates programs, plans, and subplans for requisites that specify program, plan, or subplan conditions—for example, if a student enrolls in a class for a term and the class has a requisite condition of Plan = BIOCHEM, what is the maximum effective date that a plan of BIOCHEM can have to meet the requisite for that term.
Validate Conditions Using:
|
Field or Control |
Definition |
|---|---|
| Max Prog Effdt for Term (maximum program effective date for term) |
This option is selected by default. The requisite checking process uses the following logic to establish if a student meets program, plan, or subplan conditions:
|
| Action Date |
The requisite checking process uses the enrollment action date instead of the maximum program effective date for term when the term begin date is reached:
|
When Enrollment Requirement Status is Conditionally Satisfied:
|
Field or Control |
Definition |
|---|---|
| Return a warning message |
When requisite checking uses in-progress courses to satisfy an enrollment requirement, the user receives a warning message indicating that the prerequisite has been met conditionally and that the prerequisite must be satisfied prior to the start of the class. |
| Success |
This option is selected by default. When requisite checking uses in-progress courses to satisfy an enrollment requirement, a message of success is returned. |
See Understanding Enrollment Requisite Setup and Maintenance
The Post Enrollment Requirement Checking feature:
Provides the ability to capture the status of the enrollment requirement check at the time of enrollment (satisfied, conditionally satisfied, overridden, permitted, enrollment component). Enrollments that do not satisfy the requirement are rejected. The feature captures the status for both enrolled and wait listed students.
Provides the ability for users to re-run the Enrollment Requirement Checking process (where the Enrollment Engine calls Academic Advisement for enrollment requirement evaluation) on enrolled and wait listed classes after in-progress grades have been posted. The capability is delivered in on-line/remote call mode as well as a batch process.
Includes an administrative component that allows decision makers to identify and view students who are in non-compliance of class enrollment requirements.
Includes functionality to identify and process students that need to be dropped from classes for non-compliance as a result of post-enrollment requirement checking.
Through the use of communications, includes functionality to notify students when they have been administratively dropped from a class for non-compliance.
If you plan to use communications for post enrollment requirement checking, use the instructions in the following document to set up communications and then use the 3Cs process to create and generate the communication:
See: PERC Communications Setup and Processing.pdf. This document is included in the PERC Documentation Package which is posted to My Oracle Support.
Includes a batch process to generate reports of students in non-compliance of enrollment requirements.
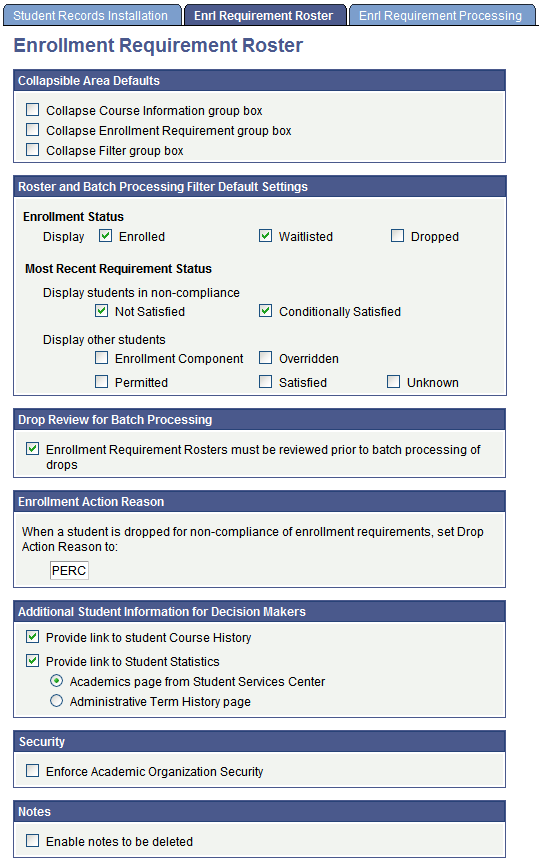
Access the Enrollment Requirement Roster page ().
Image: Enrollment Requirement Roster page
This example illustrates the fields and controls on the Enrollment Requirement Roster page. You can find definitions for the fields and controls later on this page.
Find documentation about the pages that are used to run Post Enrollment Requirement Checking—the Enrollment Requirement Roster page and the Run Post Enrollment Requirement Checking page—in the Post Enrollment Requirement Checking topics.
Collapsible Area Defaults
|
Field or Control |
Definition |
|---|---|
| Collapse Course Information group box, Collapse Enrollment Requirement group box, and Collapse Filter group box |
Clear these check boxes if you want course information, enrollment requirement description, and enrollment requirement roster filter to appear expanded by default on the Enrollment Requirement Roster. Select if you want the fields to appear collapsed. Regardless of this setup, you can expand and collapse the fields on the Enrollment Requirement Roster. |
Roster and Batch Processing Filter Default Settings
|
Field or Control |
Definition |
|---|---|
| Enrollment Status |
Select the enrollment statuses that you want to appear by default in the Set Filter Options group box on the Enrollment Requirement Roster. You can override the values on that page. |
| Most Recent Requirement Status: Display Students in non-compliance |
Select the enrollment requirement non-compliance statuses that you want to appear by default on the Enrollment Requirement Roster. You can override the values on that page. |
| Most Recent Requirement Status: Display other students |
Select any additional enrollment requirement statuses you want to appear by default on the Enrollment Requirement Roster. You can override the values on that page. |
Drop Review for Batch Processing
|
Field or Control |
Definition |
|---|---|
| Enrollment Requirement Rosters must be reviewed prior to batch processing of drops |
Select this check box to ensure that an enrollment requirement roster is set to Review Complete before batch drop processing occurs. The Review Complete for Batch Drop Processing check box appears on the Enrollment Requirement Roster and the following message appears on the Process Drop Requests for Post Enrollment Requirements batch processing page: Drops will only be processed for classes where Drop Review is set to Complete. Clear this check box if you do not use batch processing of drops or if you do not want to ensure that the enrollment requirement roster is reviewed before batch dropping students for non-compliance. The Review Complete for Batch Drop Processing check box is not available on the Enrollment Requirement Roster and the message does not appear on the batch drop processing page. |
Enrollment Action Reason
|
Field or Control |
Definition |
|---|---|
| When a student is dropped for non-compliance of enrollment requirements, set Drop Action Reason to |
Define a default drop action reason code value to be used when a student is dropped for non-compliance of enrollment requirements. The value action reason code of PERC is delivered but can be changed. The value should be unique. When a class is dropped using the action reason code of PERC, the enrollment record is retained regardless of the Academic Calendar date for the drop delete deadline. |
Additional Student Information for Decision Makers
|
Field or Control |
Definition |
|---|---|
| Provide link to student Course History |
Select this check box to allow decision makers and other users to access student course history from a link on the Enrollment Requirement Roster (the Course History link on the Audit / Information Links tab). Clear the check box to hide the Course History link. |
| Provide link to Student Statistics |
Select this check box to allow decision makers and other users to access student academic statistics from a link on the Enrollment Requirement Roster (the Statistics link on the Audit / Information Links tab). Select an option to identify whether the user links to the Academics page (recommended) as used in the Student Services Center or the Administrative Term History page. Clear the check box to hide the Statistics link. |
Security
|
Field or Control |
Definition |
|---|---|
| Enforce Academic Organization Security |
Select this check box to enforce academic organization security within the Enrollment Requirement Roster and related processing. |
Notes
|
Field or Control |
Definition |
|---|---|
| Enable notes to be deleted |
Select this check box to enable notes to be deleted from the Enrollment Requirement Roster: Tracking of Key Transactions & User Notes page. Clear to prevent notes from being deleted. |
Find documentation about the pages that are used to run Post Enrollment Requirement Checking—the Enrollment Requirement Roster page and the Run Post Enrollment Requirement Checking page—in the Post Enrolment Requirement Checking topics.
Access the Enrollment Requirement Processing page ().
Image: Enrollment Requirement Processing page (1 of 2)
This example illustrates the fields and controls on the Enrollment Requirement Processing page (1 of 2). You can find definitions for the fields and controls later on this page.
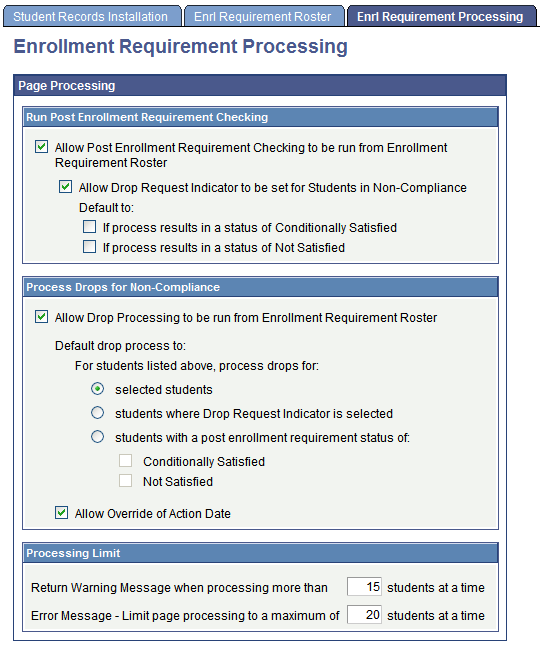
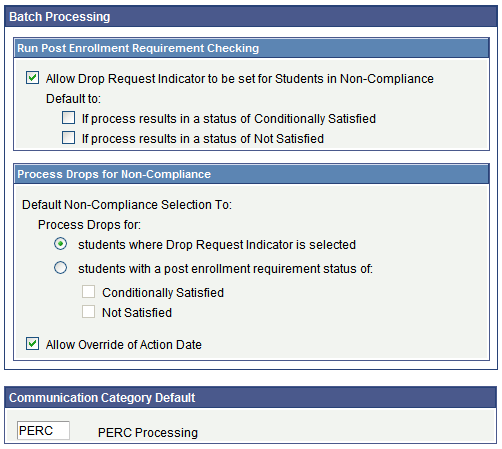
Image: Enrollment Requirement Processing page (2 of 2)
This example illustrates the fields and controls on the Enrollment Requirement Processing page (2 of 2). You can find definitions for the fields and controls later on this page.
Use the Page Processing group box to select the information and values that you want to appear by default on the Enrollment Requirement Roster.
Page Processing: Run Post Enrollment Requirement Checking
|
Field or Control |
Definition |
|---|---|
| Allow Post Enrollment Requirement Checking to be run from Enrollment Requirement Roster |
Select this check box to allow users to run post enrollment requirement checking from the Enrollment Requirement Roster. If selected, the Run Post Enrollment Requirement Checking group box appears on the roster. If cleared, the group box is not available—users would instead run batch post enrollment requirement checking. |
| Allow Drop Request Indicator to be set for Students in Non-Compliance |
If post enrollment requirement checking is enabled, select this check box to allow the Drop Request Indicator to be set from the Enrollment Requirement Roster processing page: If the check box is selected, the Set Drop Request for Students in Non-Compliance options appear in the Run Post Enrollment Requirement Checking group box on the roster. If the check box is cleared, the options are hidden. |
| Default to: If process results in a status of Conditionally Satisfied and Default to: If process results in a status of Not Satisfied |
If you have selected the Allow Drop Request Indicator to be set for Students in Non-Compliance check box, use these check boxes to set the status default settings—Conditionally Satisfied and Not Satisfied—on the Enrollment Requirement Roster. You can override the values on the Enrollment Requirement Roster. |
Page Processing: Process Drops for Non-Compliance
The check boxes and values that are selected here appear by default on the Enrollment Requirement Roster but can be overridden on that page.
|
Field or Control |
Definition |
|---|---|
| Allow Drop Processing to be run from Enrollment Requirement Roster |
Select this check box to allow users to run drop processing from the Enrollment Requirement Roster. If selected, the Process Drops for Non-Compliance group box appears on the roster page. If cleared, the group box is not available—users would instead run batch drop processing. |
| Default drop process to: |
If drop processing is enabled from the Enrollment Requirement Roster, define the default selection to:
|
| Allow Override of Action Date |
If drop processing is enabled from the Enrollment Requirement Roster, select this check box to allow a user to override the action date: the Override Action Date check box is available on the Enrollment Requirement Roster. The user must have enrollment security to override the action date. |
Page Processing: Processing Limit
|
Field or Control |
Definition |
|---|---|
| Return Warning Message when processing more than |
Set the maximum number of students that can be selected for page processing before receiving a warning message. Our recommendation for a warning message is for 15 students—you therefore receive a warning message when 16 students or more are selected. |
| Error Message - Limit page processing to a maximum of |
Set the maximum number of students that can be selected for page processing before receiving an error message. To assist with response time, use batch Post Enrollment Requirement Checking processing for large numbers of students. Our recommendation for an error message is for 20 students—you therefore receive an error message if 21 or more students are selected. |
Batch Processing: Run Post Enrollment Requirement Checking
|
Field or Control |
Definition |
|---|---|
| Allow Drop Request Indicator to be set for Students in Non-Compliance |
Select this check box to allow the Post Enrollment Requirement Checking batch process to set the Drop Request Indicator for a student when the process results in a non-compliant status. If you select this check box, the Action group box which contains the Set Drop Request Indicator for Students in Non-Compliance options is available on the Run Post Enrollment Requirement Checking page. |
| Default to: If process results in a status of Conditionally Satisfied and Default to: If process results in a status of Not Satisfied |
Use these check boxes to set the status default settings on the Run Post Enrollment Requirement Checking page: Conditionally Satisfied status and/or Not Satisfied. You can override the values on the batch processing page. |
Batch Processing: Process Drops for Non-Compliance
|
Field or Control |
Definition |
|---|---|
| Default Non-Compliance Selection To |
Process administrative student drops for students who are non-compliant with class enrollment requirements. |
| Process Drops for |
Set the default options that you want to appear in the Non-Compliance Selection group box on the Process Drop Requests for Post Enrollment Requirement page:
|
| Allow Override of Action Date |
Select this check box to allow a user to override the action date for Process Drop requests: the Override Action Date check box is available on the Process Drop Requests for Post Enrollment Requirement page. The user must have enrollment security to override the action date. |
Communication Category Default
This value default is used when creating communications for PERC. A value of PERC is delivered but can be changed. The value should be unique.
See Defining a Communication Category.
If you plan to use communications for post enrollment requirement checking, use the instructions in the following document to set up communications and then use the 3Cs process to create and generate the communication:
See: PERC Communications Setup and Processing.pdf. This document is included in the PERC Documentation Package which is posted to My Oracle Support.