Setting Up a HESA Return
This section discusses how to:
Set up a HESA return.
Set up HESA fields.
Set up HESA types.
Set up HESA action reasons.
Configure HESA.
Generate HUSID during registration or enrollment.
|
Page Name |
Definition Name |
Navigation |
Usage |
|---|---|---|---|
|
Reporting Periods |
SSR_HE_REP_PERIODS |
|
View or create a reporting period. Reporting periods from 2000 onwards are delivered with your system. |
|
Returns |
SSR_HE_RETURNS |
|
View or create a return type. The STUDENT, OFFSHORE, DLHE, KIS and ITT return types are delivered with your system. |
|
Entities |
SSR_HE_ENTITIES |
|
View or create an entity for a return type. The entities for Student, Offshore, DLHE, KIS and ITT returns are delivered with your system. |
|
Fields |
SSR_HE_FIELDS |
|
View or create return fields. For Student, Offshore, DLHE, KIS and ITT returns, the HESA fields are delivered with your system. |
|
HESA Returns |
SSR_HE_HESA_RETURN |
|
Create a return for a reporting period. To create a return, you can copy return setup data (such as the return fields) from another return you previously created. |
|
HESA Fields |
SSR_HE_HESA_FIELDS |
|
Add, edit, or view HESA fields in a return. If required, specify default and constant values for the HESA return fields. |
|
HESA Types |
SSR_HE_HESA_TYPES |
|
For the Student return, map HESA fields to the Campus Solutions name, address and external ID types. The system uses this mapping to derive HESA return field values. Also, define the program statuses that the system uses to determine which Instances records to include in the return. |
|
HESA Action Reasons |
SSR_HE_HESA_ACTN |
|
For the Student return, map HESA field codes to the Campus Solutions Program Action and Action Reason values. The system uses this mapping to derive HESA return field values. |
|
HESA Configuration |
SSR_HE_CONFIG |
|
Configure the system for Create Extract and Create HUSID processing. Control validation for DLHE survey. |
|
Create HUSID |
SSR_HE_CRTHUSID |
|
Run the process to generate HUSIDs for students during the registration or enrollment period. |
Access the HESA Returns page ().
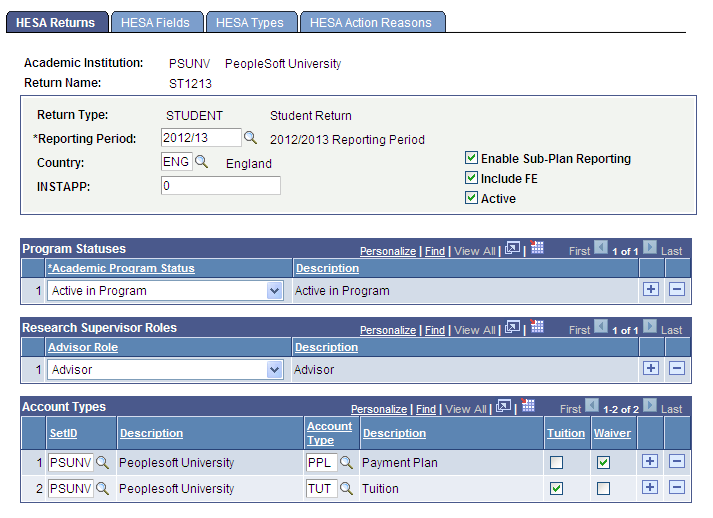
Image: HESA Returns page
This example illustrates the fields and controls on the HESA Returns page. You can find definitions for the fields and controls later on this page.
When adding a new return, you have to enter an academic institution and a return name. You must enter a unique return name for an academic institution.
Note: To test the Create Extract Application Engine (SSR_HE_DATA) process, you can define multiple returns for the same institution, return type, and reporting period.
When you access the HESA Returns page in add mode, the Copy Return Setup Data From group box appears.
Image: Example of HESA Returns page with the Copy Return Setup Data From group box
The following example shows the HESA Returns page in add mode:
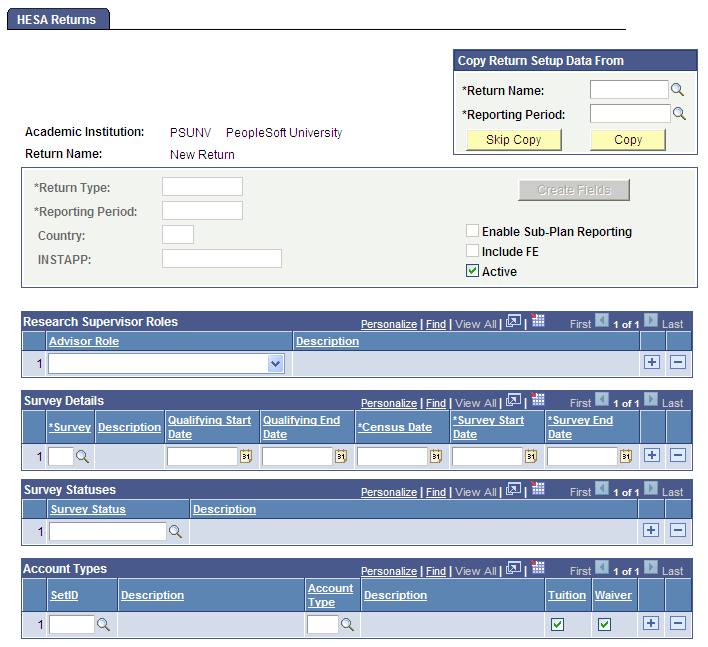
To create a return using the Copy Return Setup Data From group box:
Select a previously defined return name from which you want to copy the setup data.
Select a reporting period for which you want to create the return.
Click Copy.
The other tabs in the page appear when you copy a return or click the Skip Copy button. If you want to manually create a return, if you are creating a return for the first time, or if no appropriate records are available to copy from, click the Skip Copy button.
The Create Fields button is available only when you click the Skip Copy button.
Image: Example of the HESA Returns page after you click the Skip Copy button
The following example shows the HESA Returns page when you click the Skip Copy button:
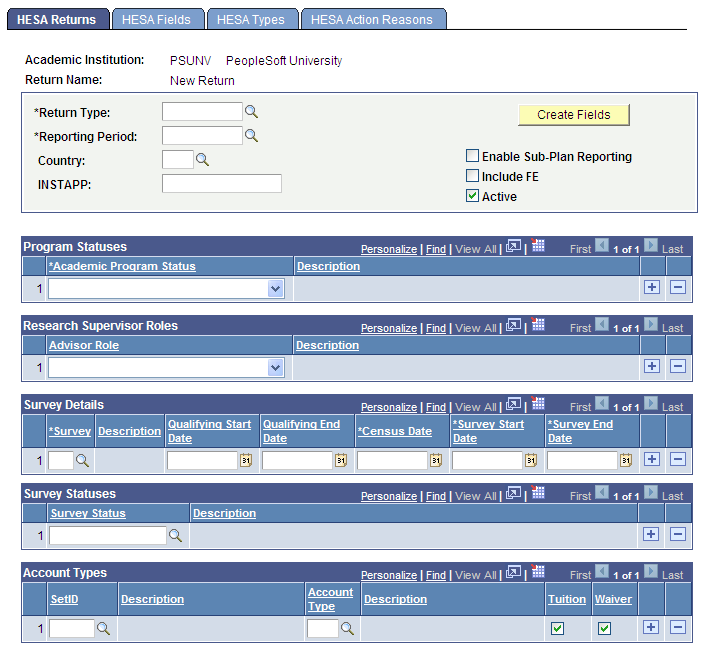
After selecting a return type, you can click the Create Fields button to have the system automatically create all the entities and the associated fields for the return. The system displays the created fields on the HESA Fields page.
|
Field or Control |
Definition |
|---|---|
| Return Type |
Select the delivered STUDENT, OFFSHORE, DLHE, ITT or KIS return type value. You can also select a return type that you have defined in the Returns page. Note: The system displays the HESA Types tab only for the Student and ITT returns. The system displays the HESA Action Reasons tab only for the Student, ITT and DLHE returns. |
| Reporting Period |
Select the reporting period for which you want to create the return. |
| Country |
Select a country code that the system uses to determine which fields to include in the return. Values for this field are delivered with your system as translate values. Values are England, Northern Ireland, Scotland, and Wales. This field is not applicable for the Aggregate Offshore return. |
| INSTAPP |
Enter a value that you want the system to return in the Institution.INSTAPP field of the return. This field is not applicable for the Aggregate Offshore, DLHE, KIS and ITT returns. |
| Enable Sub-Plan Reporting |
Select if you want to enter the reporting data in the Sub-Plan HESA and the Sub-Plan Offering/Year HESA pages. Selecting this check box enables the system to use the entered subplan level data to generate the HESA return. |
| Include FE (Include further education) |
Select to have the system derive fields relevant to further education (FE) students. This check box is not applicable for the Aggregate Offshore and DLHE returns. |
| Active |
Clear this check box if you want to prevent old test returns from being displayed in the search results. |
For more information about the HUSID, INSTAPP, and UKPRN fields, refer to the HESA Student Record specification available from the HESA website. Specification for the HUSID digit structure can also be found on the HESA website.
Program Statuses
Select program statuses that the system can use for creating Instance entities.
Research Supervisor Roles
This region is applicable for only the Student return.
Select Advisor Role values that the system uses to determine which Student Advisor records to consider when creating RAE Data entities in the Student return.
Survey Details
The system enables the Survey Details region when you select the DLHE return type. Use this region to define the details of the two surveys (April and January) for each DLHE reporting period.
|
Field or Control |
Definition |
|---|---|
| Survey |
Select the survey translate values, either 1 for the April survey or 2 for the January survey. |
| Qualifying Start Date |
Select the start date to be used when identifying students who qualify for the survey. If the Survey value is April, the value defaults to the reporting period start date. If the Survey value is January, the value defaults to 01-JAN-YYYY where the year value is the year value of the reporting period end date. |
| Qualifying End Date |
Select the end date to be used when identifying students who qualify for the survey. If the Survey value is April, the value defaults to 31-Dec-YYYY, where the YYYY value is the year of the reporting period start date. If the Survey value is January, the value defaults to the reporting period end date. |
| Census Date |
Select the census date for the survey. This system also displays the date to the student on the Survey questionnaire |
| Survey Start Date |
Select the date when the survey is available for completion by the student. |
| Survey End Date |
Select the date when the survey is no longer available for completion by the student. |
Survey Statuses
The system enables the Survey Statuses region when you select the DLHE return type. Use this region to define which surveys, based on the survey status, should be included by the Create Extract process.
|
Field or Control |
Definition |
|---|---|
| Survey Status |
Select the translate values of the statuses to be included in the HESA extract. |
Account Types
The system enables the Account Types region when you select the Student return type. Use this region to specify the account types that your institution uses for tuition and waiver charges. The system uses the values that you enter in this region to derive Instance.GROSSFEE and Instance.NETFEE.
Access the HESA Fields page ().
Image: HESA Fields page
This example illustrates the fields and controls on the HESA Fields page. You can find definitions for the fields and controls later on this page.
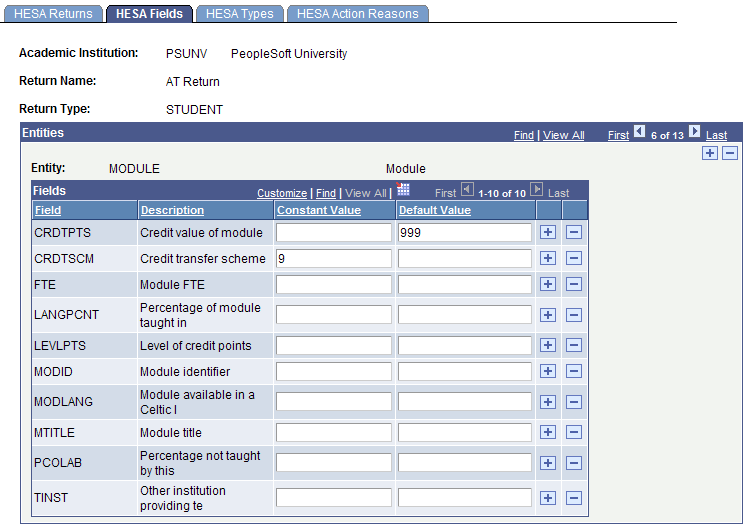
Use a field constant when your institution wants to return the same value for an entity. For example, if you want the system to derive the Credit transfer scheme as No Scheme for all modules in the Student return 2008/09, set the Module.CRDTSCM constant value to 9.
Use the field default to reduce the amount of data entry by defining a default value to be used when no value is derived for a mandatory field. For example, if a default value of 999 is defined for the Module.CRDTPTS field, and no data is found for a module, then 999 is used.
Note that you must enter the value NULL if you want to define a null constant or default.
Note: The Constant Value field or the Default Value field can accept a maximum of 30 characters. Therefore, the system does not use these two fields in the derivation of the KIS fields that exceed 30 characters (for example, the KIS URL fields).
Note: For KIS: The LEVELK field has K appended to distinguish it from the LEVEL field in the Aggregate Offshore return. The TITLEK field has K appended to distinguish it from the TITLE field in the ITT return. JACSA, JACSB and JACSC fields have A, B and C appended to allow three values to be returned and to distinguish the fields from the JACS field in the DLHE return.
Access the HESA Types page ().
Image: HESA Types page
This example illustrates the fields and controls on the HESA Types page. You can find definitions for the fields and controls later on this page.
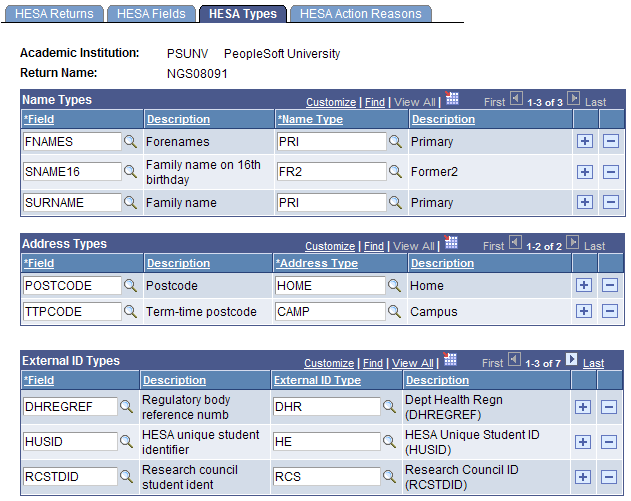
The system uses the Name Types mapping to derive the following fields for both ITT and Student returns:
Student.FNAMES
Student.SNAME16
Student.SURNAME
The system uses the Address Types mapping to derive the following fields:
EntryProfile.POSTCODE
Student.TTPCODE
Note: The Address Types region is not applicable for the ITT return.
The system uses the External ID Types mapping to derive the following fields for the Student return:
Instance.DHREGREF
Student.HUSID
Instance.RCSTDID
Student.SCN
Instance.TREFNO
Student.UCASPERID
Student.ULN
The system uses the External ID Types mapping to derive the following fields for the ITT return:
Student.HUSID
Student ISANUM
Student.NIN
Student.SKILLTEST
Student.TREFNO
Student.ULN
For information about defining external systems and entering external system IDs for a person or an organization:
Access the HESA Action Reasons page ().
Image: HESA Action Reasons page (with the Program Action tabs selected) (1 of 2)
This example illustrates the fields and controls on the HESA Action Reasons page (with the Program Action tabs selected) (1 of 2). You can find definitions for the fields and controls later on this page.
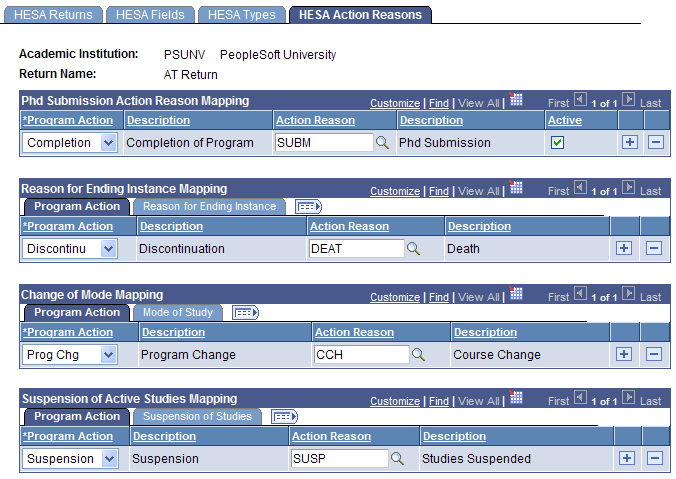
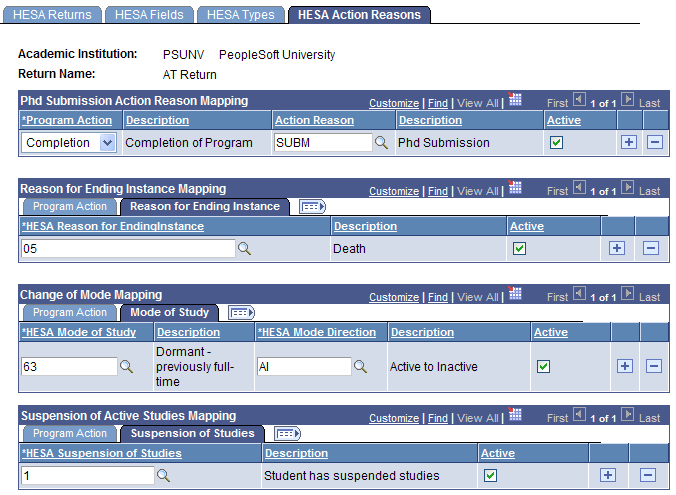
Image: HESA Action Reasons page (with the Reason for Ending Instance, Mode of Study, and Suspension of Studies tabs selected) (2 of 2)
This example illustrates the fields and controls on the HESA Action Reasons page (with the Reason for Ending Instance, Mode of Study, and Suspension of Studies tabs selected) (2 of 2). You can find definitions for the fields and controls later on this page.
Use this page to define the combinations of program action and action reason that the system uses to indicate PHD submission for research students, reason for ending studies, mode change, and suspension of active studies.
Note: The Phd Submission Action Reason Mapping and Suspension of Active Studies Mapping regions are not applicable for the ITT return.
Phd Submission Action Reason Mapping
The system uses this mapping to derive the Instance.PHDSUB field.
Reason for Ending Instance Mapping
Map the program action and action reason values to the HESA Reason for Ending Instance codes. Click the Reason for Ending Instance tab to enter the HESA Reason for Ending Instance code.
The system uses this mapping to derive Student return's Instance.ENDDATE and Instance.RSNEND fields, and ITT return's Student.ENDDATE and Student.RSNEND fields.
Change of Mode Mapping
Map the program action and action reason values to the HESA Mode of Study and HESA Mode Direction codes. Click the Mode of Study tab to enter the HESA mode of study and direction codes.
The system uses this mapping to derive the Student return's Instance.MODE field and ITT return's Student.MODE field.
Suspension of Active Studies Mapping
Map the program action and action reason values to the HESA Suspension of Studies codes. Click the Suspension of Studies tab to enter the HESA Suspension of Studies codes.
The system uses this mapping to derive the Instance.NOTACT field.
Access the HESA Configuration page ().
Image: HESA Configuration page
This example illustrates the fields and controls on the HESA Configuration page . You can find definitions for the fields and controls later on this page.
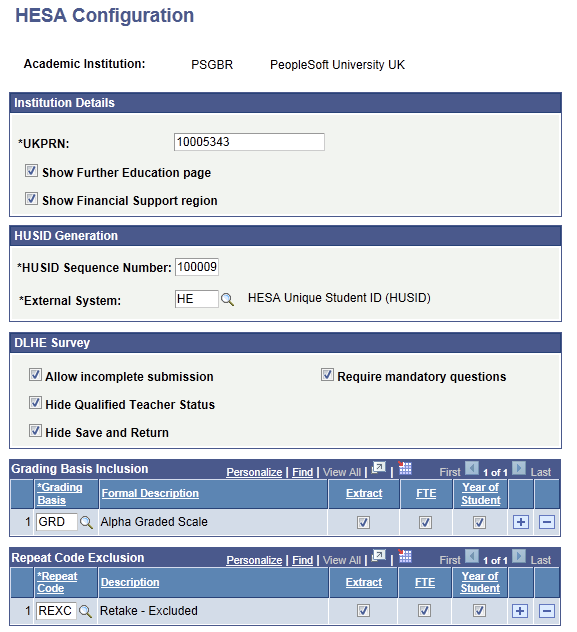
You must use this page to configure HUSID before running the Create HUSID process or the Create Extract process.
|
Field or Control |
Definition |
|---|---|
| UKPRN |
Enter a value that you want the system to return in the Institution.UKPRN field of the return. |
| Show Further Education page |
Select to enable the Further Education page on the HESA Instance Details component (SSR_HE_INSTANCE). If this check box is deselected, you cannot access the Further Education page. Note: The fields on the Further Education page are only relevant to institutions in England and Wales. |
| Show Financial Support region |
Select to enable the Financial Support region in HESA Instance Details component. Institutions in England can select this check box and institutions in Scotland, Northern Ireland and Wales can deselect this check box. |
| HUSID Sequence Number |
Enter the starting number for the system-assigned 6-digit number included in the 13-digit HUSID number. For each student without an existing HUSID, the Create HUSID process or the Create Extract process assigns a unique 13-digit HUSID value in the return. |
| External System |
Select the External ID Type that the Create HUSID or Create Extract process uses for HUSID value. |
Note: For students without HUSIDs, the system creates HUSIDs when you run the Create Extract process for the Student return. However, if you want to create these IDs at the point of registration or enrollment for new students and before running the Create Extract process, run the Create HUSID process.
For information about defining external systems and entering external system IDs for a person or an organization:
See Entering External System IDs
Allow incomplete submission
Select to allow incomplete submission of the Enter Survey self-service page data.
If the Allow Incomplete Submission check box is not selected and the student clicks the Submit button on Section F of the Enter Survey self-service page:
If there are any questions in the Incomplete Questions section then a message (In order to submit your survey all questions must be complete. Please update any incomplete questions and then select Submit) appears and the system saves the survey record but does not submit it. The student can then navigate back to other sections and enter the answers.
If all the questions are answered, the system submits the survey.
If the Allow Incomplete Submission check box is selected and the student clicks the Submit button:
If Q1 appears in the Incomplete Questions section, then a message (In order to submit your survey Section A must be complete. Please update any incomplete questions and then select Submit) appears and the system saves the survey record but does not submit it. The student can then navigate back to Section A to enter the answers.
If Q1 is answered, the system submits the survey.
This check box is applicable for only students accessing the Enter Survey self-service page. If you are accessing the Enter Survey self-service page by clicking the Enter Survey button on the Survey Management page, then this check box does not impact you.
Require mandatory questions
This check box becomes available for edit, if you select the Allow incomplete submission check box.
If the Allow incomplete submission is selected and the Require mandatory questions is not selected, then the students can submit the survey as long as Section A is complete (regardless of whether or not the Incomplete Questions list in section F contains optional or required fields).
If both the Allow incomplete submission and Require mandatory questions check boxes are selected, then the students will not be able to submit if there are any required questions listed in the Incomplete Questions list; students will be able to submit if only optional questions or no questions are included in the Incomplete Questions list.
This check box is applicable for only students accessing the Enter Survey self-service page. If you are accessing the Enter Survey self-service page by clicking the Enter Survey button on the Survey Management page, then this check box does not impact you.
Hide Qualified Teacher Status
If you select this check box, the system does not display the following on both student and admin versions of the survey:
Your Education Summary region in Section A.
Help text and the Newly Qualified Teacher Status check box in Section C (however, admin users can still update the Newly Qualified Teacher Status check box on the Survey Details page).
Hide Save and Return
If you select this check box, the system does not display the Save and Return button and the Cancel button on each section of the student version of the survey (but the system will display the Save button on the admin version of the survey).
Grading Basis Inclusion and Repeat Code Exclusion
These regions enable you to specify which Grading Basis values to include and which Repeat Codes to exclude in the Create Extract, Calculate Full-Time Equivalence, and Calculate Year of Student processes
In the Grading Basis Inclusion region, when you select a Grading Basis and select a check box for the Extract, FTE or the Year of Student process, the selected Grading Basis is considered by the selected process. In the Repeat Code Exclusion region, when you select a Repeat Code and select a check box for the Extract, FTE or Year of Student process, the selected process excludes class enrollments for the selected Repeat Code.
Access the Create HUSID page ().
Image: Create HUSID page
This example illustrates the fields and controls on the Create HUSID page. You can find definitions for the fields and controls later on this page.
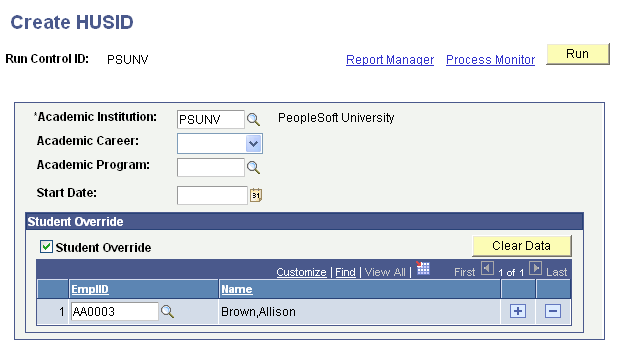
Run the Create HUSID process if you want to create HUSIDs when registering or enrolling new students and before running the Create Extract process.
|
Field or Control |
Definition |
|---|---|
| Start Date |
Specify a date if you want the process to only examine Student Program records that are Active or Matriculated on or after the specified date. For example, if you enter January 5, 2009, the process creates HUSIDS for students who have records that have a program action of MATR or ACTV with an effective date of January 5, 2009 or later. |
The process selects a student's earliest MATR Student Program record to create a HUSID. If the MATR record is not available, then it selects the student's earliest ACTV record. If a record is found, the process uses the record's effective date for the entry year element. Then, the Create HUSID process uses the following logic to generate the HUSID value for a student who does not have a HSUID:
The first two digits of HUSID represent the year the student entered the Institution (for example, 08 for 2008). The entry year is determined as the final two digits of the year element of the effective date of the selected Student Program record.
The next four digits represent the institution identifier.
The process calculates the institution identifier as Institution Code plus 1000 (for example, 0184 is calculated as 1184)
Note that the process picks the Institution Code value from the HESA Configuration page.
The next six digits represent the system assigned sequence number.
Note that the starting number is defined in the HESA Configuration page. The process assigns this number for the first student for whom calculation is done.
The system automatically increases the starting number by one when it assigns a new sequence number.
The final digit is a check digit based on the existing ten digits. See the HESA website for details on check digit calculation.