Setting Up the Activity Registry
This section provides an overview of the activity registry and discusses how to:
Define a registry header.
Review self-service message controls.
Define copy content.
Define registry details.
Define content notes.
Establish common attributes.
Review coursework item dates.
Define staff instructions.
Review the content tree.
The activity registry enables users to define the grading hierarchy of a course by establishing content types and setting details against the appropriate inclusion and extension records. The generic content tree structure can be applied to one or many courses.
|
Page Name |
Definition Name |
Navigation |
Usage |
|---|---|---|---|
|
Registry Header |
SSR_AC_REG_HDR |
|
Define the activity registry ID, set a course control record against which the activity registry ID will reference, and review the Activity Manager update capabilities. |
|
Content Inclusions |
SSR_AC_INCL_FAC2 |
Click the Updateable Inclusions link on the Registry Header page, Activity Manager WorkCenter Settings tab. |
View or update inclusion settings defined as part of the Activity Definition. |
|
Self-Service Messages Control |
SSR_INCL_FAC2_NEW |
Click the Self-Service Messages Control link on the Registry Header page, Self-Service Messages Controls tab. |
View or update the inclusion message settings for the Activity Registry, Activity Manager, and IAM. |
|
Copy Content |
SSR_AC_CONT_CPY |
Click the Copy Content button on the Registry Header page. |
Copy content details from one Activity Registry ID to another. The system copies all content details, which can then be edited as needed. Part of the copy process is to identify a Course Control Record for the new activity registry ID. |
|
Registry Detail |
SSR_AC_REG_DTL |
|
Establish the content structure and content item details. Your institution will create a hierarchy of content items representing the coursework structure. The representation appears in a tree structure. |
|
Content Notes |
SSR_AC_CONT_MSGS |
Click the Content Notes link on the Registry Detail page. |
Select an existing content message or enter free-form text that should be displayed for a content item. |
|
Attributes |
SCC_CAF_DYN_SEC |
Click the Attributes link on the Registry Detail page. Select to access common attribute fields that were defined on the Record Context page for Activity Registry Items. |
Set up common attributes in the Activity Registry. |
|
Review Content Item Dates |
SSR_AC_COMP_DATES |
Click the Review Dates link on the Registry Detail page. |
View the dates that would be assigned for assessment items based on the Day values assigned in the Dates and Duration group box. You can view the dates that would be assigned for a given class section with a specific start date in a term or session. |
|
Staff Instructions |
SSR_AC_STAFF_MSGS |
Click the Staff Instructions link on the Registry Detail page. |
Define staffing content messages. |
|
Content Tree |
SSR_AC_REG_CONN |
|
Build a content tree. |
Access the Registry Header page ().
Image: Registry Header page: Activity Manager tab
This example illustrates the fields and controls on the Registry Header page: Activity Manager tab. You can find definitions for the fields and controls later on this page.
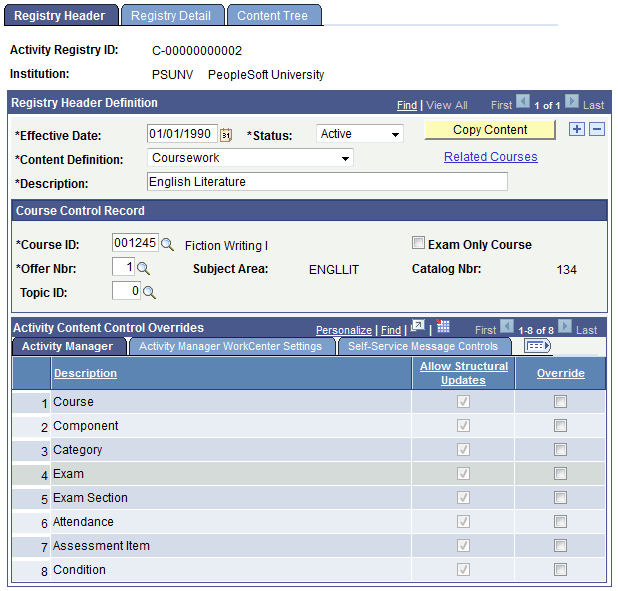
Image: Registry Header page: Activity Manager WorkCenter Settings tab
This example illustrates the fields and controls on the Registry Header page: Activity Manager WorkCenter Settings tab. You can find definitions for the fields and controls later on this page.
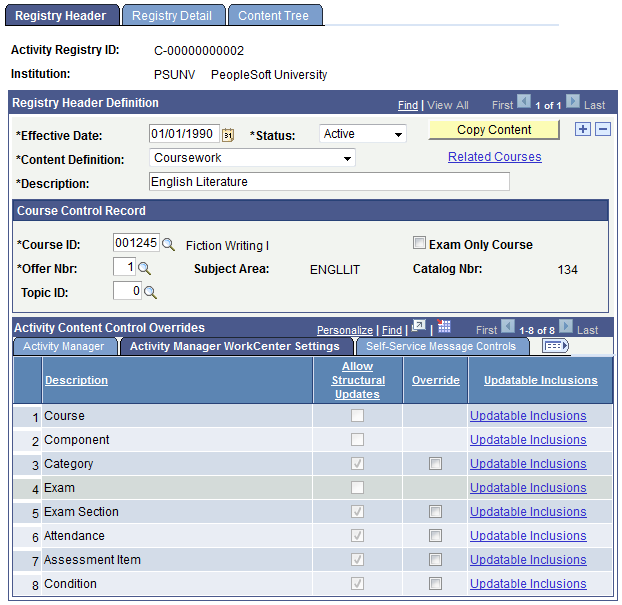
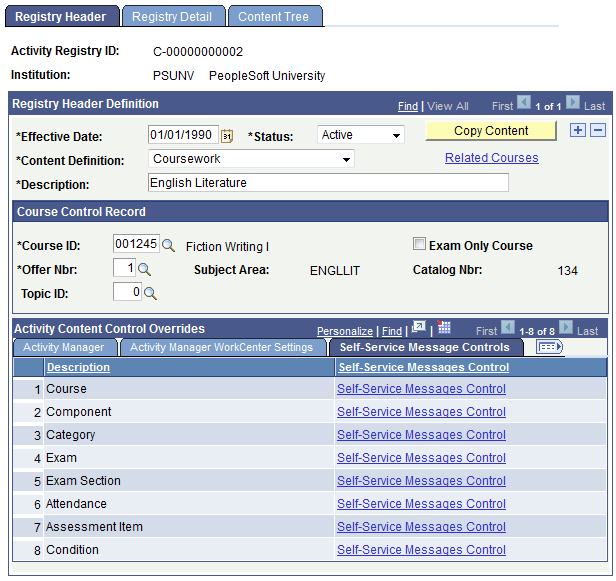
Image: Registry Header page: Self-Service Message Controls tab
This example illustrates the fields and controls on the Registry Header page: Self-Service Message Controls tab. You can find definitions for the fields and controls later on this page.
|
Field or Control |
Definition |
|---|---|
| Activity Registry ID |
The system sequentially assigns this value to indicate a unique activity registry. The prefix used for the number can be set and the last ID assigned can be viewed on the Student Admin Installation page. |
| Copy Content |
You can copy an entire content tree from one activity registry ID to another. Click this button to access the Copy Content page, where you enter an activity registry ID to copy as well as to define the course control record for the new ID. |
| Content Definition |
The delivered content definition value for the Marks and Exams initiative is Coursework. |
| Related Courses |
Click this link to access the Related Courses page, which displays the courses that have been associated with this registry. You can add additional courses on either the Maintain Course Content XRef or Manage Content to Courses components. |
Course Control Record
This section is created based upon the extension record defined for the Coursework Activity Definition. The course identified here will be considered the control course for this activity registry and is automatically associated with the registry. The system prompts for this course when determining the course catalog structure and ownership. This becomes particularly significant when multiple courses are associated with one activity registry.
|
Field or Control |
Definition |
|---|---|
| Course ID |
Identify the course ID of the course control record. |
| Offer Nbr (number) |
Identify the course offer number of the course control record. |
| Associate All Offerings |
This field appears in Add mode. If the course has multiple offerings but all offering have the same content item requirements then this check box will associate the Registry ID to all offerings. However, if the content item requirements will differ among the course offerings, clear this flag and create unique Activity Registry IDs for each course offering. |
| Topic ID |
(Optional) Identify the course topic of the course control record. If a topic exists at the class section level but no Topic ID is entered here, the registry will be applicable to all sections regardless of topic. However if content item requirements will differ among a course topic course, then create unique Activity Registry IDs for each course topic. |
| Exam Only Course |
This check box is set to Yes by default when it is set to Yes on the CRSE_CATALOG_OFFER page of the Course Catalog. Exam-only courses (EOCs) are those for which no class sections are scheduled and no student class enrollment occurs; the student receives credit for the course only by sitting and successfully completing the course exam. When this flag is set to Yes, the Component content type will not be available on the Registry Details page. |
Activity Manager Structural Update Overrides
This section enables users to view and/or override the settings that control what users can update on the content tree in the Activity Manager.
|
Field or Control |
Definition |
|---|---|
| Content Type and Description |
These two display-only fields indicate the sequential number of the content type and its description. |
| Allow Structural Updates |
This check box indicates whether the content type was set up to allow updates in the Activity Manger. This setup occurs on the Activity Definition page. |
| Override |
If the content type was set up to allow structural updates for a specific activity registry, this check box appears. Select the check box to enable users to change a content value only from Yes to No. |
Activity Management WorkCenter Structural Update Overrides
This section enables users to view and/or override the settings that control what faculty and exam staff users can update on the coursework tree in the Activity Management WorkCenter.
|
Field or Control |
Definition |
|---|---|
| Content Type and Description |
These two display-only fields indicate the sequential number of the content type and its description. |
| Allow Structural Updates |
This check box indicates whether the content type was set up to allow updates in the Activity Management WorkCenter. This setup occurs on the Activity Definition page. |
| Override |
If the content type was set up to allow structural updates for a specific activity registry, this check box appears. Select the check box to enable users to change a content value only from Yes to No. |
| Updateable Inclusions |
Select this link to access the Inclusion Options secondary page where you can review or override the inclusion settings that were defined in the Activity Definition. In the Activity Management WorkCenter, faculty and exam staff users are only able to edit those inclusions set to Yes. Select the check box to enable users to change a content value only from Yes to No. |
Self-Service Message Controls
Configure which messages the system should display in self service, based on the source of the data, the Activity Registry, the Activity Manager, or the IAM. The selections are populated by the Activity Definition, but can be overridden here for a specific registry.
Click the Self-Service Messages Control link on the Registry Header page, Self-Service Message Controls tab.
Image: Self-Service Messages Control page (for exam content type)
This example illustrates the fields and controls on the Self-Service Messages Control page (for exam content type). You can find definitions for the fields and controls later on this page.
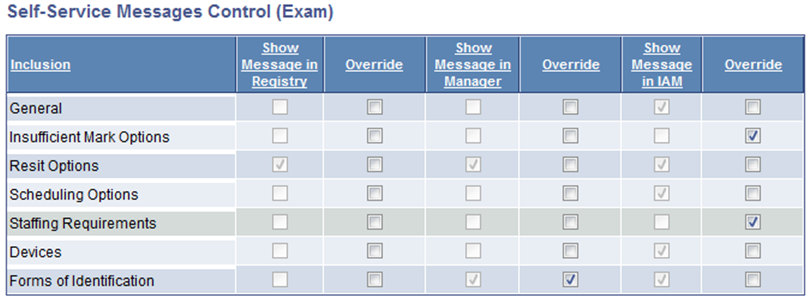
Image: Self-Service Messages Control page (for assessment item content type)
This example illustrates the fields and controls on the Self-Service Messages Control page (for assessment item content type). You can find definitions for the fields and controls later on this page.
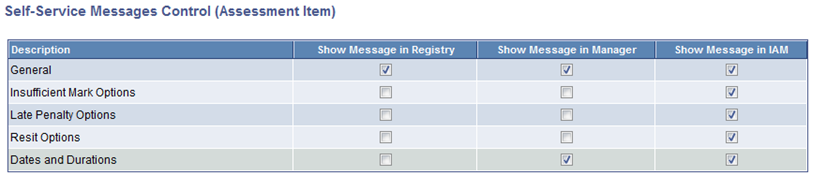
The values on this page appear by default from the Activity Definition. To change these values, select the Override field.
In the example above, if an individual is reviewing activity detail that comes from the Activity Registry, he will not see any information concerning Forms of Identification that would be required for an examination. However if the source of the data is the Activity Manager (overridden in this example) or the IAM, he will see the Forms of Identification information.
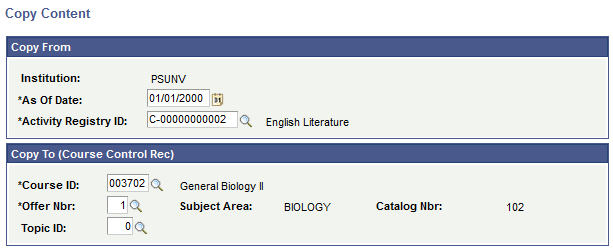
Access the Copy Content page (click the Copy button on the Registry Header page).
Image: Copy Content page
This example illustrates the fields and controls on the Copy Content page. You can find definitions for the fields and controls later on this page.
|
Field or Control |
Definition |
|---|---|
| As Of Date |
The effective date from which to copy the activity registry id. The effective dated row matching this date will be copied. |
| Activity Registry ID |
Enter the activity registry ID from which to copy all content detail. |
| Course ID and Offer Nbr (number) |
Identify the course ID and offer number of the course control record. |
| Topic ID |
(Optional) Identify the course topic of the course control record. If a Topic ID exists but it not entered, the system applies the registry to all sections of the Course ID/Offer Nbr/Topic ID combination. |
Access the Registry Detail page ().
Image: Registry Detail page
This example illustrates the fields and controls on the Registry Detail page. You can find definitions for the fields and controls later on this page.
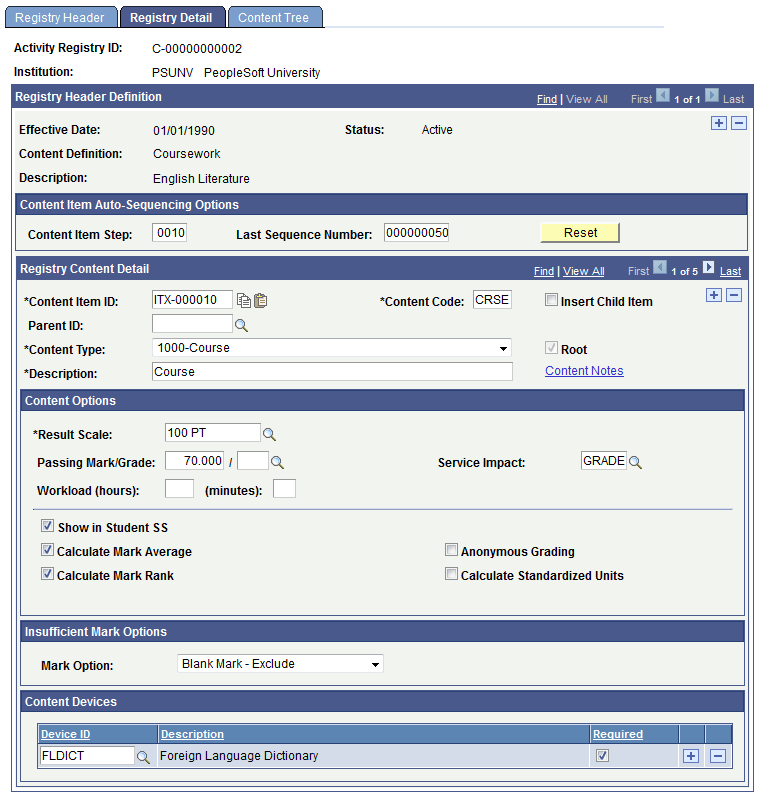
The following group boxes always appear on this page:
Registry Header Definition
Content Item Auto-Sequencing Options
Registry Content Detail
Content Options
The system displays all other group boxes based on the extension and inclusion records (Activity Definition) associated with the content type being defined.
Content Item Auto-Sequencing Options
|
Field or Control |
Definition |
|---|---|
| Content Item Step |
The Content Item Step numbers the content item ID. When you create a content item in the Activity Registry the system assigns a content item ID (prefix + step number sequence). A value of 0010 indicates that content item ID numbers will be sequenced by 10. You can change this value from the creation of one content item ID to the next. Note: The prefix and default content item step are initially established on the Student Admin Installation table. |
| Last Sequence Number |
This field records the last content item ID generated. It can be altered if there is a need to insert a new row into the content structure. To insert a new row, go to the row where the insert should be placed, and change the last sequence number to that content item ID. Then alter the content item step with the sequence number of the new row and then add the new row. For example, two rows are created: ITX-000010 and ITX-000020. You then need to insert a row between these two content items. On the ITX-000010 row, change the Last Sequence Number to 000000010 and change the Content Item Step to 0005. Then insert a new row. The system assigns the new row as ITX-000015. Next, select the Reset button to reset the Last Sequence Number back to the highest assigned: 000000020. |
| Reset |
Select this button to reset the Last Sequence Number to the highest number assigned in this Activity Registry ID. |
Registry Content Details
It is within this section that you build the content tree structure using the content types defined on the coursework activity definition. Based on the content type entered, you will be presented with attributes and grading options selections. Users should utilize the Insert Child/Insert Sibling options to ensure that valid parent/child relationships exist throughout the structure.
Note: Many of the elements entered in this section imply a calculation requirement. The calculation process is under construction and will be delivered fully functional in a later release.
|
Field or Control |
Definition |
|---|---|
| Content Item ID |
The system assigns this ID based on the Content Item Prefix and the Content Item Step. You can override this number or manually assign it. |
| Parent ID |
The system populates this field when inserting child or sibling items with the parent content item ID of that particular content item ID. You can override this number or manually assign it. |
Copy/Paste Icons  |
Click the icons to copy and paste detail from one content item to another. First select the copy icon, then select the Insert a Row icon, and then select the paste icon. Then, you can adjust different values on the new row. |
| Content Type |
The values in this field are concatenated from the Content Type and Description fields on the Activity Definition page. On the Activity Definition page, the Content Types must be Active to appear here. The root content type (Course for the Coursework definition) automatically defaults in add mode. You cannot delete this row. At the Course level, only children content items can be inserted. At all other levels, the Insert Sibling check box appears. Under the root level, you can add children and sibling content items. The children and sibling options available are dependent on the Item Order, the Child Item flag, and the Self-Reference Allowed flag defined on the Activity Definition page. Children and sibling items can only be added if the Item Order is </= to the current content type and the child item and self-reference allowed settings are appropriate. The exception to this is the 9000-Condition type, which can be placed into the content tree based upon the defined parent and child types defined in the Activity Definition. If a course was identified as an EOC, the 2000-Component value will be disabled. |
| Description |
The system displays this description in the content tree and in self-service user interfaces. |
| Content Code |
Enter a short description of the coursework item. |
| Insert Child Item |
Select this check box to allow insertion of a child item to this content item ID. The Parent Item ID carries forward to the new row. |
| Insert Sibling Item |
Select this check box to allow insertion of a sibling item to this content item ID. The Parent Item ID carries forward to the new row. This field is hidden when the content type is Course. |
| Root |
This flag indicates whether the current content item ID is the content root. This check box is selected when the content type is Course. |
| Content Notes |
Click this link to access the Content Notes page where you can select a content message ID or enter free form text. Information entered here pertains to the specific content item ID. |
Content Options
These options are applicable to all content types, although some specific considerations are taken when the Content Type is Course.
|
Field or Control |
Definition |
|---|---|
| Result Scale |
Result scales that were defined on the Result Scale setup page appear here. This field value is required for the root content item and is inherited by all the children of the root. However, it can be overridden at any level. Users can predefine this value using the Activity Management Default setup on the Academic Institution. |
| Override |
The Result scale for all content items, except the root, is inherited from its parent. Select this check box to allow users to change the Result Scale. |
| Weighting Multiplier |
Indicate what weighting is given to this content item in the calculation of its parent result. Percentages can be represented using less than whole numbers. |
| Assessed |
Select this check box to indicate that the item is required to have a result and it will be used in a calculation. Clear this check box if the content item will be used for display purposes only. |
| Passing Mark/Grade |
Enter the minimum passing mark and/or the minimum passing grade for the specific content item. Users can predefine these values using the Activity Management Default setup on the Academic Institution. |
| Service Impact |
Indicate which service impact will disallow the view of results in student self service. This field value will be inherited by all the children of the content item against which it is set. However, you can override it at any level. Users can predefine this value using the Activity Management Default set up on the Academic Institution component. |
| Workload (hours) / (mins) |
Enter the estimated hours and minutes that a student will need to allocate to complete this content item. This field is informational for students and is not used in any calculation. |
| Attributes |
This link appears when a Common Attribute has been added to a content type entity on the Common Attribute Record Context page. |
| Show in Student SS (Self Service) |
Select this check box to indicate that the content item details are available for display in self service. This flag must also be selected on parent items for the content item to appear. This field is selected by default. |
| Calculate Mark Average |
Select this check box to indicate that a mark average across all students should be calculated for this content item. |
| Calculate Mark Rank |
Select this check box to indicate that student ranks should be calculated for this content item. |
| Mandatory Pass Required |
Select this check box to indicate that this content item is required to be passed to achieve an overall passed result for the course. When the system performs the primary course calculation, it will analyze this setting. For those items where this field is selected, the system will review the corresponding result scale. For the mandatory pass processing to run, the result scale must use the Outcome field (it identifies a failed result) and must have the Mandatory Fail flag set. If these two items do not exist on the associated Result Scale, the system will not apply the mandatory pass processing. |
| Anonymous Grading |
Select this check box to indicate that this content item requires anonymous grading. (future) |
| Calculate Standardized Units |
Select this check box to indicate that standardized units should be assessed when the student achieves a passing mark for this content item. |
| Standardized Units |
This field appears when the Calculate Standardized Units check box is selected. Enter any standardized units for this content item. For example, this field can be used to store European Credit Transfer and Accumulation System (ECTS) units. |
Extension Records
Additional group boxes appear on this page based on the Content Type selected. Extension records allow you to refine the functional properties of content types by assigning additional relevant attributes to them. These extension record definitions are set for specific content types on the Activity Definitions page.
|
Field or Control |
Definition |
|---|---|
| Course |
A course serves as the root of a coursework content tree. It is the only required content type that must be used in the content structure. The extension record for the course content type populates the course control record that appears on the Registry Header page of the activity registry. |
| Component |
When the Content Type is Component, the Component Options group box appears. In the Course Component field, the system displays components that are specific to the course that was defined as the Course Control Record. The component used in Activity Management is SSR_COMPONENT; the same field is used in the course catalog structure. The valid values that appear are from the Course Control Record defined on the Activity Header page. Component results will be calculated from their children, but can be overridden. Component results will also be used to calculate their parents' result (course). Components are not required to be built into the coursework structure. When creating a content structure, consider the following when determining if a component should be added to the structure:
|
| Category |
When the Content Type is Category, the Category Options group box appears. In the Content Category field, the system displays categories that were defined on the Content Category setup page. A category is an optional level that can be added to the content structure to assist with grouping for display and/or calculation purposes. When calculated, category results are computed from their children, but can be overridden. Category results will also be used to calculate their parents' result (component or course). |
| Exam |
When the Content Type is Exam, the Exam Options group box appears. In the Exam Type field, the system displays types that were defined on the Exam Type setup page. In addition, set the Exam Duration (in hours and minutes). This content type should be used for any examination that requires its own rules and attributes, will be scheduled outside of a class construct, and has special enrollment considerations. Do not use exams for class section-specific tests (in class or a final that is section specific); define these as assessment items. An exam can have a child item of itself if it makes sense for an institution to create an exam in a hierarchical structure. Examination results are entered manually and will be used to calculate their parents' result (exam, category, component, or course). |
| Attendance |
There is no delivered extension record for the content type Attendance. Enter an Attendance content type into the content tree when your institution wants to store an attendance result and use it in a calculation for a parent result; however, there is no specific extension record for this content type. The attendance details will be captured as part of the Attendance inclusion record. Users can track attendance without inserting the Attendance content type. You can select the attendance content inclusion for the other content types and record a result; however the system will not use this result in the primary course calculation. To use an attendance result in the primary course calculation, you must insert the Attendance content type into the content tree. Users can predefine these values using the Activity Management Default setup on the Academic Institution component. |
| Assessment Item |
When the Content Type is Assessment Item, the Assessment Item Options group box appears. Select the Extra Credit check box if the given assignment is undertaken for extra credit. The extra credit assignment can be added to all or individual students in the IAM. The system adds the points attained to the calculation for the overall category, component, or course result as applicable. Select the Question check box if the given assessment item is being created as part of an exam and you want to identify it as a question on the exam. An assessment item can have a child item of itself if it makes sense for an institution to create assessment items in a hierarchical structure. Assessment item results are entered manually and will be used to calculate their parents' result (assessment item, attendance, exam, category, component, or course). |
| Condition |
When the Content Type is Condition, the Condition Options group box appears. Use a condition to inject an option for students. When you use a condition you indicate how many of the following child items a student must select and complete. The system applies the label Select nbr to the condition in the content tree. The child items of the condition will have the Or condition inserted into the content tree. Conditions can be used to create varying And/Or scenarios. Below are a number of examples. Example 1: AND/OR/AND Each student must complete either HW1 AND HW2 OR Oral Presentation 1 AND Oral Presentation 2. A condition (Options – Select 1) is created as the parent of two categories (Option 1 – Homework and Option 2 – Oral Reports). Each category has two assessment items. Example 2: Option within an option Each student must complete either Option 1 (HW1 and HW2) OR Option 2 (either Report 1 OR Report 2). A condition is created as a parent to a category (Option 1 – Homework) and a condition (Option 2 – Report). Example 3: OR/AND/OR Each student must complete a homework assignment from both Option 1 and Option 2. A condition is created for each selection. Thus, it reads HW1 OR HW2 AND HW3 OR HW4. |
Inclusion Options
The following sections appear on the page based on the inclusion options defined for each content type on the Activity Definitions page. Include or exclude these options based upon your institution's needs.
General Options
|
Field or Control |
Definition |
|---|---|
| Mandatory |
Select this check box to indicate that this content item is required. When a content item is required the system automatically assigns it to a student when the student enrolls in the class or the EOC. When an item is not marked as mandatory it is considered optional. Optional items can be placed in a condition that will allow a student to choose between several options. This field is selected by default. |
| Required by Institution |
Select this check box to indicate that this content item is required by the institution and cannot be deleted by a faculty or administrative user. |
| Allow Override or Substitution |
Select this check box to indicate that for a student this content item can be overridden or substituted with a different content item. |
| Topic Approval Required |
Select this check box to indicate that a specific topic approval is required for this content item. For instance, a research project topic may require approval before students can begin the project. |
| Include for Mid Term Grade |
Select this check box to indicate that this content item mark will be used to calculate a midterm result. |
Insufficient Mark Options
This group box applies to all content types, but can be turned off for any content type on the Activity Definition. Use these fields to define what should occur when there is an insufficient mark in the student record for a given content item.
|
Field or Control |
Definition |
|---|---|
| Mark Option |
During the calculation process, if no mark has been entered for an assigned content item, and if applicable, the Late Content Penalty Rule has expired, the system uses the value selected here to determine how to calculate the content item. Valid values are:
You can also use this feature to eliminate a result from a calculation.
|
| Minimum Mark Value |
This field appears when the Blank Mark – Include value is selected as the Mark Option. This indicates that even though there is no mark entered for the content item, this value will be used in calculation. If this field is left blank, a zero is used in the calculation. |
| Insufficient Mark Threshold |
This field displays when the Below Threshold – Exclude is selected as the Mark Option. This indicates that the content item will be excluded from the calculation when it is less than or equal to the mark indicated here. |
Attendance Tracking Options
This group box applies to all content types, except Exam Section. It is delivered as active only for the Attendance content type, but that can be adjusted on the Coursework Activity Definition. Users can predefine these values using the Activity Management Default setup on the Academic Institution.
|
Field or Control |
Definition |
|---|---|
| Track Using |
Define the requirement for attendance as a Number of Classes Attended, Percentage of Classes Attended, or Number of Allowed Absences. |
| Required Attendance |
This field appears when the Track Using field is set to Number of Classes Attended or Percentage of Classes Attended. Indicate the number or percentage of classes that a student must meet to pass the attendance requirement. |
| Allowed Absences |
This field appears when the Track Using field is set to Number of Allowed Absences. Indicate the number of absences allowed. |
| Result |
This check box appears when the attendance tracking inclusion is being used with a non-Attendance content type. The field should be selected if you will track an attendance result (it cannot be calculated) for any content item except Attendance. |
Late Content Penalty Options
This group box applies to Assessment Item content types. Late penalties can be automatically calculated by setting one of five late penalty options. Both the earned mark and the penalized mark will be stored but only the penalized mark will be used in calculation. A late penalty is assessed for this content item when the student submits the assignment after the due date or the extended due date (if an extended due date exists).
|
Field or Control |
Definition |
|---|---|
| Penalty Type |
Select the method to apply late penalties. Valid values include: Capped – students can earn no higher than the specified value; Daily – students will have points deducted for each day the item is late Fixed – students will automatically earn this mark One Time – students will have this value deducted Weekly – students will have points deducted for each week the item is late. No Penalty is the delivered default. |
| Late Penalty |
This field appears when you select a Penalty Type of Daily, One Time, or Weekly. When you select Daily or Weekly, the Penalty Max field also appears. |
| Penalty Mark |
This field appears when you select a Penalty Type of Capped or Fixed. The system will enter this value for the student when the item is submitted late. |
| Penalty Max |
This field appears when you select a Penalty Type of Daily or Weekly. Enter the maximum number of points that an assessment item can be penalized. |
| Grade Expires to Zero in ___ Days |
Select this check box if, at some point, the mark should be marked as zero. Then, enter the number of days that will pass before the assessment item turns to zero. |
Dates and Durations
This group box applies to Assessment Item content types. In this section you define landmark days for the content item as well as the number of days from a date trigger the landmark dates should fall. When the content tree for the course is associated with a scheduled class, the landmark dates are populated based on these rules. The Review Dates page serves as a visual tool for a given term to see how the dates might populate.
|
Field or Control |
Definition |
|---|---|
| Date Trigger |
Select which trigger date option to use to determine the landmark dates. The choices are to use the Term Start Date, the Session Start Date, or the Class Start Date. |
| Start Days |
Enter the number of days from the Date Trigger when this content item can be started. |
| Due Days |
Enter the number of days from the Date Trigger when this content item is due. The system will dispense late penalties against this content item beginning one day after this date unless an extended due date exists for an individual student. |
| Grading Days |
Enter the number of days from the Date Trigger when this content item will be graded. |
| Review Dates |
Click this link to access the Review Content Item Dates page where you can view estimated dates for a given term, session, or class start date. |
Resit Options
This group box can be applied to Category, Exam, Assessment Item, and Condition content types. Use this section to support reassessment (resit) rules. Resit rules pertain to both standard reassessment (resitting the same activity) and supplemental resits (substituting the original activity with a different activity).
|
Field or Control |
Definition |
|---|---|
| Resits Allowed |
Select this check box to indicate that this content type is allowed to be reassessed. When selected, the Supplemental Resit field, the Resit Period Option, and the Attempt Limit sections are displayed. |
| Supplemental Resit |
Select this check box to indicate if this content item is to be used as a supplemental resit content item. This content item will only be used when a student must be reassessed. For instance, initially students may be assessed on a particular assessment item. Students who fail this assessment item, however, may be given an opportunity to be reassessed, but not on the same assessment item. This secondary item should be noted as a supplemental resit. After indicating this item is a supplemental resit, it must be added as a Supplemental Resit Item on the initial content item. If several items can be used as a supplemental resit to an original attempt, the supplemental items should be created as children of a category or a condition and the Supplemental Resit flag should be placed at the category or condition level. Use a category if multiple supplemental items are to be used for reassessment (creates AND connectors). Use a condition if students have a choice of the supplemental items to be used for reassessment (creates OR connectors). |
| Calculation Option |
Indicate how to calculate a Resit in relation to the previous mark:
|
| Supplemental Resit Item |
This field is available when the Resits Allowed check box is selected. It should be used when the current content item is to be reassessed with a supplemental content item. The content item to be used as the supplemental item must already be created in the hierarchy and selected as a supplemental resit. |
| Resit Period Assignment |
This grid is available when the Resits Allowed check box is selected. When the resit item is an exam, users will define how to assign the academic period for the resit exam. Values include Next Exam Period, Next Regular Resit Period, and Next Resit Exam Period. The Regular and Resit Period types are defined on the Academic Period Table. |
| Student Can Refuse |
Select to indicate that student can refuse the assigned exam period. For future use. |
| Attempt Time Period |
Select the time periods against which reassessment limits will be applied. This field works in conjunction with the Allowed Attempts field. Delivered time periods are: Academic Year, Academic Career, and Academic Program. |
| Allowed Attempts |
Enter the number of allowed attempts for the activity for the period selected. This value is for total attempts of the activity, including the original. If an activity can be reassessed just once, the value entered should be 2 for the original attempt and the resit attempt. |
Scheduling Options
This group box applies to Exam content types. Use these fields to define exam scheduling requirements. You can override these requirements when the exam is scheduled in the Section Manager.
|
Field or Control |
Definition |
|---|---|
| Schedule Activity |
Select this check box to indicate that an exam section should be scheduled in the Section Manager. |
| Number of Sections to Schedule |
Indicate the number of exam sections to schedule in the Section Manager. Users will not insert the Exam Section content type into the Activity Registry. By selecting the Schedule Activity check box and indicating the number of exams to schedule for the exam, the system automatically inserts the exam section row(s) into the content tree at the section level. The sections will appear initially in the Activity Generator. |
| Connector Type |
This field appears when the Number of Sections to Schedule is two or more. The connector type allows users to indicate whether students should be assigned to each of the scheduled exam sections (And) or if the students need to choose between multiple sections (Or). The system will insert Or connectors into the content tree in the Activity Generator when the exam sections are inserted. |
| Calculated Result |
Select this check box to indicate that this particular exam level will not have a mark entered directly against it, but will have a calculated result based upon the calculation of child items. |
| Confirmation Required |
Select this check box to indicate that a student must confirm his/her attendance in the assigned exam section. |
| Use 3rd Party Scheduler |
Select to indicate you will find an alternate solution for scheduling exams. |
Note: Exam sections will inherit the exam type of the exam content type (its parent). If multiple scheduled sections require different exam types, users should create an exam for each type in the coursework hierarchy.
Staffing Requirements
This group box applies to Exam content types. Users can use these fields to define staffing requirements. You can override these requirements when the exam is scheduled.
|
Field or Control |
Definition |
|---|---|
| Staff Instructions |
Click this link to access the Staff Instructions page where you can add staff instruction content messages. |
| Staff Type |
Select an examination staff type. Staff Types are delivered as translate values. Delivered values include: Chief Examiner, Examiner, Invigilator, and Proctor. Additional staff types can be added to the translate field SSR_CW_EX_STF_TYPE. |
| Minimum Required |
Enter the number required for each staff type. You can enter a flat number, or use the field in conjunction with the Student/Staff Ratio field by indicating the number of staff in this field per the number of students identified in the Student/Staff Ratio field. |
| Student/Staff Ratio |
Use with the Minimum Required field to establish a staff (minimum required)-to-student ratio. For example, there could be requirement that two proctors are required for every 30 students. |
Content Devices
This group box applies to all content types, but can be turned off for any content type on the Activity Definition. Users can indicate devices that are allowed or required for a content item. You can override these devices when a class or an exam is scheduled.
|
Field or Control |
Definition |
|---|---|
| Device ID |
Indicate devices that may be required for a course, could be used during an examination, or are needed to complete an assessment item. The devices are setup on the Content Devices page. |
| Required |
Select this check box to indicate whether students are required to have this device type for a content item. Otherwise, this device type is considered acceptable, but optional. |
Forms of Identification
This group box applies to Exam content types. Users can use these fields to define acceptable forms of identification. You can override these requirements when the exam is scheduled. Users can predefine these values using the Activity Management Default setup on the Academic Institution.
|
Field or Control |
Definition |
|---|---|
| Form of Identification |
Indicate which documents or identification a student is required to show for entrance into the examination. |
| Required |
Select this check box to indicate if the form of ID is required for entrance into the examination. Otherwise, this form of ID is considered acceptable, but optional. |
Access the Content Notes page (click the Content Notes link on the Registry Detail page).
Image: Content Notes page
This example illustrates the fields and controls on the Content Notes page. You can find definitions for the fields and controls later on this page.
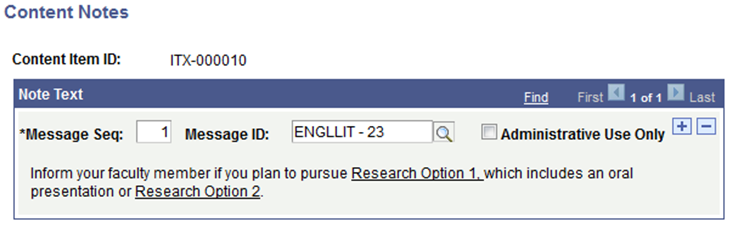
The Message ID options available here are defined during Content Message setup. Only those messages defined as General Content Messages will appear. This message appears to students, faculty, and administrative users unless the Administrative Use Only check box is selected. If selected, students do not see the message.
|
Field or Control |
Definition |
|---|---|
| Message Seq (sequence) |
The system assigns the sequential number. |
| Message |
If you enter a Message ID, that message appears; otherwise you can enter a free-form message. |
Access the Attributes page (click the Attributes link on the Registry Detail page). Select to access common attribute fields that were defined on the Record Context page for Activity Registry Items)
Image: Attributes page
This example illustrates the fields and controls on the Attributes page. You can find definitions for the fields and controls later on this page.
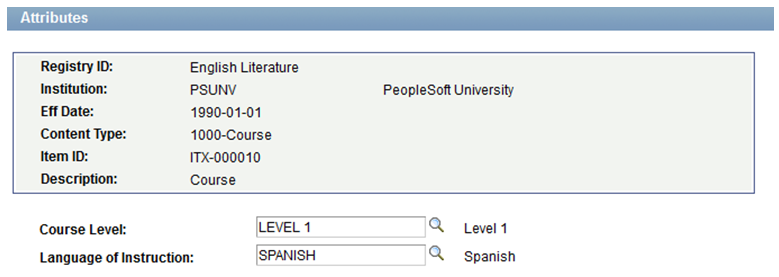
The screenshot above provides an example of common attributes set up for the course content item in the Activity Registry.
The fields that appear on the Attributes page are customer-specific and are defined on the Common Attributes and Record Context pages. The record context used for the Activity Registry is the Content Item Attributes (SSR_AC_CONT_ITM) record. The entity names used for the Activity Registry are prefixed by 'ACR'.
Access the Review Content Item Dates page (click the Review Dates link on the Registry Detail page).
Image: Review Content Item Dates page
This example illustrates the fields and controls on the Review Content Item Dates page. You can find definitions for the fields and controls later on this page.
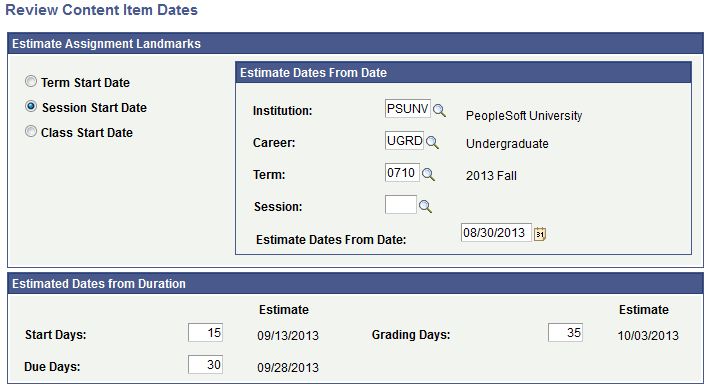
Note: This page is designed to provide a visual estimate when originally defining the Activity Registry ID. These values are not stored.
Estimate Assignment Landmarks
|
Field or Control |
Definition |
|---|---|
| Term Start Date, Session Start Date, or Class Start Date |
Select the trigger date to use to determine the landmark dates. |
| Estimate Dates from Date |
Enter a class start date. |
Estimated Dates from Duration
Based on the days entered in the fields of this group box, the system populates a date estimate.
Access the Staff Instructions page (click the Staff Instructions link on the Registry Detail page).
Image: Staff Instructions page
This example illustrates the fields and controls on the Staff Instructions page. You can find definitions for the fields and controls later on this page.
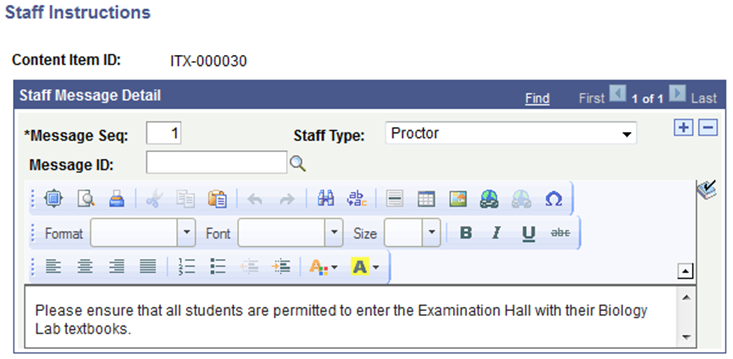
This page applies to Exam content types. The Message ID options available here are defined during Content Message setup. Only those messages defined as Staff Instructions will appear. These requirements can be overridden when the exam is scheduled.
|
Field or Control |
Definition |
|---|---|
| Message Seq (sequence) |
The system assigns the sequential number. |
| Message ID |
If you enter a Message ID, that message appears; otherwise you can enter a free-form message. |
| Staff Type |
Indicate to which staff type this instruction is applicable. |
Access the Content Tree page ().
Image: Content Tree page
This example illustrates the fields and controls on the Content Tree page. You can find definitions for the fields and controls later on this page.
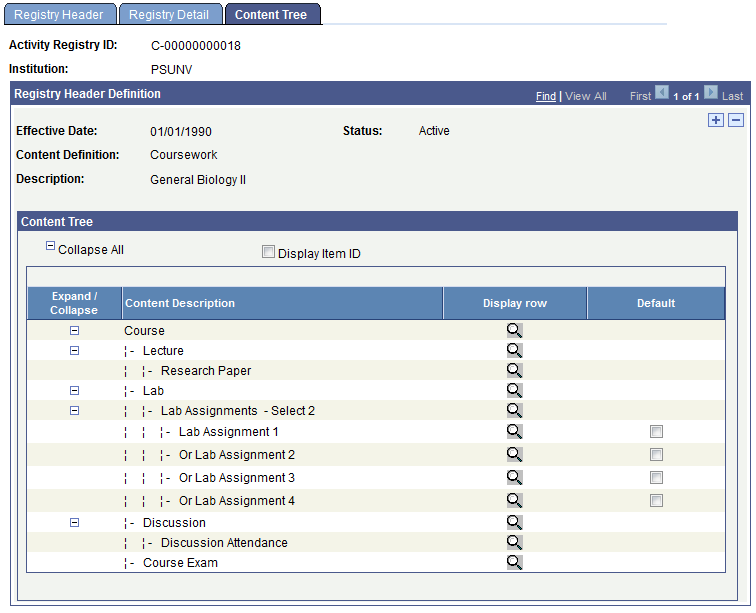
The system builds the content tree as you save content types and can be viewed on the Content Conditions page. If a condition was established on the Registry Detail page you will see it with the Select Nbr appended to the description and the Or conditions inserted into the condition children. In the above example the condition Lab was inserted as a parent to Lab Assignments 1, 2, 3 and 4. The condition was built indicating that the student must select and complete two of the lab assignments. Exam sections—the number defined on the Exam content type—will be inserted on the Activity Generator component.
|
Field or Control |
Definition |
|---|---|
| Display Item ID |
Select this check box to display the Content Item ID in the content tree. |
Item Details Icon  |
Select the Items Detail icon to transfer to the corresponding row on the Registry Content Detail page. |
| Default |
This check box appears on the child items of a condition. Indicate whether students should automatically be assigned certain conditional items. If items are indicated as the default(s) then these items will be in an assigned status on the student's IAM. Students, though, will have the option to change these assigned values in self service. |