26 Work with Print Options
This chapter contains these topics:
26.1 Working with Printing Options
You can set the print options for a specific version. You can also change these options for specific versions or change them for only one instance.
To work with printing options, complete the following tasks:
26.2 Defining Print Requirements
Access the Printer File Overrides screen to control the format of a report and the printer from which a report prints.
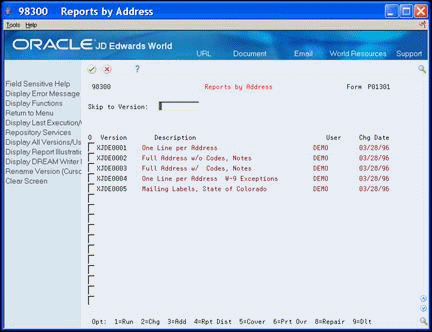
From Address Book (G01), choose Report and Labels
From Periodic Processes (G121), choose Reports by Address
-
On any versions list, enter 6 in the Option (O) field for the version you want to change.
Printer File Overrides displays.
Figure 26-2 Printer File Overrides screen
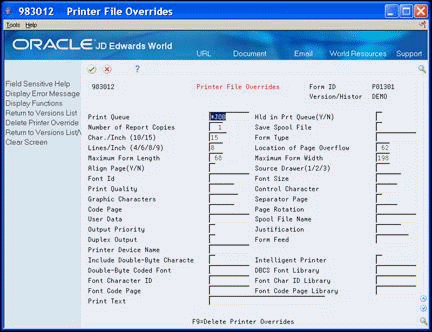
Description of "Figure 26-2 Printer File Overrides screen"
-
On Printer File Overrides, complete one or more of the following optional fields:
-
Print Queue
-
Hold on Print Queue
-
Number of Report Copies
-
Save Spool File
-
Characters Per Inch
-
Form Type
-
Lines Per Inch
-
Location of Page Overflow
-
Maximum Form Length
-
Maximum Form Width
-
Print Text
-
| Field | Explanation |
|---|---|
| Print Queue | A designation of a specific print queue, such as QPRINT.
If left blank, this field defaults to the print queue specified in your user profile. |
| Hld in Prt Queue(Y/N) | This flag is used to determine whether to hold the print file in the print queue rather than printing it.
Valid values are: Y – hold on the print queue N – do not hold on the print queue S – same as Y but print file will be saved on the print queue T – same as N but print file will be saved on the print queue Note: You can use 1 for Y and 0 (zero) for N. UPGRADE PLANNER: If you are entering information into your Upgrade Plan, the following values are valid: 1 – hold on print queue 0– do not hold on the print queue |
| Number of Report Copies | The number of copies of this report to be printed. One copy is the default. |
| Save Spool File | Indicates whether the spool file should be set to a SAV status after printing. |
| Char./Inch (10/15) | The horizontal printing density. This should be entered as the number of characters per inch and must be supported by your printer. |
| Form Type | A field used in the definition of a report version used to indicate the special forms number to be used in the printing of a particular report. |
| Lines/Inch (4/6/8/9) | The line spacing should be entered as the number of lines per inch and must be supported by your printer. The valid values are:
4 – IBM 5219, 5224, 5225, and 3287 printers only 6 – IBM 5224 printer only 8 – IBM 5224 printer only 9 – IBM 5225 printer only The standard computer print is 6 LPI and 10 CPI. If you are printing on 8 1/2" x 11" paper, you would specify 8 LPI and 15 CPI. |
| Location of Page Overflow | A field used in the definition of a report version to indicate the number of lines to be printed on a specific form before page overflow is detected. |
| Maximum Form Length | A field used in the definition of a report version to indicate the length of the form on which the requested report is to be printed. This is expressed in lines per page. |
| Maximum Form Width | A field used in the definition of a report version used to indicate the width of the form on which the requested report is to be printed.
The standard form width is 132 characters. If more than 132 characters are specified, you must compress printing to 15 characters per inch. |
| Print Text | The Print Text field specifies a character string that will be printed at the bottom of each page of the specified report. A maximum of 30 characters are allowed. Refer to "PRTTXT" keyword of the "OVRPRTF" command on the AS/400. |
26.3 Defining a Report Routing List
You can identify people you want to receive a copy of your report. If you included a cover page, the list of recipients prints on the cover page of your printed report.
To define your report routing list
-
On the versions list, enter 4 in the Option (O) field in front of your version.
Figure 26-3 Report Distribution List screen
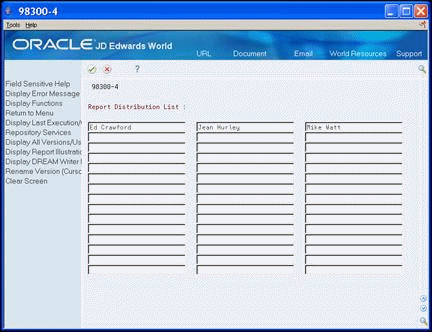
Description of "Figure 26-3 Report Distribution List screen"
-
On Report Distribution List, enter the names of people you want to receive the report.
See Also:
-
Section 25.4, "Revising Parameters"for information on how to include a cover page on your report version.