28 Work with Submitted Reports
This chapter contains these topics:
28.1 Working with Submitted Reports
To learn the status of a report you submit, you can view your job in the system queues.
Complete the following:
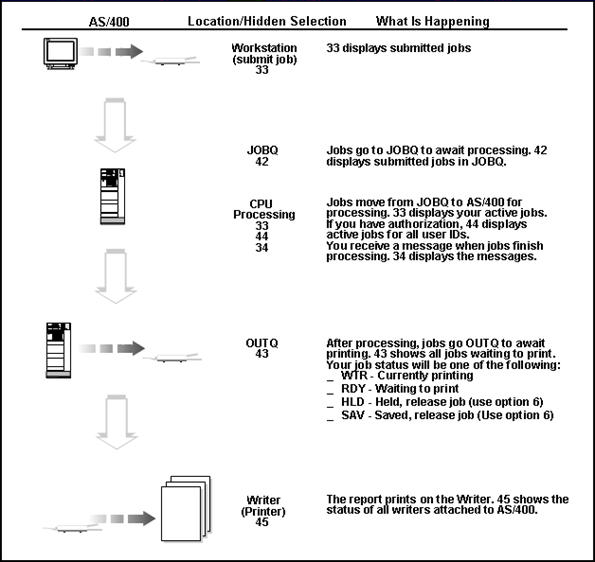
When you submit your report version, the report passes through the following queues:
-
Job queue
-
Output queue
The job queue is the area where your report awaits processing by the system. When the system finishes processing your report, the job moves to the output queue. Your report prints from this queue.
28.2 Reviewing Submitted Jobs
All the jobs you have submitted for processing display on Work with Submitted Jobs. You can review a job after you send it to the output queue on Work with Job Spooled Files. If you do not know the name of the job, you can use a word or character string to locate a spooled file.
Complete the following tasks:
-
To review submitted jobs
-
To review a processed report
-
To search with the Find field
-
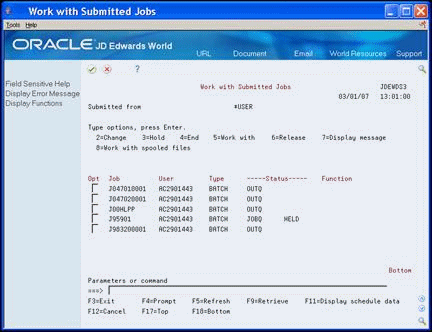
On the command line on any menu, enter 33.
Work with Submitted Jobs displays.
Figure 28-2 Work with Submitted Jobs screen

Description of "Figure 28-2 Work with Submitted Jobs screen"
-
On Work with Submitted Jobs, locate your job and view the status information.
| Field | Explanation |
|---|---|
| Job | The simple name of the job, or the JD Edwards World job number. |
| User | Your user ID |
| Type | The type of the job. Valid types are:
|
| Status | The status of the job (in two fields). Valid values for the first field are:
The second field indicates whether the job is being held or not held. The field is blank if the job is not being held. If the system failed while the job was active, the status JOBLOG PENDING is show in the two fields until the job log is written. |
-
On Work with Submitted Jobs, enter 8 in the Option (Opt) field in front of your completed job.
Figure 28-3 Work with Submitted Jobs screen
Description of "Figure 28-3 Work with Submitted Jobs screen"
-
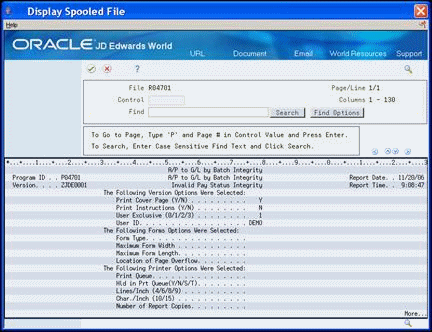
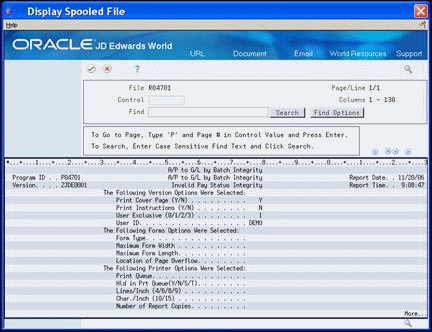
On Work with Job Spooled Files, enter 5 in the Option (Opt) field in front of the spool file you want to display.
You can have more than one spool file. For example, if you select a cover page for your report, the processed report and the cover page display on the Work with Job Spooled Files screen.
Figure 28-4 Work with Job Spooled Files screen

Description of "Figure 28-4 Work with Job Spooled Files screen"
The report displays.
-
Perform one of the following to view more of the report.
-
Use the Page Up and Page Down keys
-
Click the up and down arrows
-
Click the left (F19) and right (F20) arrows to view the right and left portions of the report
-
| Field | Explanation |
|---|---|
| Control | Used to access specific pages of the spooled file displayed or to window to a specific column. Enter a specific page number or use the + / - signs.
For example:
Enter a specific column number to move to if known or use the + / - signs. For example:
|
-
On Display Spooled Files, type a search topic in the following field:
-
Find
-
-
Click Search (F16) to search for the topic.
If the search locates the topic, the screen displays the highlighted word.
| Field | Description |
|---|---|
| Find | Enter the word or character string you wish to find.
Blanks at the end of the character string are ignored. Use quotation marks if blanks are required at the end of a string.
|
28.3 Reviewing the Job Queue
You can view all jobs waiting for processing in a user's assigned job queue. The following considerations apply to the job queue:
-
Jobs wait here until the system is able to process them
-
Jobs are submitted for processing in the order they appear
-
On the command line on any menu, enter 42.
Work with Job Queue displays.
-
On Work with Job Queue, review the information in the following fields:
-
Job
-
Number
-
Priority
-
Status
-

| Field | Explanation |
|---|---|
| Number | The six digit number assigned by the system. |
| Priority | The job priority that was used for this job. The priority ranges from 0 (highest) to 9 (lowest0. |
| Status | The status of the job. Valid values are:
The following status values with a * in front of them display when an action was performed on the job as a result of taking an option:
|
28.4 Printing from the Output Queue
You can review all the jobs in your assigned output queue. When a report is ready, you can release it to the printer.
To print from the output queue
-
On any menu, enter 43 in the command line.
Figure 28-8 Work with Output Queue screen
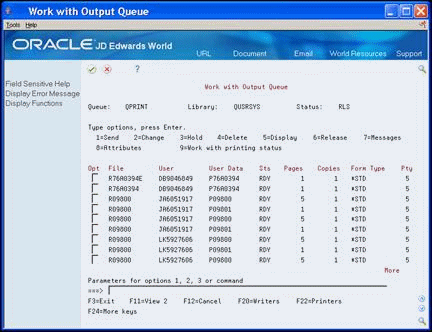
Description of "Figure 28-8 Work with Output Queue screen"
-
On Work with Output Queue, review the information in the following fields:
-
File
-
User
-
User Data
-
Status
-
Pages
-
Form Type
-
Priority
-
-
If the report status is RDY (Ready) enter 6 in the Option (Opt) field to release the report.
| Field | Explanation |
|---|---|
| Status | The status of the spooled file. Valid values are:
The following status values with a * in front of them display when an action was performed on the job as a result of taking an option:
|
| Form Type | The type of form which should be loaded on the printer. For diskette files, this field is blank. |