10.6 Customizing Interactive Reports as an End User
Users can alter the layout of interactive reports data by choosing the columns they are interested in, applying filters, highlighting, and sorting. They can also define breaks, aggregations, charts, group bys, and add their own computations.
See Also:
"Creating Reports Using a Wizard" and "Customizing an Interactive Report Using the Actions Menu" in Oracle Application Express End User Guide10.6.1 About the Search Bar
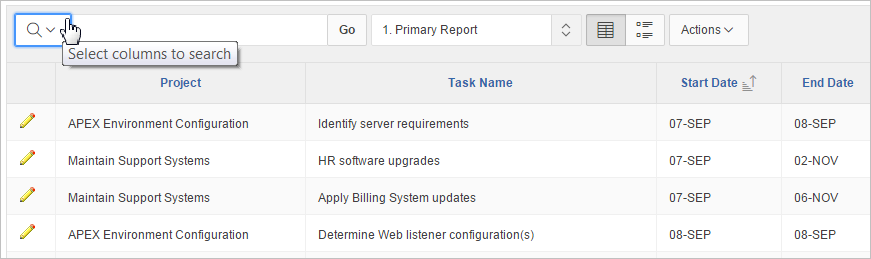
Description of the illustration ''ir_search.png''
A search bar displays at the top of every interactive report and may include the following features:
-
Select Columns to Search - This icon resembles a magnifying glass. Click this icon to narrow your search to specific columns. To search all columns, select All Columns.
-
Text Area - Enter case insensitive search criteria (wildcard characters are implied) and click Go.
-
Go Button - Executes a search.
-
Reports - Displays alternate default and saved private, or public reports. See "Saving Interactive Reports."
-
View Icons - Switches between an View Icon, View Report and View Detail of the default report (if enabled). May also include Chart and Group By View (if defined).
-
Actions menu - Use the Actions menu to customize an interactive report. See "About the Actions Menu."
10.6.2 About the Actions Menu
You can customize an interactive report by selecting options on the Actions menu.
Tip:
Not all options described in this section are available on every Actions menu. Developers can customize what options appear. See "Customizing the Actions Menu in Page Designer" and "Customizing the Search Bar and Actions Menu."The Actions menu appears to the right of the Go button on the Search bar. Use this menu to customize an interactive report.
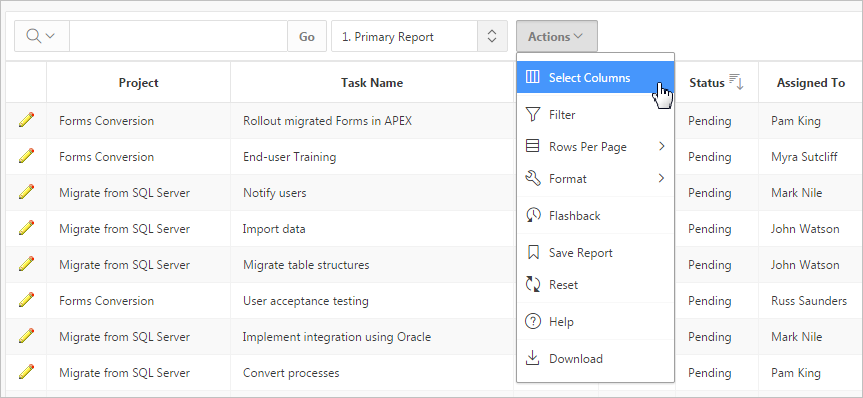
Description of the illustration ''ir_action_menu.png''
The Actions menu contains the following options:
-
Select Columns specifies which columns to display and in what order.
-
Filter focuses the report by adding or modifying the
WHEREclause on the query. -
Rows Per Page determines how many rows display in the current report.
-
Format contains the following submenu:
-
Sort - Changes the columns to sort on and determines whether to sort in ascending or descending order.
-
Control Break - Creates a break group on one or several columns. This pulls the columns out of the interactive report and displays them as a master record.
-
Highlight - Defines a filter that highlights the rows that meet the filter criteria.
-
Compute - Enables users to add computed columns to a report.
-
Aggregate - Enables users to perform mathematical computations against a column.
-
Group By - Enables users to group the result set by one or more columns and perform mathematical computations against columns.
-
Pivot - Enables users to define a Pivot report.
-
-
Flashback - Enables you to view the data as it existed at a previous point in time.
-
Save Report - Saves the interactive report. Depending upon their user credentials, users can save different types of reports.
-
Reset - Resets the report back to the default report settings.
-
Help - Provides descriptions of how to customize interactive reports.
-
Download - Enables users to download a report. Available download formats depend upon your installation and report definition.
-
Subscription - Enables users to send themselves an interactive report by email.
See Also:
"Customizing an Interactive Report Using the Actions Menu" in Oracle Application Express End User Guide10.6.3 Using Interactive Report Filters
When you customize an interactive report, a filter displays between the search bar and the report. The following illustration shows a report with two filters Project = 'Bug Tracker' and Status = 'On-Hold'.
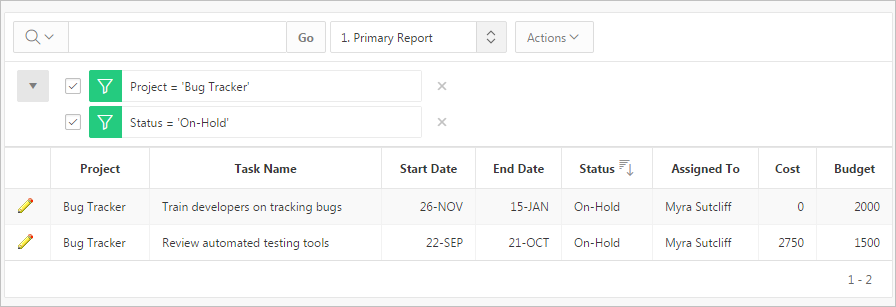
Description of the illustration ''ir_filter_show.png''
By default, multiple filters display horizontally stacked on top of one another. To minimize the amount of information that displays and hide filter details, click the arrow to the left of the filter name. The following illustration shows the same report with the Project and Status filter details hidden.
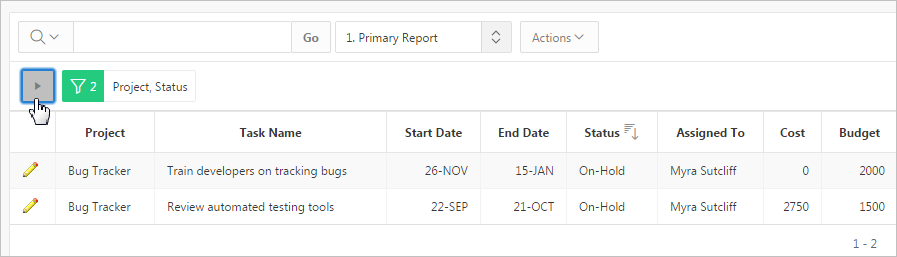
Description of the illustration ''ir_filter_hide.png''
Other keys features of interactive report filters include:
-
Enable/Disable - To enable and disable a filter, select and deselect the checkbox to the left of the filter name.
-
Filter Edit - To edit a filter, click the filter name.
-
Remove Filter - To remove a filter, select the Remove Filter icon to the right of the filter name.
10.6.4 Saving Interactive Reports
This section describes how to save an interactive report. All users can save a private or public interactive report. However, only the user who creates a private report can view, save, rename, or delete it. Developers have additional save capabilities in that they can save the report that initially displays, called the Primary Default, or create an Alternative Default report.
See Also:
"Managing Saved Interactive Reports" in Oracle Application Express Administration Guide10.6.4.1 About the User Type and Available Save Options
An end user can save an interactive report in two ways:
-
Public Report (End user and developer). This report is viewable by all users. However, only the user who creates a public report can save, rename, or delete it. Although all users can view a public report, they can only save it under a new report name.
-
Private Report (End user and developer). Only the user who creates the private report can view, save, rename, or delete it.
A developer can additionally save an interactive report in the following ways:
-
Primary Default (Developer only). The Primary Default is the report that initially displays. Primary Default reports cannot be renamed or deleted.
-
Alternative Report (Developer only). Enables developers to create multiple report layouts. Only developers can save, rename, or delete an Alternative Report.
The following shows the Reports list on the Search bar of an interactive report.
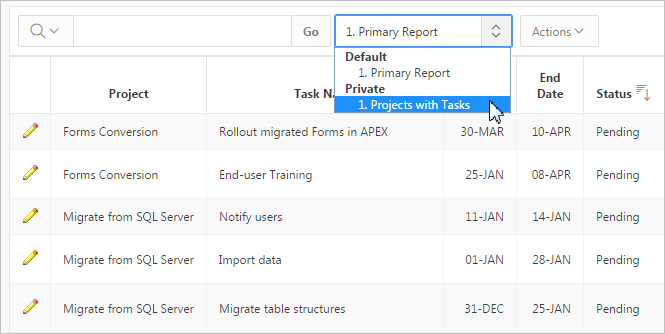
Description of the illustration ''ir_report_list.png''
This example shows two reports:
-
Default - Primary Report. This is the initial report created by the application developer. Default, Primary reports cannot be renamed or deleted.
-
Private - 1. Projects with Tasks. This is a Private report. Only the user who creates a private report can view, save, rename, or delete it.
Tip:
You can view saved report activity from the Workspace Administration page. On the Workspace home page, click the Administration menu and then select Administration, Monitory Activity and By Interactive Report.10.6.4.2 About Configuration Dependencies
The Save Report option on the Actions only displays if the application developer:
-
Defines an authentication scheme for the current application. See "Establishing User Identity Through Authentication."
-
Selects Save Report or Save Public Report under Search Bar on the Report. See "Managing the Search Bar and Actions Menu in Component View."
Also note that the Reports select list on the Search Bar only displays if the application developer selects Reports Select List under Search Bar on the Report Attributes page. See "Managing the Search Bar and Actions Menu in Component View."
Note that many of these options are selected by default.
10.6.4.3 Saving a Public or Private Interactive Report
End users can save an interactive report and classify it as being either public or private. Public reports can be viewed by all users. Private reports can only be viewed by the user who saves the report.
Tip:
To save a public report, the developer must select Save Public Report under Include in Actions Menu on the Report Attributes page. Developers can also apply authorization scheme to enable or disable Save Public Report. See "Managing the Search Bar and Actions Menu in Component View."To save a public or private interactive report:
-
Go to the page containing the interactive report you want to save.
-
Customize the report (for example, hide columns, add filters, and so on). See "About the Actions Menu."
-
Click the Actions menu and select Save Report.
The Save Report dialog appears.
-
For end users, the following Save Report dialog appears.
Description of the illustration ''ir_save_user.png''
In Save Report:
-
Name - Enter a name for the report.
-
Public- Select this check box to make the report viewable to all users. Deselect this check box to make the report private.
-
Description - Enter an optional description.
-
Click Apply.
-
-
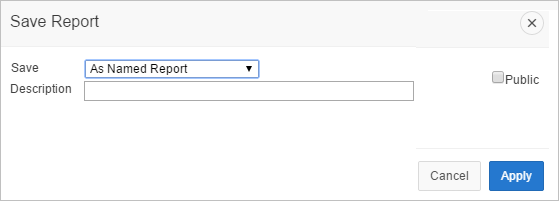
For developers, the following Save Report dialog appears.

Description of the illustration ''ir_save_dev.png''
In Save Report:
-
Save - Select As Named Report.
-
Name - Enter a name for the report.
-
Public- Select this check box to make the report viewable to all users. Deselect this check box to make the report private.
Tip:
The Public check box only displays if you have enabled the Save Public Report report attribute. -
Description - Enter an optional description.
-
Click Apply.
-
10.6.4.4 Saving a Default Interactive Report
Developers can save two types of default interactive report: primary and alternative. Both reports display on the Report list on the search bar. However, primary default reports cannot be renamed or deleted.
To save a default interactive report:
-
Run the report as a developer.
-
Customize the report (for example, hide columns, add filters, and so on). See "About the Actions Menu."
-
Click the Actions menu and select Save Report.
The Save Report dialog appears.
Description of the illustration ''ir_save_dev.png''
-
From Save, select As Default Report Settings.
The Save Default Report dialog appears.
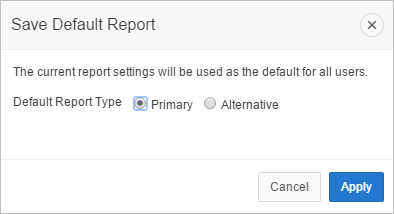
Description of the illustration ''ir_save_rpt_dev2.png''
-
For Default Report Type, select either:
-
Primary - This report displays as the primary report when the page runs.
-
Alternative - This report displays as an alternative option on the Reports list on the Search bar. If you select Alternative, enter a name.
-
-
Click Apply.
10.6.4.5 Renaming a Public or Private Interactive Report
To rename a public or private interactive report:
-
Run the report as a developer.
-
Select public or private interactive report to rename.
-
Click the saved report link.

Description of the illustration ''ir_rename.png''
-
In the Rename Report dialog, edit the attributes (for example, enter a new name) and click Apply.
10.6.4.6 Deleting a Public or Private Interactive Report
To delete a public or private interactive report:
-
Run the report as a developer.
-
Click the Remove Report icon next to the report name link.
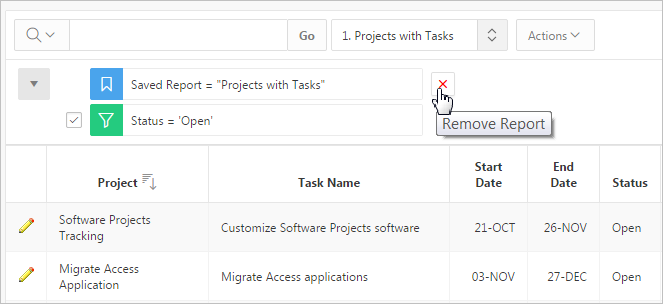
Description of the illustration ''ir_delete.png''
-
Click Apply.
10.6.4.7 About Exporting Interactive Reports
When you export an application, the Primary Default, Alternative Default, public reports are included by default. You can also choose to include personal reports during the export process by selecting Yes for Private Interactive Reports. See "Exporting an Application."