10.5 Editing Interactive Reports in Component View
By default, an interactive report includes a search bar, an Actions menu, a Column Heading menu, and Edit icons in the first column of each row. Users can use these controls to alter the layout of report data by selecting columns, applying filters, highlighting, and sorting. This section describes how developers can customize an interactive report in Component View and configure how these controls display.
See Also:
"Managing Pages in Component View," "Customizing Interactive Reports as an End User," and "APEX_IR" in Oracle Application Express API Reference10.5.1 Editing Interactive Report Attributes in Component View
This section describes how to customize an interactive report by editing report attributes.
10.5.1.1 Accessing the Interactive Report Attributes Page in Component View
To access the Report Attributes page:
-
View the page in Component View. See "Viewing a Page in Component View."
Component View appears.
-
Under Regions, click the Interactive Report link next to the name of the report region you want to edit.

Description of the illustration ''int_rprt_att.png''
-
The Report Attributes page appears and is divided into the following sections:
-
Column Attributes control the report layout. See "Editing Column Attributes in Component View."
-
Column Groups attributes enable you to group columns on the single row view. See "Creating Column Groups."
-
Pagination attributes control report pagination. See "Controlling Interactive Report Pagination in Component View."
-
Search Bar contain attributes that enable you to define the search bar within an interactive report. See "Managing the Search Bar and Actions Menu in Component View."
-
Download enables you to add a download option to the Actions menu and export the report as CSV, HTML, Email, XLS, PDF, or RTF file. See "Configuring Download Options on the Actions Menu."
-
Link Column attributes enable you to add a link to a column. See "Managing Link Columns in Component View." and "Creating a Column Link in an Interactive Report."
-
Advanced Attributes enable you to define the Interactive Report region alias, specify an item whose value stores the saved report id, and define items to set into session state. See "Configuring Interactive Report Advanced Attributes."
-
Icon View attributes enable you to add a View Icons icon to the Search bar. See "Enabling Icon View in Component View."
-
Detail View attributes enable you to add a View Details icon to the Search bar. See "Enabling Detail View in Component View."
-
Description lists a textual description of the current report.
Tip:
To learn more about an attribute, see field-level Help. See "Viewing Field-Level Help." -
10.5.1.2 Report Attribute Page Navigation Alternatives
The Report Attribute page is divided into these sections. You can access these sections by scrolling down the page, or by clicking a navigation button at the top of the page. When you select a button at the top of the page, the selected section appears and all other sections are temporarily hidden. To view all sections of the page, click Show All.
10.5.2 Editing Column Attributes in Component View
You can use the Column Attributes section of the Report Attributes page to precisely control the report layout. For example, you can use these attributes to alter column heading text, change column positioning, or hide a column.
To access Column Attributes:
-
Access the Interactive Report Attributes page. See "Accessing the Interactive Report Attributes Page in Component View."
The Interactive Report Attributes page appears with the Column Attributes section at the top of the page.
Use the Column Attributes section to control report column appearance and functionality.
Heading displays the heading text to be included in the report. Type indicates the type of query column. The Link column indicates if a link column is currently defined.
Table 10-6 describes common report column edits.
Table 10-6 Common Report Column Edits for Interactive Reports
Description Developer Action Change column heading text.
Under Heading, enter different heading text.
Change column group assignment.
If Column Groups are defined, individual columns can be assigned under Column Group.
Change how columns display.
Select an option from Display Text As.
You can further refine the attributes of a specific column on the Column Attributes page.
-
To access the Column Attributes page, click the Edit icon next to the appropriate column.
The Column Definition appears.
-
Under Column Definition, Allow Users To, select the appropriate check boxes. Options include: Hide, Sort, Filter, Highlight, Control Break, Aggregate, Compute, Chart, and Group By. The options you select determine how users can manipulate the report.
-
Edit the appropriate attributes.
To learn more about an attribute, see field-level Help.
-
Click Apply Changes to save your edits.
10.5.3 Creating Column Groups
Use column groups to group columns on a single row view.
To create a column group:
-
Access the Interactive Report Attributes page. See "Accessing the Interactive Report Attributes Page in Component View."
The Interactive Report Attributes page appears.
-
Scroll down to Column Groups.
-
Click Add Group.
-
Under Column Group:
-
Sequence - Enter the display sequence for this column group. This attribute determines the order in which the column groups display in the detail view.
-
Group Name - Enter a column group name. This name displays in the region header in detailed view.
-
Description - Enter an optional description for the column group. This description never displays to the end user.
-
-
Click Create.
10.5.4 Controlling Interactive Report Pagination in Component View
You control how pagination displays by making selections from Pagination attributes on the Interactive Report Attributes page.
To access the Pagination section of the Report Attributes page:
-
Access the Interactive Report Attributes page. See "Accessing the Interactive Report Attributes Page in Component View."
The Interactive Report Attributes page appears.
-
Scroll down to Pagination.
You use the Pagination attributes to select a pagination style, determine where pagination occurs, specify the maximum number of rows to query, and messages to display when more than the maximum number of rows are returned or if no rows are returned.
Table 10-7 describes the available Pagination attributes.
Table 10-7 Pagination Attributes
Attribute Description Pagination Type
Select a pagination type. Pagination provides the user with information about the number of rows and the current position within the result set. Available pagination options include:
-
Row Ranges X to Y
-
Row Ranges X to Y of Z
Pagination Display Position
Defines where pagination occurs. Pagination can be display on the left side, right side, at the bottom, or above the report.
Show Null Values as
Enter the text you want to display for null columns. The default value is
(null).Maximum Row Count
Defines the maximum number of rows to query, for example, rows 1 - 10 of 456.
If you set this attribute to 200, the result would appear as follows:
rows 1 - 10 of more than 200 rowsThis attribute impacts performance. Counting fewer rows can improve performance and counting thousands of rows can degrade performance.
When more than maximum row data found message
Defines the text message that displays when more than the maximum row count is returned.
When No Data Found Message
Defines the text message that displays when the query does not return any rows.
-
-
Click Apply Changes to save your edits.
10.5.5 Managing the Search Bar and Actions Menu in Component View
This section describes how to customize the interactive a report search bar.
10.5.5.1 Interactive Report Search Bar and Actions Menu
A search bar displays at the top of every interactive report and includes a Select columns to search icon, Text area, Go button, and Actions menu.
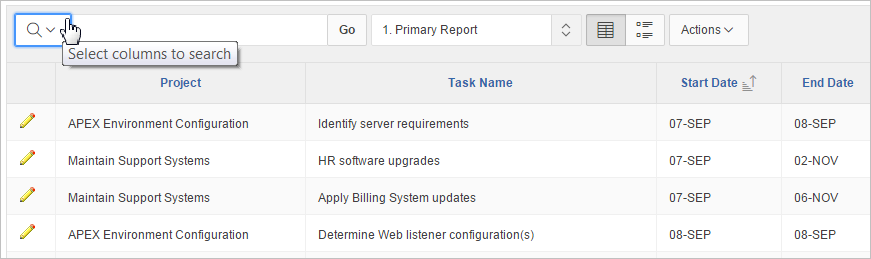
Description of the illustration ''ir_search.png''
You can remove or customize the search bar by selecting and deselecting options in the Search Bar section of the Interactive Reports Attributes page.
10.5.5.2 Customizing the Search Bar and Actions Menu
To customize the search bar:
-
Access the Interactive Report Attributes page. See "Accessing the Interactive Report Attributes Page in Component View."
The Interactive Report Attributes page appears.
-
Scroll down to Search Bar.

Description of the illustration ''ir_alt_search_bar.png''
Use these attributes to customize how the search bar displays. Table 10-8 describes Search bar attributes:
Table 10-8 Search Bar Attributes
Attribute Description Include Search Bar
Select Yes or No. Selecting No removes the following default components:
-
Search Field - Displays a text field in the search bar in which to enter search criteria.
-
Finder Drop Down - Enables users to search on a selected column or against all columns.
-
Reports Select List - Displays report select list if the report has alternative default, shared report or personal report. See "Saving Interactive Reports."
-
Rows Per Page Selector - Displays a select list to enable users to select the number of rows to display per page.
-
Actions Menu - Enables the user to customize the report based on selected Actions.
Include in Actions Menu
Select and deselect functions to be included in the Actions menu. Available options include:
-
Select Columns - Used to hide, unhide, and order the report columns.
-
Filter - Used to add filters to the report (for example, STATE = VA).
-
Rows Per Page - Used to display rows per page menu.
-
Sort - Used to sort columns.
-
Control Break - Used to build control breaks on report columns.
-
Highlight - Used to define conditions that highlights certain rows.
-
Compute - Used to add computed columns.
-
Aggregate - Used to include aggregate calculations on report columns.
-
Chart - Used to create a Flash chart based off the data in the report.
-
Group By - Used to create a Group By view based off the data in the report.
-
Pivot - Used to create a cross tab view based off the data in the report.
-
Flashback - Used to flashback the report data to some time in the past.
-
Save Report - Used to save the report settings for future use. Only available for authenticated pages.
-
Save Public Report - Used to save a public report for all users to view. You must select Save Report to enable this option. Only available for authenticated pages.
-
Reset - Used to reset the report to the default settings.
-
Help - Used to display instructions for using the Interactive report.
-
Download - Used to download the report in different formats.
Note: Disabling the Download functionality only prevents the Download menu from displaying on the Actions menu. To fully prevent users from downloading data, deselect all check boxes in the Download Formats section.
-
Subscription - Used to schedule a subscription to send the report in email. Only available for authenticated pages.
See Also: "About the Actions Menu".
Save Report Public Authorization
Users can save reports and classify them as being either public or private. Public reports can be viewed by all users. Private reports can only be viewed by the user who saved the report.
In addition to enabling Save Public Report on the Actions Menu, you can add additional security by defining an Authorization Scheme to determine who has rights to enable Save Public Report.
To enable support for public reports, select an authentication method from this list.
Search Button Label
Specify the text to use as search button label.
Maximum Rows Per Page
Enter the maximum number to display in the Rows Per Page Selector.
-
-
Click Apply Changes.
10.5.5.3 Removing the Search Bar
To remove the search bar:
-
Access the Interactive Report Attributes page. See "Accessing the Interactive Report Attributes Page in Component View."
The Interactive Report Attributes page appears.
-
Scroll down to Search Bar.
-
From Include Search Bar, select No.
-
Click Apply Changes.
10.5.5.4 Configuring Download Options on the Actions Menu

Description of the illustration ''download.png''
You can add a Download option to the Actions menu to enable users to download an interactive report as a comma-delimited file (CSV) format, HTML, Microsoft Excel (XLS) format, Adobe Portable Document Format (PDF), Microsoft Word Rich Text Format (RTF), or as HTML attached to an email.
10.5.5.4.1 Enabling Download Formats
To configure download formats:
-
Access the Interactive Report Attributes page. See "Accessing the Interactive Report Attributes Page in Component View."
The Interactive Report Attributes page appears.
-
Scroll down to Search Bar.
-
For Include Search Bar, select Yes and then select Actions Menu.
-
Under Include in Actions menu, select Download.
Tip:
Disabling the Download functionality only prevents the Download menu from displaying on the Actions menu. To fully prevent users from downloading data, deselect all check boxes in the Download Formats section.
-
-
Scroll down to Download.
-
Select download formats. Options include:
-
CSV. See "Enabling CSV Download."
-
HTML.
-
Email. See "Enabling Email Download."
-
XLS.
-
PDF. See "About Printing Reports to PDF."
-
RTF.
Tip:
The Download option only appears on the Actions menu if a file format is selected. If a report server has not been defined within Instance Administration then certain options do not display. To learn more, see "Configuring Report Printing" Oracle Application Express Administration Guide. -
-
Click Apply Changes.
10.5.5.4.2 Enabling CSV Download
To enable the Enable CSV download:
-
Enable the CSV output option on the Edit Globalization Attributes page. See "Accessing the Globalization Attributes Page" and "Automatic CSV Encoding."
-
Access the Interactive Report Attributes page. See "Accessing the Interactive Report Attributes Page in Component View."
The Interactive Report Attributes page appears.
-
Scroll down to Search Bar.
-
For Include Search Bar, select Yes and then select Actions Menu.
-
Under Include in Actions menu, select Download.
-
-
Scroll down to Download.
-
From Download Formats, select CSV.
Tip:
The Download option only appears on the Actions menu if a file format is selected. -
In the CSV Separator, define the column separator. If no value is entered, a comma or semicolon is used depending on your current NLS settings.
-
In the CSV Enclosed By, enter a delimiter character. This character delineates the starting and ending boundary of a data value. Default delimiter is double quotation marks (" ").
-
In Filename, enter a name for the downloaded document. Do not specify a file extension, the extension is added automatically. If you leave this blank, the region name is used as the file name.
-
Click Apply Changes.
10.5.5.4.3 Enabling Email Download
You can configure the Download option to send static HTML report to specific email addresses.
Tip:
Email download is only supported on authenticated pages. If you enable Email download on a public page, the Email download option does not display in Download dialog.To enable email download:
-
An Oracle Application Express administrator must configure email at the Instance level. See "Configuring Mail" in Oracle Application Express Administration Guide
-
Access the Interactive Report Attributes page. See "Accessing the Interactive Report Attributes Page in Component View."
The Interactive Report Attributes page appears.
-
Scroll down to Search Bar.
-
For Include Search Bar, select Yes and then select Actions Menu.
-
Under Include in Actions menu, select Download.
-
-
Scroll down to Download.
-
From Download Formats, select Email.
Tip:
The Download option only appears on the Actions menu if a file format is selected. -
Click Apply Changes.
Note:
Email sent from an Email Download contains a system generated email signature identifying who sent the email. This signature cannot be removed.10.5.6 Managing Link Columns in Component View
A Link Column displays on the left side of an interactive report. This section describes how to configure a Link Column to link to a single row view, a custom target, or be excluded from the report.
Tip:
A Link Column cannot be sorted, hidden, or moved by an end user and does not interact with the standard column link defined on the Column Attributes page.10.5.6.1 Linking to a Single Row View
To link to a single row view:
-
Access the Interactive Report Attributes page. See "Accessing the Interactive Report Attributes Page in Component View."
The Interactive Report Attributes page appears.
-
Scroll down to Link Column.
-
For Link Column, select Link to Single Row View.
-
From Single Row View, select the appropriate options:
-
Allow Exclude Null Values - Excludes columns with null values.
-
Allow Displayed Columns - Displays only the columns shown in the report.
-
-
For Uniquely Identify Rows by, select ROWID or Unique Column.
If you select, Unique Column, specify the column in the Unique Column field.
-
For Link Icon, accept the icon specified or specify new image.
-
For Link Attributes (Optional), specify additional column link attributes to be included in the
<a href= >tag (for example, a link target, classes, or styles). -
Click Apply Changes.
Tip:
If an interactive report links to single row view and the link icon is missingALT text or has empty ALT text, the alt="Single Row View" gets included automatically to make the report accessible. To override this behavior, include meaningful ALT text.10.5.6.2 Linking to a Specific Page
To link to a specific page:
-
Access the Interactive Report Attributes page. See "Accessing the Interactive Report Attributes Page in Component View."
The Interactive Report Attributes page appears.
-
Scroll down to Link Column.
-
For Link Column, select Link to Custom Target.
-
For Link Icon, select an icon.
-
For Link Attributes (Optional), specify additional column link attributes to be included in the
<a href= >tag (for example, a link target, classes, or styles). -
For Target, select Page in this Application.
-
For Page, select the target page number. To reset the pagination for this page, select Reset Pagination.
-
For Request, specify the request to be used.
-
For Clear Cache, specify the pages (that is, the page numbers) on which to clear cache. You can specify multiple pages by listing the page numbers in a comma-delimited list. See "Linking to Interactive Reports."
-
For Name and Value, specify session state for a specific item.
-
Click Apply Changes.
10.5.6.3 Linking to a URL
To link to a URL:
-
Access the Interactive Report Attributes page. See "Accessing the Interactive Report Attributes Page in Component View."
The Interactive Report Attributes page appears.
-
Scroll down to Link Column.
-
For Link Column, select Link to Custom Target.
-
For Link Icon, select an icon.
-
For Link Attributes (Optional), specify additional column link attributes that to be included in the
<a href= >tag (for example, a link target, classes, or styles). -
From Target, select URL.
-
In URL, enter the appropriate address.
-
For Checksum - Select one of the following:
-
Use default
-
Application Level - Link reusable by any user
-
User Level - Link reusable by current user
To learn more about an attribute, see field-level Help.
-
-
Click Apply Changes.
10.5.6.4 Excluding a Link Column
To exclude a column link:
-
Access the Interactive Report Attributes page. See "Accessing the Interactive Report Attributes Page in Component View."
The Interactive Report Attributes page appears.
-
Scroll down to Link Column.
-
For Link Column, select Exclude Link Column.
-
Click Apply Changes.
10.5.7 Creating a Column Link in an Interactive Report
Use Column Attributes to create a link from a report to another page in your application or to a URL.
10.5.7.1 Creating a Column Link to Another Page
To create a column link to another page:
-
Access the Interactive Report Attributes page. See "Accessing the Interactive Report Attributes Page in Component View."
The Interactive Report Attributes page appears.
-
Under Column Attributes, locate the column to contain the link.
-
Click the Edit icon next to the column name.
The Column Attributes page appears.
-
Scroll down to Column Link.
-
To create a column link to another page:
-
From Target, select Page in this Application.
-
(Optional) In Link Attributes, specify additional column link attributes to be included in the
<a href= >tag (for example, a link target, classes, or styles). -
In Link Text, enter the text to be displayed as a link, specify an image tag, or pick from the list of default images.
-
In Page, specify the target page number. To reset the pagination for this page, select Reset Pagination.
-
In Request, specify the request to be used.
-
In Clear Cache, specify the pages (that is, the page numbers) on which to clear cache. You can specify multiple pages by listing the page numbers in a comma-delimited list.
-
Use the Name and Value fields to specify session state for a specific item.
-
For Checksum - Select one of the following:
-
Use default
-
Application Level - Link reusable by any user
-
User Level - Link reusable by current user
To learn more, see field-level Help.
-
-
-
Click Apply Changes.
10.5.7.2 Create a Column Link to a URL
To create a column link to a URL:
-
Access the Interactive Report Attributes page. See "Accessing the Interactive Report Attributes Page in Component View."
The Interactive Report Attributes page appears.
-
Access the Column Attributes page by clicking the Edit icon next to the appropriate column.
The Column Attributes page appears.
-
Scroll down to Column Link.
-
Under Column Link, specify the following:
-
From Target, select URL.
-
In Link Text, enter the text to be displayed as a link and select a substitution string.
-
(Optional) In Link Attributes, specify additional column link attributes to be included in the
<a href= >tag (for example, a link target, classes, or styles). -
In URL, enter the appropriate address.
-
-
Click Apply Changes.
10.5.8 Displaying Interactive Reports Conditionally
You can choose to have interactive reports display conditionally by editing region attributes on the Edit Region page.
To display an interactive report conditionally:
-
Navigate to the appropriate page. See "Viewing a Page in Component View."
-
Access the Region Definition. Under Regions, select the region name.
The Region Definition appears.
-
Scroll down to Conditions.
-
From the Condition Type list, make a selection.
-
Enter an expression in the fields provided.
-
Click Apply Changes.
Tip:
Asynchronous JavaScript and XML (Ajax) is used throughout interactive reports. Because Ajax is asynchronous, the value evaluated for conditional display must be in the session. To display an interactive report conditionally based on specified value, use a page item instead of using a:REQUEST value. Using :REQUEST in a conditional display causes an interactive report to function incorrectly.10.5.9 Defining a Column as a List of Values in an Interactive Report
In interactive reports you can use a list of values to improve the speed of built-in filter tools.
To define a report column as a list of values:
-
Access the Interactive Report Attributes page. See "Accessing the Interactive Report Attributes Page in Component View."
The Interactive Report Attributes page appears.
-
Access the Column Attributes page by clicking the Edit icon next to the appropriate column.
The Column Attributes page appears.
-
Scroll down to List of Values.
-
From List of Values, Column Filter Type, specify how to create a list of values as a filter on the report column list. Available options include:
-
None - Disable filter on list of values.
-
Default Based on Column Type -
STRINGandNUMBERcolumns derive the list of values from distinct column values.DATEcolumns derive the list of values from predefined date ranges. -
Use Defined List of Values to Filter Word Contains - Derive the list of values from a defined list of values SQL query to create a contains filter.
-
Use Named List of Values to Filter Exact Match - Derive the list of values from the named list of values to create an equal filter.
-
Use Named List of Values to Filter Word Contains - Derive the list of values from the named list of values to create a contains filter.
-
-
Click Apply Changes.
10.5.10 Formatting Columns in an Interactive Report
You can use HTML expressions in interactive reports to further the customize column display.
To define column formatting:
-
Access the Interactive Report Attributes page. See "Accessing the Interactive Report Attributes Page in Component View."
The Interactive Report Attributes page appears.
-
Access the Column Attributes page by clicking the Edit icon next to the appropriate column.
-
Scroll down to Column Formatting.
-
Specify HTML expressions to be shown for the column. Use substitution strings for column names to show column values in HTML. Consider the following examples:
Example 1:
<span style="background-color: yellow; color: red;">#EMPLOYEE_STATUS</span>
Example 2:
<span class="#COLUMN_CLASS#">#EMPLOYEE_STATUS#</span>
In the previous example, the
#COLUMN_CLASS#and#EMPLOYEE_STATUS#substitutions in this example are columns selected in the report SQL query.Example 3:
<img src="#IMAGE_NAME#" title="#EMPLOYEE_NAME#">
-
Click Apply Changes.
10.5.11 Enabling Icon View in Component View
Be default, most interactive reports display as a report. You can optionally display columns as icons. When configured to display columns as icons, a View Icons icon displays on the Search bar.
Description of the illustration ''ir_search_bar_icon.png''
To use Icon view, you must identify the columns used to identify the icon, the label, and the target (that is, the link). As a best practice, set these columns to display as hidden since they are typically not useful for end users.
10.5.11.1 Adding Icon View to an Interactive Report
To add Icon view to an interactive report:
-
Access the Interactive Report Attributes page. See "Accessing the Interactive Report Attributes Page in Component View."
The Interactive Report Attributes page appears.
-
Scroll down to Icon View.
-
For Icon View Enabled, select Yes.
-
Specify the following mandatory attributes:
Tip:
To view examples, see field-level Help.-
Link Column - Select the column that returns the link target of the icon.
-
Image Source Column - Identify the column that returns the image source.
-
Label Column - Select the column that returns the image label.
-
-
For Columns Per Row, identify the number of icons to be displayed per row. A value of
5would display 5 icons per row. -
Click Apply Changes.
10.5.11.2 Adding a Custom Icon View Link
To add a custom Icon View link:
-
Access the Interactive Report Attributes page. See "Accessing the Interactive Report Attributes Page in Component View."
The Interactive Report Attributes page appears.
-
Scroll down to Icon View.
-
For Use Custom Icon Link, select Yes.
-
For Columns Per Row, identify the number of icons to be displayed per row.
A value of 5 would display 5 icons per row.
-
In Custom Link, enter the column link for the Icon view. Use substitution strings for column names, for example:
<a href="#ICON_LINK#"><img src="#DETAIL_IMG_NO_STYLE#" title="" alt="" width="75" height="75"><br />#PRODUCT_NAME#</a>
-
Click Apply Changes.
10.5.12 Enabling Detail View in Component View
Be default, most interactive reports display as a report. You can optionally display details about each column. When configured, a View Details icon displays on the Search bar.

Description of the illustration ''ir_search_bar_detail.png''
To add Details view to an interactive report:
-
Access the Interactive Report Attributes page. See "Accessing the Interactive Report Attributes Page in Component View."
The Interactive Report Attributes page appears.
-
Scroll down to Detail View.
-
For Detail View Enabled, select Yes.
-
Specify the following attributes:
-
Before Rows - Enter the HTML to be displayed before report rows. For example:
<TABLE>
-
For Each Row (Use #COLUMN_ALIAS# substitutions) - Use substitution strings for column names and column labels. For example:
<tr><td align="right">#ENAME_LABEL#:</td><td>#ENAME#</td></tr>
<tr><td align="right">#JOB_LABEL#:</td><td>#JOB#</td></tr>
-
After Rows - Enter the HTML to be displayed after report rows. For example:
</TABLE>
-
-
Click Apply Changes.
10.5.13 Configuring Interactive Report Advanced Attributes
This section describes how to configure Advanced Attributes section of the Interactive Report Attributes page to define the Interactive Report region alias, specify an item whose value stores the saved report ID, and define a from address in an interactive report subscription or email download.
10.5.13.1 Configuring Advanced Attributes
To configure Advanced Attributes:
-
Access the Interactive Report Attributes page. See "Accessing the Interactive Report Attributes Page in Component View."
The Interactive Report Attributes page appears.
-
Scroll down to Advanced Attributes.
Table 10-9 describes the available Advanced Attributes.
Table 10-9 Advanced Attributes
Attribute Description Enter an alphanumeric alias for this interactive report region. The alias must be unique within the application.
You can use an alias to reference an interactive report in an API call. For example, you can write a function to return
INTERACTIVE_REPORT_IDby queryingALIAScolumn in theAPEX_APPLICATION_PAGE_IRview). The alias must be unique within the application. Since theINTERACTIVE_REPORT_IDvalue can change when you export or import to different instance, referencing an interactive report region using an alias can be useful.Enables you to send a user to a saved view of a report rather than the default, or working view. You specify an item whose value stores the report id of the saved view. Report ID's can be retrieved from the
APEX_APPLICATION_PAGE_IR_RPTview.Enter a valid email address to use as the from address when sending email from an email download or a subscription. The value can be a literal string containing a valid email or an application substitution defined at the application-level using substitution syntax or the
&APP_EMAIL.substitution which returns the Application Email From Address defined at the application-level. Examples:john.doe@abc.com &MY_APP_EMAIL_FROM. &APP_EMAIL.
Oracle does not recommend using an item substitution at the application or page-level since it only works in an email download, but not for subscriptions.
Tip: The email from address comes from the following in the order of precedence:
Email From Address at report level > Application Email From Address at application level > Default Email From Address at instance level.
If all of them are null, the email from address is the same as email to address.
See Also: "Edit Application Definition Page"
-
Click Apply Changes.
10.5.13.2 About Emailing from an Interactive Report
You can define the from address for emails sent from an interactive report in two ways:
-
At the application-level on the Edit Application Definition page in the Application Email from Address attribute. See "Edit Application Definition Page."
-
At the interactive report-level on the Interactive Report Attributes page in the Email from Address attribute. See "Configuring Interactive Report Advanced Attributes."
In either case, the value can be a literal string containing a valid email or an application substitution defined at the application-level using substitution syntax or &APP_EMAIL. substitution which returns the Application Email From Address defined at the application-level. Examples:
john.doe@abc.com
&MY_APP_EMAIL_FROM.
&APP_EMAIL.
Oracle does not recommend using an item substitution at the application or page-level since it only works in email download, but not for subscriptions.
10.5.14 Linking to Interactive Reports
Unlike classic reports which typically use page items as report parameters, the data in an interactive report is driven by declarative filters. However, the developer may want to set these report parameters by modifying interactive report settings for an end user. These settings only affect the end user's working report and do not affect any saved report settings. Use the syntax described in this section in the Request value and ItemNames section of the URL to link to interactive reports.
10.5.14.1 Request Syntax
To link to a specific saved report, use the following Request syntax:
IR[region static ID]_<report_alias>
Consider the following example:
IR[EMP]_dept20
Note:
The use ofRequest in the URL is optional. To link to multiple saved reports, separate each Request with comma.10.5.14.2 Name and Value Syntax
To create a filter, use the following itemNames and itemValues syntax:
IR[region static ID]<operator>_<target column alias>
Consider the following example:
IR[EMP]C_ENAME:KING
Note:
If there is only one interactive report region on the page, theitemName does not need to be fully qualified with the region static ID. If an operator is not defined, a filter with equal operator is added.To create a filter on an interactive report in a link, use the itemNames syntax described previously and add the filter value in the corresponding location in the item names section of the URL.
To create row text which contains a filter on an interactive report, use ROWFILTER as the target column alias in the item name syntax and add a filter value in the item itemValues of the URL. The link will add a Row Text Contains filter which searches all columns displayed in the report with type STRING or NUMBER.
Consider the following example:
IR[EMP]_ROWFILTER:SALES
Valid operators include:
-
C= Contains -
EQ= Equals (this is the default) -
GTE= Greater than or equal to -
GT= Greater Than -
LIKE= SQL Like operator -
LT= Less than -
LTE= Less than or equal to -
N= Null -
NC= Not Contains -
NEQ= Not Equals -
NLIKE= Not Like -
NN= Not Null -
NIN= Not In (escape the comma separated values with backslash, \) -
IN= In (escape the comma separated values with backslash, \) -
ROWFILTER= Row Text Contains (this searches all columns displayed in the report with type STRING or NUMBER)
10.5.14.3 ClearCache Syntax
Use the following syntax in the ClearCache section of the URL to reset, clear, or reset pagination the interactive report:
-
RIR- Resets an interactive report. This is equivalent to the end user choosing the Reset option from the interactive report Actions menu on the target page. The report is returned to the default report settings specified by the developer or saved by the user. -
CIR- Clears interactive report. This clears all of the report settings such as control break, aggregate, flashback, chart, number of rows to display, filter, highlight, computation, group by and pivot. -
RP- Resets interactive report pagination.
10.5.14.4 Restrictions When Linking to Interactive Reports
When linking to interactive reports, remember the following restrictions:
-
If a
Requestvalue is not defined in the URL, all of the primary default report settings will change. -
If a
Requestvalue is not defined anditemNamessection does not include a fully qualified filter column name with region static ID, an error occurs if there are more than one interactive report region in the target page. -
If a
Requestvalue is not defined anditemNamessection do not include a fully qualified filter column name with region static ID, it will create a filter on the primary default report if there is only one interactive report region in the target page.
10.5.14.5 Valid Linking Examples
This section contains valid linking examples.
This example includes a link with no Request value, but includes a qualified filter column with region static ID in the itemNames section of the URL. This example creates a filter on the primary default report in the referenced region item name.
f?p=&APP_ID.:2:&SESSION.::::IR[EMP]_ENAME:KING
To support backwards compatibility with previous releases, this example uses older syntax and works on a page with one interactive report region.
?p=&APP_ID.:1:&SESSION.:IR_REPORT_12345::RIR,CIR::RIR,CIR:IR_ENAME:KING
In this example the link has no Request value. The clear cache section and has RIR or CIR or RP and will reset, clear, or reset the pagination of the primary default reports of all interactive report regions.
f?p=&APP_ID.:1:&SESSION.:::RIR:
10.5.14.6 Invalid Linking Examples
This section contains invalid linking examples.
This link has no Request value and does not include a fully qualified filter column with region static ID in the item name section of the URL. This example generates an error if there is more than one interactive report region in the target page.
f?p=&APP_ID.:2:&SESSION.::::ENAME:KING
This example has a link with two request values separated by commas and does not contain a fully qualified filter column with region static ID in the item name section of the URL. This example generates an error since it is not clear where the filter needs to be created.
f?p=&APP_ID.:2:&SESSION.:IR[test]_employee,IR[test2]_dept10:::ENAME:KING
This example uses old request value syntax used on a page with multiple interactive report regions. This example will generate an error. The old syntax only works if there is one interactive report region.
f?p=&APP_ID.:2:&SESSION.:IR_REPORT_myrpt:::ENAME:KING
10.5.15 Linking to Shared Interactive Reports
This section describes how to link to saved primary default, alternative default, and public reports using IR_REPORT_[report_alias] in the request value of the URL.
Tip:
You can edit the report alias or view a link example on the Saved Reports page. See "Editing the Alias of Default Report in Component View."10.5.15.1 Link Examples to a Primary Report
The following examples demonstrate how to link to a primary report (report_alias=12345):
This example links to a primary report:
f?p=100:1:&APP_SESSION.:IR_REPORT_12345
This example links, resets, and clears primary report settings:
f?p=100:1:&APP_SESSION.:IR_REPORT_12345::RIR,CIR:
This example links, resets, and clears primary report settings. It additionally creates a ENAME = 'KING' filter on the primary report:
f?p=100:1:&APP_SESSION.:IR_REPORT_12345::RIR,CIR:IR_ENAME:KING
10.5.15.2 Link Examples to Saved Reports
The following examples demonstrate how to link to a saved report (report_alias=12345):
This example links to a saved report:
f?p=100:1:&SESSION.:IR_REPORT_1234
This example links, resets, and clears settings for saved report 12345:
f?p=100:1:&SESSION.:IR_REPORT_12345::RIR,CIR:
This example links, resets, and clears saved report 12345 settings. It additionally creates a ENAME = 'KING' filter on saved report 12345.
f?p=100:1:&SESSION.:IR_REPORT_12345::RIR,CIR::RIR,CIR:IR_ENAME:KING
If you reset, clear, or create filter using URL without the IR_REPORT_[report_alias] request value, it resets, clears, and creates filter on the primary report. For example, this link goes to the primary report:
f?p=100:1:&SESSION.:::RIR,CIR:IR_ENAME:KING
10.5.16 Editing Saved Default Interactive Reports in Component View
This section describes how developers can view and manage default interactive reports.
See Also:
"Saving a Default Interactive Report" and "Managing Saved Interactive Reports" in Oracle Application Express Administration Guide10.5.16.1 Editing the Alias of Default Report in Component View
Developers can edit the report alias or view link examples for default reports on the Saved Reports page.
To edit the report alias for a default report.
-
Navigate to the appropriate page containing the saved interactive report. See "Viewing a Page in Component View."
-
Under Regions, click the Saved Report link.
The Saved Reports page appears.
-
In Report Alias, you can either:
-
Enter a new alias for the saved report
-
Copy and paste the link example to link to a specific saved report
-
-
Click Apply Changes.
10.5.16.2 Deleting Saved Default Reports in Component View
To delete saved default reports:
-
Navigate to the appropriate page containing the saved interactive report. See "Viewing a Page in Component View."
-
Under Regions, click the Saved Report link.
The Saved Reports page appears.
-
To delete a report, select it and click Delete Checked.
10.5.17 Viewing Saved Interactive Report Activity
Developers can view saved report activity by clicking the View Saved Report Activity link under Tasks on the Edit Report Attributes page. This link only displays if saved reports other than the primary default report exist. You can use this page to determine which reports are being used and which ones are not.
To view saved report activity:
-
Access the Interactive Report Attributes page. See "Accessing the Interactive Report Attributes Page in Component View."
The Interactive Report Attributes page appears.
-
On the Tasks list, click View Saved Report Activity.
Tip:
You can also view saved report activity from the Workspace Administration page. On the Workspace home page, click the Administration menu and then select Administration, Monitory Activity and By Interactive Report.