8.3 Using Page Designer
This section explains how to view and edit database application pages using the Page Designer.
-
Adding a Region, Item, or Button Using Gallery Context Menus
-
Creating Pre-Rendering Branches, Computations, and Processes
-
Creating Page Submission Branches, Validations, Computations, and Processes
8.3.1 Viewing a Page in Page Designer
To view a page in Page Designer:
-
Navigate to the Workspace home page.
-
Click the Application Builder icon.
-
Select an application.
-
Select a page.
The default view, Page Designer appears.
You preview a page by running it. Running an application page displays the rendered version as end users would see it.
8.3.2 Accessing the Property Editor
The Property Editor displays in the right pane and displays all attributes for the currently selected components.
To access the Property Editor:
-
View the page in Page Designer. "Viewing a Page in Page Designer."
Page Designer appears.
-
In either the Tree pane or Grid Layout, select components or controls to edit.
Tip:
Passing the cursor over a control or component, displays a tooltip that describes it.The Property Editor displays attributes for the selected component or control.
See Also:
"Property Editor"8.3.3 Adding a Region, Item, or Button by Dragging and Dropping
Each page can have buttons and fields (called items) which are grouped into containers called regions.You can add regions, items, and buttons to a page by dragging and dropping them from the Gallery.
To add a region, item, or button from the Gallery:
-
View the page in Page Designer. "Viewing a Page in Page Designer."
Page Designer appears.
-
If needed, select the Grid Layout tab in the central pane.
-
From the Gallery locate the region, item or button you want to create.
-
Click and hold the mouse on the component to be created and drag it the desired location in Grid Layout.
Tip:
Components can only be dropped into appropriate drop positions, as determined by the component type. If you wish to place the new component next to an existing component then drag the new component to the right, and level, with the existing component, and wait a short period until a new drop zone is displayed.Based on the type of component you add, Page Designer indicates what actions are required next. The Messages tab displays a red or yellow badge indicating the number of messages you need to address. See "Messages." The following example shows a new Interactive Report region with an error message indicating that a SQL statement is required.
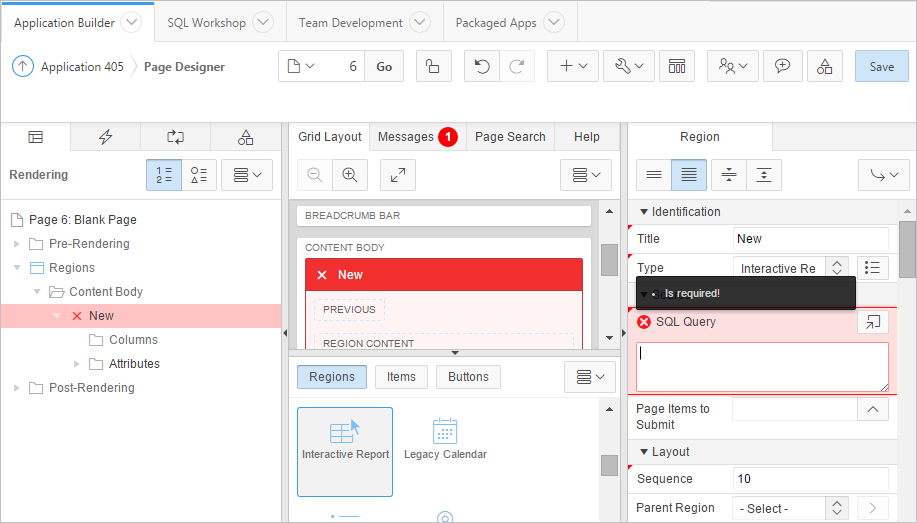
Description of the illustration ''pd_add_eg.png''
-
Edit the appropriate attributes in the Property Editor. Required attributes display a red triangle in the upper left corner next above attribute label.
-
Click Save or Save and Run Page.
8.3.4 Adding a Region, Item, or Button Using Gallery Context Menus
In addition to dragging and dropping components from the Gallery, you can also right-click a component to view a context menu. Each context menu features an Add To option which displays the actual locations where you can add the component.
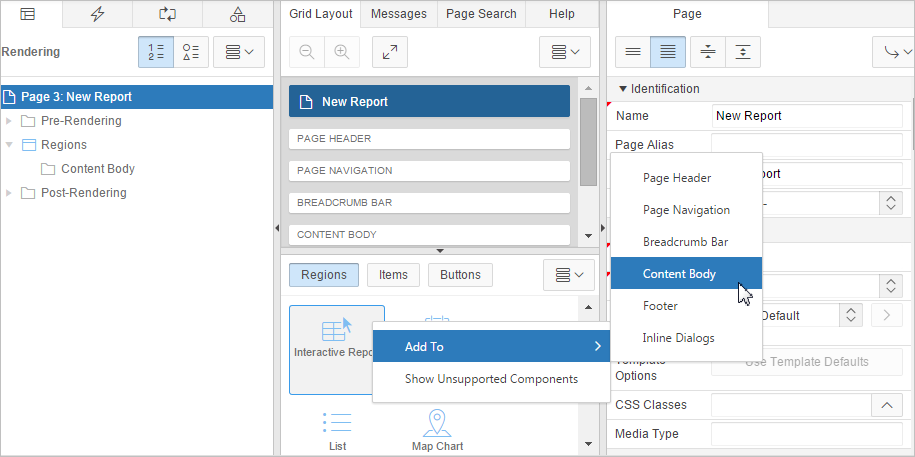
Description of the illustration ''pd_context_menu.png''
8.3.5 Adding a Region, Item, or Button from the Rendering Tree
To create new components within the Rendering tree:
-
View the page in Page Designer. "Viewing a Page in Page Designer."
Page Designer appears.
-
In the left pane, select the Rendering tab.
-
Navigate to the appropriate region, item, or region button.
-
Right-click Right-click on an existing component or container to display the context menu for that component type.
-
Select Create Region, Create Page Item, or Create Button. The options available depend upon the node you select.
-
Edit the appropriate attributes in the Property Editor. Required attributes display a red triangle in the upper left corner next above attribute label.
-
Click Save or Save and Run Page.
8.3.6 Creating Pre-Rendering Branches, Computations, and Processes
To create branches, computations, and processes that execute before rendering the page:
-
View the page in Page Designer. "Viewing a Page in Page Designer."
Page Designer appears.
-
In the left pane, select the Rendering tab.
-
Expand the Pre-Rending node at the top of the Rendering tree.
-
Right-click Before Header, After Header, Before Regions to display the context menu for that processing point.
-
Select Create Branch, Create Computation, or Create Process.
-
Edit the appropriate attributes in the Property Editor. Required attributes display a red triangle in the upper left corner next above attribute label.
-
Click Save or Save and Run Page.
Tip:
If you have changed the default display to group components by component type, then you must to navigate to the Processing tab to maintain pre-rendering components.8.3.7 Creating Page Submission Branches, Validations, Computations, and Processes
To create branches, validations, computations, and processes that execute when the page is submitted:
-
View the page in Page Designer. "Viewing a Page in Page Designer."
Page Designer appears.
-
In the left pane, select the Processing tab.
-
Navigate to After Submit, Validating, Processing, or After Processing as appropriate within the processing tree.
-
Right-click the identifier or an existing component to display the context menu for that processing point.
-
Select Create Branch, Create Validation, Create Computation, or Create Process.
-
Edit the appropriate attributes in the Property Editor. Required attributes display a red triangle in the upper left corner next above attribute label.
-
Click Save or Save and Run Page.
Tip:
You can use context menus to duplicate, delete, and copy a component to other pages.8.3.8 Searching for Pages

Description of the illustration ''pd_toolbar.png''
The Page Finder is the first control in the Page Designer toolbar and displays the current page number. Use the Page Finder to search for pages within the current application.
To search for pages within an application:
-
View the page in Page Designer. "Viewing a Page in Page Designer."
Page Designer appears.
-
On the Page Designer toolbar, click the Page Finder.
The Page Finder appears.
-
Click the tabs at the top of the window to change the view:
-
Current User Interface - Displays pages in the current user interface.
-
Current Group - If the current page is associated with a group, this tab displays the pages associated with the current group.
-
All Pages - Displays all pages in the current application.
-
Recently Edited - Displays recently edited pages.
-
-
Enter search terms in the Search field and press ENTER.
Search for page numbers, page names, user interface, or group names. The search is not case sensitive and supports regular expressions.