8.4 Editing Page Attributes in Page Designer
This section describes how to view and edit page attributes in the Property Editor in Page Designer. Common page attributes you may want to edit include the page name or title, header and footer text, and the selected authorization scheme.
8.4.1 Viewing Page Attributes in the Property Editor
To view page attributes in the Property Editor:
-
View the page in Page Designer. See "Viewing a Page in Page Designer."
Page Designer appears.
-
In either the Rendering Tree or Grid Layout, select the page name. The page name is selected by default when editing a page.
The Property Editor displays the Page attributes.
-
Edit the appropriate attributes.
To learn more about an attribute, select the attribute in the Property Editor and click the Help tab in the center pane. Once you activate the Help pane, the content that displays changes every time you select another attribute.
See Also:
"Viewing Help in Page Designer"
8.4.2 Property Editor - Page
By default, Property Editor displays all attributes.
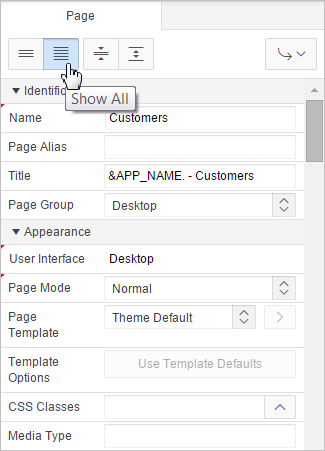
Description of the illustration ''pd_pg_attribute.png''
You can control how attributes display using the following controls at the top of the pane:
-
Show Common - Displays only those attributes for which the default value has changed or are commonly edited.
-
Show All - Displays all attributes.
-
Collapse All - Shows only functional group headings.
-
Expand All - Shows all attributes under each group heading.
Required attributes display a red triangle in the upper left corner above the attribute label.
To learn more about an attribute, select the attribute in the Property Editor and click the Help tab in the center pane. Once you activate the Help pane, the content that displays changes every time you select another attribute.
8.4.3 Incorporating JavaScript Using Page Designer
You can include JavaScript on a page by editing the attributes in the JavaScript group. This is a good approach for functions that are very specific to a page and a convenient way to test a function before you include it in a .js file.
In the following example, adding the code would make the test function accessible from anywhere on the current page.
To add JavaScript code to the JavaScript attribute:
-
View the page attributes in the Property Editor. "Viewing Page Attributes in the Property Editor."
-
Click the Collapse All icon and then locate and expand JavaScript.
-
Under Javascript, enter code into the following attributes:
Tip:
To learn more about an attribute and view examples, select the attribute in the Property Editor and click the Help tab in the center pane.-
File URLs - Enter JavaScript file URLs for code to be loaded on this page. Each URL has to be written into a new line. If you provide a minified version of your file you can use the substitution string
#MIN#to include.minor#MIN_DIRECTORY#to includeminified/in your file URL for a regular page view and an empty string if the page is viewed in debug mode. You also have access to the substitution string#APP_VERSION#if you want to include the application's version in the file URL. -
Function and Global Variable Declaration - Enter JavaScript code such as functions or global variable declarations referenced on this page. If the same JavaScript is required on multiple pages, consider putting the code into an external JavaScript file to avoid duplication and to leverage browser caching of static files.
Code you enter here replaces the
#PAGE_JAVASCRIPT#substitution string in the page template.Note: Do not to include opening or closing script tags. Just include the JavaScript code.
To reference a shortcut, use:
"SHORTCUTNAME"
-
Execute When Page Loads - Enter JavaScript code to execute when the page loads. The code is executed after the JavaScript code generated by Oracle Application Express.
For example, adding the following to the Function and Global Variable Declaration attribute would test a function accessible from anywhere on the current page.
function test(){ alert('This is a test.'); } -
-
Click Save.
8.4.4 Configuring Rejoin Sessions in Page Designer
The Rejoin Sessions attribute controls support for joining existing sessions (similar to deep linking). Technically, this attribute determines whether URLs to this application contain session IDs.
Warning:
Enabling rejoin sessions may expose your application to possible security breaches, as it can enable attackers to take over existing end user sessions. To learn more, see "About Rejoin Sessions."To use Rejoin Sessions, administrators must enable Rejoin Sessions at the instance-level. A more restrictive value of Rejoin Sessions at the instance-level overrides application and page settings.
To configure Rejoin Sessions in Page Designer:
-
View the page attributes in the Property Editor. "Viewing Page Attributes in the Property Editor."
-
Click the Collapse All icon and then locate and expand Security.
-
From Rejoin Sessions, select an option:
-
Application Default - Inherits the setting defined at application-level. See "Browser Security."
-
Disabled - If the URL does not contain a session ID Application Express creates a new session.
-
Enabled for Public Sessions - If the URL goes to a public page and does not contain a session ID, Application Express attempts to utilize the existing session cookie established for that application. Application Express only joins using the cookie when the session is not yet authenticated.
The option Enabled for Public Sessions requires that Embed In Frames be set to Allow from same origin or Deny. This is not tied to a condition about the URL payload, but also applies to session state protected URLs.
-
Enabled for All Sessions - If the URL does not contain a session ID, Application Express attempts to utilize the existing session cookie established for that application, providing the following conditions are met:
Session State Protection is enabled for the application and the URL includes a valid checksum. For public bookmarks, the most restrictive item level protection must be either Unrestricted or Checksum Required - Application Level.
The URL does not contain payload (a request parameter, clear cache or data value pairs).This setting also requires that Embed In Frames is set to Allow from same origin or to Deny for the application.
-
-
Click Save.
See Also:
"Browser Security," "About Rejoin Sessions," and "Configuring Rejoin Sessions" in Oracle Application Express Administration Guide8.4.5 Configuring Dialogs Attributes in Page Designer
Tip:
Creating a dialog page is a multiple step process. To learn more, see "Creating Dialog Pages."To configure Dialog attributes in Page Designer:
-
View the page attributes in the Property Editor. "Viewing Page Attributes in the Property Editor."
-
Click the Collapse All icon.
-
Expand Appearance and verify that the Page Mode is set to either Modal Dialog or Non-Modal Dialog. See field-level Help for more information.
-
Expand Dialog. and configure the attributes described in Table 8-1.
Table 8-1 Page Attributes: Dialog
Attribute Description Enter the width of the dialog, in pixels or a percentage. This setting overwrites the default dialog width specified at page template-level.
For a page using a Desktop user interface, the value should be set in pixels, for example, 500. For a page using the jQuery Mobile Smartphone user interface, the value should be set in percent, for example, 80%.
The substitution string
#DIALOG_WIDTH#in the dialog initialization code of the page template is replaced with the value entered in this item.Enter the height of the dialog in pixels, for example, 500.
The substitution string
#DIALOG_HEIGHT#in the dialog initialization code of the page template is replaced with value entered in this item.Enter the maximum width of the dialog, in pixels. This setting will overwrite the default dialog maximum width specified at page template-level.
For a page using the jQuery Mobile Smartphone user interface, the maximum width is 500.The substitution string
#DIALOG_MAX_WIDTH#in the dialog initialization code of the page template is replaced with the value entered in this item.Dialog support in Oracle Application Express varies depending on the page user interface: Desktop user interfaces use a jQuery UI dialog and Mobile user interface uses the jQuery Mobile dialog widget. Oracle Application Express supports the following subset of dialog attributes: height, width, and maximum width.
To define any additional attributes for the dialog, enter the name/value pairings in a comma separated list.
The substitution string
#DIALOG_ATTRIBUTES#in the dialog initialization code defined at page template-level, replaces any values entered in this item.For more information, see Help:
Enter additional CSS classes you wish to be applied to the dialog, as a space delimited list. For example:
ui-dialog--wizard
Any occurrence of the substitution string
#DIALOG_CSS_CLASSES#in the page template is replaced with the values specified in this field. This value overwrites any value set at page template-level.Select Yes if this dialog is opened by another dialog, and should reuse the same dialog window. For example, if this dialog is part of a multiple page dialog wizard, and you wish to reuse the dialog window for each step of the wizard.
Select No if this dialog is opened by another dialog, and should be opened in a new dialog window. For example, when this dialog is modal, and you wish to open it within a parent modal dialog window.
-
Click Save.
See Also:
"Creating Dialog Pages"