Oracle® Enterprise Manager Ops Center
Explore Your Server Pools
12c Release 3 (12.3.0.0.0)
E60033-01
June 2015
This guide provides an end-to-end example for how to use Oracle Enterprise Manager Ops Center.
Introduction
This guide explores the options available for managing the server pool configuration and policies in Oracle Enterprise Manager Ops Center. When you create a server pool, you add the virtualization hosts, provide the shared resources, and set the polices for the pool. After the pool is created, you can add more storage and network resources to the server pool for the guest usage. You can also modify the policies set for the server pool and balance the load on the servers.
The actions described in this example are applicable for server pools of all types of virtualization technology. However, for each server pool, there are differences in the network deployment to the server pool and supported storage libraries.
See Related Articles and Resources for more information about server pools.
What You Will Need
The following types of server pool are used in this example to demonstrate the actions:
-
Oracle VM Server for SPARC server pool
-
Oracle Solaris Zones server pool
You must have the following resources to execute the actions:
-
Virtualization Admin role to perform the actions on the server pool.
-
Either an Oracle VM Server for SPARC or Oracle Solaris Zones server pool.
-
Storage libraries to be associated with the server pool.
-
User-defined network domains to be associated with the server pool.
-
Networks to be attached to the server pool.
Exploring Your Server Pool Actions
The following actions are available to manage the server pools created in Oracle Enterprise Manager Ops Center:
About Server Pool Configuration
You can always modify the configuration of a server pool. In this example, Oracle VM Server for SPARC server pool is modified from the configuration set during the creation.
The Summary tab for the server pool contains the configuration details. You can edit any of the configuration attributes from the Summary tab. In this example, as shown in the image, the configuration is as follows:
-
Placement Policy: Place guests on the Oracle VM Server with the lowest relative load. The server is considered over utilized when the CPU utilization exceeds 75% for 10 minutes.
-
Auto Balancing Policy: Do not automatically balance the server pool.
-
Migration Networks: One network is listed.
-
Automatic Recovery: Power off a failed server from the service processor before automatic recovery of the logical domains.
-
Automatic Recovery Authorization: Allowed at the pool level.
-
Automatic Recovery Retries Number: Unlimited.
-
Check Servers Reachability Every: 180 seconds.
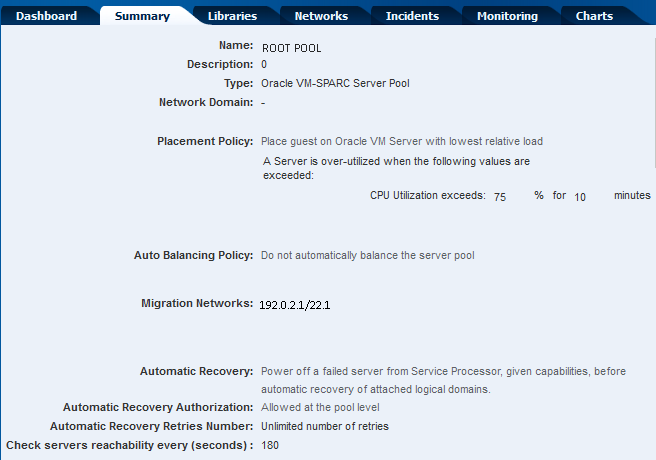
Description of the illustration pool_summary_1222.png
Editing Server Pool Configuration
In this example, the following details of the server pool are modified:
-
Name and description.
-
Change the placement policy to place the guest on the Oracle VM Server with lowest allocated CPU and memory.
-
Set the CPU allocation threshold to 80% for 10 minutes.
-
Set the memory allocation threshold to 80%.
The following procedure details the steps required to modify the Oracle VM Server for SPARC server pool configuration:
-
Select Server Pools in the Resource Management view.
-
Select the Oracle VM Server for SPARC server pool from the list.
-
Click Edit Attributes in the Actions pane.
The Summary tab of the server pool appears with the configuration settings that can be edited.
-
Edit the following parameters:
-
Change the Name to edited_ROOT_POOL in this example.
-
Change the Description to modified_description for the server pool.
-
Select the Placement Policy option to place the guest on the Oracle VM Server with lowest allocated CPU and memory.
-
Set the CPU and memory allocation thresholds to 80%.
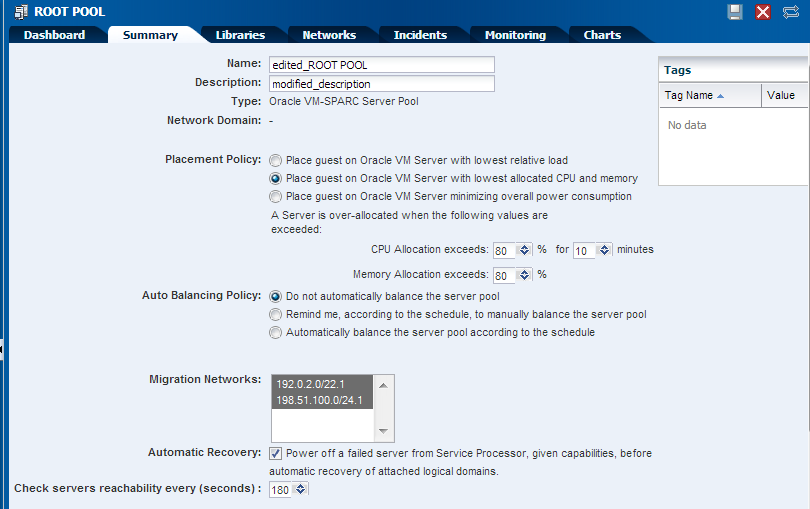
Description of the illustration edit_server_pool_param.png
-
-
Click the Save icon to accept the changes.
The Summary page shows the modified configuration for the Oracle VM Server for SPARC server pool.
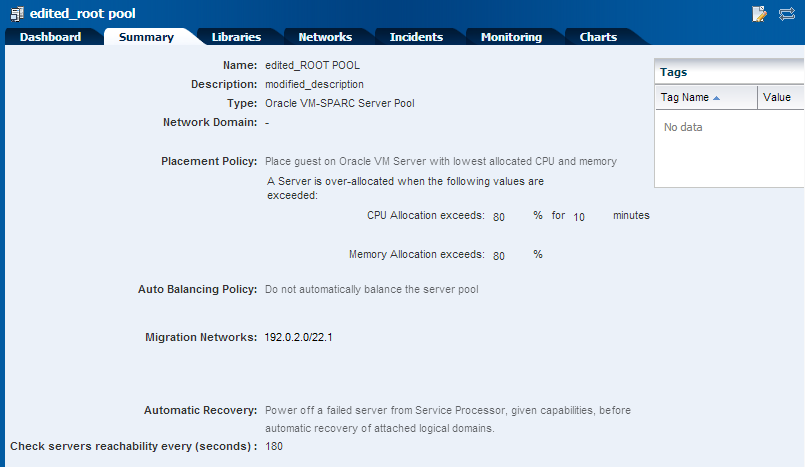
Description of the illustration server_pool_after_edit.png
Adding Virtualization Hosts
Depending on the virtualization type of the server pool, you can add Oracle VM Servers or global zones to the pool. When you add a virtualization host to the server pool, the storage libraries must be associated with the new member of the pool, and connected to the networks attached to the server pool.
In this example, an Oracle VM Server is added to an Oracle VM Server for SPARC server pool. The server pool is not associated with user-defined network domain.
-
Select Server Pools in the Resource Management View.
-
Select the Oracle VM Server for SPARC server pool from the list of server pools.
-
Click Add Oracle VM Servers in the Actions pane.
The Add Oracle VM Servers to Server Pool wizard is displayed.
-
Select the compatible Oracle VM Server for SPARC systems from the list.
The list of available Oracle VM Server for SPARC systems that are not placed in any server pool and are in healthy state is displayed.
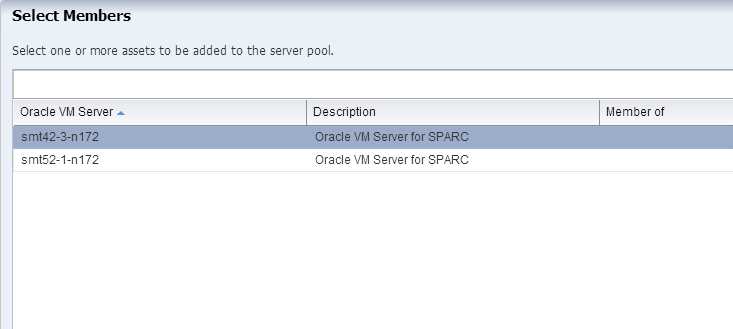
Description of the illustration add_server_step1.png
Click Next to continue.
-
The selected Oracle VM Server has root domain installed and configured in it. You must select whether the I/O resources of the root domain are for exclusive use of the guest domains. The root domain is not selected for exclusive access and hence you can create zones on the root domain.
Click Next.
-
You must associate the server pool storage libraries with the selected Oracle VM Server. You can select to which domain the storage library will be associated. You must select at least one domain per server. In this example, the storage library is selected to be associated with both the control domain and root domain of the selected server.
Click Next.
-
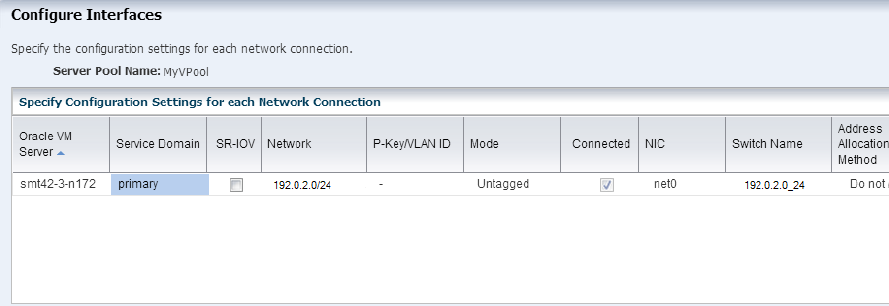
The selected Oracle VM Server's network connections are displayed in the Configure Interfaces step. The Connected column indicates whether the network is already connected to the target system or not.
Connected enables you to reuse an existing network or standalone connection. If you do not want to use the current connection for the server pool, you can add a new connection.
You can modify the network connection, if required. In this example, the existing network connection for the server smt42-3-n172 is retained. The network tagging mode is automatically set to Untagged as the network does not have a VLAN ID.
Description of the illustration add_server_step6.png
Click Next to view the summary.
-
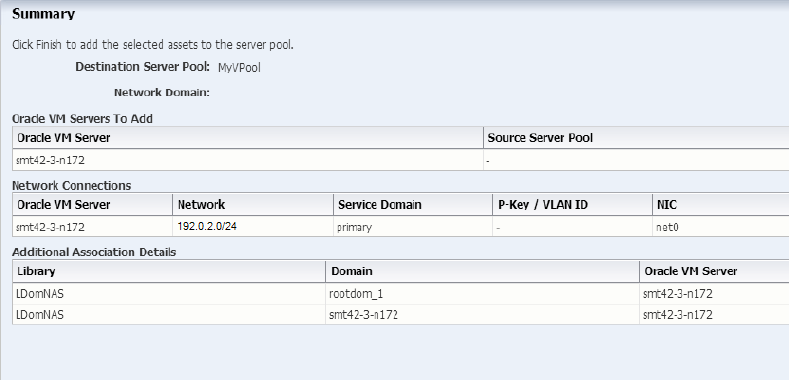
Review the information and click Finish to add the Oracle VM Server for SPARC to the server pool.
Description of the illustration add_server_step7.png
The Oracle VM Servers are added to the server pool and appears in the server pool.
Associating Storage Libraries
Storage libraries provide the storage resources required for the guests in a server pool. You must associate one or more storage libraries with the server pool to provide virtual disk storage to guests. The type of library that can be associated with a server pool depends on the virtualization type of the server pool. See the Related Articles and Resources section for more information.
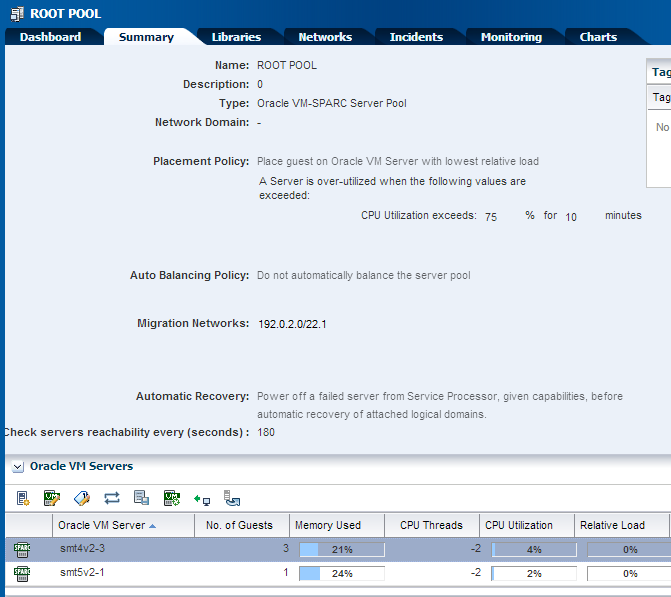
In this example, a Static Block Storage Library is associated with the Oracle VM Server for SPARC server pool. The Oracle VM Server for SPARC server pool is of the following configuration:
-
Two Oracle VM Server for SPARC 3.1 systems are in the server pool.
-
Placement policy is set to place the guest on Oracle VM Server with lowest relative load.
-
The server pool is not set to automatically balance for the load.
Description of the illustration pool_summary.png
The server pool has the following libraries associated with it:

Description of the illustration library_before.png
The following procedure describes the steps to associate a library with the server pool:
-
Select Server Pools in the Resource Management View.
-
Select the Oracle VM Server for SPARC server pool in the list of server pools.
-
Click Associate Libraries in the Actions pane.
The Associate Library Wizard is displayed.
-
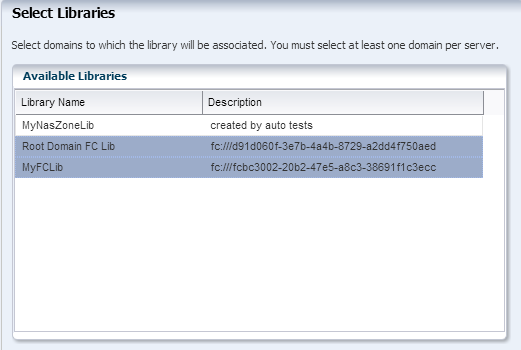
Select the libraries from the list.
Description of the illustration associate_library1.png
Click Next.
-
The Oracle VM Servers in the server pool have root domain and I/O domains. You must select the domains to which the library will be associated. At least one domain must be selected per server.
Click Next.
-
Select the association for another selected library. Select at least one domain per server for the library association.
Click Next.
-
Review the selected domains to which the libraries will be associated.
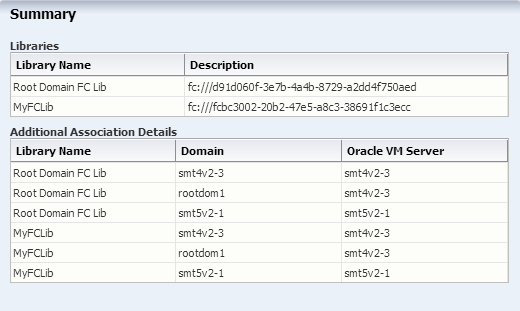
Description of the illustration associate_library4.png
Click Finish to confirm the action.
The selected library is associated with the Oracle VM Server for SPARC server pool and displayed in the list of associated libraries. For each library, you can also view the domains to which the library is associated.
The associated library can then be used for guest storage in the server pool. You can use the Disassociate Library icon in the Libraries tab to disassociate the library from the server pool.
Associating Network Domains
You can associate a user-defined network domain with a server pool. When you associate a network domain with the server pool, you can attach only the networks available in the network domain. You must connect the physical interface of all the servers in the server pool to each fabric in the network domain.
In this example, a user-defined network domain is associated with an Oracle Solaris Zones server pool.
The user-defined network domain has the following configuration:
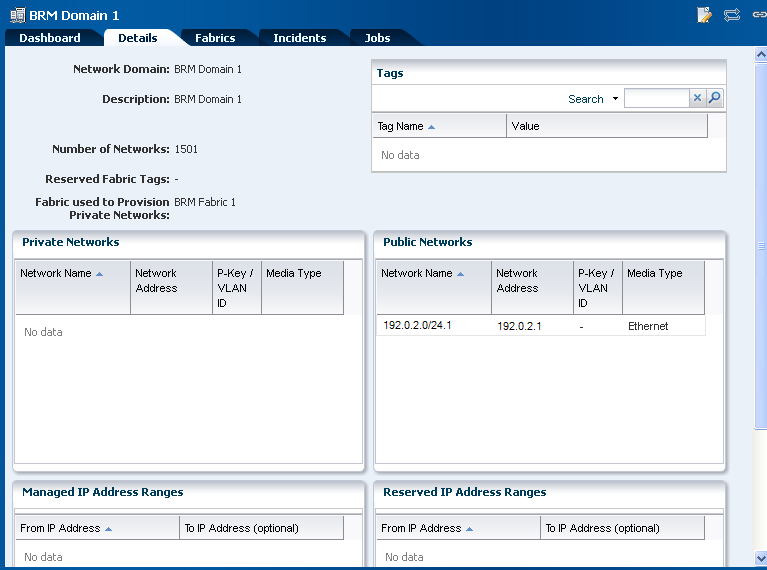
Description of the illustration network_domain.png
The network domain has the following fabrics:
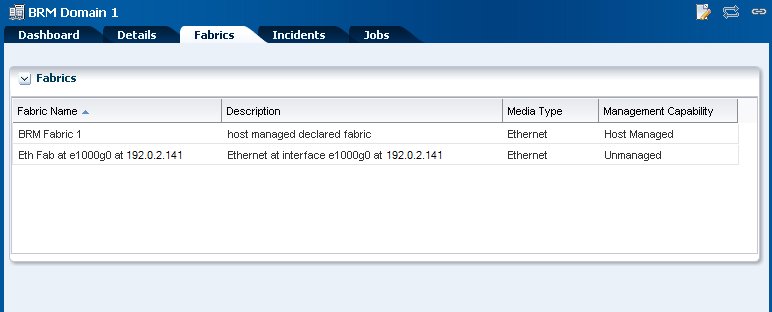
Description of the illustration netw_domain_fabrics.png
The default network domain is associated with the zones server pool, which you can view in the server pool's Dashboard tab.
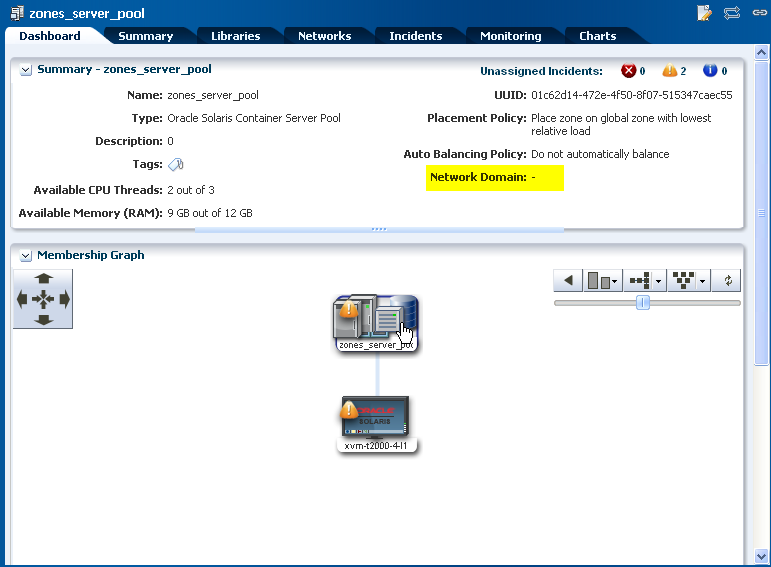
Description of the illustration zones_pool_dashboard.png
The following procedure takes you through the steps to associate the network domain with the server pool:
-
Select Server Pool in the Resource Management Views.
-
Select the zones server pool listed in the Navigation pane.
-
Click Associate Network Domain in the Actions pane.
The Associate Network Domain wizard is displayed.
-
Select the network domain from the list to associate with the server pool.
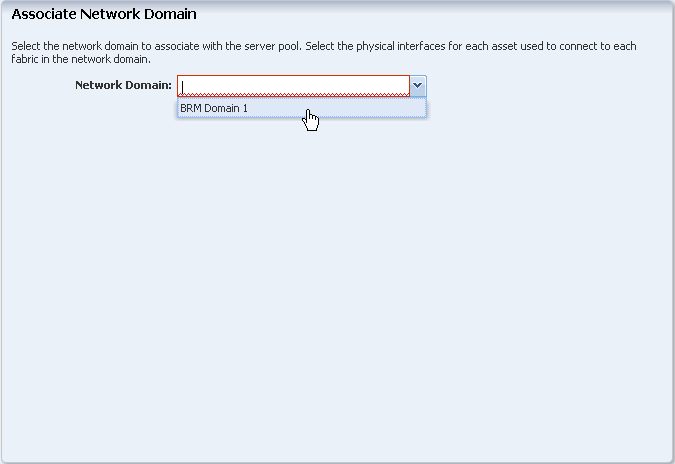
Description of the illustration asso_netw_domain.png
-
Select the physical interfaces of the servers in the server pool to connect to each fabric in the network domain.
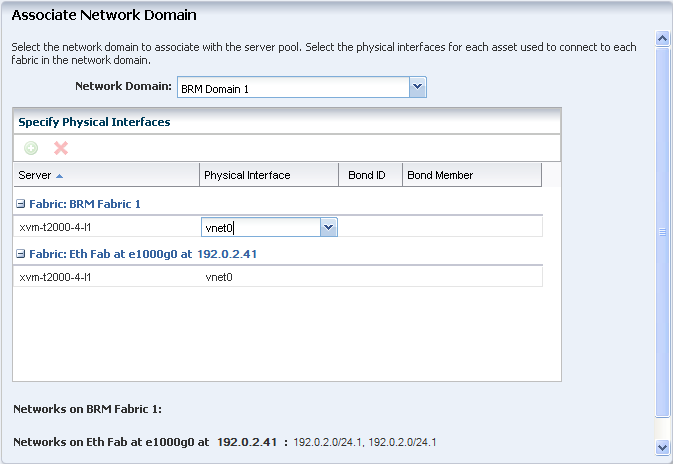
Description of the illustration asso_netw_domain_2.png
Bonding is similar to link aggregation. You must provide the Bond ID and the Bond Member for the bonding. To configure the bonding, you must have sufficient physical interfaces. In this example, the interfaces are not bonded.
Click Next to continue to the Summary step.
-
Review the details in the Summary step and click Finish to associate the network domain with the server pool.
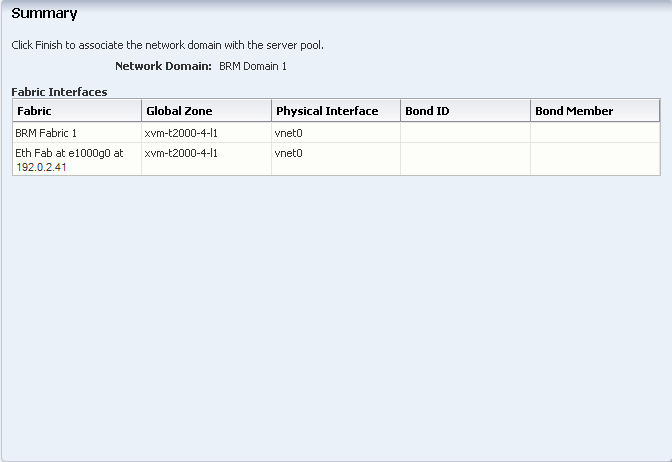
Description of the illustration netw_domain_sum_step.png
The network domain is associated with the zones server pool and the Dashboard tab is updated with the network domain details for the server pool.
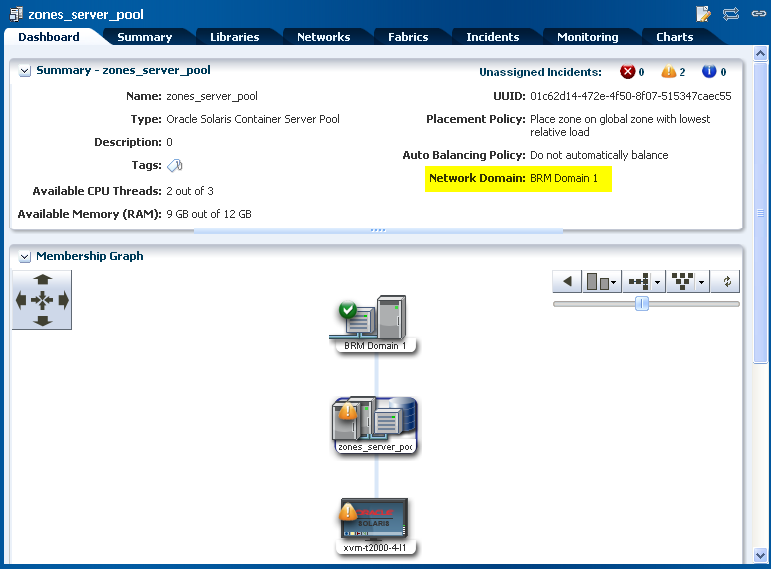
Description of the illustration zone_pool_dash_after.png
Attaching Networks
When a server pool is associated with a user-defined network domain, only the networks in that domain are available to be attached to the server pool. For the default network domain, all the networks discovered and managed in Oracle Enterprise Manager Ops Center are available. Multiple connections to a network depends on the type of virtualization technology of the server pool. Refer to the Related Articles and Resources section for more information.
In this example, a network is attached to the Oracle VM Server for SPARC server pool. You can make multiple connections to a network. For each network connection, a virtual switch is created. Virtual switch is not applicable for SR-IOV enabled networks. For SR-IOV enabled networks, select the physical function that provides virtual functions. For each network connection, you must select the service domain that provides the network interface and the NIC.
The existing server pool network connection is displayed in the UI as follows:
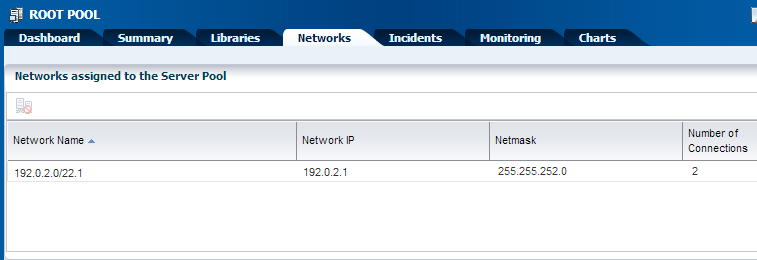
Description of the illustration pool_networks.png
In this example, a network is assigned to the server pool and it is attached to both the Oracle VM Servers in the pool.
-
Select Server Pools in the Resource Management view.
-
Select the Oracle VM Server for SPARC server pool.
-
Click Attach Network in the Actions pane.
The Attach Network wizard is displayed.
-
Select the network that you want to assign to the server pool.

Description of the illustration step1.png
Click Next.
-
Enter the number of connections for the selected network. You must add the number of connections required to the existing number of connections.
The network is configured with VLAN ID and all the members of the server pool are connected to network in tagged mode. To maintain a homogenous network configuration in the server pool, the mode is selected as Tagged.

Description of the illustration step2.png
Click Next.
-
The Oracle VM Servers in the server pool is not connected to the selected network. A new connection is made. Select the NIC provided by the primary domain and provide an IP address for the network connection.
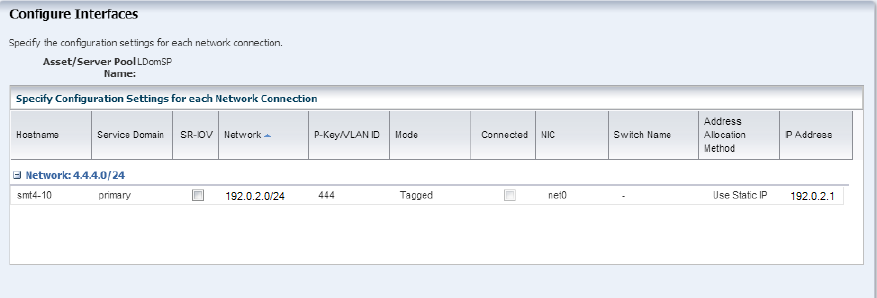
Description of the illustration step3_1.png
Leave the Switch Name column blank. The virtual switch name is automatically created in a default naming pattern.
Click Next.
-
Review the network information and click Finish to attach the networks to the server pool.

Description of the illustration step4.png
The selected network is attached to the server pool and it displayed in the UI as follows:
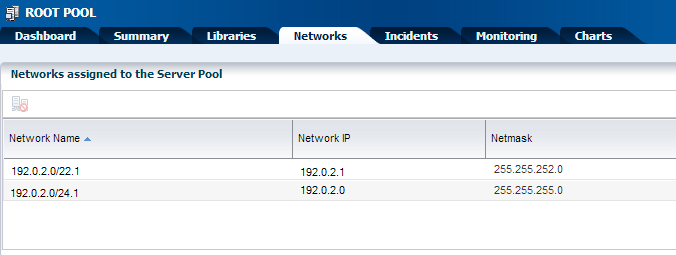
Description of the illustration network_result.png
Balancing Server Pool Resources
If a server pool is set not to balance the resources automatically, you can use the Balance Resources option to check and balance the load of the servers in the server pool.
When the load of the virtualization servers exceeds the threshold, you can reduce the load by migrating some of the guests to other servers in the server pool. Use the Balance Resources option as described in the following procedure to check the load on the servers and also the proposed guest layout if the server load exceeds the threshold:
-
Select the server pool for which you want to check the load.
-
Click Balance Resources in the Actions pane.
The Balance Server Pool Resources window is displayed.
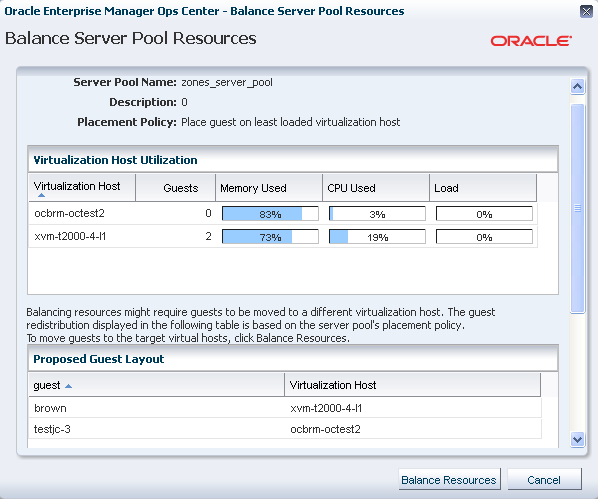
Description of the illustration balance_resource_after.png
-
When the load in a server exceeds the set threshold, a guest layout is proposed. The possible server to which the guest can be migrated is displayed. To accept the proposal, click Balance Resources.
This initiates the guest migration job. In this example, the zones are migrated to the proposed global zone in the server pool. When the zones are to be migrated, the zones are checked for patch compatibility between the source and target global zones. Depending on the requirement, the zone's patches and packages are updated to the target global zone level and then migrated.
When the virtualization server's load is within the set threshold, the balance resources window is displayed as follows:
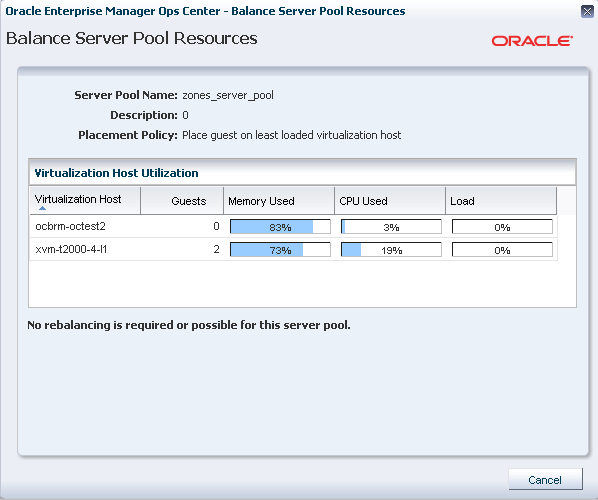
Description of the illustration balance_resource_first.png
What's Next?
You can manage the server pool and create guests in the server pool. You can assign the resources to the guests. The other options that are available to manage a server pool are:
-
Apply a monitoring profile
-
Extract a monitoring profile
-
Create guests
See Related Articles and Resources for more information about monitoring policies and creating guests in the server pool.
Related Articles and Resources
See the following resources for more information about managing Oracle VM Server for SPARC and Oracle Solaris Zones in Oracle Enterprise Ops Center:
The Oracle Enterprise Manager Ops Center 12c Release 3 documentation is available at http://docs.oracle.com/cd/E59957_01/index.htm.
For current discussions, see the product blog at https://blogs.oracle.com/opscenter.
See the Deploy How To library at http://docs.oracle.com/cd/E59957_01/nav/deploy.htm and the Operate How To library at http://docs.oracle.com/cd/E59957_01/nav/operate.htm for deployment and operational examples.
Documentation Accessibility
For information about Oracle's commitment to accessibility, visit the Oracle Accessibility Program website at http://www.oracle.com/pls/topic/lookup?ctx=acc&id=docacc.
Oracle customers that have purchased support have access to electronic support through My Oracle Support. For information, visit http://www.oracle.com/pls/topic/lookup?ctx=acc&id=info or visit http://www.oracle.com/pls/topic/lookup?ctx=acc&id=trs if you are hearing impaired.
Oracle Enterprise Manager Ops Center Explore Your Server Pools, 12c Release 3 (12.3.0.0.0)
E60033-01
Copyright © 2007, 2015, Oracle and/or its affiliates. All rights reserved.
This software and related documentation are provided under a license agreement containing restrictions on use and disclosure and are protected by intellectual property laws. Except as expressly permitted in your license agreement or allowed by law, you may not use, copy, reproduce, translate, broadcast, modify, license, transmit, distribute, exhibit, perform, publish, or display any part, in any form, or by any means. Reverse engineering, disassembly, or decompilation of this software, unless required by law for interoperability, is prohibited.
The information contained herein is subject to change without notice and is not warranted to be error-free. If you find any errors, please report them to us in writing.
If this is software or related documentation that is delivered to the U.S. Government or anyone licensing it on behalf of the U.S. Government, then the following notice is applicable:
U.S. GOVERNMENT END USERS: Oracle programs, including any operating system, integrated software, any programs installed on the hardware, and/or documentation, delivered to U.S. Government end users are "commercial computer software" pursuant to the applicable Federal Acquisition Regulation and agency-specific supplemental regulations. As such, use, duplication, disclosure, modification, and adaptation of the programs, including any operating system, integrated software, any programs installed on the hardware, and/or documentation, shall be subject to license terms and license restrictions applicable to the programs. No other rights are granted to the U.S. Government.
This software or hardware is developed for general use in a variety of information management applications. It is not developed or intended for use in any inherently dangerous applications, including applications that may create a risk of personal injury. If you use this software or hardware in dangerous applications, then you shall be responsible to take all appropriate fail-safe, backup, redundancy, and other measures to ensure its safe use. Oracle Corporation and its affiliates disclaim any liability for any damages caused by use of this software or hardware in dangerous applications.
Oracle and Java are registered trademarks of Oracle and/or its affiliates. Other names may be trademarks of their respective owners.
Intel and Intel Xeon are trademarks or registered trademarks of Intel Corporation. All SPARC trademarks are used under license and are trademarks or registered trademarks of SPARC International, Inc. AMD, Opteron, the AMD logo, and the AMD Opteron logo are trademarks or registered trademarks of Advanced Micro Devices. UNIX is a registered trademark of The Open Group.
This software or hardware and documentation may provide access to or information about content, products, and services from third parties. Oracle Corporation and its affiliates are not responsible for and expressly disclaim all warranties of any kind with respect to third-party content, products, and services unless otherwise set forth in an applicable agreement between you and Oracle. Oracle Corporation and its affiliates will not be responsible for any loss, costs, or damages incurred due to your access to or use of third-party content, products, or services, except as set forth in an applicable agreement between you and Oracle.