Oracle® Enterprise Manager Ops Center
Add an Existing Oracle VM Server for SPARC
12c Release 3 (12.3.1.0.0)
E60035-02
December, 2015
This guide provides an end-to-end example for how to use Oracle Enterprise Manager Ops Center.
Introduction
This guide describes how to discover and fully manage an existing Oracle VM Server for SPARC environment with Oracle Enterprise Manager Ops Center. An existing Oracle VM Server for SPARC environment is one that you create outside of Oracle Enterprise Manager Ops Center.
You can discover and add the existing environment to the Oracle Enterprise Manager Ops Center software and begin monitoring and managing the logical domains. Once managed, Oracle Enterprise Manager Ops Center does not distinguish between the server and logical domains that you create with the software and those that you create outside of the software.
You can manage the following types of existing Oracle VM Server for SPARC servers:
-
Oracle Solaris 11 running Oracle VM Server for SPARC server. The Control Domain can have non global-zones.
-
Oracle Solaris 10 running Oracle VM Server for SPARC server. The Control Domain can have non global-zones.
The most robust management capabilities are available when you install a Virtualization Controller (VC) Agent and use shared storage and connect network resources. Using shared storage and networks enables you to create a server pool that contains one or more Oracle VM Server for SPARC environments. Server pools enable you to share resources and migrate logical domains to other Control Domains in the same server pool.
Virtualization Controller Agents
You can install the agent during discovery, or at any time after discovery. You have the following agent management options:
-
OVM Server for SPARC Virtualization Controller Agent: Manages the logical domains that run on the Control Domain. The Oracle VM Server, Control Domain and operating system are reflected in the UI. Using this agent enables full monitoring and management actions for the Oracle VM Server system.
-
Zones Virtualization Controller Agent: Manages the zones that run on the logical domains. The global zone is reflected in the UI. Using this agent enables full zone monitoring and management actions.
-
Agentlessly: Limited management functionality is available with this method. The software gathers information by using SSH connection between the logical domains and the Proxy Controller.
For robust management, use the Oracle VM Server for SPARC Virtualization Controller Agent to manage the domains. The agent runs on the Control Domain and monitors the configuration and reflects any changes on the configuration in its copy of the metadata.
Note:
If you have a manually configured Oracle VM Server for SPARC environment that you managed with an earlier version of Oracle Enterprise Manager Ops Center, it might have the Zones VC Agent installed instead of the Oracle VM Server VC Agent. See Related Articles and Resources for more information about VC Agents and how to change the type of Agent Controller to the Oracle VM Server VC Agent.
Storage for Logical Domains
Storage libraries store logical domain metadata, ISO images and provide virtual disks for logical domain storage. The logical domain metadata is saved in either a local library or a shared storage library.
When you use the native CLI to install Oracle VM Server for SPARC on a system, instead of using Oracle Enterprise Manager Ops Center, the metadata is saved in a default local library on the Control Domain. Before you can add the Oracle VM Server server and logical domains to a server pool, you must define a shared storage location for the metadata.
You can use the following libraries for Oracle VM Server:
-
Filesystem storage: This includes the NAS storage libraries.
-
Block storage: This includes the Static and Dynamic Storage libraries. The Static Storage library includes the exported LUNs of SAN and iSCSI storage servers that are not managed by Oracle Enterprise Manager Ops Center. The LUNs of storage servers managed in Oracle Enterprise Manager Ops Center are available through Dynamic Storage library. This library provide option to create a LUN when you add storage to the logical domains.
When the logical domain storage disks are on storage servers that are not managed by Oracle Enterprise Manager Ops Center, they appear in the UI as Opaque storage. To enable migration, you must move the logical domain metadata to shared storage. You can mark the logical domain storage disks as on-shared-storage to indicate that the storage is available to other managed Oracle VM Servers using the same back end name.
The virtual disk multipathing that has been configured for the logical domain virtual disks are also displayed in the Storage tab of the logical domain.
Note:
You cannot migrate a logical domain until you move all of its virtual disks to shared storage and move the domain's metadata to a shared library.
Workflow
Figure 1-1 is a flowchart that shows how you can begin managing an existing Oracle VM Server for SPARC system with Oracle Enterprise Manager Ops Center. The left side of the chart shows the prerequisites that you must have in place before you can successfully complete the tasks in the workflow on the right side of the figure. A task appears in a box and a decision point appear in a triangle. The end of the flow is indicated by an ellipse that points you to the next flow.
Prerequisites
The following prerequisites appear on the left side of Figure 1-1 :
-
Install and Configure the Enterprise and Proxy Controllers. For Oracle VM Server for SPARC, it is best to deploy the Enterprise Controller and Proxy Controllers on a system that is running Oracle Solaris 11.
Note:
Oracle Solaris 10 Update 11 also supports Oracle VM Server for SPARC 3.1. The advantage to installing the Enterprise and Proxy Controllers on an Oracle Solaris 11 system is that you can perform Oracle Solaris 10 and 11 update and provisioning tasks. When the Enterprise Controller is running on Oracle Solaris 10, you cannot update or provision Oracle Solaris 11.
-
Deploy Oracle VM Server for SPARC manually. If you do not already have a system deployed outside of Oracle Enterprise Manager Ops Center, you can create one manually. The system can have logical domains, or not. This example uses Oracle Solaris 11.1 SRU 7.5, which contains Oracle VM Server for SPARC 3.0.0.3.
-
Deploy Networks. To use the advanced management features, you must use a shared network instead of a local network.
-
Deploy Storage Libraries. To use the advanced management features, you must use a shared storage library to store the logical domain metadata instead of local storage. This example uses an NFS library.
Tasks and Decisions
The following tasks and decisions appear in the right side of Figure 1-1 :
-
Decision: Do you want to share resources and migrate logical domains?
-
If you answer no, go to the next decision point.
-
If you answer yes, complete the next task.
-
-
End of Flow: Go to the Operate Logical Domains workflow
Figure 1-1 Managing an Unmanaged Oracle VM Server for SPARC Server
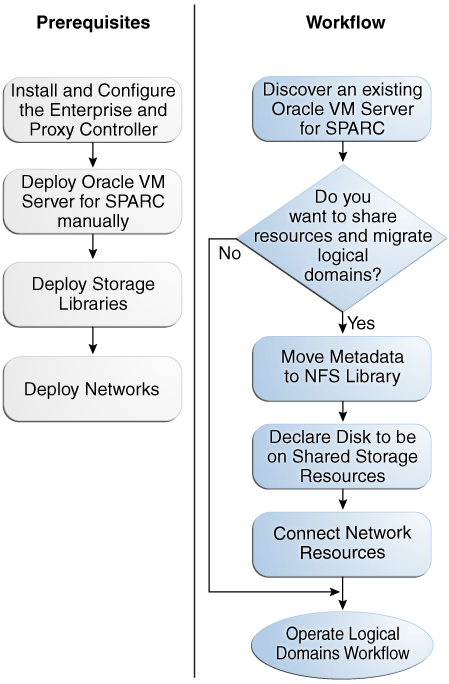
Description of "Figure 1-1 Managing an Unmanaged Oracle VM Server for SPARC Server"
What You Will Need
To complete this example, you need the following:
-
Oracle Enterprise Manager Ops Center installed on an Oracle Solaris 11 operating system. Oracle Solaris 11 and Oracle Solaris 10 Update 11 support Oracle VM Server for SPARC version 3.1. This example uses an Oracle Solaris 11 operating system.
-
An Oracle VM Server for SPARC installed using Oracle Solaris 11.1 SRU 7.5, which contains Oracle VM Server for SPARC 3.0.0.3.
-
NFS storage library to store the metadata.
-
Network to provide networking for the logical domains.
-
The roles and permissions to complete the tasks. You need the following Oracle Enterprise Manager Ops Center roles:
-
Plan/Profile Admin to create and manage the discovery profile
-
Asset Admin to discover and manage assets
-
Virtualization Admin to create and manage the domains.
-
Discover an Existing Oracle VM Server for SPARC
You can add an existing Oracle VM Server for SPARC to the Oracle Enterprise Manager Ops Center user interface and begin managing the domains. The discovery feature enables you to display the domains (control, root, I/O, and logical domains) in the user interface and begin displaying information about the virtual services, I/O resources, PCIe buses, PCIe endpoint devices, and SR-IOV configurations.
When you discover the Oracle VM Server for SPARC environment, you choose whether to install the Virtualization Controller Agent.
-
Discovering and Agent-Managing an Existing Oracle VM Server Environment
-
Discovering and Agentlessly Managing an Existing Oracle VM Server
When you manage the control domain agentlessly, you do not deploy the Agent Controller on the Control Domain and you restrict the management capabilities to the following:
-
Perform basic state change command such as shutdown, start, reboot, and destroy.
-
Edit the number of vCPUs, the number of crypto units, and the memory size.
-
Provision the Oracle Solaris operating system.
-
Access the guest's serial console.
-
View the network configuration and storage configuration for each guest.
With an agentlessly managed domain, you are unable to change the network and storage configurations, and therefore, unable to migrate the guests to another managed Oracle VM Server.
Discovering and Agent-Managing an Existing Oracle VM Server Environment
To discover the server, the Control Domain must be running.
-
Create SSH credentials.
-
Create an OS Discovery profile.
-
Expand Plan Management in the Navigation pane.
-
Click Discovery in Profiles and Policies.
-
Click Create Profile in the Actions pane.
-
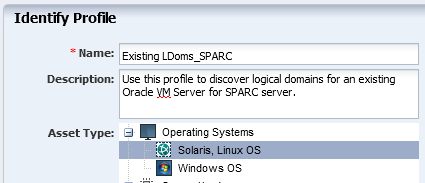
Enter a name and description for the discovery profile. Expand Operating Systems and select Solaris, Linux OS. Click Next.
-
(Optional) Click Next to skip tags.
-
(Optional) Click Next to skip adding IP Ranges. You are prompted to provide IP addresses and host names during discovery.
-
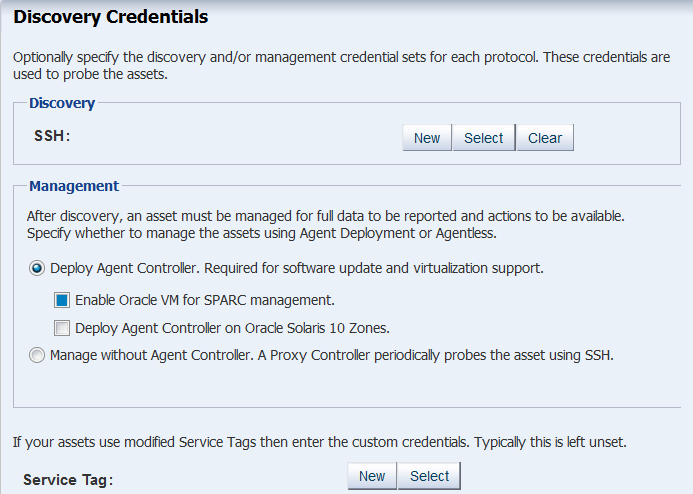
Click Select to choose the SSH credentials that you previously created, then click OK. To create new credentials, click New and create the credentials.
-
In the Management selection, accept the default option, Deploy Agent Controller option. The discovery process will install the Agent Controller on the asset, lightweight software that can only respond to inquiries and commands from the Proxy Controller and makes this asset an agent-managed asset.
-
Select Enable Oracle VM for SPARC management to deploy the Virtualization Controller. Click Next.
-
Review the Summary page, then click Finish.
-
-
Add the assets using the OS discovery profile.
-
Expand Assets in the Navigation pane, then click Add Assets in the Actions pane.
-
Select Add and manage various types of assets via discovery probes, then click Next.
-
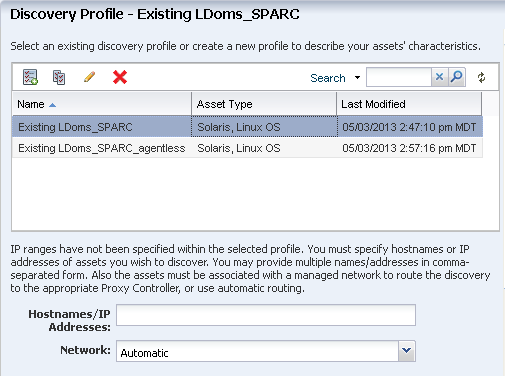
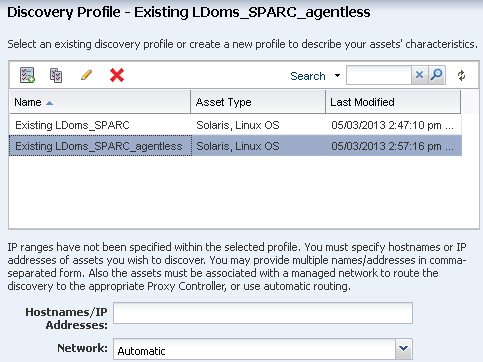
Select the Discovery profile you created in the previous step. You are prompted to complete the host names or IP addresses and network.
-
Enter a comma-delimited list of host names or IP addresses. Select a managed network with which the host is associated, or select Automatic to route the job to the most appropriate Proxy Controller.
The IP address of a target must resolve to only one known network for automatic routing to succeed.
-
(Optional) The Discovery credentials and management option are completed based on the profile. You can edit these fields.
-
Click Add Now.
-
The Control Domain appears in the Asset tree under its service processor server. The Control Domain operating system appears under its Control Domain server, and the non global zones, with a limited set of capabilities, appear under the Control Domain operating system.
The logical domains of different subtypes, root domain, I/O domain and the guest domain are automatically discovered, managed and displayed in the UI with the allocated PCIe root complex, PCIe Endpoint devices, and virtual I/O devices.
The logical domain metadata is stored in the local library of the corresponding Control Domain. The logical domain virtual storage disk is defined as Opaque.
Discovering and Agentlessly Managing an Existing Oracle VM Server
Agentlessly managed discovery locates the logical domains through the proxy management point.
To discover the server, the Control Domain must be running.
-
Create SSH credentials.
-
Create an agentless OS Discovery profile.
-
Create an OS Discovery profile.
-
Expand Plan Management in the Navigation pane.
-
Click Discovery in Profiles and Policies.
-
Click Create Profile in the Actions pane.
-
Enter a name and description for the discovery profile. Expand Operating Systems and select Solaris, Linux OS. Click Next.
-
(Optional) Click Next to skip tags.
-
(Optional) Click Next to skip adding IP Ranges. You are prompted to provide IP addresses and host names during discovery.
-
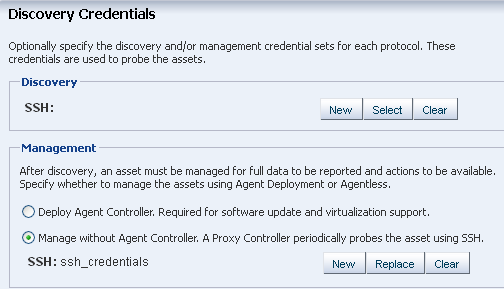
Select Manage without Agent Controller. Click Replace and choose the SSH management credentials. Click Next.
-
Review the Summary page, then click Finish.
-
-
Use the OS Discovery profile to add the Oracle VM Server for SPARC:
-
Expand Assets in the Navigation pane, then click Add Assets in the Actions pane.
-
Select Add and manage various types of assets via discovery probes, then click Next.
-
Select the Discovery profile you created in the previous step. When prompted, complete the host names or IP addresses and network for the Oracle VM Server for SPARC.
-
Enter a comma-delimited list of host names or IP addresses. Select a managed network with which the host is associated, or select Automatic to route the job to the most appropriate Proxy Controller.
The IP address of a target must resolve to only one known network for automatic routing to succeed.
-
(Optional) The Discovery credentials and management option are completed based on the profile. You can edit these fields.
-
Click Add Now.
-
The Control Domain appears in the Asset tree under its service processor server. The Control Domain operating system appears under its Control Domain server and the logical domains appears under the Control Domain operating system.
Because it is agentlessly managed, you have a minimum level of monitoring and management actions for the Control Domain.
Note:
To change the server to agent managed, use Switch Management Access. To monitor and manage the Oracle VM Server for SPARC server, Control Domain, and operating system, select the Oracle VM Server VC Agent. To monitor and manage the global zone, select the Zone VC Agent.
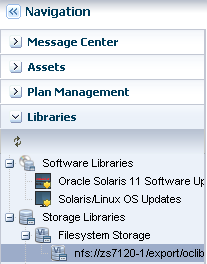
Move Metadata to NFS Library
The following options are available for moving metadata:
Prerequisites
The following conditions must be met before you can move the logical domain metadata to another library:
-
The Control Domain must be managed with an OVM Server for SPARC VC Agent.
-
The Logical Domain must be known to Oracle Enterprise Manager Ops Center.
-
The Logical Domain and its associated resources are created with Oracle Enterprise Manager Ops Center
-
A manually created logical domain is agent managed with Oracle Enterprise Manager Ops Center
-
-
The logical domain is in a shutdown state.
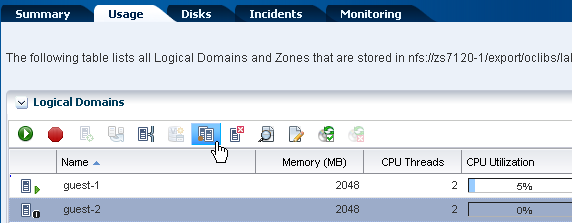
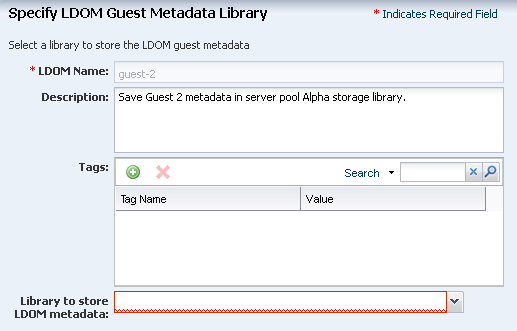
To Move Metadata to a Shared Library From the Control Domain View
When the job completes, the logical domain's metadata is located on the new library.
To Move Metadata to a Shared Library From the Logical Domain View
- Expand Assets in the Navigation pane, then select the logical domain.
- Click Move Metadata in the Actions pane.
- Select the new library from the list of available libraries to store the logical domain metadata. Optionally, add a description and add tags. Click Next.
- Review the Summary, then click Submit.
When the job completes, the logical domain's metadata is located on the new library.
Declare Disk to be on Shared Storage
To enable the ability to migrate a logical domain from one Control Domain to another Control Domain, both Control Domains must use a shared resource library (NFS library) for the logical domain metadata and shared storage for the virtual disks.
Complete both of the tasks described in the following sections to share storage resources:
Enabling Shared Access for Opaque Storage Disks
When the logical domain storage disks are on storage servers that are not managed by Oracle Enterprise Manager Ops Center, they are defined as Opaque Storage Disks.
To share access for opaque storage disks, use the Move Metadata option to move the logical domain metadata to a shared storage. You can mark the logical domain storage disks as shared to indicate that the storage is available to other managed Oracle VM Servers using the same back-end name.
Note:
You cannot migrate a logical domain until you move the domain's metadata to a shared library and all of its virtual disks to shared storage.
- Select the logical domain that uses local storage disks.
- Select the Storage tab in the center pane.
- Select the disks tagged as Opaque in the Disk Type.
- Click the Enable Sharing icon.
The selected disks are marked as sharing in the UI.
Note:
After you define the shared storage and connect the network resources, you can create a server pool or add the environment to an existing server pool. The storage that is marked as shared must be available for all the members in the server pool.
Connect Network Resources
Attach networks to Oracle VM Server to provide networking facilities for the logical domains.
You can make multiple connections to a network in the Oracle VM Server Control Domain. For each network connection, a virtual switch is created and the switch has a naming pattern. For an example network 1.1.1.0/24, the virtual switches take the name as 1.1.1.0_24, 1.1.1.0_24_1, 1.1.1.0_24_2 and 1.1.1.0_24_3. This ensures that the switches have a unique name. When a network connection is made to the server, the virtual switch created is incremented. When you create and start a logical domain, you define the virtual switch that connects to the logical domain. Each virtual switch must be connected to a NIC.
When you migrate logical domains, the switch name must be identical in the source and the target Oracle VM Server for SPARC.
You can create IPMP groups and aggregate links in the Control Domain. Navigate to the Control Domain's Oracle Solaris operating system and create IPMP groups or Link Aggregation. See the Related Articles and Resources section for more information about creating IPMP groups and Link Aggregations in an Oracle Solaris operating system.
If the networks are SR-IOV enabled, there is no virtual switch creation. An SR-IOV enabled network interface means that there are virtual functions created on the physical function of PCIe Endpoint device and you can allocate the virtual functions to logical domains. When you select SR-IOV option while attaching networks, only the interfaces on which the virtual functions are created are available for network configuration.
When you assign SR-IOV enabled networks to logical domains, then you cannot migrate the domains.
What's Next?
You can create server pools of your Oracle VM Server for SPARC systems in Oracle Enterprise Manager Ops Center. The Oracle VM Server for SPARC can have logical domains running in it.
When you want to create logical domains for the Oracle VM Servers placed in the server pool, the designation of the domains and the virtual switches or virtual functions to provide network connection are auto assigned. You cannot specify the network connection resource assignments.
Related Articles and Resources
The Oracle Enterprise Manager Ops Center 12c Release 3 documentation is available at http://docs.oracle.com/cd/E59957_01/index.htm. See the following for more information:
-
See the Oracle VM Server for SPARC 3.1 documentation library at
http://www.oracle.com/technetwork/documentation/vm-sparc-194287.htmlfor how to create an Oracle VM Server without using . -
For information about zones, server pools, VC Agents, IPMP groups, and link aggregation, see the Oracle Enterprise Manager Virtualize Reference.
-
For information about installing on Oracle Solaris, see the Oracle Enterprise Manager Ops Center Installation Guide for Oracle Solaris Operating System.
For current discussions, see the product blog at https://blogs.oracle.com/opscenter.
See the Deploy How To library at http://docs.oracle.com/cd/E59957_01/nav/deploy.htm and the Operate How To library at http://docs.oracle.com/cd/E59957_01/nav/operate.htm for deployment and operational examples.
Oracle® Enterprise Manager Ops Center Add an Existing Oracle VM Server for SPARC, 12c Release 3 (12.3.1.0.0)
E60035-02
Copyright © 2007, 2015, Oracle and/or its affiliates. All rights reserved.
This software and related documentation are provided under a license agreement containing restrictions on use and disclosure and are protected by intellectual property laws. Except as expressly permitted in your license agreement or allowed by law, you may not use, copy, reproduce, translate, broadcast, modify, license, transmit, distribute, exhibit, perform, publish, or display any part, in any form, or by any means. Reverse engineering, disassembly, or decompilation of this software, unless required by law for interoperability, is prohibited.
The information contained herein is subject to change without notice and is not warranted to be error-free. If you find any errors, please report them to us in writing.
If this is software or related documentation that is delivered to the U.S. Government or anyone licensing it on behalf of the U.S. Government, then the following notice is applicable:
U.S. GOVERNMENT END USERS: Oracle programs, including any operating system, integrated software, any programs installed on the hardware, and/or documentation, delivered to U.S. Government end users are "commercial computer software" pursuant to the applicable Federal Acquisition Regulation and agency-specific supplemental regulations. As such, use, duplication, disclosure, modification, and adaptation of the programs, including any operating system, integrated software, any programs installed on the hardware, and/or documentation, shall be subject to license terms and license restrictions applicable to the programs. No other rights are granted to the U.S. Government.
This software or hardware is developed for general use in a variety of information management applications. It is not developed or intended for use in any inherently dangerous applications, including applications that may create a risk of personal injury. If you use this software or hardware in dangerous applications, then you shall be responsible to take all appropriate fail-safe, backup, redundancy, and other measures to ensure its safe use. Oracle Corporation and its affiliates disclaim any liability for any damages caused by use of this software or hardware in dangerous applications.
Oracle and Java are registered trademarks of Oracle and/or its affiliates. Other names may be trademarks of their respective owners.
Intel and Intel Xeon are trademarks or registered trademarks of Intel Corporation. All SPARC trademarks are used under license and are trademarks or registered trademarks of SPARC International, Inc. AMD, Opteron, the AMD logo, and the AMD Opteron logo are trademarks or registered trademarks of Advanced Micro Devices. UNIX is a registered trademark of The Open Group.
This software or hardware and documentation may provide access to or information about content, products, and services from third parties. Oracle Corporation and its affiliates are not responsible for and expressly disclaim all warranties of any kind with respect to third-party content, products, and services unless otherwise set forth in an applicable agreement between you and Oracle. Oracle Corporation and its affiliates will not be responsible for any loss, costs, or damages incurred due to your access to or use of third-party content, products, or services, except as set forth in an applicable agreement between you and Oracle.
