Oracle® Enterprise Manager Ops Center
Configure and Install I/O Domains
12c Release 3 (12.3.0.0.0)
E60038-01
June 2015
This guide provides an end-to-end example for how to use Oracle Enterprise Manager Ops Center.
Introduction
Using Oracle Enterprise Manager Ops Center, you can configure and install I/O domains on Oracle VM Server for SPARC systems.
A logical domain is a virtual machine with resources, such as CPU threads, memory, I/O devices, and its own operating system. An I/O domain is a logical domain that has PCIe Endpoint devices assigned to it in Oracle Enterprise Manager Ops Center. Therefore, the I/O domain is defined as Physical I/O Domain in the UI. The PCIe Endpoint devices are manually released from the PCIe bus using the CLI.
The released PCIe Endpoint devices are then available for creating I/O domains. The PCIe bus must be allocated to primary or root domain before releasing the PCIe Endpoint devices.
The number of I/O domains that you can create depends on the number of PCIe Endpoints that are available in a PCIe bus.
In this how to, the following scenario is set to create an I/O domain:
-
Oracle VM Server for SPARC 3.1 version installed on Oracle SPARC T4-2 server.
-
A PCIe bus pci_1 is detached from the primary domain while provisioning Oracle VM Server for SPARC.
-
A root domain is created with the detached PCIe bus. The OS is provisioned on the root domain.
-
The PCIe Endpoint devices are released from the PCIe bus pci_1.
Use the released PCIe Endpoint and create the I/O domain. Then, provision OS on the domain.
What You Will Need
You need the following to configure and deploy an I/O domain:
-
Oracle VM Server for SPARC system
A server installed and configured with Oracle VM Server for SPARC 3.1 version using Oracle Enterprise Manager Ops Center. See the Related Articles and Resources section for more information.
-
Root domain installed and provisioned with OS. See the Related Articles and Resources section for more information.
-
Network Connection
Obtain the details of the Ethernet devices connected to the PCIe bus that will be assigned to the root domain. You must acquire the network interfaces in the PCIe Endpoint device that are physically connected to the network.
The network to which the network interface is physically connected must be discovered and managed in Oracle Enterprise Manager Ops Center.
An IP address to be assigned to the I/O domain OS.
-
Storage Libraries
The local library is used for virtual disks of the I/O domain. The I/O domain is not migratable and hence the I/O domain metadata is stored in the local library automatically. In this example, 20 GB of virtual disk is created for the I/O domain.
-
OS Image
You must install and configure Oracle Enterprise Manager Ops Center in Oracle Solaris 11 OS and populate the Oracle Solaris 11 Library with SRUs. You can select an Oracle Solaris 11 OS of particular SRU version. See the Related Articles and Resources section for more information.
-
Roles and Permissions
A user with the following roles:
-
Virtualization admin role to create I/O domains and server provisioning.
-
Plan/Profile admin role to create profiles and plan for I/O domain creation and OS provisioning.
-
Hardware and Software Configuration
In this example, the I/O domain is installed on Oracle VM Server for SPARC 3.1 version. The control domain is configured and deployed in stand-alone mode and it is not placed in a server pool. The PCIe Endpoint for the I/O domain is from the PCIe bus allocated to the root domain. In the Oracle VM Server for SPARC system, the root domain is first created and provisioned with OS. The root domain is displayed in the UI as follows:
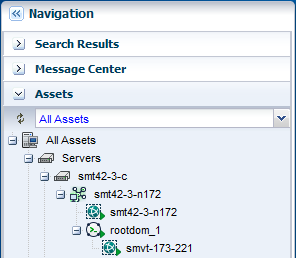
Description of the illustration root_dom_view.png
From the root domain, a PCIe Endpoint device is released manually and assigned to the I/O domain. Refer to the Related Articles and Resources section for more information about the commands for releasing the PCIe Endpoint devices.
Configuring and Installing I/O Domains
The steps to configure and install I/O domain are as follows:
Create an I/O Domain Profile
Create an I/O domain with the following resource requirements:
-
Two CPU Threads
-
4 GB of memory. You must provide 4 GB of memory for each I/O device.
-
Native CPU architecture
-
Local filesystem library for the virtual disks
In this example, virtual network connection is not provided for the I/O domain. Instead, an Ethernet connection to one of the PCIe Endpoint device assigned to the I/O domain will be used for providing the physical network connection for OS provisioning.
You can provide virtual network connection to I/O domain when the I/O domain does not have Ethernet device and has only storage device such as Fibre Channel cards.
In Oracle Enterprise Manager Ops Center, you create I/O domains that have physical resources assigned to them and hence the option Physical I/O Domain in the Subtype of Create Logical Domain profile creation.
-
Select the Plan Management section.
-
Expand Profiles and Policies and select Logical Domain.
-
Click Create Profile from the Actions pane.
The Create Logical Domain Profile wizard is displayed.
-
Enter a name and description to identify the profile.
Retain the option to create a deployment plan for this profile. Select Physical IO Domain in the Subtype.
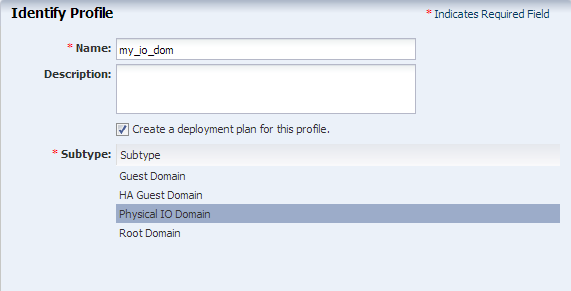
Description of the illustration ioprof_step1.png
Click Next.
-
Enter the name of the I/O domain as io_domain and the starting number as 1. The I/O domain will be created with the name as io_domain1.
Provide description and add new tags for the I/O domain. All the logical domains created using this profile use the same description and tags.
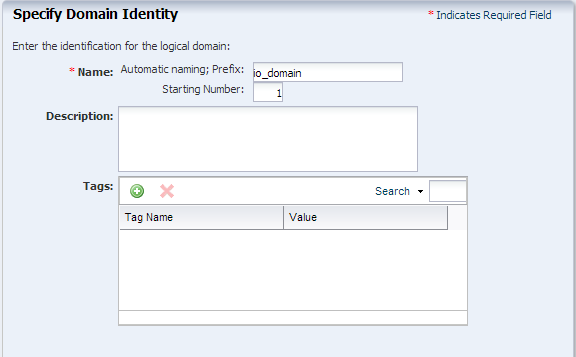
Description of the illustration ioprof_step2.png
Click Next to configure the CPU Threads and memory.
-
The threads in the physical CPU of the Oracle VM Server are dedicated to the logical domains. Select Virtual CPU as the CPU Model and enter the values for CPU Threads and memory to be allocated for the I/O domain:
-
2 CPU Threads.
-
4 GB of memory.
-
Do not specify a value for Crypto Units. Depending on the number of CPU threads, the Crypto units are assigned automatically.
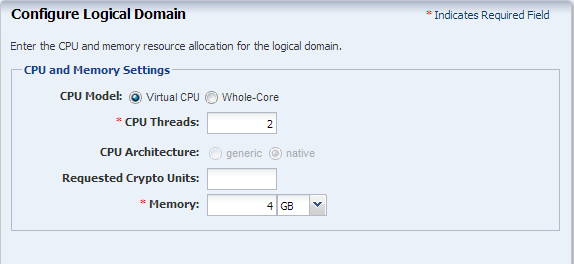
Description of the illustration ioprof_step3.png
Click Next.
-
-
Specify the PCIe Endpoint Type and number of devices that must be allocated to the I/O domain. The type can be Ethernet, InfiniBand, SCSI, Fibre Channel or Any type.
In this example, an Ethernet device is selected and one PCIe Endpoint device is allocated to the I/O domain.
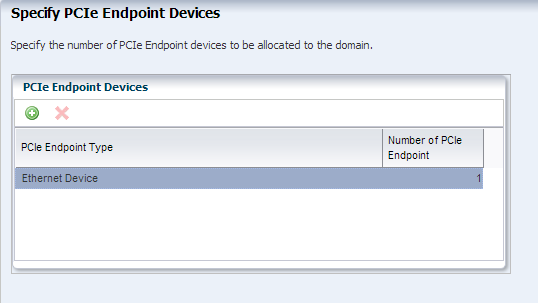
Description of the illustration ioprof_step4.png
Click Next to specify the storage for the logical domains.
-
Select the local file system storage library for the virtual disks. Enter the disk size as 20 GB. You can retain or edit the name of the virtual disk.
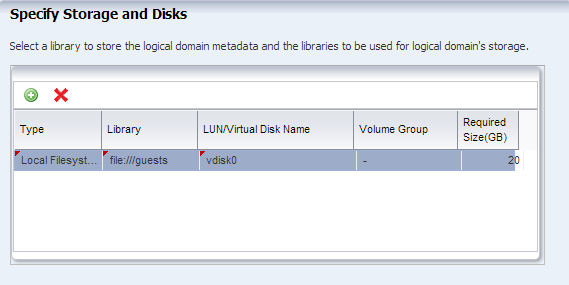
Description of the illustration ioprof_step5.png
Click Next to specify the networks for the domains.
-
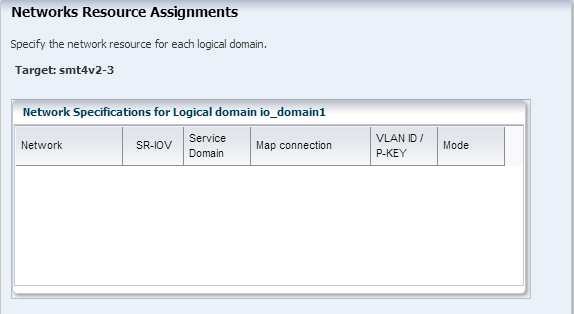
Skip this step to specify the networks that must be used for OS provisioning. The physical connection network is used from the Ethernet device in the PCIe Endpoints assigned to the I/O domain.
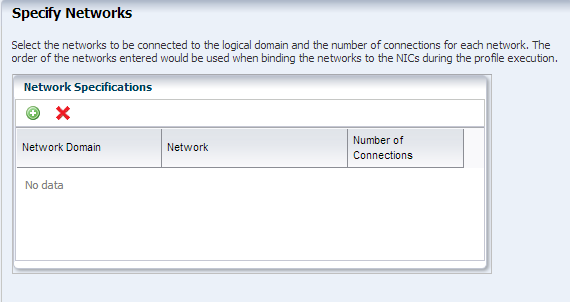
Description of the illustration ioprof_step6.png
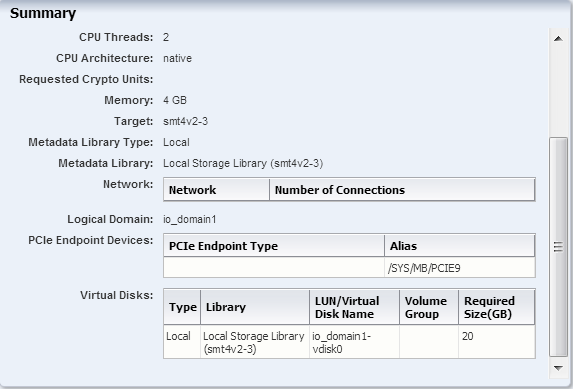
Click Next to view the summary of the logical domain details.
-
Review the information and click Finish to save the profile.
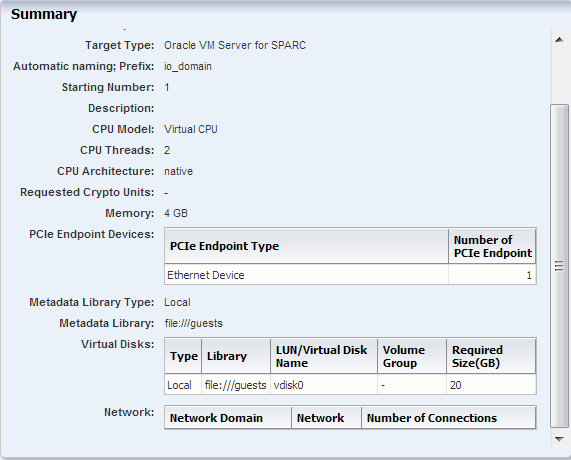
Description of the illustration ioprof_step7.png
The profile to create to the I/O domain and the corresponding deployment plan are created. Apply the deployment plan to create the I/O domain.
Deploy I/O Domain Plan
Deploy the automatically created I/O domain plan to create I/O domain. The I/O domain is created without any OS provisioned on it.
-
Select the Plan Management section in the Navigation pane.
-
Expand Deployment Plan and select Create Logical Domains.
-
Select the plan from the list of plans and click Apply Deployment Plan in the Actions pane.
-
In the Select Targets window, select the Oracle VM Server for SPARC system on which you want to create the I/O domain.
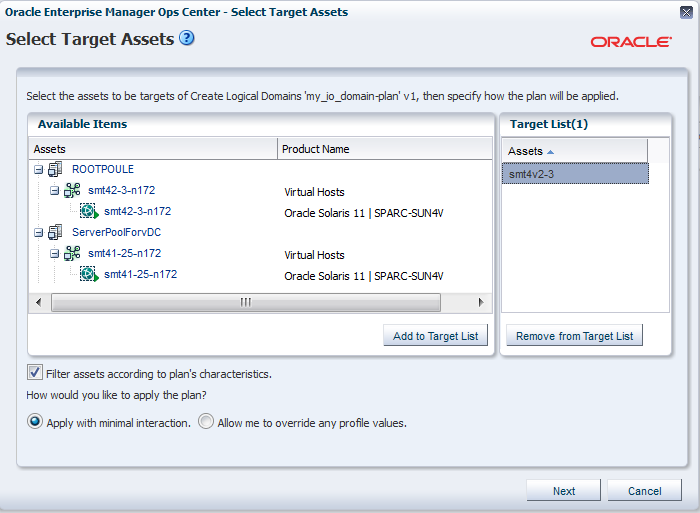
Description of the illustration select_target_plan.png
Click Add to Target List to move the selected target Oracle VM Server to the Target List. Select to apply the deployment plan in minimum interaction mode.
Click Next.
-
The Specify Domain Identity step is displayed. Confirm the given name in the profile.
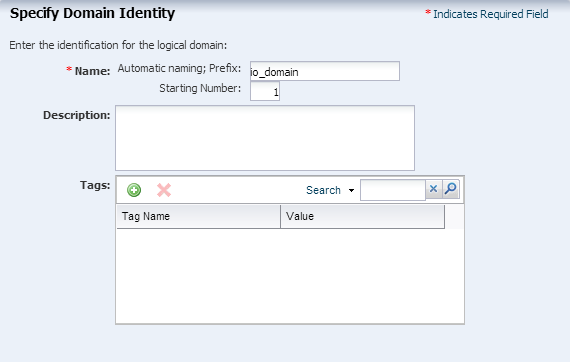
Description of the illustration plan_step1.png
Click Next to proceed.
-
Specify the PCIe Endpoint devices for the I/O domain. The PCIe Endpoints that are released from the root domain are listed in the Alias.
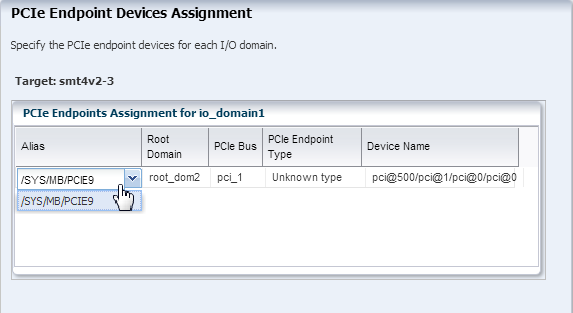
Description of the illustration plan_step2.png
Click Next.
-
In the Storage Resource Assignments step, retain the storage library selected for the virtual disks from the profile.
There is only one path to access the backend storage and the multipathing group name is not entered. Therefore, multipathing group is not created for this virtual disk.
The virtual disk server is named as io_domain1-vds0 by default. If required, you can modify the name of the virtual disk server.
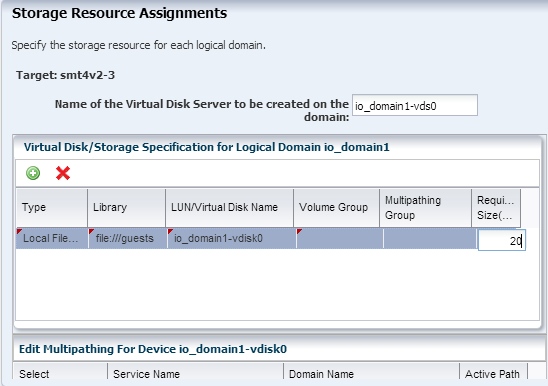
Description of the illustration plan_step3.png
Click Next.
-
In the profile to create I/O domain, the network connections details were not provided. Therefore, the network connection settings step and network resource step are empty.

Description of the illustration plan_step4.png
Description of the illustration plan_step5.png
Click Next.
-
Schedule the job to run now.

Description of the illustration plan_step6.png
Click Next.
-
Review the properties and click Apply to apply the deployment plan to create logical domain.
Description of the illustration plan_step7.png
The I/O domain is created and is in installing state. The domain is displayed under the corresponding Oracle VM Server for SPARC system. Now, apply OS provisioning deployment plan to provision OS on the domain. The PCIe Endpoint device is assigned to the I/O domain. The PCIe slot status will be updated once the OS is provisioned on it.
Create OS Provisioning Profile
Create a new OS provisioning profile for the Oracle Solaris 11.1 OS that must be provisioned on the I/O domain. You can also edit the default profiles that are created for the Oracle Solaris 11.1 OS. The procedure in this section describes about creating a new OS provisioning profile.
-
Select the Plan Management section in the Navigation pane.
-
Expand Profiles and Policies and select OS Provisioning profile.
-
Click Create Profile in the Actions pane.
The Create Profile - OS Provisioning wizard is displayed.
-
Provide the following details for the profile identification:
-
Enter the name of the profile as my_iodom_osp.
-
Enter a suitable description for the profile.
-
Select Logical Domain as the Subtype.
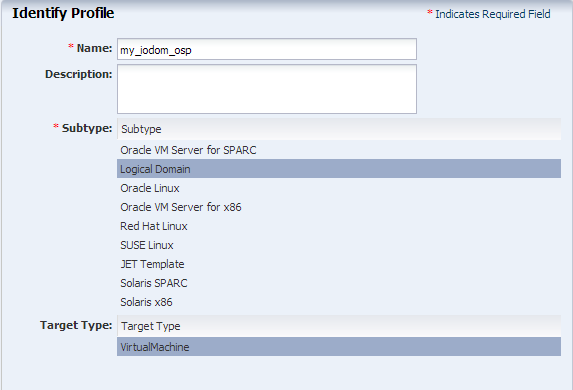
Description of the illustration osp_prof_step1.png
Click Next to specify the provisioning parameters.
-
-
Select the following OSP parameters:
-
Oracle Solaris 11.1 OS version from the list.
Select the SRU 12.5.0 from the list.
-
Software Group as
solaris-small-serverfrom the list.
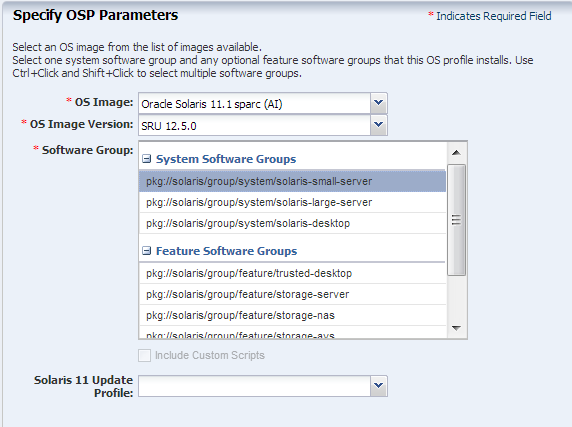
Description of the illustration osp_prof_step2.png
Click Next to specify the OS Setup.
-
-
Specify the OS setup parameters:
-
Enter the time zone, language, terminal type, console serial port, and console baud rate.
-
Enter the root password.
-
The NFS4 domain is set to dynamic in this example. If a naming service is configured in your environment, enter the NFS4 domain value.
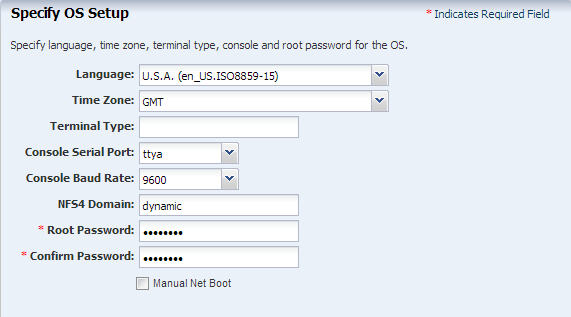
Description of the illustration osp_prof_step3.png
Click Next.
-
-
Create a user account to SSH to the OS after provisioning. Provide a user name and password for the account.
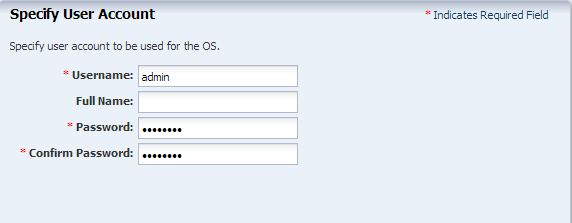
Description of the illustration osp_prof_step4.png
Click Next to specify whether you want to use iSCSI disks for OS provisioning.
-
Do not select the option to use iSCSI disk as this scenario does not involve the use of iSCSI disk for OS provisioning.
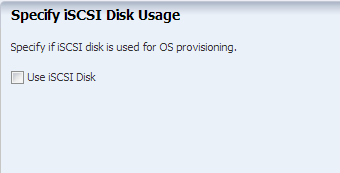
Description of the illustration osp_prof_step5.png
Click Next.
-
The root (/) and a swap file system are defined by default. Click the Add icon to add more ZFS file systems.
UFS File System Type is available when you are provisioning Oracle Solaris 10 1/13 OS.
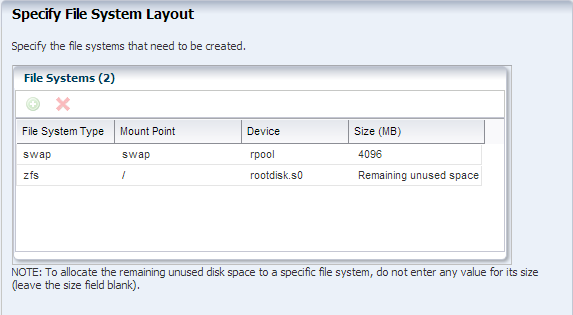
Description of the illustration osp_prof_step6.png
Click Next to specify the name service.
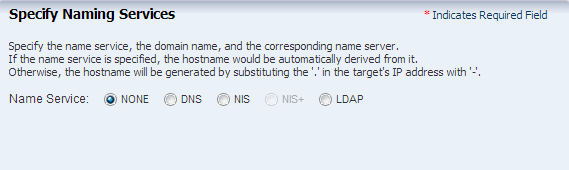
-
If you have a naming service in place, select the appropriate one and provide the setup details. In this procedure, select None for the naming service.
If you have any naming service in your setup, refer to the help in the wizard or the Related Articles and Resources section for information about specifying the naming services.
Description of the illustration osp_prof_step7.png
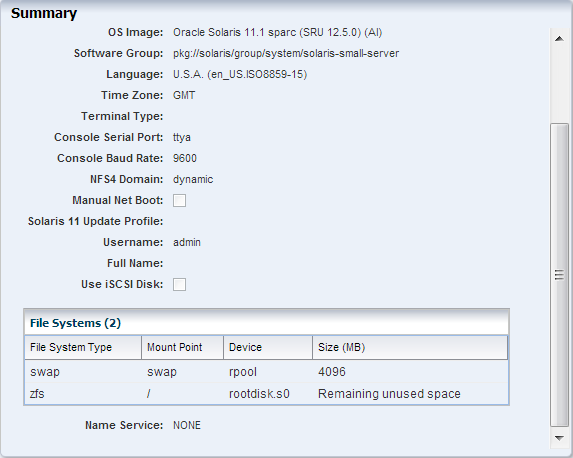
Click Next to view the summary of the parameters selected for the profile.
-
Review the parameters selected for the profile and click Finish to create the OS provisioning profile.
Description of the illustration osp_prof_step8.png
-
Click Finish to create the OS provisioning profile.
Create OS Configuration Profile
-
Select the Plan Management section and expand Profiles and Policies.
-
Select OS Configuration and click Create Profile in the Actions pane.
-
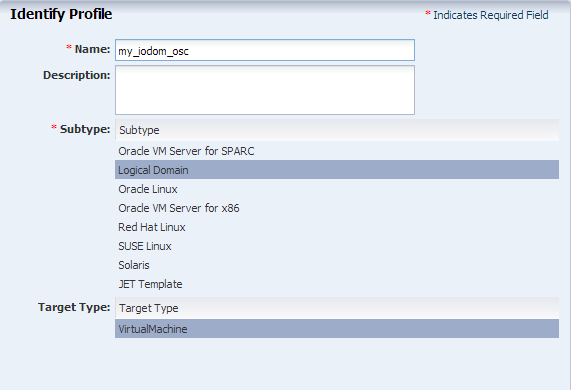
Enter the following details to identify the profile:
-
Name and description of the profile.
-
Select Logical Domain as the Subtype and Virtual Machine as the Target Type.
Description of the illustration osc_prof_step1.png
Click Next to set the OS Management properties
-
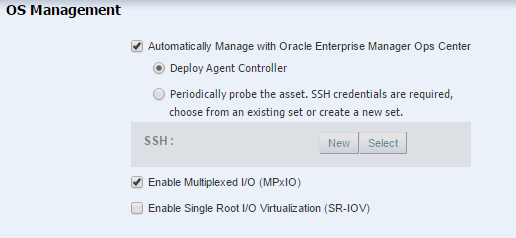
-
Select to manage the OS automatically and deploy the Agent Controller to manage the asset.
Select the option Enable Multiplexed I/O so that you can associate block storage libraries such as FC and iSCSI for storage with the OS.
Deselect the option Enable Single Root I/O Virtualization (SR-IOV), the option is only applicable to root domains.
Description of the illustration osc_prof_step2.png
Click Next to specify the networking details.
-
Select None as the networking option for the OS.
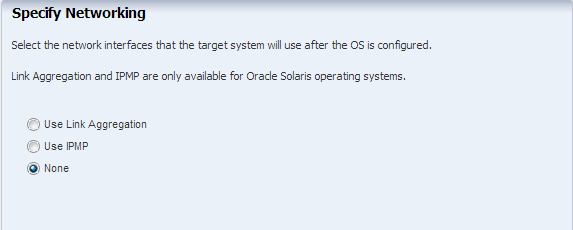
Description of the illustration osc_prof_step3.png
Click Next.
-
Enter the number of network interfaces that must be configured on the OS. The details of the interfaces are collected while deploying the plan.
In this example, enter one interface that will be configured on the OS.
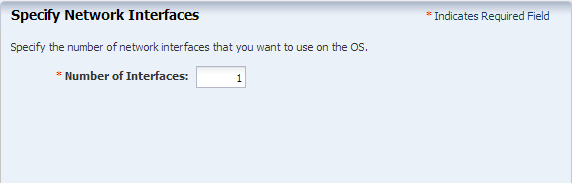
Description of the illustration osc_prof_step4.png
Click Next to view the summary of the parameters selected for OS configuration.
-
Review the parameters and click Finish to create the OS configuration profile.
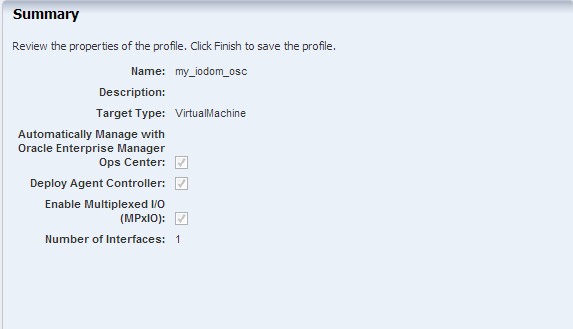
Description of the illustration osc_prof_step5.png
Create Provision OS Deployment Plan
Create a Provision OS plan that includes the OS Provisioning and OS Configuration profile created in the previous procedures. The provision plan will then be applied on the created I/O domain.
-
Select Plan Management section in the Navigation pane.
-
Expand Deployment Plans and select Provision OS.
-
Click Create Deployment Plan in the Actions pane.
-
In the Create Deployment Plan window, enter the following details:
-
Name of the plan as iodom_osp.
-
Description for the plan.
-
Select Stop at failure for Failure Policy.
-
Select the OS Provisioning Profile and the OS Configuration Profile created for provisioning OS on the I/O domain.
Click Save to save the deployment plan.
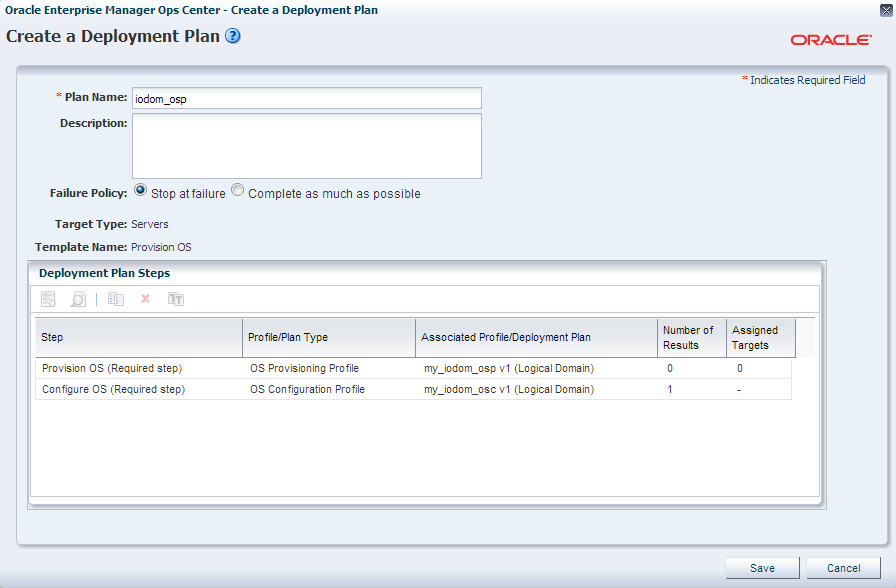
Description of the illustration iodom_osp_plan.png
-
Apply Provision OS Deployment Plan On I/O Domain
For provisioning OS on the I/O domain, two important parameters are required:
-
Boot interface details: The details can be either the network port number of the PCIe Endpoint device, or the MAC address of the interface.
-
OS Provisioning IP Address: The IP address that must be used on the OS. If you have more than one interfaces defined to be used on the OS, the network slot and the IP address for each network connection.
In this scenario, the I/O domain creation and OS provisioning plan are not combined in a single plan. Hence, the available PCIe Endpoint devices are filtered and provided in the boot interface list.
-
Select the I/O domain in the Assets tree of the Navigation pane.
-
Click Install Server in the Actions pane.
The Install Server window is displayed.
-
Select the OS provisioning plan created for deploying the OS and apply the plan in minimal interaction mode.
Click Apply Plan.
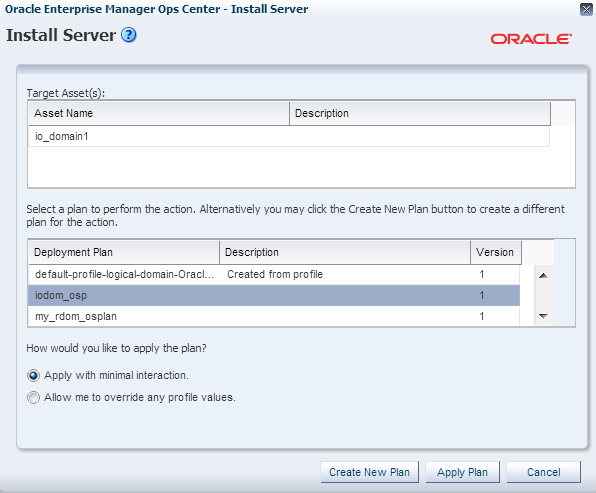
Description of the illustration select_plan.png
-
The OS deployment wizard is displayed. Select not to review the steps that are not included in the deployment plan.
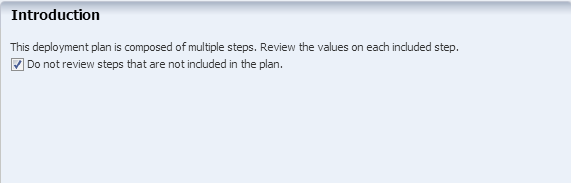
Description of the illustration ioos_step1.png
Click Next in the Introduction step.
-
The plan consists of the OS provisioning profile and OS configuration profile. The application of the plan starts with the Provision OS step.
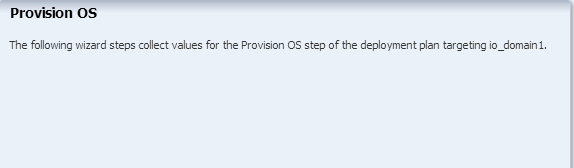
Description of the illustration ioos_step2.png
Click Next to define the boot interface resources.
-
In the Boot Interface Resource Assignment step, enter the following details:
-
Select the network from the list. The networks that are discovered and managed in Oracle Enterprise Manager Ops Center are listed.
-
Select the PCIe Endpoint device that provides the network interface for the network connection.
In this example, select
PCIE9(pci_1)as the Controller. The Controller displays only those devices that are available for network connection. It does not display all the devices. -
Select the interface from the list of interfaces available for that PCIe slot. In this example, the net_3 is the network interface that is physically connected to the selected network.
-
Provide the IP address for the boot interface.
-
(Optional) Provide the host name for the target.
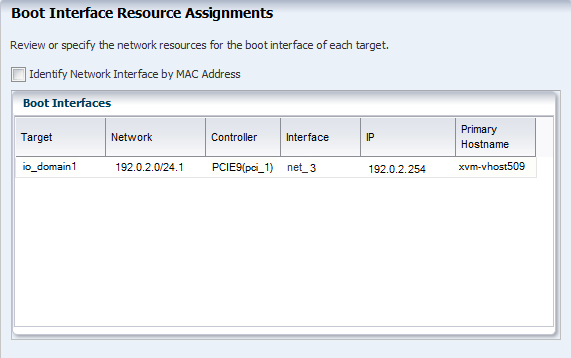
Description of the illustration ioos_step3.png
Click Next.
-
-
Review the summary of information for OS provisioning and click Next.
-
The application of the OS configuration profile starts in the wizard. Click Next.
Description of the illustration ioos_step5.png
-
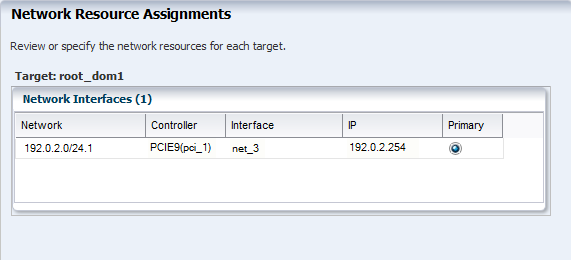
The boot interface network details are populated in this step. In this example, there was only one network interface selected to be configured on the OS. Therefore, the network resource is populated with the boot interface network details.
If you have selected more than one interface to be configured on the OS, the first interface is always overwritten by the boot interface network details. Always define the first interface as the boot interface. You can select the interface that you want to be the primary interface. Specify the network resources for the selected interfaces:
If you have selected more than one interface to be configured on the OS, then specify the network resources for the interfaces:
-
Select the network in the Network column.
-
Select the PCIe Endpoint device in the Controller column. The PCIe Endpoint device provides the network interface for communication.
-
Select the network interface.
-
Enter the IP address for OS provisioning.
-
Select the primary interface.
Description of the illustration ioos_step6.png
Click Next.
-
-
In this example, the OS is not placed in a server pool for zones.
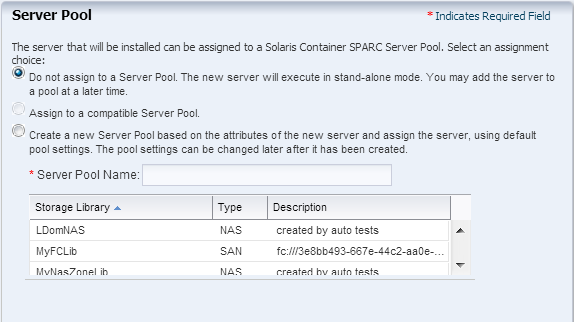
Description of the illustration ioos_step7.png
Click Next.
-
Review the summary of OS configuration parameters and click Next.
-
Schedule the job to run now and click Apply.
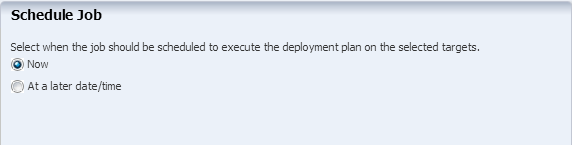
Description of the illustration ioos_step9.png
The provisioning job is executed and the I/O domain is provisioned with the OS and displayed in the UI:

Description of the illustration iodomain_os_finish.png
You can view the I/O Resources tab of the I/O domain that displays the details of the PCIe Endpoint device allocated to the domain:
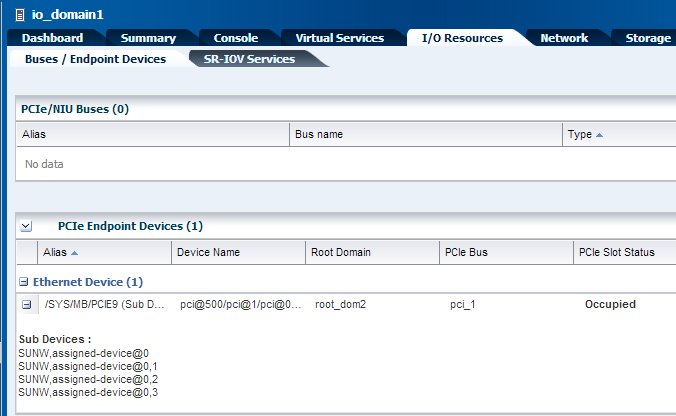
Description of the illustration iodom_view.png
From the control domain, smt4v2-3, you can also view that the PCIe Endpoint device allocated to the I/O domain is from the PCIe bus assigned to the root domain.
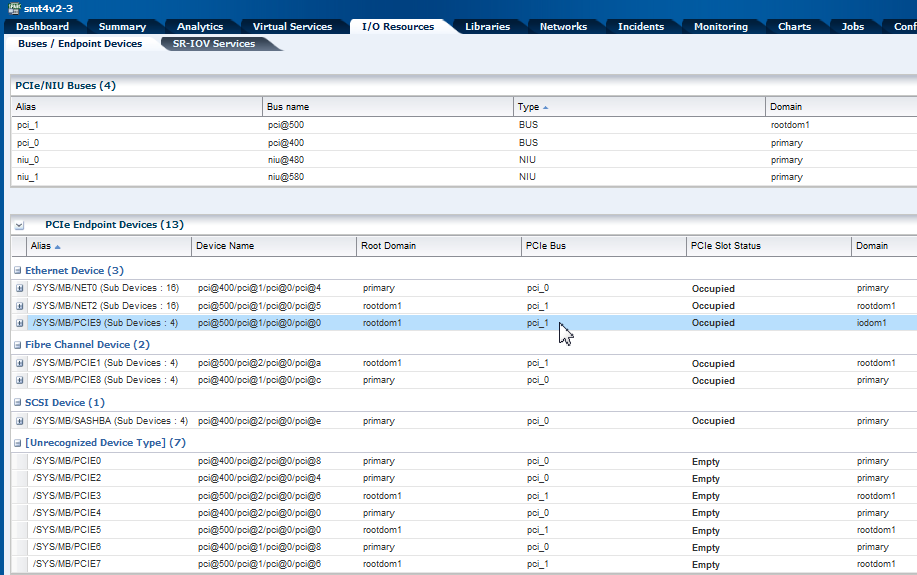
Description of the illustration io_resources.png
What's Next?
You can provide virtual I/O resource services to other guest domains in the control domain. You can also create zones on these domains and provide the resources to the zones.
Related Articles and Resources
The Oracle Enterprise Manager Ops Center 12c Release 3 documentation is available at http://docs.oracle.com/cd/E59957_01/index.htm.
See the following for more information:
-
Oracle Enterprise Manager Ops Center Virtualize Reference for more information about managing Oracle VM Server for SPARC.
-
Oracle Enterprise Manager Ops Center Configuration Guide for more information about uploading or importing OS images.
-
For information about Oracle VM Server for SPARC, see its documentation at http://www.oracle.com/technetwork/documentation/vm-sparc-194287.html.
-
Oracle Enterprise Manager Ops Center Configuring and Deploying Oracle VM Server for SPARC for deployment procedures.
-
Configuring and Installing Root Domains for a root domain installation procedure.
For current discussions, see the product blog at https://blogs.oracle.com/opscenter.
See the Deploy How To library at http://docs.oracle.com/cd/E59957_01/nav/deploy.htm and the Operate How To library at http://docs.oracle.com/cd/E59957_01/nav/operate.htm for deployment and operational examples.
Documentation Accessibility
For information about Oracle's commitment to accessibility, visit the Oracle Accessibility Program website at http://www.oracle.com/pls/topic/lookup?ctx=acc&id=docacc.
Oracle customers that have purchased support have access to electronic support through My Oracle Support. For information, visit http://www.oracle.com/pls/topic/lookup?ctx=acc&id=info or visit http://www.oracle.com/pls/topic/lookup?ctx=acc&id=trs if you are hearing impaired.
Oracle Enterprise Manager Ops Center Configure and Install I/O Domains, 12c Release 3 (12.3.0.0.0)
E60038-01
Copyright © 2007, 2015, Oracle and/or its affiliates. All rights reserved.
This software and related documentation are provided under a license agreement containing restrictions on use and disclosure and are protected by intellectual property laws. Except as expressly permitted in your license agreement or allowed by law, you may not use, copy, reproduce, translate, broadcast, modify, license, transmit, distribute, exhibit, perform, publish, or display any part, in any form, or by any means. Reverse engineering, disassembly, or decompilation of this software, unless required by law for interoperability, is prohibited.
The information contained herein is subject to change without notice and is not warranted to be error-free. If you find any errors, please report them to us in writing.
If this is software or related documentation that is delivered to the U.S. Government or anyone licensing it on behalf of the U.S. Government, then the following notice is applicable:
U.S. GOVERNMENT END USERS: Oracle programs, including any operating system, integrated software, any programs installed on the hardware, and/or documentation, delivered to U.S. Government end users are "commercial computer software" pursuant to the applicable Federal Acquisition Regulation and agency-specific supplemental regulations. As such, use, duplication, disclosure, modification, and adaptation of the programs, including any operating system, integrated software, any programs installed on the hardware, and/or documentation, shall be subject to license terms and license restrictions applicable to the programs. No other rights are granted to the U.S. Government.
This software or hardware is developed for general use in a variety of information management applications. It is not developed or intended for use in any inherently dangerous applications, including applications that may create a risk of personal injury. If you use this software or hardware in dangerous applications, then you shall be responsible to take all appropriate fail-safe, backup, redundancy, and other measures to ensure its safe use. Oracle Corporation and its affiliates disclaim any liability for any damages caused by use of this software or hardware in dangerous applications.
Oracle and Java are registered trademarks of Oracle and/or its affiliates. Other names may be trademarks of their respective owners.
Intel and Intel Xeon are trademarks or registered trademarks of Intel Corporation. All SPARC trademarks are used under license and are trademarks or registered trademarks of SPARC International, Inc. AMD, Opteron, the AMD logo, and the AMD Opteron logo are trademarks or registered trademarks of Advanced Micro Devices. UNIX is a registered trademark of The Open Group.
This software or hardware and documentation may provide access to or information about content, products, and services from third parties. Oracle Corporation and its affiliates are not responsible for and expressly disclaim all warranties of any kind with respect to third-party content, products, and services unless otherwise set forth in an applicable agreement between you and Oracle. Oracle Corporation and its affiliates will not be responsible for any loss, costs, or damages incurred due to your access to or use of third-party content, products, or services, except as set forth in an applicable agreement between you and Oracle.