Oracle® Server X6-2L Getting Started Guide
Read this guide before you begin the steps to rack mount, power on, and install an operating system on your Oracle Server X6-2L. For detailed installation instructions, refer to the Oracle Server X6-2L Installation Guide.
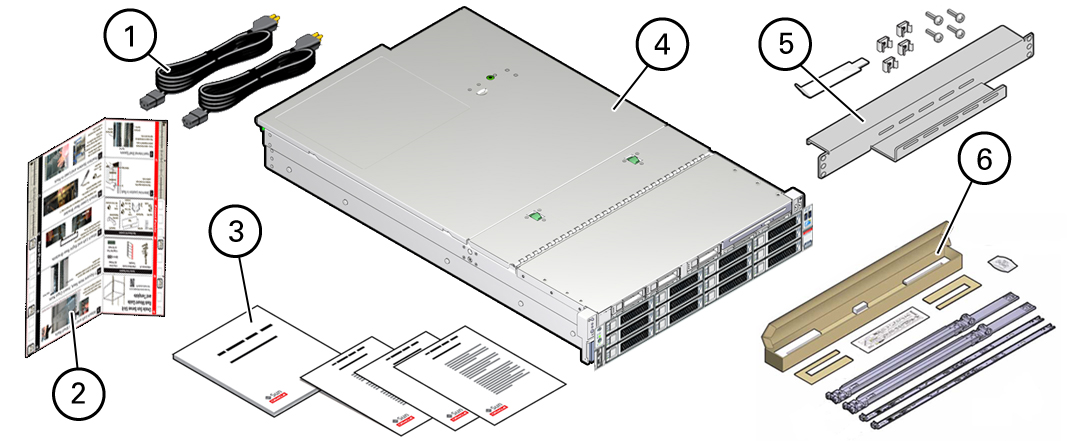
Server and Shipped Inventory

|
Before You Begin — Review the Documentation
Review the following documents at: http://www.oracle.com/goto/x6-2l/docs
-
Oracle Server X6-2L Safety and Compliance Guide — For safety and regulatory compliance information
-
Oracle Server X6-2L Product Notes — For late-breaking information that affects installation requirements
-
Oracle Server X6-2L Installation Guide — For detailed installation information and procedures
-
Oracle Server X6-2L Service Manual — For instructions on how to remove and install server components, and how to troubleshoot server operation
-
Oracle Server X6-2L operating systems installation guides — For installation and configuration information for Oracle Solaris, Oracle VM Server, Oracle Linux and other Linux, and Windows Server operating systems
-
Oracle X6 Series Servers Administration Guide — For software methods to set up the server using BIOS, Oracle ILOM, and Oracle Hardware Management Pack
-
Oracle ILOM Documentation Collection — For descriptions of Oracle ILOM features and functionality
Also, refer to Important Safety Information for Oracle's Hardware Systems that ships with the server.
Installing Optional Components
Install optional components, such as memory modules, PCIe cards, or storage drives before rackmounting the server.
Install Optional Components
- For instructions to install optional components, refer to the Oracle Server X6-2L Service Manual.
- Customers with service contracts can find a list of optional server components in the Oracle System Handbook at:
Rackmounting the Server
For rackmounting instructions, refer to the Rackmount Guide and Template that is shipped with the server, the service label on the server, and the Oracle Server X6-2L Installation Guide. You can use the shipping bracket, ordered as a separate X-option component, to secure the installed servers when moving the rack.
Preparing for Installation and Power On
Setting up the server for the first time takes about 1 hour. Plan for additional time if you are also installing optional components and rackmounting hardware.
 | Caution - Do not apply full main power until instructed to do so. The server includes a service processor (SP) that is used to configure and monitor the server. To properly configure the server and to view SP messages, do not apply AC power to the server until the SP and server networking connections are made, as described in this guide. |
Prepare to Install the Server
-
Choose the best way to set up your server environment.
The instructions in this guide work for any networking environment and require a terminal device for connecting to the server's serial management port (SER MGT). If you have a networking environment running Dynamic Host Control Protocol (DHCP), you can configure your network using the network management port (NET MGT) by following the instructions in the Oracle Server X6-2L Installation Guide.
-
Obtain a terminal device.
To communicate with the SP, you need a terminal device, which can be a terminal, a terminal server, or a laptop running terminal emulation software. Set up the terminal device to communicate using 9600 baud, 8 bit, no parity, and 1 stop bit. For DTE-to-DTE communication, you need to obtain an RJ-45 to DB-9 adapter with a standard RJ-45 cable to set up a null modem configuration so that transmit and receive signals cross over.
Connecting Cables and Applying Standby Power
The following procedure explains how to cable the server for the first time for connection to the Oracle Integrated Lights Out Manager (ILOM) service processor (SP).
Connect Cables and Power Cords
 | Caution - Do not apply full main power to the server until instructed to do so. To properly configure the server and to view SP messages, cable the server as described in this procedure before applying AC power to the server. |
Use the following figure to locate ports, AC inlets, and status indicators (LEDs) on the server back panel.

|
-
Connect a serial cable between the server's serial
management port (SER MGT) and a terminal
device.
This connection provides the initial communication with the SP.
-
Connect an Ethernet cable between the server's network
management port (NET MGT) and the network to which
future connections to the Oracle ILOM SP and host
will be made.
Configure the server for the first time using the SER MGT port. After initial configuration, you can set up communication between the SP and host through this Ethernet interface.
-
For network access, connect an Ethernet cable between
one of the server's Ethernet NET ports (NET0-3) and
the network to which the server will
communicate.
Note - Ethernet ports NET2 and NET3 are non-functional in single-processor systems. - Connect the power cords to the two AC inlets on the server.
Powering On the Server
The following procedure explains how to power on the server locally using a serial connection and Oracle ILOM. If you want to power on the server remotely using an Ethernet connection and Oracle ILOM, refer to the Oracle X6-2L Installation Guide for instructions.
Power On the Server
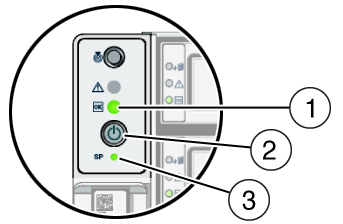
Use the next figure to locate status indicators (LEDs) on the server front panel.

|
-
Connect the power cords to two separate power
sources.
The server can operate with one power source; however, using only one power source eliminates redundancy.
When the power cords are connected to the server's AC inlets and power sources, the following actions occur:
-
The green AC OK power supply LEDs light.
-
While the Oracle ILOM SP initializes, the green SP OK LED flashes rapidly.
-
Once the Oracle ILOM SP has fully initialized, the SP OK LED is steady on and the green Power/OK LED flashes slowly, indicating that the host is in Standby power mode.
In Standby power mode, the server is not initialized or powered on.
-
-
Press Enter on the terminal device to create a
connection between the terminal and serial console
of the Oracle ILOM SP.
The Oracle ILOM Login prompt appears.
-
Use the root user
account and the password
changeme to log
in to Oracle ILOM.
host-name login: root
Password: changeme
The Oracle ILOM command-line interface (CLI) prompt (->) appears.
By default, the SP is configured to use DHCP to obtain an IP address. If you plan to assign a static IP address to the SP, refer to the Oracle Server X6-2L Installation Guide.
For optimal security, change the root password when working in Oracle ILOM. For information about administrative tasks such as changing passwords, adding accounts, and setting account privileges, refer to the Oracle X6 Series Servers Administration Guide and the Oracle ILOM documentation at http://www.oracle.com/goto/ilom/docs.
-
Power on the server and redirect the host output to
display on the serial terminal device.
-> start /System
Are you sure you want to start /System (y/n/)? y
-> start /HOST console
Are you sure you want to start /HOST console (y/n)? y
Serial console started
The host boots and the server enters Main power mode. The host power-on self-test (POST) and BIOS output appear on the serial terminal device.
The Power/OK LED flashes rapidly to indicate that the host is booting. The Power/OK LED lights steady on when the host is booted and the server is in Main power mode.
Installing an Operating System and Drivers
You can now install a supported operating system (OS) on the server. The following table lists the OS installation options and the related documents that include detailed OS installation and configuration information.
|
Getting the Latest Patches and Firmware
Later versions of operating system patches and server firmware might be available for your server. Some server features are enabled only when certain versions of patches or firmware are installed. Refer to the Oracle X6-2L Installation Guide for instructions on how to download patches and firmware.
To obtain patch and firmware updates, go to the My Oracle Support web site at: https://support.oracle.com
Managing the Server Using Oracle ILOM
Oracle ILOM is system management firmware embedded on the service processor (SP). Using Oracle ILOM, you can configure the system independently of the operating system, and monitor system health and performance.
To learn how to use Oracle ILOM functions, refer to the Oracle ILOM Getting Started Guide at: http://www.oracle.com/goto/ilom/docs