Category 1 Customizations: Adding Columns to Existing Fact or Dimension Tables

Category 1 customizations add additional columns from source systems that have pre-packaged adapters and load the data into existing Oracle Business Analytics Warehouse tables.

Category 1 customizations involve extracting additional columns from source systems for which pre-packaged adapters are included (for example, Oracle E-Business Suite) and loading the data into existing Oracle Business Analytics Warehouse tables. For Category 1 customizations, data can also come from non-packaged sources, but this section assumes that the sources have already been mapped with a Universal adapter and only need to be extended to capture additional columns. (The initial mapping of a Universal adapter is considered a Category 3 customization. For information, see Category 3 Customizations: Adding New Data as a Whole Row into a Standard Dimension Table.)

To see additional columns in the Oracle Business Analytics Warehouse, the columns must first be passed through the ETL process. The existing mappings and tables are extensible. Oracle Business Intelligence Applications provides a methodology to extend preconfigured mappings to include these additional columns and load the data into existing tables.

Oracle Business Intelligence Applications recognizes two types of customization: extension and modification. The supported extension logic allows you to add to existing objects. For example, you can extract additional columns from a source, pass them through existing mappings, and populate new columns added to an existing table. Generally, Oracle Business Intelligence Applications does not allow you to modify existing logic or columns. You should not change existing calculations to use different columns, and you should not remap existing columns to be loaded from different sources.

For example, if you want to calculate revenue differently from the existing logic, you should create a new column (for example, X_REVENUE) and populate it with a custom mapping expression. You can then remap the Oracle Business Intelligence repository to point to the new X_REVENUE column.

Most datastores have a single placeholder column named X_CUSTOM. Each ETL task has mapping expressions to populate this column. These serve as templates for customizing ODI datastores and interfaces. When creating new custom columns, follow the naming convention of including the X_ prefix to help distinguish custom columns.

In the figure, the preconfigured logic is shaded in gray. You should not modify anything contained within these objects. You should add customizations to existing objects rather than creating new packages and interfaces, which allows them to run parallel to the existing logic.

Typical Steps to Extend Mappings in the Oracle Business Analytics Warehouse

The most common reason for extending the Oracle Business Analytics Warehouse is to extract existing columns from a source system and map them to an existing Oracle Business Analytics Warehouse table (either fact or dimension). This type of change typically requires you to extend the interfaces within a SIL package.

If the data is coming from a packaged source, then you will also need to extend the interfaces within an appropriate SDE adapter package. If the data is coming from a non-packaged source, then you must use a Universal adapter package. If an appropriate package does not already exist, you will need to create a Universal adapter package with interfaces.

To extend an ODI package in the Oracle Business Analytics Warehouse:

  1. Create new SDE and SIL Adaptor folders (do not copy existing Adaptor folder as this will copy all subfolders).

    Rename folders to include Custom or some other useful identifier in the name, and set Release Tag to match that of the existing Adaptor folder. Do this for both the SDE and SIL folders.

    1. Right-click the Mappings folder and select New Sub-Folder.
    2. Set Name as CUSTOM _Original Folder Name.

      For example, CUSTOM_SDE_ORA11510_Adaptor, CUSTOM_SILOS represent custom SDE and SIL folders.

    3. Click the Connect Navigator button in the Designer tab.
    4. Select Edit Release Tags.
    5. Select the release tag that corresponds to your source. For example, EBS_11_5_10.
    6. Select the custom SDE folder you created and add it to the release tag.
    7. Click Next, then click Finish.
    8. Repeat the above steps for the CUSTOM_SILOS folder, associating it with the BIA_11 Release Tag.
  2. Enable versioning for the preconfigured Task Folder to be customized.

    The version comment should indicate this is the base version of the task. Subsequent patches applied to this task in the future would require increasing the version in the comment so that it can be compared to the original task to identify any changes.

    1. Right-click the Task folder and select Version, then Create Version.
    2. Accept the default version number, 1.0.0.0.
    3. Add a description indicating that this is the original version of this task.
  3. Duplicate the Task folder to be customized by copying it.

    Cut and paste the copied task folder to the Custom adaptor, and rename it to remove the 'Copy of…' prefix.

  4. Using the same method as in step 2, enable versioning of copied Task folder.

    The version comment should indicate this is the original version. This versioning enables comparison of the customized task to a copy of the original version to determine all changes that have been introduced.

  5. Create another version of the copied task.

    The version comment should indicate this is the customized version. Use the same steps as above.

  6. Version the Model that the datastore to be customized exists in, for example, Oracle BI Applications.

    Submodels and datastores cannot be versioned. The version comment should indicate this is the base or original version.

  7. Create a new version of the model, with a version comment indicating that this is where customizations are introduced.

    The models can now be compared to show differences. If the model ever needs to be patched, the model should be versioned again so that the patched version can be compared to the custom and original version.

  8. Apply customizations to the datastore and task.

    Customizations should be additive as much as possible rather than overwriting existing content. For example, if you don't like the way a particular column is calculated, add a new custom column and map it in the way you prefer. In the RPD, have the logical column point to this new custom column rather than the original column.

  9. Prior to generating scenarios, ensure the Scenario Naming Convention User Parameter has a value of %FOLDER_NAME(2)%_%OBJECT_NAME%.
  10. Generate a new scenario for the custom task using the same scenario name as the original.

    ODI enforces unique scenario names and versions. Use the same scenario name for the custom task so that the load plan executes this ETL task rather than the out-of-the-box ETL task. Retain the same scenario name but use a different, higher version number. The load plan always executes the scenario with the largest version number. By using the same scenario name but with a larger higher version number, the custom scenario will be executed without requiring any changes in the load plan.

    1. Note the name of the out-of-the-box scenario.

      Navigate to the original Task folder - Packages - Package Name- Scenarios - Scenario Name. Make a note of the Scenario Name (you can double-click the scenario and use CTRL-C to copy the scenario name).

    2. Generate a scenario for the custom task.

      Navigate to the custom Task folder - Packages - Package Name, then right-click the package and select Generate Scenario. Use the original scenario name as noted (you can use CTRL-V to paste the name if you copied it). Set the version number to 002 (or any value larger than the default, 001, used by the out-of-the-box scenario).

    3. Check the Generate scenario as if all underlying objects are materialized checkbox, then click OK.
    4. Select Use All from the Startup Parameters drop-down, then click OK.
    5. Click OK.

    When you execute the load plan, it now executes the custom task rather than the original task. In the future if you make changes to any of the interfaces or the package, you can either regenerate the existing scenario or generate a new scenario. Unless you need separate scenarios, it is recommended that you regenerate the existing scenario. To do this, right-click the scenario and select Regenerate.

  11. Generate the Load Plan.
  12. Execute the Load Plan.

Example of Extending the Oracle Business Analytics Warehouse

This working example illustrates adding additional columns from source systems that have pre-packaged adapters and loading the data into existing Oracle Business Analytics Warehouse tables (known as a Category 1 customization).

In this example, a company has identified additional fields in a source system table HZ_CUST_ACCOUNTS that need to be added to the Oracle Business Analytics Warehouse table W_ORG_D. Data is passed from an existing source table to an existing target table, known as a category 1 customization. The company uses an extension field to capture information related to organizations referred to as 'ACCOUNT_LOG.' In addition, the company wants to include the name of the person who last updated the record as an attribute of the organization.

In this example, you want to extract information from the following two fields that are not extracted by the out-of-the-box application:

  • HZ_CUST_ACCOUNTS.ATTRIBUTE1

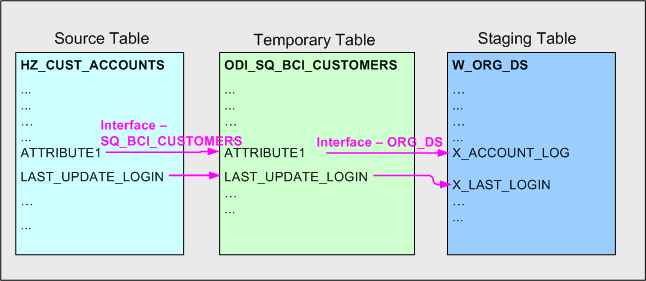
    ATTRIBUTE1 is currently not extracted from the source table HZ_CUST_ACCOUNTS into the temporary table ODI_SQ_BCI_CUSTOMERS.

  • HZ_CUST_ACCOUNTS.LAST_UPDATE_LOGIN

    LAST_UPDATE_LOGIN is currently extracted from the source table HZ_CUST_ACCOUNTS into the temporary table ODI_SQ_BCI_CUSTOMERS, but is not loaded into the staging table W_ORG_DS.

The diagram below shows the two fields ATTRIBUTE1 and LAST_UPDATE_LOGIN as they pass from the source system table to the target table via the tables: HZ_CUST_ACCOUNTS to ODI_SQ_BCI_CUSTOMERS to W_ORG_DS to ODI_Sq_W_ORG_DS to W_ORG_D.

The customization is done in two parts:

Example of Extracting Data from an Oracle EBS 11.5.10 Data Packaged Source into the ODI Staging Area

This example shows how data is extracted from an existing source table into the staging area.

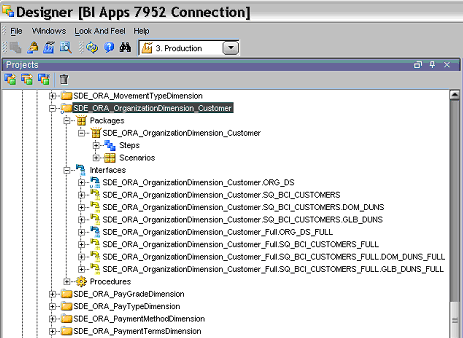
The diagram below shows the new ETL mappings that you need to load the new data into the staging area, and the ODI Interfaces that you need to modify.

Note: The diagram above only shows the incremental interfaces.

To customize the ETL process to load these two fields into the staging area, you need to:

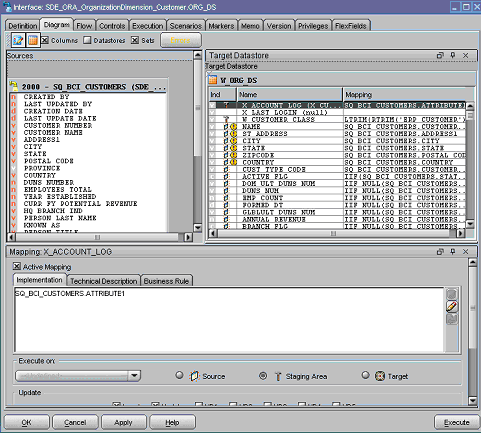
  • Extract the HZ_CUST_ACCOUNTS.ATTRIBUTE1 value from the source table HZ_CUST_ACCOUNTS into the temporary table ODI_SQ_BCI_CUSTOMERS using the Interfaces SQ_BCI_CUSTOMERS and SQ_BCI_CUSTOMERS_FULL.

    Then, load the ODI_SQ_BCI_CUSTOMERS.ATTRIBUTE1 value from the temporary table ODI_SQ_BCI_CUSTOMERS into the X_ACCOUNT_LOG field in the staging table W_ORG_DS using the Interfaces ORG_DS and ORG_DS_FULL.

  • Load the SQ_BCI_CUSTOMERS.LAST_UPDATE_LOGIN value from the temporary table ODI_SQ_BCI_CUSTOMERS into the X_LAST_LOGIN field in the staging table W_ORG_DS using the Interfaces ORG_DS and ORG_DS_FULL.

    Note: Remember that LAST_UPDATE_LOGIN value is already extracted from the source table HZ_CUST_ACCOUNTS into the temporary table ODI_SQ_BCI_CUSTOMERS, but is not loaded into the staging table W_ORG_DS.

To extract data from an Oracle EBS 11.5.10 Data Packaged Source:

  1. In ODI Designer, display the Projects view, expand the Oracle BI Applications\Mappings\SDE_ORA11510_Adaptor folder.
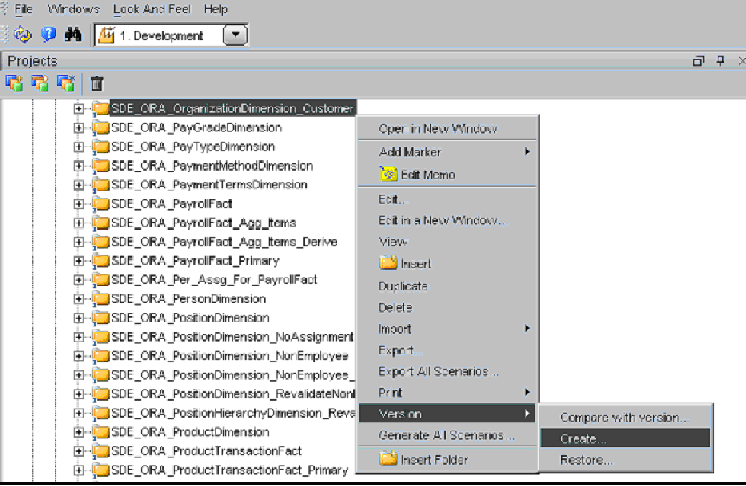
  2. Right-click the SDE_ORA_OrganizationDimension_Customer folder, and choose Version, then Create to display the Create: Object dialog, and specify a unique version number and optional version description.
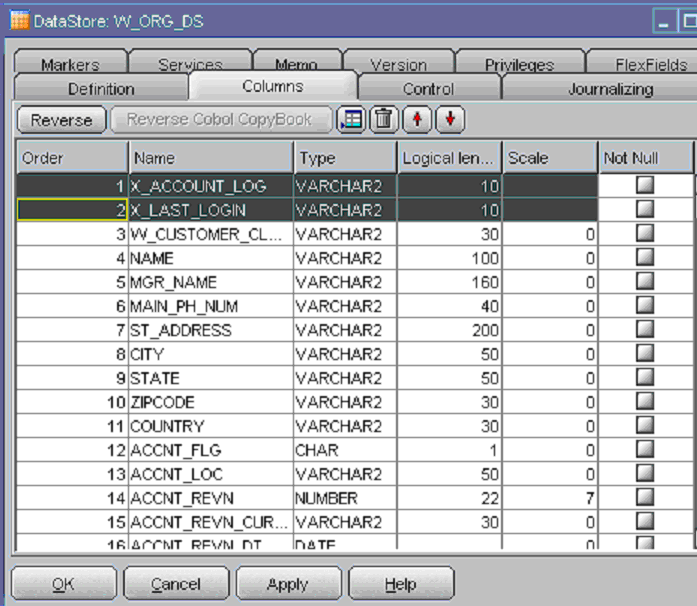
  3. Display the Models view, expand the Dimension Stage folder, and edit the W_ORG_DS data store to display the DataStore: Name dialog, and display the Columns tab.
  4. Create the following columns:
    • X_ACCOUNT_LOG (VARCHAR2(10))

    • X_LAST_LOGIN (VARCHAR2(10))

  5. In the Models view, right click on the model 'Oracle BI Applications' and select Generate DDL to display the Generate DDL dialog.

    The Generate DDL option deploys the changes in the database.

  6. Select the check-box in the Synchronize column next for the W_ORG_DS table.
  7. Click the (...) button to the right of the Generation Folder field to display the Select a folder dialog, and select the \Utilities\System folder, and click OK.
  8. When the Procedure: DDL Name dialog is displayed, click Execute.

    Display ODI Operator and make sure that the procedure executes successfully.

  9. Display the Projects view, expand the Mappings folder, and expand the SDE_ORA_OrganizationDimension_Customer folder.
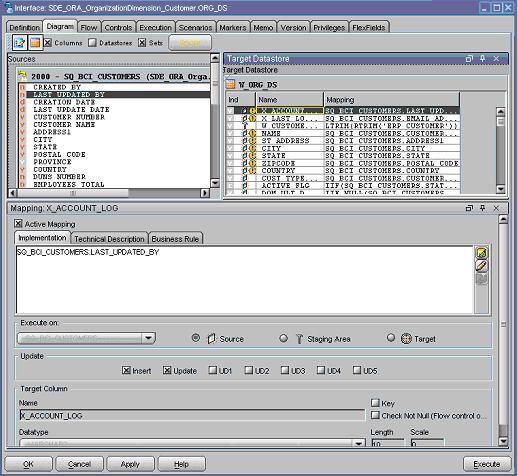
  10. Edit the Interface SDE_ORA_OrganizationDimension_Customer.SQ_BCI_CUSTOMERS to display the Interface: Name dialog.
    1. Display the Diagram tab, and select the ATTRIBUTE1 field in the Target Datastore area.
    2. Use the Launch Expression Editor icon to display the Expression Editor dialog, and then select HZ_CUST_ACCOUNTS.ATTRIBUTE1 as the value in the Implementation field.
    3. Click OK to save the details.
  11. Repeat Step 10 for the Interface SDE_ORA_OrganizationDimension_Customer.SQ_BCI_CUSTOMERS_FULL.
  12. Edit the Interface SDE_ORA_OrganizationDimension_Customer.ORG_DS to display the Interface: Name dialog.
    1. Display the Diagram tab, and select the X_ACCOUNT_LOG field in the Target Datastore area.
    2. Use the Launch Expression Editor icon to display the Expression Editor dialog, and then select SQ_BCI_CUSTOMERS.ATTRIBUTE1 as the value in the Implementation field.
    3. Select the X_LAST_LOGIN field in the Target Datastore area.
    4. Use the Launch Expression Editor icon to display the Expression Editor dialog, and then select SQ_BCI_CUSTOMERS.LAST_UPDATE_LOGIN as the value in the Implementation field.
    5. Click OK to save the details.
  13. Repeat Step 12 for the Interface SDE_ORA_OrganizationDimension_Customer.ORG_DS_FULL.
  14. Right-click the scenario SDE_ORA_OrganizationDimension_Customer and select Regenerate.

Now that you have set up the ETL process for extracting and staging the data, you need to load the new data into the data warehouse. For more information, see Example of Loading Data from the Staging Area into an Existing Target Table.

Example of Loading Data from the Staging Area into an Existing Target Table

This example shows how data is loaded from the staging area into an existing target table.

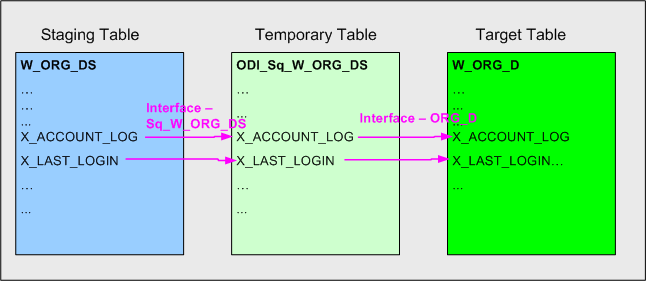
The diagram below shows the new ETL mappings that you need to load the new data from the staging area into the target table, and the ODI Interfaces that you need to modify.

To customize the ETL process to load these two fields into the staging area, you need to:

  • Load the X_ACCOUNT_LOG value and X_LAST_LOGIN value from the staging table W_ORG_DS into the temporary table SQ_W_ORG_DS using the Interfaces Sq_W_ORG_DS and Sq_W_ORG_DS_FULL.

  • Load the X_ACCOUNT_LOG value and X_LAST_LOGIN value from the temporary table ODI_Sq_W_ORG_DS into the Target table W_ORG_D using the Interfaces ORG_D, ORG_D_FULL, and ORG_D_UNSPC.

To extract data from an Oracle EBS 11.5.10 Data Packaged Source:

  1. In ODI Designer, display the Projects view, expand the Oracle BI Applications\Mappings\SILOS folder.
  2. Right-click the SIL_OrganizationDimension folder, and choose Version, then Create to display the Create: Object dialog, and specify a unique version number and optional version description.
  3. Display the Models view, expand the Dimension Stage folder, and edit the W_ORG_DS data store to display the DataStore: Name dialog, and display the Columns tab.
  4. Make sure that these columns are setup:
    • X_ACCOUNT_LOG (VARCHAR2(10))

    • X_LAST_LOGIN (VARCHAR2(10))

  5. Repeat steps 3 and 4 for the W_ORG_D data store.
  6. In the Models view, right click the Oracle BI Applications model and select Generate DDL to display the Generate DDL dialog.

    The Generate DDL option deploys the changes in the database.

  7. Select the check-box in the Synchronize column next for the W_ORG_DS table.
  8. Click the (...) button to the right of the Generation Folder field to display the Select a folder dialog, and select the \Utilities\System folder, and click OK.
  9. When the Procedure: DDL Name dialog is displayed, click Execute.

    Display ODI Operator and make sure that the procedure executes successfully.

  10. Display the Projects view, expand the Mappings folder, and expand the SIL_OrganizationDimension folder.
  11. Edit the Interface Sq_W_ORG_DS to display the Interface: Name dialog.
    1. Display the Diagram tab, and select the X_ACCOUNT_LOG field in the Target Datastore area.
    2. Use the Launch Expression Editor icon to display the Expression Editor dialog, and then select W_ORG_DS.X_ACCOUNT_LOG as the value in the Implementation field.
    3. Select the X_LAST_LOGIN field in the Target Datastore area.
    4. Use the Launch Expression Editor icon to display the Expression Editor dialog, and then select W_ORG_DS.X_LAST_LOGIN as the value in the Implementation field.
    5. Click OK to save the details.
  12. Repeat Step 11 for the Interface Sq_W_ORG_DS_FULL.
  13. Edit the Interface ORG_D to display the Interface: Name dialog.
    1. Display the Diagram tab, and select the X_ACCOUNT_LOG field in the Target Datastore area.
    2. Use the Launch Expression Editor icon to display the Expression Editor dialog, and then select Sq_W_ORG_DS.X_ACCOUNT_LOG as the value in the Implementation field.
    3. Select the X_LAST_LOGIN field in the Target Datastore area.
    4. Use the Launch Expression Editor icon to display the Expression Editor dialog, and then select Sq_W_ORG_DS.X_LAST_LOGIN as the value in the Implementation field.
    5. Click OK to save the details.
  14. Repeat Step 13 for the Interface ORG_D_FULL and ORG_D_UNSPC.
  15. Right-click the scenario SILOS\SIL_OrganizationDimension and select Regenerate.

Tips for Modifying the SQ_BCI_ Interface

Follow these tips to modify the SQ_BCI_Interface.

  • A new source table should always be defined on right side of a LEFT OUTER join syntax with existing source tables. Using an INNER join or a RIGHT OUTER join can result in loss of records.

  • Make sure that you define joins to match on a unique set of values. If you do not define a join that ensures a unique relationship, you might get a Cartesian product, which changes the granularity and results in duplicate errors.

If it is not possible to define a unique join, then do the following:

  1. Create an inline view interface sourcing from the new table, outputting necessary columns plus a column LKP_ACTIVE.

    For example, you might specify the expression for LKP_ACTIVE as:

    IS_FIRST(
    ARG_GROUP(columns to be partitioned by),
    ARG_GROUP(columns to be ordered by))
    

    Note:

    In the above example, the IS_FIRST command and the matching filter are only needed if multiple records might be returned.
  2. Bring the inline view interface into an existing interface with a filter LKP_ACTIVE=1, which guarantees that at most one record will be returned.

    As a best practice, you should comment custom code that you introduce. Comments should include the developer's name and the date that the code was added.

Other Types of Customizations Requiring Special Handling

These types of customization require special handling.

How to Modify Category 2 SCD Behavior

The BI Applications ETL process supports Type I and Type II slowly changing dimension behavior. Some dimensions are enabled only for Type I behavior while other dimensions are enabled to also support Type II behavior.

Of those dimensions that support Type II behavior, different dimension attributes have different Slowly Changing behavior including some attributes being treated as Type I.To enable or disable Type II behavior associated with a dimension.

Note:

Modifying the Type-II tracking logic is the only change that you should make to shipped logic.

To modify a Category 2 SCD Trigger:

  1. In ODI Designer, modify the dimension datastore.
    1. In the Models view, expand the Oracle BI Applications folder, Oracle BI Applications (Model), and Dimension (Submodel).
    2. Double-click the Dimension table.
    3. In the Definition tab, change the OLAP type value to either Dimension (only supports Type I changes) or Slowly Changing Dimension (supports Type II changes).
  2. Modify the SIL Dimension Task.
    1. Navigate to the SIL task that populates this dimension.
    2. Double-click the Main interface.
    3. In the Flow subtab, select the Target (ORACLE_BI_APPLICATIONS) window.
    4. If the Property Window is not visible, open it by clicking the Menu Options View – Property Inspector.
    5. Change the IKM Selector value to IKM BIAPPS Oracle Slowly Changing Dimension if enabling Type II behavior or IKM BIAPPS Oracle Incremental Update if removing Type II behavior.
    6. Regenerate the scenario.

Enabling or Disabling Type II Behavior Associated with a Dimension

You can modify which columns are treated as Type I or Type II in a dimension that is configured to support Type II behavior. If a dimension is configured to support only Type I behavior, the following changes will have no effect as all columns are treated as Type I.

  1. In ODI Designer, modify the dimension datastore.

    In the Models view, expand the 'Oracle BI Applications' folder, Oracle BI Applications (Model), Dimension (Submodel), and Columns.

  2. Double-click the column whose SCD behavior you want to change.
  3. In the Description subtab Slowly Changing Dimensions Behavior drop-down list, select the column behavior.

    To implement Type I behavior, select Overwrite on Change. To implement Type II behavior, select Add Row on Change. If enabling Type II behavior for a custom dimension, be sure to set columns as follows:

    • ROW_WID - Surrogate Key

    • INTEGRATION_ID, DATASOURCE_NUM_ID - Natural Key

    • CURRENT_FLG - Current Record Flag

    • EFFECTIVE_FROM_DT - Starting Timestamp

    • EFFECTIVE_TO_DT - Ending Timestamp

How to Add A Dimension to an Existing Fact

You can add a dimension to an existing fact, adding a dimension and dimension staging datastores as well as associated SDE and SIL processes, which also requires extending the fact and fact staging tables to reflect the association with the new dimension.

Customize Fact Datastores and Tasks

The Fact related datastores and tasks must be extended to reflect the new dimension.

Both the W_Fact Name_FS and W_Fact Name_F datastores must be extended.
  1. Extend the Fact Staging datastore by adding an ID column that follows the naming convention X_name_ID and datatype VARCHAR2(80).

    The Oracle BI Applications Model should already be versioned.

    1. Navigate to Models, Oracle BI Applications (Folder), Oracle BI Applications (Model), Fact Stage (Submodel) and double-click the Fact Staging Table.
    2. In the Columns subtab, select the X_CUSTOMcolumn.
    3. Click the green + symbol to add a column below the X_CUSTOM column.
  2. Extend the Fact datastore by adding a WID column that follows the naming convention X_name_WID and datatype NUMBER(10).

    Follow the same steps as above to add a column to the fact datastore.

  3. Add a foreign key constraint to the fact table that refers to the custom dimension table created previously.

    The foreign key constraint ensures the Custom SIL task is included in the generated load plan. The Custom SDE task is included in the generated load plan because it populates the staging table that is used as a source for the custom SIL task.

    1. Drill into the Fact datastore.
    2. Right-click the Constraints subfolder below the Fact datastore and select New Reference.

      The naming convention is FK_Fact Table_Dimension Table.

    3. If there are multiple WID columns that need to reference the same dimension table, enumerate each with a numeric suffix, for example, FK_WC_CUSTOM_F_WC_CUSTOM_D1. Type must be 'User Reference'.
    4. Select Custom Dimension from the Table drop-down list.
    5. In the Columns subtab, click the green + symbol to add a new column.
    6. For the Foreign Table column, select the custom WID column in the fact table. For the Primary Table column, select the ROW_WID column in the dimension table.
  4. Add a non-unique bitmap index on the X_name_WID column.
    1. Drill into the Fact datastore.
    2. Right-click the Constraints subfolder below the Fact datastore and select New Key.

      The naming convention is Fact Table_Fn.

    3. Enumerate each of these indexes with a numeric suffix, for example, WC_CUSTOM_F1.
    4. Select the Not Unique Index radio button.
    5. In the Columns subtab, add the WID column using the shuttle button.
    6. In the Control subtab, check the Defined in the Database and Active check boxes.
    7. In the Flexfields subtab, set the index type value to QUERY and the bitmap index value to Y.
  5. Modify the Fact SDE task.

    Pass the value from the source table to the custom X_name_ID column in the staging table. In the mapping expression, include any necessary conversion functions to get the data into the VARCHAR2(80) format.

  6. Modify the Fact SIL task. Add logic to retrieve the ROW_WID value from the custom dimension.

    This is usually done in one of the following ways. There is no significant difference between these two methods:

    1. Add the dimension as a source in the SQ temp interface.

      Join on the fact table's ID column and the dimension table's INTEGRATION_ID column and the fact and dimension DATASOURCE_NUM_ID columns. If the dimension is a Type II dimension, include a range join on the fact's canonical date between the dimension's effective dates. Configure the join as a Left Outer Join. Pass the ROW_WID column as an output.

    2. Add the dimension as a lookup in the main interface.

      The Lookup join is on the fact table's ID column and the dimension table's INTEGRATION_ID column and the fact and dimension DATASOURCE_NUM_ID columns. If the dimension is a Type II dimension, include a range join on the fact's canonical date between the dimension's effective dates. Configure the Lookup Type as 'SQL left-outer join in the from clause'.

  7. In the mapping expression to populate the custom WID column in the main interface, embed the ROW_WID column from the dimension table in a function that defaults NULL values to 0.

    For example, COALESCE(SQ_W_AP_HOLDS_FS.PURCHASE_ORG_WID,0)

How to Add a DATE_WID column to a Fact

This use case is similar to adding a regular Dimension to a fact but in this case, a Date dimension is used. There are several Date related dimension, each representing dates in a different manner (fiscal, enterprise, and so on) and different granularities (day, week, month, etc.).

Joins between a fact and Date dimension table are performed on a Date specific WID column. The Date WID column is a 'smart key' value that represents the date in YYYYMMDD format. There is no need to do a lookup to resolve the ROW_WID of the Date dimension, rather you pass the Date column through the ETL process and convert it to this format.

Each fact table has exactly one 'canonical' Date specific WID column. This is the primary date used to drive various date-related calculations. There is no particular metadata to identify this column but lookups to effective dated tables will use this column in the ETL and various date-related expressions in the RPD will also use this column. All packaged fact tables have a single canonical date already identified. When creating custom fact tables, one Date WID column should be nominated as the canonical date and consistently used.

Follow the same steps as adding a dimension to a fact with the following changes. There is no need to create a custom SDE as we use the existing Date dimension.

The Fact related datastores and tasks must be extended to reflect the new dimensionality. Both the W_Fact Name_FS and W_Fact Name_F datastores must be extended.

  1. Extend the Fact Staging datastore by adding a DT column that follows the naming convention X_name_DT.

    This column should have the format DATE(7).

  2. Extend the Fact datastore by adding both custom DT and DT_WID columns.

    These follow the naming convention X_name_DT and X_name_DT_WID.

  3. Add a foreign key constraint to the Date dimension or dimensions. If there are multiple WID columns that need to reference the same date dimension table, enumerate each with a numeric suffix.
  4. Modify the Fact SDE task.

    Pass the value from the source table to the custom X_name_DT column in the staging table. Apply any conversions required to get the data into DATE format.

  5. Modify the Fact SIL task. Pass the X_name_DT value from the staging table to the corresponding column in the fact table.

    In the mapping expression to populate the custom X_name_DT_WID column in the main interface, embed the DT column in a function that calculates the DT_WID value, defaulting to 0 when the supplied DT value is NULL. For example, CALCULATE_DT_WID_DFLT(SQ_W_AP_HOLDS_FS.HOLD_DATE,0).