Implementing GL Segment, GL Account, Asset Category and Asset Location Dimensions for Fusion Applications

You can implement GL Segment and GL Segment Hierarchy Dimensions.

Guidelines

  • If you need to report on only concatenated segments, then no configuration is required, and you can skip this section.

  • If you want only Group Account Num (and related attributes), then at a minimum you need to configure just the Natural Account dimension.

  • If you are exposing any GL Segments (including cost center, balancing segment, natural account), then you must go through the full configuration.

  • If you are exposing any Financial fact, then at a minimum you need to configure the Natural Account dimension, because you need group account number.

Prerequisites

Make sure that preconfiguration tasks for BI Extender have been performed, as specified in Section A.3.2 'Performing Preconfiguration Tasks for the BI Extender', in Oracle Business Intelligence Applications Administration Guide.

Mapping the GL Segment Labels to BI Objects in Fusion Applications

To enable GL Accounting Flexfield in Oracle BI Applications, sue the Manage Key Flexfields UI in Fusion Applications to configure the Accounting Flex Segments for BI and provide the mapping with BI Object names that should be used as dimensions for each of the Account Flexfield segments.

  1. In Fusion Applications, navigate to Manage Key Flexfields.
  2. For General Ledger, in each of the Accounting Flexfield segments, set the BI Enabled Flag to Y.
    1. Query for GL# as Key Flexfield Code.
    2. Click Manage Structure Instances.
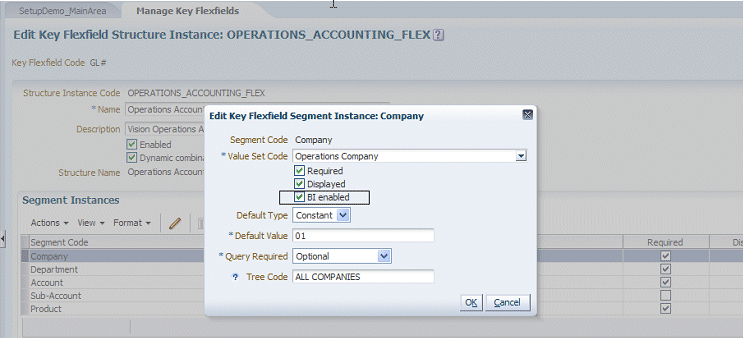
    3. Edit each of the segments and select the BI enabled check box, then save the details.

      This should be done for all segments in every Structure instance that you intend to be mapped in the BI metadata repository (that is, the RPD file).

  3. Populate the BI Object Name for each of the Segment Labels.

    This name is the Logical table name in the BI metadata repository (that is, the RPD file) that is used as the dimension for the corresponding segment.

    1. In the Manage Key Flexfields UI in Fusion Applications, query for GL# as Key Flexfield Code.
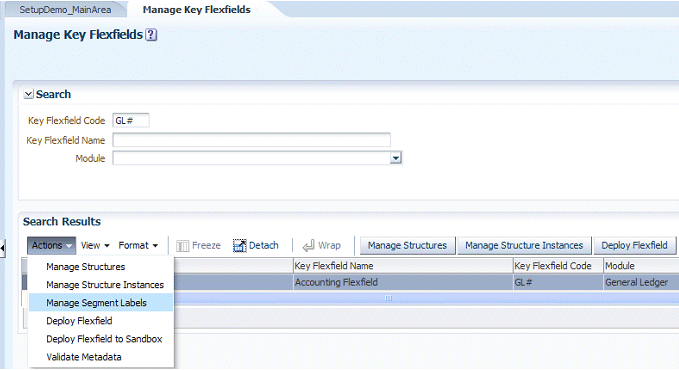
    2. Choose Actions, then Manage Segment Labels.
    3. Populate the BI Object Name for all the segment labels that you need to map in the RPD, then save the details.

      The following table shows the BI Object Names for each Qualified Segment label.

      Segment Label Code BI Object Name

      FA_COST_CTR

      Dim - Cost Center

      GL_BALANCING

      Dim - Balancing Segment

      GL_ACCOUNT

      Dim - Natural Account Segment

      For the non qualified segment labels, the BI Object Name should be populated with one of the 10 numbered Dim - Segments: Dim - GL Segment1, Dim - GL Segment2, Dim - GL Segment<n>, and so on, to Dim - GL Segment10.

  4. Click the Deploy Flexfield option to deploy the Flexfields.

Mapping the Asset Segment Labels to BI Objects in Fusion Applications

You can map the Assets segment labels to BI Objects in Fusion Applications.

  1. In Fusion Applications, navigate to Manage Key Flexfields.
  2. For Assets, in each of the Accounting Flexfield segments, set the BI Enabled Flag to Y.
    1. Query for Key Flexfield Code equals the following:

      For Fixed Asset Category, query on CAT#.

      For Fixed Asset Location, query on LOC#.

    2. Click Manage Structure Instances.
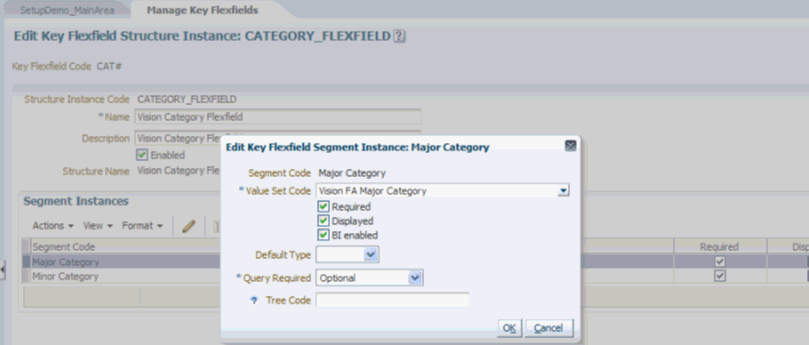
    3. Edit each of the segments and select the BI enabled check box, then save the details.

      This should be done for all segments in every Structure instance that you intend to be mapped in the BI metadata repository (that is, the RPD file).

  3. Populate the BI Object Name for each of the Segment Labels.

    This name is the Logical table name in the BI metadata repository (that is, the RPD file) that is used as the dimension for the corresponding segment.

    1. Query for the appropriate Key Flexfield Code (CAT# or LOC#) in the Manage Key Flexfields dialog.
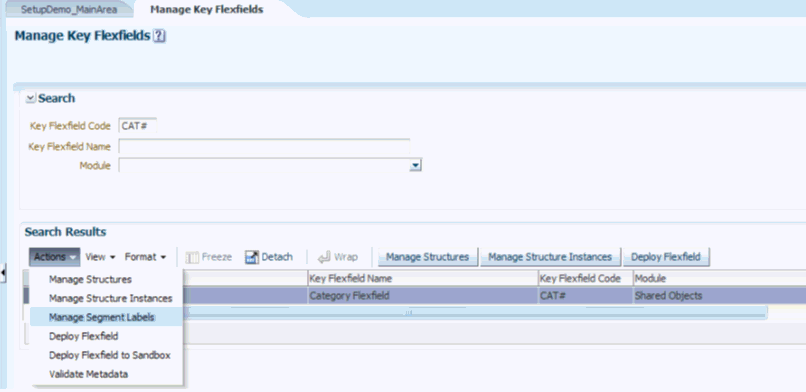
    2. Choose Actions, then Manage Segment Labels.
    3. Populate the BI Object Name for all the segment labels that you need to map in the BI metadata repository (that is, the RPD file), then save the details.

      For the "qualified" segment labels, use the following BI Object Names for each Qualified Segment label:


      Segment Label Code BI Object Name

      BASED_CATEGORY

      Major Category

      MINOR_CATEGORY

      Minor Category


      For all other segment labels, use any of the following values: Segment1, Segment2, and so on, to Segment10

      For BI Object Names for "Fixed Asset Location (LOC#)" Key Flex Field, for all segment labels, use Segment1, Segment2, and so on, to Segment7.

  4. Click the Deploy Flexfield option to deploy the Flexfields.

Configuring GL Segments and GL Account Using the BI Extension Process

You can configure the GL Accounting Segment Dimension in the BI metadata repository (that is, the RPD file), and extend the ETL metadata to populate the corresponding tables in Oracle Business Analytics Warehouse.

Prerequisites:

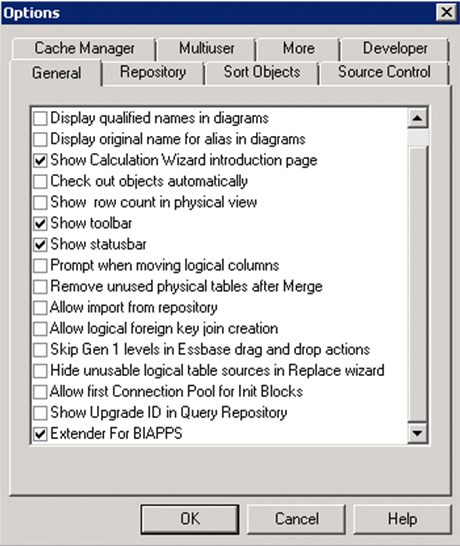
Before you start the BI Extension process, you must enable the Extender For BIAPPS setting using Oracle BI EE Administration Tool. To do this, choose Tools, then Options, then General, to display the Options dialog, and select the Extender for BIAPPS check box.

Overview of the BI Extension Process

In Oracle Business Analytics Warehouse, there are no default mappings to populate the segment dimension tables (W_COST_CENTER_D, W_COST_CENTER_DH, W_NATURAL_ACCOUNT_D, W_NATURAL_ACCOUNT_DH, W_BALANCING_SEGMENT_D, W_BALANCING_SEGMENT_DH, W_GL_SEGMENT_D, W_GL_SEGMENT_DH). Mappings to populate these tables are generated by the BI extension process. This process is driven through the RPD metadata. The logical dimensions in the RPD metadata corresponding to these tables are 'Dim – Cost Center', 'Dim – Balancing Segment', 'Dim – Natural Account Segment' and all 'Dim – GL Segment<n>' dimensions. These dimension tables are populated from a Tree View Object (VO) or from a Value Set View Object (VO), depending on whether a tree was associated with the segment or not in Fusion Applications.

For each segment associated with trees, two VOs will be generated (Tree and TreeCode) with the following naming structure:

- FscmTopModelAM.AccountBIAM.FLEX_TREE_VS_<segment label> _VI

- FscmTopModelAM.AccountBIAM.FLEX_TREECODE_VS_<segment label>_VI

For each segment without trees, one VO will be generated with the following naming structure:

- FscmTopModelAM.AccountBIAM.FLEX_VS_<XXX>_VI

In addition to the segment dimension tables, the BI Extension process also extends the installed ETL mapping that populates the GL Account Dimension (W_GL_ACCOUNT_D). This dimension table has a pair of columns for each segment dimension. For example, COST_CENTER_NUM and COST_CENTER_ATTRIB for Cost Center dimension, BALANCING_SEGMENT_NUM and BALANCING_SEGMENT_ATTRIB for Balancing Segment dimension, ACCOUNT_SEGn_CODE and ACCOUNT_SEGn_ATTRIB corresponding to the generic GL Segment<n> dimensions. These columns will be populated from the Flex BI Flattened VO; FscmTopModelAM.AccountBIAM.FLEX_BI_Account_VI. This VO will have a pair of columns for each segment; <segment label>_ and <segment label>_c. For example, for your Cost Center segment which has the segment label FA_COST_CTR, there will be two columns in this VOs named FA_COST_CTR_ and FA_COST_CTR_c.

BI Extension Process Flow

  • Step 1 - Import the appropriate View Objects (VOs) from the ADF data source.

  • Step 2 – Verify the automatic mapping of the VOs to the logical objects in the mapping dialog.

  • Step 3 - Provide connection information such as user name and password for repositories.

  • Step 4 - Click finish, and the appropriate metadata is generated and updated in the respective repositories.

To configure GL Segments and GL Account using the BI Extension process:

  1. In Oracle BI EE Administration Tool, edit the BI metadata repository (for example, OracleBIAnalyticsApps.rpd).
  2. Navigate to the Oracle ADF database in the physical layer:
    oracle.apps.fscm.model.analytics.applicationModule.FscmTopModelAM_FscmTopModelAMLocal
    

    Then right-click on the connection pool and select Import Metadata.

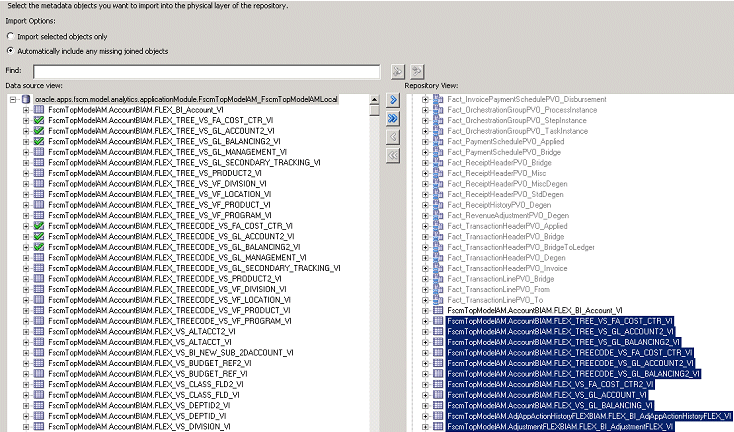
  3. In the Select Metadata Objects dialog:
    1. Ensure that you have selected the Automatically include any missing joined objects radio button.
    2. Click on the Synchronize with data source icon, as shown in the example screenshot.

      These settings import all VOs that need to be mapped to the logical tables in the RPD based on the mapping done between the segment labels and the BI Objects.

      For Implementing Fixed Asset Category and Asset Location dimensions, the following Flex BI Flattened View Objects and Segment columns will be imported in the same import process.

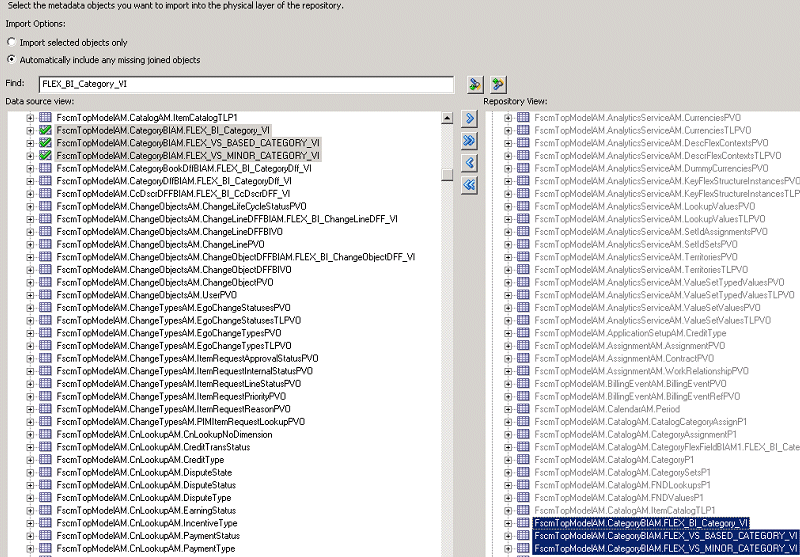
      - FscmTopModelAM.CategoryBIAM.FLEX_BI_Category_VI

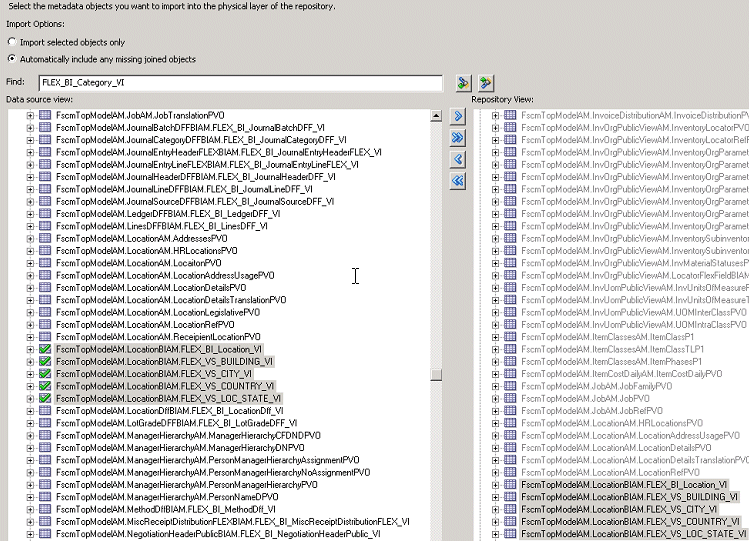
      - FscmTopModelAM.LocationBIAM.FLEX_BI_Location_VI

      The example shows the import process for FLEX_BI_Category_VI.

      The example shows the import process for FLEX_BI_Location_VI.

  4. Click Next after you complete the import.

    Note:

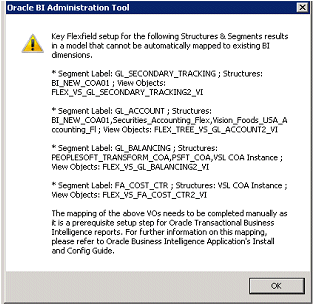
    When some complex Chart of Account structures are defined in Fusion Applications, more than one VO might be generated for the same segment label. In this case you will see a warning message as shown in the screenshot. Copy the information posted in the message, as this might be required in later steps. Click OK to proceed.
  5. In the Map to Logical Model dialog you would see that the VOs imported in Step 3 are automatically mapped to the appropriate logical tables. You would also see that the logical columns are automatically mapped to the VO columns in the bottom panel.

    Validation:

    • For tree based segments, both the Tree and the Tree Code VO should be mapped to the same logical table. The 'Hierarchy' option should be checked for both.

    • For non-tree based segments, 'Hierarchy' option should not be checked.

    • FscmTopModelAM.AccountBIAM.FLEX_BI_Account_VI is mapped to 'Dim – GL Account'.

    • For the VOs that are mapped to logical tables, the necessary VO columns are also mapped to appropriate logical columns.

      Note:

      If you received the warning message in step 4, then none of the VOs mentioned in the message are mapped to a logical table. If you want to map these VOs in Oracle BI Applications, then you need to map to one of the generic GL segment dimensions (Dim – GL Segment<n>) manually at this stage. For each of the VOs that you manually map at this step, you also need to map the corresponding columns in FscmTopModelAM.AccountBIAM.FLEX_BI_Account_VI to the appropriate logical column in "Dim – GL Account".

      In the Map to Logical Model dialog, note that the VOs imported in Step 3 are automatically mapped to the appropriate logical tables. Note also that the logical columns are automatically mapped to the VO columns in the bottom panel.

      Validation: You can validate at this stage that all the automatic mappings have happened as expected using the guidelines below:

      - FLEX_BI_Category_VI is mapped to logical table 'Dim – Asset Category' and FLEX_BI_Location_VI is mapped to logical table 'Dim – Asset Location'.

      - The segment columns in these VOs are mapped to the appropriate logical columns in these dimensions based on the Segment Label Code to BI Object Name mapping.

  6. When you have validated your mappings, click Next to display the Publish to Warehouse dialog.
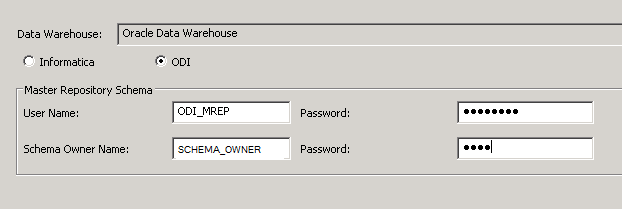
  7. Select the ODI check box, and provide the following details:

    User Name – <ODI Master Repository User Name>

    Password - <ODI Master Repository Password>

    Schema Owner Name – <ODI Master Repository DB Schema Owner Name>

    Password - < ODI Master Repository DB Schema Owner Password>

  8. Click Finish, then Validate, and save your changes.
  9. Validation: If you have successfully completed the extension process, you will see new mappings in the ODI repository to populate the necessary tables. The mappings will be named with the following naming convention SDE_<Logical Table Name>_<Physical Target Name>.

    For General Ledger:

    • If a segment is mapped from a Tree and a Tree Code VO, then two mappings are generated: one mapping for loading the segment dimension, and one mapping for the hierarchy dimension. For example, SDE_Dim_Cost_Center_W_COST_CENTER_D and SDE_Dim_Cost_Center_W_COST_CENTER_DH for Cost Center Dimension.

    • If a segment is mapped from a Value Set VO, then one mapping is generated for loading the segment dimension. For example, SDE_Dim_GL_Segment1_W_GL_SEGMENT_D.

    • For the GL Account dimension extension, the mapping SDE_FUSION_GLAccountDimension is extended to populate the new columns that were mapped in the previous steps.

    • For each new mapping created above, the mappings are also added to the corresponding load plan components under "Designer navigator -> Load Plans and Scenarios -> BIAPPS Load Plan -> Load Plan Dev Components -> SDE -> FUSION_1_0". The load plan component that is modified will be one of the following depending on the segment dimension:

      - 3 SDE Dims COSTCTR_DIM FUSION_1_0

      - 3 SDE Dims BALSEG_DIM FUSION_1_0

      - 3 SDE Dims NAT_ACCT_DIM FUSION_1_0

      - 3 SDE Dims GLSEG_DIM FUSION_1_0

    For Asset Category and Asset Location:

    • For the Asset Category and Asset Location extensions, the mappings under the folders SDE_FUSION_FixedAssetCategoryDimension and SDE_FUSION_FixedAssetLocationDimension are extended to populate the new columns that were mapped in the previous steps.

  10. When you have completed the BI Extension process, rebuild the appropriate Load Plan or create a new Load Plan.

Validating the Logical Table Source Filters for Generic GL Segment Divisions

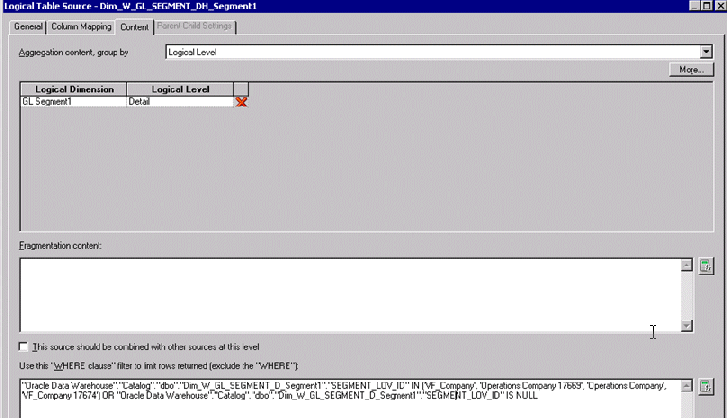
The RPD metadata contains multiple logical tables that represent the generic GL segments, such as Dim – GL Segment1, Dim – GL Segment2 and so on. Since these logical tables are mapped to the same physical table, W_GL_SEGMENT_D, a filter should be specified in the logical table source of these logical tables to restrain the output of the logical table to represent only that particular segment.These filters must be applied on the physical column SEGMENT_LOV_ID to the Value Set Codes that are applicable for that particular segment.

The extension process applies the content Logical Table Source filters for all the generic Dim – GL Segment<n> dimensions mapped in the previous steps. You can validate to check if the filters are applied accordingly and save your changes.

To validate the Logical Table Source Filters for Generic GL Segment Divisions:

  1. In Oracle BI EE Administration Tool, edit the BI metadata repository (for example, OracleBIAnalyticsApps.rpd).
  2. In the Business Model and Mapping layer, double-click on Dim – GL Segment<n> and open the LTS.

    Navigate to the Content table and there you would be able to see the filters applied, which should look similar to the filters in the example.

    You can find the list of value set codes for a particular segment by opening the segment VO table object in the physical layer of the RPD. It will be stored in the 'description' field of the table object.

Reconfiguring Segment Dimensions

While configuring the segment dimensions as described in the first section, if you had mapped an incorrect VO to the segment dimension and generated metadata, you must revert the changes and re-map using the correct VO(s).

  1. Delete the existing VO Logical Table Source from the corresponding logical table to bring it to the initial state.
  2. Delete the Logical Table Source filters if any applied on the DW Logical Table Source (only for the generic segment dimensions).
  3. Import the new VO (re-import if the VO already exists in the physical layer) and re-do the extension process as mentioned in the previous sections.
  4. If the process completes successfully, then the previously created mapping is replaced with a new mapping with the new VO.