Creating Journals

You use journals to enter adjustments to account balances and maintain an audit trail of changes to your data. You create journals by entering a journal label and description, balance type, point of view, and adjustment amounts. You can also enter a class for the journals, and a journal group that you can use to filter and sort journals. After you create a journal, its status is Working.

You can drag the Entity, ICP, and all Custom dimensions between the journal grid and the POV. If all dimensions in the journal detail lines are the same, the dimension is moved to the POV header information. If they are not the same, they remain in the journal details. The Account dimension remains on the detail line, and all other dimensions remain in the header. If you are creating a journal for a single entity, you can use the entity dimension from the POV header without dragging it to the journal rows.

When you enter journal data, you can scan the journal and verify that the entries are valid. You can then make any necessary changes before posting the journal. See Scanning Journals.

Before you begin this procedure, in the Smart View Panel, ensure that you are connected to a Oracle Hyperion Financial Management data source.

To create a journal:
  1. Perform an action:
    • In the Smart View Panel, right-click a Financial Management application, and then select Create Journal.

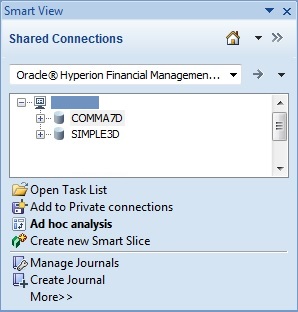
      Alternatively, in the Smart View Panel, select a Financial Management application , and then select Create Journal from the Action Panel, shown in Figure 14-1.

      Figure 14-1 Create Journal Command in the Smart View Action Panel


      Create Journal command in Smart View Action Panel

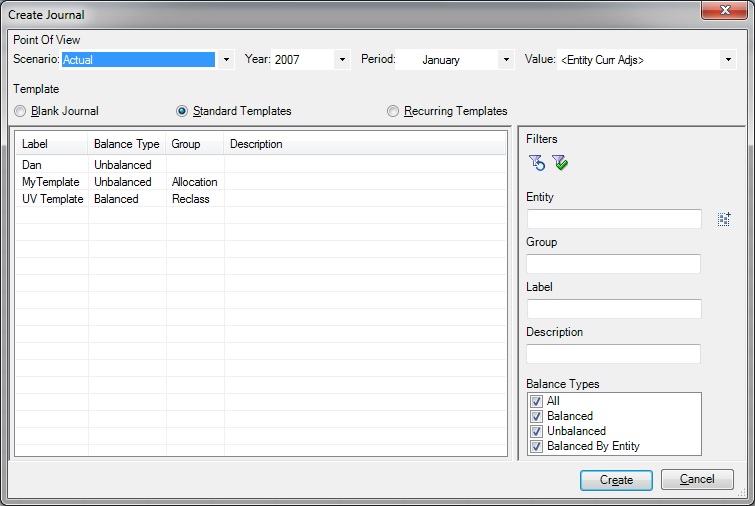
      The Create Journal dialog box is displayed:

      Figure 14-2 Create Journal Dialog Box


      The Create Journal dialog box
    • From an ad hoc grid or form, select a cell or range of cells on which to base the journal, and in the HFM Ad Hoc ribbon or HFM ribbon, click Create Journal, The Create Journal button in the HFM Ad Hoc ribbon or HFM ribbon.

      Alternatively, right-click a cell or cell range on which to base the journal and select Smart View, then Journals, and then Create Journal.

      Note:

      See Guidelines for Creating Journals from Ad Hoc Grids or Data Forms for additional information on creating journals using this method.

      The journal is created and you can now proceed directly to Editing Journal Properties.

      Note:

      Do not click Refresh or Save if you want to make further changes to the POV. Once you click Refresh or Save, the POV is locked for this journal.

  2. In Create Journal, to change the Point of View, click the arrow in the text box next to a dimension name and select a member.

    The dimensions that display in the POV across the top of the Create Journal dialog box (Figure 14-2) are always the Scenario, Year, Period and Value dimensions.

    When creating a journal, ensure that the values in Scenario, Year, Period, and Value are the ones to which you want to enter adjustments.

  3. From Template, select an option:
    • To create a new blank journal, select Blank Journal.

      Note that when you select Blank Journal, the options in the Filters area are not available.

      Proceed to step 5.

    • To use a standard journal template, select Standard Templates, then select a template from the list.

      Standard templates contain accounts and entities for adjustments that you enter frequently.

      Optional: To filter the list of standard templates, go to step 4. Otherwise, proceed to step 5.

    • To use a recurring journal template, select Recurring Templates, then select a template from the list.

      You can use a recurring template to create journals automatically. When you generate a journal from a recurring template, you receive a confirmation message that the journal has been generated. The status of the journal is Approved.

      Optional: To filter the list of recurring templates, go to step 4. Otherwise, proceed to step 5.

    Note:

    The journal template type you select determines the Type property for the journal you are creating and is a one-time selection. Once a journal is created, you can view the Type property for the journal, but it cannot be edited.

  4. Optional: To filter the standard or recurring templates list, set filters for one or more of the following criteria, and then click Apply Filters, Apply Filters button in the Create Journal dialog box.:
    • Entity—Click the Search button, Search button for filtering templates by Entity and, in the Member Selection dialog box, select the members to filter on.

      Or, type the member names, in their qualified format, directly into the text box, separated by a semicolon (;). For example, for EastSales, type EastRegion.EastSales.

    • Group—Enter journal group names, separated by a semicolon (;). The percent sign (%) may be used as a wildcard character. The journal group that you assign must exist in the application.

    • Label—Enter a journal label. The label can contain a maximum of 20 characters. The percent sign (%) may be used as a wildcard character. These characters are not allowed: . + - */ # {} ; , @ ”

    • Description—Enter a description. The percent sign (%) may be used as a wildcard character.

    • Balance Types—Select a type: All, Balanced, Unbalanced, or Balanced by Entity. Selecting All automatically selects all balance types.

    To clear filters and view the entire template list, click Reset Filters, Reset Filters button on Create Journal dialog box.

  5. Click Create Journal.

    The journal is displayed, but the basic properties of the journal are yet to be defined. Continue with the procedure in Editing Journal Properties.

    An example journal is shown in Figure 14-3, using a standard, balanced template, The POV for this journal is Scenario=Actual, Year=2008, Period=January, and Value=<Entity Curr Adjs>.

    Figure 14-3 Journal Example, Balanced Using Standard Template


    Example of initial journal after clicking Create Journal using a standard, balanced template. There are two rows on the journal from the EastSales entity, one row for Sales, and one for SalesDiscounts.

    Additionally, the Oracle Journals ribbon is displayed, where you can access the Edit button to edit properties of the journal you created in this procedure.


    The Oracle Journals ribbon, after initially creating a journal
  6. Continue to Editing Journal Properties.