54 Customizing Deployment Procedures
The Deployment Procedures offered by Oracle Enterprise Manager Cloud Control (Cloud Control) are default procedures that have been created considering all the best practices in the industry. The steps embedded within a Deployment Procedure ensure that they meet all your provisioning and patching requirements. You can, of course, use them with the default settings to provision or patch your targets in the environment, however, you also have the choice of customizing them to include additional custom steps, disable unwanted steps, and use authentication tools to run some steps as another user.
By customizing Deployment Procedures, you can also implement different error handling methods. For example, in a patching operation where multiple hosts are patched in parallel, it may be wise to skip the host on which a failure occurs. However, failure on a device creation could render the remaining provisioning operation ineffective. Therefore, it may be necessary to abort the entire procedure for failure of such a step.
This chapter helps you understand how you can customize Deployment Procedures to make them suit your needs. In particular, this chapter covers the following:
54.1 About Deployment Procedure Customization Types
The following describes the types of customization you can perform with Deployment Procedures:
| Type 1 | Type 2 |
|---|---|
|
Editing Custom Deployment Procedures You can edit an existing custom Deployment Procedure that is offered by Cloud Control to add new phases and steps. However, for patching the steps that can be added are restricted to either a Directive step or a Host command step. You can perform the following tasks:
Note: You can not edit an Oracle-owned deployment procedure. To do so, you must clone the Oracle-owned procedure using Create-like functionality, and then edit the copy to include your changes. |
Creating a User Defined Deployment Procedures You can create your own Deployment Procedure with new steps, phases, privilege levels, and so on. You can perform the following tasks:
Note: For steps to Create a User Defined Deployment Procedure, see Creating, Saving, and Launching User Defined Deployment Procedure (UDDP). |
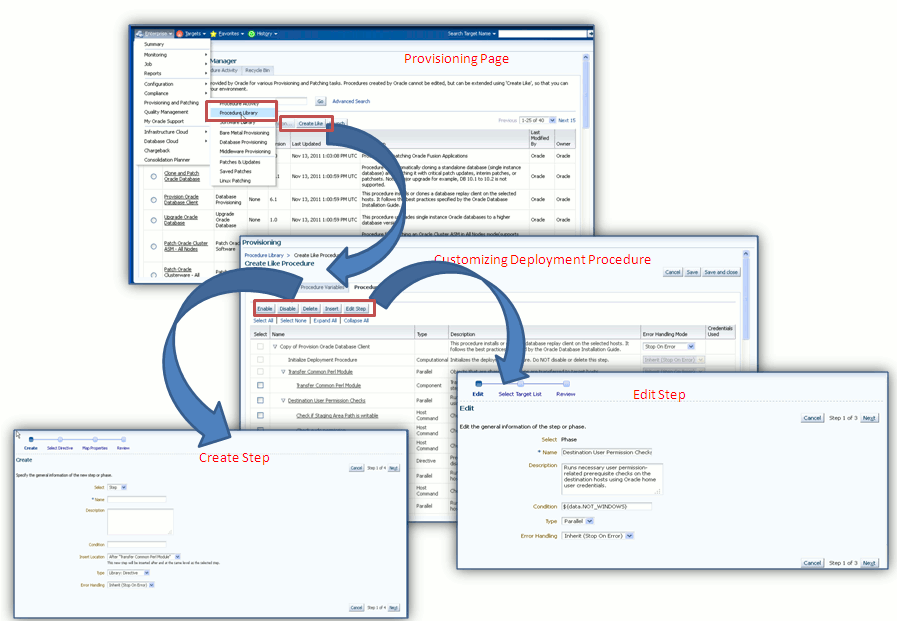
The following graphic shows how you can use the Customizing Deployment Procedure page to create a copy of the default Deployment Procedure that is offered by Cloud Control. You can then add new steps and phases or edit the existing steps and phases in the copy to customize your procedure.
For more information on adding steps and phases, see Customizing a Deployment Procedure.
54.2 Customizing a Deployment Procedure
The first step towards customizing a Deployment Procedure is to create a copy of the default Deployment Procedure that is offered by Cloud Control. Note that only a copy can be edited and customized with your changes; the default Deployment Procedures must always and will always remain unchanged.
You can add additional phases or steps to a Deployment Procedure to run additional custom scripts, host commands, or jobs, see Phases and Steps.
Note:
If a step is added outside a phase, then the type of step that can be added is restricted to a Job Step or a Manual Step. You can not add other steps outside a phase. Howevere, within a phase all the steps discussed in this section can be added.
This section explains how you can edit different types of phases or steps to a Deployment Procedure. In particular, it covers the following:
54.2.1 Editing the Rolling and Parallel Phase of a Deployment Procedure
To edit the general information of the phase, follow these steps:
-
From the Enterprise menu, select Provisioning and Patching and then select Procedure Library.
-
On the Provisioning page, in the Procedure Library tab, from the menu, select Create New, then click Go.
-
On the Create New Procedure page, select Procedure Steps tab.
-
Select the phase, and click Edit Step to edit a phase.
-
In the Create wizard, do the following:
-
On the Create page, the general information of the phase as displayed. You can change them if you want, and click Next.
-
On the Select Target List page, select a target list to indicate the type of targets on which the new phase should run.
All the target lists declared while creating the procedure is listed in the drop down menu, select the target list to use for this phase. The actual targets can be chosen when the procedure is being launched.
-
On the Review page, review the information you have provided for creating a new phase, and click Finish. The changes to the phase are saved.
-
54.2.2 Editing a Job Step of a Deployment Procedure
In the Edit wizard, do the following:
- On the Edit page, review the general information about the step. If you want to update the values, follow the general information about the step as described in Table 54-1.
- On the Select Type page, you can view the job type details.
- On the Map Parameters page, you can update the variable values or set a new one. Additionally, you can also update the credentials to be used for the target list.
- On the Review page, review the updates, and click Finish.
54.2.7 Editing a Manual Step of a Deployment Procedure
In the Edit wizard, do the following:
Table 54-1 Field Description - Customizing Steps
| Field Name | Description |
|---|---|
|
Select |
Select Step. |
|
Name |
Specify a name for the custom step. |
|
Description |
Provide a description for the custom step. |
|
Condition |
Leave this field blank. |
|
Insert Location |
If you want to insert the custom step after the step you selected, then select After <step name>. Otherwise, select Before <step>. |
|
Type |
|
|
Error Handling |
Select the error handling mode you want to set for the custom phase. Every step in a Deployment Procedure is preconfigured with an error handling mode that indicates how the Deployment Procedure will behave when the phase or step encounters an error. The error handling modes offered by Cloud Control are: - Inherit - Inherits the error handling mode that was set for the enclosing phase. (When set for a step that is outside a phase, it inherits the error handling mode from the Deployment Procedure). - Stop On Error - Stops when an error is encountered. Deployment Procedure does not proceed to the next step until you correct the errors or override them. - Continue On Error - Continues even when an error is encountered. - Skip Target - Ignores the failed target on the list and continues with other targets. |
54.3 A Workflow Example for Assigning Values to Deployment Procedure Variables at Runtime
Starting with Enterprise Manager 12.1.0.3 (Patch Set 2), a new feature has been enabled using command blocks within the PAF functional domain. Command blocks are a set of strings that needs to be printed to the output stream by the script running on a host. They follow this format:
$$$--*$$'
<commandBlock>
<executeProc name="MGMT_PAF_UTL.UPDATE_RUNTIME_DATA">
<scalar>%job_execution_id%</scalar>
<scalar>${data.<DP_VARIABLE_NAME>}</scalar>
<scalar><DP_VARIABLE_VALUE></scalar>
</executeProc>
</commandBlock>
$$$*--$$

Where,you need to enter the values for <DP_VARIABLE_NAME> and <DP_VARIABLE_VALUE>

Example:
In the following example, isPingSuccessful is the DP variable, and true is the value.
print '$$$--*$$';
print '<commandBlock>';
print '<executeProc name="MGMT_PAF_UTL.UPDATE_RUNTIME_DATA"> ';
print '<scalar>%job_execution_id%</scalar> ';
print '<scalar>${data.isPingSuccessful}</scalar> ';
print '<scalar>true</scalar> ';
print '</executeProc>';
print '</commandBlock>';
print '$$$*--$$';
Any language (shell, Perl, and so on) can be used to write the script that will run on the host. As long as the above command block gets printed on the output stream, procedure variables will be updated.
This feature enables you to update the values of procedure declared variables at runtime. The command block feature allows some automatic post-processing of the output generated from a remote machine (agent), which is then uploaded to the OMS, and processed by Job Systems. In PAF, you can use this feature to define steps in a procedure with command block formatted output. Within the command block, SQL procedure can be invoked to assign values to procedure variables.
Note:
Only a directive step, or a component step, and a job step can use the command block to update the values of a procedure declared variables at runtime.
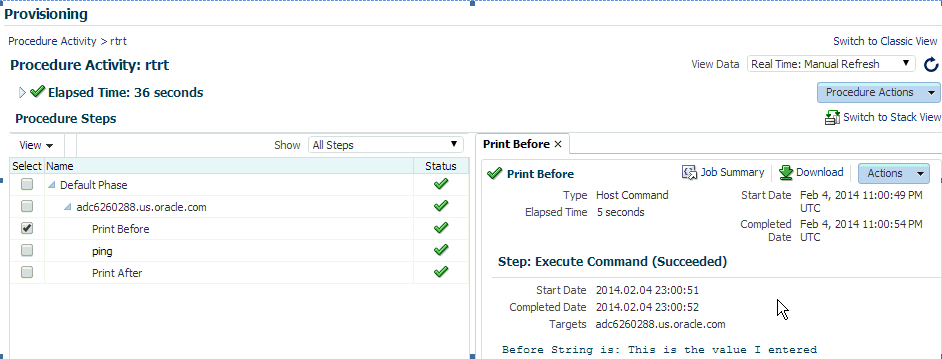
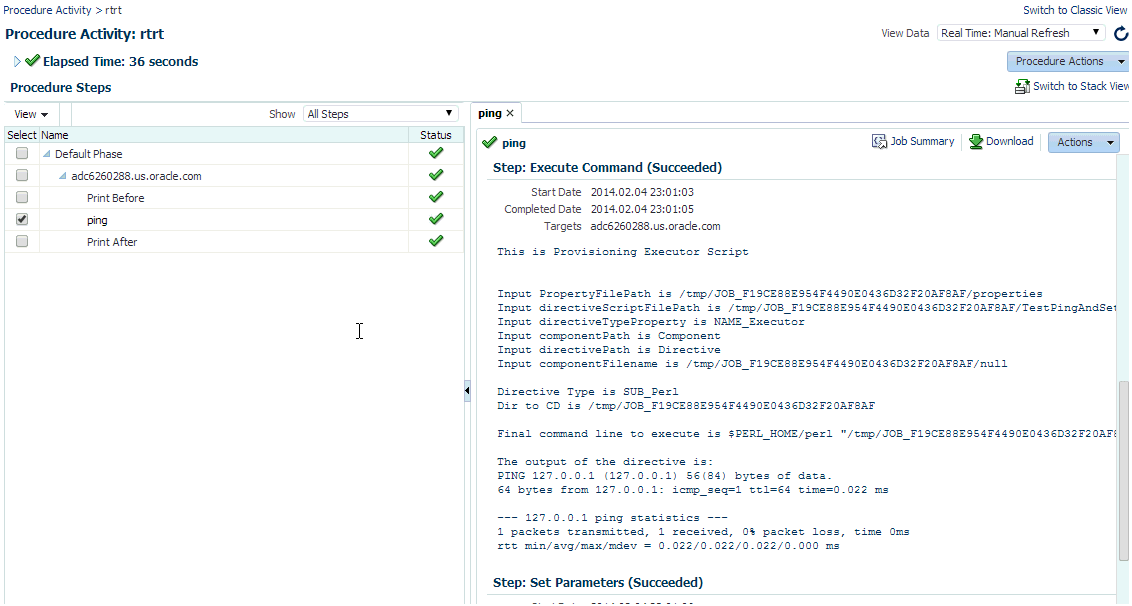
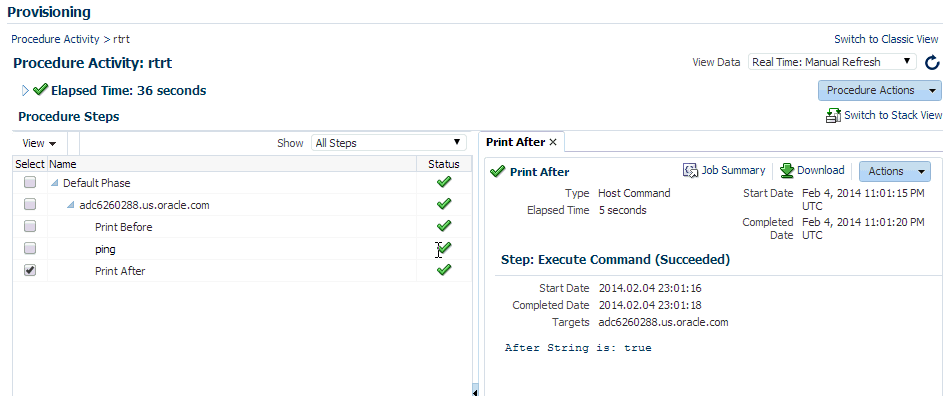
The following example demonstrates how a command that is run on the target can update the variable in a procedure at runtime. In this example, a ping command is run on a host using the directive step in a procedure. If the ping command succeeds, then the directive sets the value of the procedure to true. If not, the directive sets the value of the procedure to false.

Here are the high level steps:
Table 54-2 Assigning Variable Values at Runtime
| Step | Details |
|---|---|
|
Step 1 |
Create a Perl File called |
|
Step 2 |
Upload the Perl script to the Software Library. For a detailed list of steps, see Step 2: Uploading TestPingAndDPvariable.pl to Software Library. |
|
Step 3 |
Create a procedure to add the variable |
|
Step 4 |
Run the Procedure. For details, see Step 4: Launching the Deployment Procedure, and Providing the Variable Values at Runtime. |
|
Step 5 |
Verify the variable details. For details, see Step 5: Verifying the Deployment Procedure Variable Values. |
54.3.1 Step 1: Creating a Perl Script to Assign Values to Deployment Procedure Variables at Runtime
Open any editor, copy the following lines of code, then save the file as a Perl script:
system("ping", "-c", "1", "127.0.0.1");
if ( $? == 0 )
{
  # below 9 lines of print statements set the DP variable "isPingSuccessful" as "true" string
  print '$$$--*$$';
  print '<commandBlock>';
  print '<executeProc name="MGMT_PAF_UTL.UPDATE_RUNTIME_DATA"> ';
  print '<scalar>%job_execution_id%</scalar> ';
  print '<scalar>${data.isPingSuccessful}</scalar> ';
  print '<scalar>true</scalar> ';
  print '</executeProc>';
  print '</commandBlock>';
  print '$$$*--$$';
}
else
{
  # below 9 lines of print statements set the DP variable "isPingSuccessful" as "false" string
  print '$$$--*$$';
  print '<commandBlock> ';
  print '<executeProc name="MGMT_PAF_UTL.UPDATE_RUNTIME_DATA"> ';
  print '<scalar>%job_execution_id%</scalar> ';
  print '<scalar>${data.isPingSuccessful}</scalar> ';
  print '<scalar>false</scalar> ';
  print '</executeProc> ';
  print '</commandBlock>';
  print '$$$*--$$ ';
}
54.3.2 Step 2: Uploading TestPingAndDPvariable.pl to Software Library
To create a directive entity in Software Library, follow these steps:
See Also:
For more information, see Enterprise Manager Cloud Control Administrator's Guide.
54.3.3 Step 3: Creating a Deployment Procedure
To create a procedure, follow these steps:
-
In Cloud Control, from Enterprise menu, select Provisioning and Patching, then click Procedure Library.
-
On the Procedure Library page, from the menu, select Create New, then click Go.
-
On the General Information page, enter a unique name for your procedure.
-
On the Create New Procedure page, click Procedure Variables. Click Add Row, and enter the following details:

-
Click Procedure Steps tab. Select the Default phase, then click Insert to add the following steps to the default phase:
-
Add a Host Command step to print the value of the variable before running the procedure. Here are the steps: On the Create page, select Host Command from the menu, enter a unique name for the step, then click Next. On the Enter Command page, enter the value:
echo Before String is: "${data.isPingSuccessful}".Note: The expression to access the DP variable
isPingSuccessfulin DP code is ${data.isPingSuccessful}.Click Next. Review the details, click Finish.
-
Add a Directive step called
pingto call the directive that was uploaded to Software Library. To do so, on the Create page, enter a unique name for the step, then select Directive from the Type menu. On the Select Directive page, search with a string%Ping%.Select the Directive that you uploaded, and click Next. You can leave all the default values as is on Map Properties page, and Review page, then click Finish. -
Add a Host Command step to print the value of the variable after running the procedure. Here are the steps: On the Create page, select Host Command from the menu, enter a unique name for the step, then click Next. On the Enter Command page, enter the value:
echo After String is: "${data.isPingSuccessful}". Click Next. Review the details, click Finish.
-
-
Click Save and Close.
54.3.4 Step 4: Launching the Deployment Procedure, and Providing the Variable Values at Runtime
Run the procedure as follows:
54.4 Changing Deployment Procedure Error Handling Modes
Every step in a Deployment Procedure is preconfigured with an error handling mode that indicates how the Deployment Procedure will behave when the phase or step encounters an error. The error handling modes offered by Cloud Control are:
-
Inherit - Inherits the error handling mode that was set for the enclosing phase. (When set for a step that is outside a phase, it inherits the error handling mode from the Deployment Procedure).
-
Stop On Error - Stops when an error is encountered. Deployment Procedure does not proceed to the next step until you correct the errors or override them.
-
Continue On Error - Continues even when an error is encountered.
-
Skip Target - Ignores the failed target on the list and continues with other targets.
For more information about steps, see Phases and Steps.
To change the error handling modes, follow these steps:
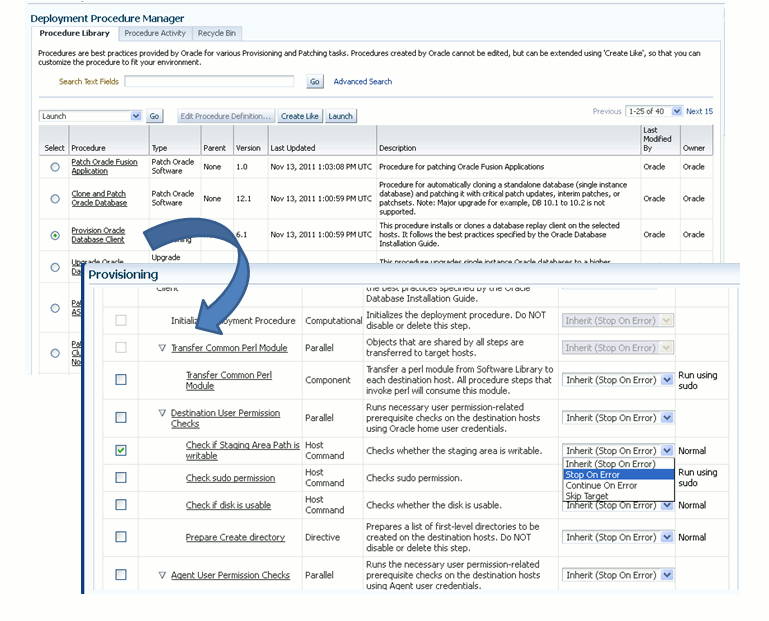
The following is an example that illustrates how you customize the Oracle Database Provisioning Deployment Procedure to change the error handling mode of the Destination User Permission Checks phase:
54.5 Setting Up email Notifications Regarding the Status of Deployment Procedures
Cloud Control can send email notifications to report the status of a Deployment Procedure. However, by default, Deployment Procedures do not have this feature enabled. For email notifications to be sent, your Super Administrator must configure an Outgoing Mail (SMTP) Server within Enterprise Manager, and then you as an Administrator must provide your email Address and Password for receiving notifications.
Enabling email notifications is a two-step process:
-
Configuring an Outgoing Mail (SMTP) Server In Enterprise Manager
-
Adding E-mail Addresses for Enterprise Manager Notifications
Note:
As a prerequisite, you are expected to have configured the Mail Server and set up the email address in Cloud Control.
54.5.1 Configuring an Outgoing Mail (SMTP) Server In Enterprise Manager
Before Enterprise Manager can send e-mail notifications, you must first set up the Outgoing Mail (SMTP) servers.
Note:
Only a privileged user can configure SMTP servers.
To set up the SMTP server, follow these steps:
In the following example, two mail servers are specified--smtp01.example.com on port 587 and smtp02.example.com on port 25 (default port). A single administrator account (myadmin) is used for both servers.
Outgoing Mail (SMTP) Server smtp01.example.com:587, smtp02.example.com
User Name myadmin
Password ********
Confirm Password ********
Identify Sender As EMD Notifications
Sender's E-mail Address mgmt_rep@example.com
Use Secure Connection: SSL
54.5.2 Adding E-mail Addresses for Enterprise Manager Notifications
You specify one or more e-mail addresses to which notifications can be sent when you define the Notifications Schedule. In addition to defining notification e-mail addresses, you associate the notification message format (long or short) to be used for each e-mail address.
Each e-mail address can have up to 128 characters; there is no upper bound with the number of e-mail addresses.
To add an e-mail address:
- In Cloud Control, from the Setup menu, select Notification, then select My Notifications Schedule.
- Specify an Enterprise Manager administrator, and click Define Schedule.
- If no previous e-mail addresses have been defined for the administrator, a message displays prompting your to define e-mail addresses for the administrator. Click Click here to set e-mail addresses. The General page appears.
- Click Add Another Row to create a new e-mail entry field in the E-mail Addresses table.
- Specify the e-mail address associated with your Enterprise Manager account. All e-mail notifications you receive from Enterprise Manager will be sent to the e-mail addresses you specify. For example,
user1@example.com,user2@example.com, and so on. - If you need to additional e-mail addresses, click Add Another Row, enter the e-mail address and select the format.
- You can test if the e-mail address is properly configured to receive e-mails from Enterprise Manager by selecting it and clicking Test.
- Click Apply to save your changes when finished.
Once you have defined your e-mail notification addresses, they will be shown when you define a notification schedule. For example, user1@example.com, user2@example.com, user3@example.com. You can choose to use one or more of these e-mail addresses to which e-mail notifications for the Incident Rule will be sent.
54.6 Copying Customized Provisioning Entities from One Enterprise Manager Site to Another
If you have customized provisioning entities on an Enterprise Manager installation that you want to apply to another installation of Enterprise Manager, follow these steps. The provisioning entities can include procedure definitions or Software Library entities or a combination of these.
This section consists of the following:
54.6.1 Prerequisites for Copying Customized Provisioning Entities from One Enterprise Manager Site to Another
Ensure that:
-
Customized provisioning entities exist in the system at source site.
-
Source administrator has access to the customized provisioning entities at source site.
-
Source administrator has necessary privileges to export the provisioning entities.
-
Destination site has similar setup as source site, that is, both have the same version of Enterprise Manager installed.
-
Destination administrator has privileges to import provisioning entities.
54.6.2 Copying Customized Provisioning Entities from One Enterprise Manager Site to Another
Follow these steps:
-
Export the PAR file using the following command:
emctl partool export -guid <procedure guid> -file <file> -displayName <name> -description <desc> -metadataOnly(optional)
-
For importing the provisioning entities, you can use
emctlpartool as follows:emctl partool <deploy|view> -parFile <file> -force(optional) emctl partool <deploy|view> -parFile <file> -force(optional) -ssPasswd <password> emctl partool <deploy|view> -parDir <dir> -force(optional)
-
Alternatively, you can import the PAR file from Cloud Control as explained in the following steps.
-
From the Enterprise menu, select Provisioning and Patching and then select Procedure Library.
-
On the Procedure Library page, from the list, select Import and click Go.
-
-
In the Upload Procedure File page, select:
-
Upload From Local Machine, if the PAR files are stored on your local machine. Click Browse and select the PAR File to Upload. Click Import.
-
Upload From Management Agent Machine, if you have stored the PAR files on the Management Agent machine. Click Target and select the Host. Click Select File and select the PAR file. Click Import.
-
-
Apply the imported entities.
54.7 A Workflow Example for Customizing a Directive
Directives are essentially scripts stored in the Software Library. They are used in Deployment Procedures within a Directive Step, which is a special type of action step. For more information about adding a Directive Step, see Adding a Directive Step.
If you want to customize a directive offered by Cloud Control, then first create a copy of the Perl script associated with that Directive and make a new directive out of that copy. Then customize the Deployment Procedure to modify a step to use this new directive, and then schedule the deployment. This section explains the following:
54.7.1 Creating and Uploading a Copy of a Default Directive
To create a new customized directive using a default directive, follow these steps:
-
In Cloud Control, from the Enterprise menu, select Provisioning and Patching, then select Software Library.
-
On the Software Library page, from the table, expand the Software Library and the other levels under this category to reach the directive you want to copy.
For example, if you want to copy the Apply Patch directive of a patching operation, then expand Software Library and then expand Patching. From this level, expand Common, and then All, and finally Generic. Under Generic, you should see the directive Apply Patch.
-
Select the directive you want to copy and click Create Like, and store the copy of the directive in a custom folder called Directive.
-
Select the custom directive, and then click Edit.
-
In the Create Directive wizard, do the following:
-
On the Describe page, describe the directive you are creating.
-
On the Configure page, click Add to specify the command line arguments to be passed to the Directive. Set the Shell Type to Perl because you are adding a Perl script. If the script is neither Perl nor Bash, then set it to Defined in Script.
Each entry represents a single command line argument. Each argument may include a variable to be set later, a prefix and suffix. The prefix and suffix text are appended before and after the property value to produce the command line argument.
Repeat this step to add all the command line arguments.
-
On the Select Files page, select Upload Files. In the Specify Source section, select Local Machine, and click Add to select the modified perl file.
-
Click Save and Upload.
-
54.7.2 Customizing a Deployment Procedure to Use the New Directive
To customize a Deployment Procedure to use the new directive, follow these steps:
-
In Cloud Control, from the Enterprise menu, select Provisioning and Patching, then select Procedure Library.
-
On the Provisioning page, select the Deployment Procedure for which you want to use this new directive, and click Create Like.
-
On the Create Like Procedure page, select Procedure Steps tab, and do the following:
-
From the table that lists all the steps within that Deployment Procedure, select the directive step with which you want to associate the new directive, and click Edit Step.
-
In the Edit Directive Step wizard, do the following:
-
On the Edit page, click Next.
-
On the Select Directive page, select Select New Directive. Then search and select the new directive you created, and click Next.
-
On the Map Properties page, specify the values for the directive properties, and click Next.
-
On the Review page, click Finish.
-
-
Click Save.
-
54.7.3 Running the Customized Deployment Procedure
To run the customized Deployment Procedure, follow these steps:
- In Cloud Control, from the Enterprise menu, select Provisioning and Patching, then select Procedure Library.
- On the Provisioning page, select the customized Deployment Procedure and click Schedule Deployment.
