3 Discovery of the Microsoft SQL Server Target

This chapter describes how to add a Microsoft SQL Server target to Enterprise Manager Cloud Control.

The following topics are provided:

3.1 Discovering Targets

After successfully deploying the plug-in, follow these steps to add the plug-in target to Cloud Control for central monitoring and management:

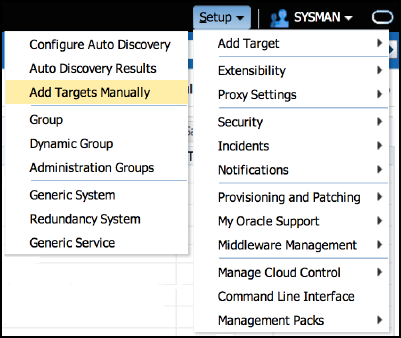
  1. From the Setup menu, select Add Target and then Add Targets Manually as shown in Figure 3-1:

    Figure 3-1 Add Targets Manually Menu


    add target

  2. In the Add Targets Manually page, select Add Targets Declaratively by Specifying Target Monitoring Properties, select Target Type as Microsoft SQL Server, select a Monitoring Agent and click Add Manually.

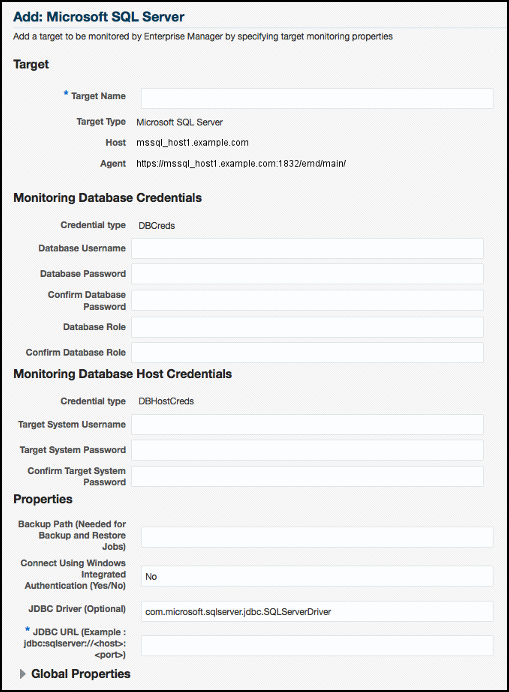
    In the Add Microsoft SQL Server page (Figure 3-2), provide the following information for the properties:

    • Target Name: Unique target name across all Cloud Control targets, such as MSSQL_Hostname. This is the display name in Cloud Control. It represents this SQL Server target across all user interfaces within Cloud Control.

    • Monitoring Database Host Credentials

      • Target System Username (Needed when SQL Server is at remote location): Valid host user name. Required only for remote Agent monitoring. When using WIA remotely this account must be a Windows Domain account with access to the OMA host and target database. For more information, see Configuring Remote Connections to Monitor Targets. The system user name must be fully qualified. For example:

        hostname.domainname.com\Administrator
        
      • Target System Password: Password for the System Username. Required only for remote Agent monitoring.

      • Confirm Target System Password: Confirm the password entered for the System Username.

    • Monitoring Database Credentials

      • Database Username (Required for SQL Authentication): Valid user for the database in sysadmin fixed server role.

      • Database Password (Required for SQL Authentication): Corresponding password for the database user.

      • Confirm Database Password (Required for SQL Authentication): Confirm the password entered for the database user.

      • Database Role (Optional): Role assigned to the database user.

      • Confirm Database Role: Confirm database role entered for database user.

    • Properties

      • Backup path (optional for backup and restore jobs): Insert a path, encapsulated in single quotes, that backups generated with the Microsoft SQL Server Plug-in for OEM should be generated to.

      • Connect Using Windows Integrated Authentication (Yes/No): Select Yes for Windows Integrated Authentication, or select No for SQL Authentication.

      • JDBC Driver: (Optional) Microsoft SQL Server JDBC driver class name.

        For example,

        com.microsoft.sqlserver.jdbc.SQLServerDriver
        
      • JDBC URL: URL for JDBC. It is recommended that the host name provided in the JDBC URL should be a fully qualified domain name (FQDN). The default port number for Microsoft SQL Server is 1433. You can specify either IP Address or host name. If you are monitoring a Microsoft SQL Server Cluster, then specify the IP address or host name of the virtual SQL server of the cluster (Note: this is not the same as the IP address or host name of the Windows cluster). For example:

        jdbc:sqlserver://<hostname.domain.com>:<port>
        

        You do not need to include the port number if your instance is using the default of 1433.

      Note:

      Specifying a Named Instance is possible for the URL of the JDBC, however consider the following when building the JDBC URL string:

      • Microsoft recommend method for SQL Server hosts with multiple instances of SQL Server installed is to specify unique port numbers for each instance and only specify hostname:port for each URL string.

      • Optionally, to make use of the Instance Name in the URL use the following supported URL format:

        jdbc:sqlserver://hostname:port;instanceName=nameofinstance
        
      • Building JDBC connection URLs with backslashes "\" or without the port number, is not supported by the Microsoft SQL Server plug-in.

  3. Click Test Connection to make sure the parameters you entered are correct.

Figure 3-2 Add Microsoft SQL Server


add microsoft

3.2 Adding Targets with EMCLI

To add Microsoft SQL Server targets with EMCLI, use the add_target verb, as shown in Example 3-1.

You will need to specify the following options:

  • Target name: *-name*

    It must begin with an alphabetic character contain only alphanumeric characters, multibyte characters, a space, -, _, ., :, /, (, ) and have a maximum length of 256 characters.

  • Target type: *-type*

    Always use "microsoft_sqlserver_database" (including the quotes).

  • Host name: *-host*

    Network name of the machine running the Management Agent that is collecting data for this target instance.

  • Target instance properties: *-properties*

    Name-value pair list of properties for the target instance. The available property names are as follows.

    SysUserName
    SysPassword
    DBUserName
    DBpassword
    Role
    dbBackupPath
    WinSecurityEnabled
    jdbcdriver
    url
    
  • Properties separator delimiter: *-separator=properties*

    Specify a string delimiter to use between name-value pairs for the value of the -properties option. The default separator delimiter is ";".

  • Properties subseparator delimiter: *-subseparator=properties*

    Specify a string delimiter to use between name and value in each name-value pair for the value of the -properties option. The default subseparator delimiter is ":". For the SQL Server plug-in, it is recommended that a plus "+" sign be used.

Example 3-1 Adding Microsoft SQL Server Targets Using EMCLI

emcli.bat add_target 
          -name=“SqlServerTarget" 
          -type="microsoft_sqlserver_database" 
          -host=“HostTargetName"
          -properties="jdbcdriver+com.microsoft.sqlserver.jdbc.SQLServerDriver;
                       url+jdbc:sqlserver://SqlServerHost.domain.localnet:1433;
                       DBUserName+sa;DBpassword+password;
                       SysUserName+SqlServerHost.domain.localnet\Administrator;
                       SysPassword+password;WinSecurityEnabled+No;"
          -subseparator=properties="+"
3.3 Verifying and Validating the Plug-in

After waiting a few minutes for the plug-in to start collecting data, use the following steps to verify and validate that Enterprise Manager is properly monitoring the plug-in target:

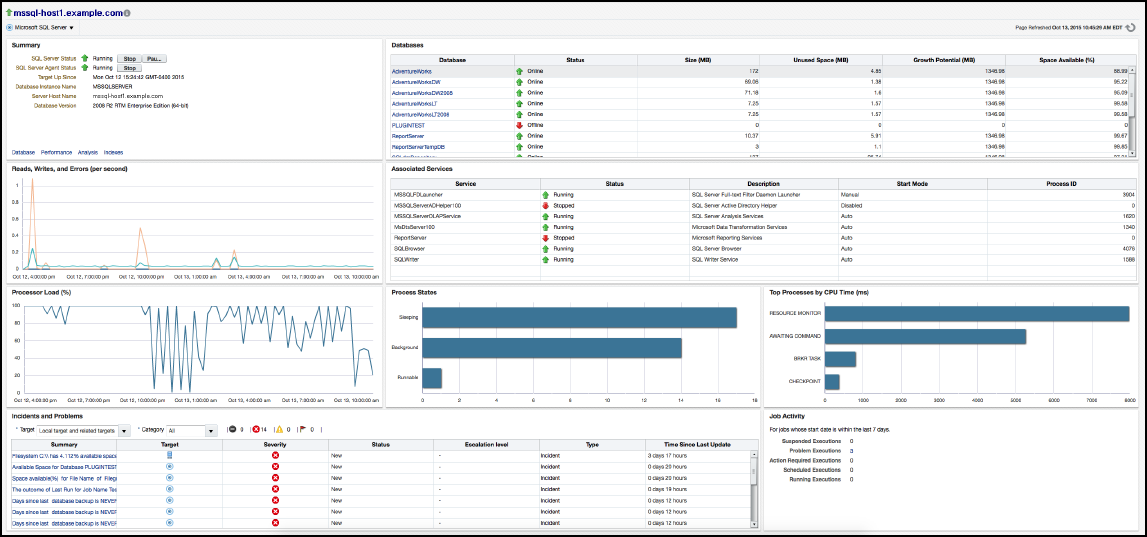
  1. Click the Microsoft SQL Server target link from the All Targets page. The Microsoft SQL Server home page appears as shown in Figure 3-3:

    Figure 3-3 Microsoft SQL Server Target Home Page


    microsoft sql server

  2. Verify that no metric collection errors are reported by clicking Monitoring and then Metric Collection Errors from the Target menu.
  3. Ensure that reports can be seen and no errors are reported by clicking Information Publisher Reports in the Target menu and viewing reports for the Microsoft SQL Server target type.
  4. Ensure that configuration data can be seen by clicking Configuration and then Last Collected in the Target menu. If configuration data does not immediately appear, click Refresh in the Latest Configuration page.
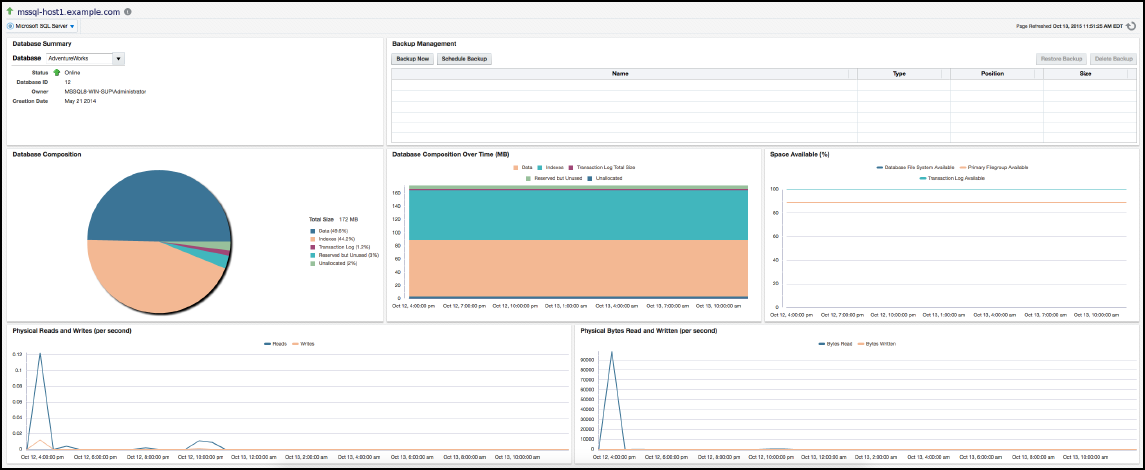
  5. View the Database Page by selecting the Microsoft SQL Server drop down under the target name and selecting Database. The database page appears (Figure 3-4). The database page contains database specific performance and configuration metrics as well as backup and restore functionality. The database will be selected from a drop­down menu.

    Figure 3-4 Microsoft SQL Server Database Page


    microsoft sql server

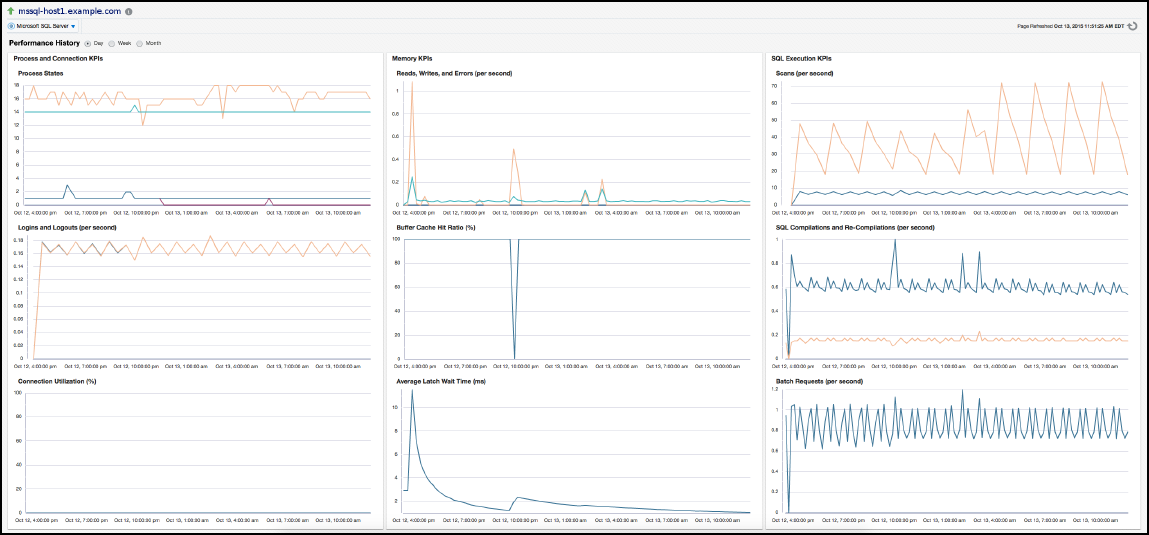
  6. View the Performance Page by selecting the Microsoft SQL Server drop down under the target name and selecting Performance. The Performance page appears (Figure 3-5). The performance page contains convenient performance graphs built from collected metrics.

    Figure 3-5 Microsoft SQL Server Performance Page


    microsoft sql server

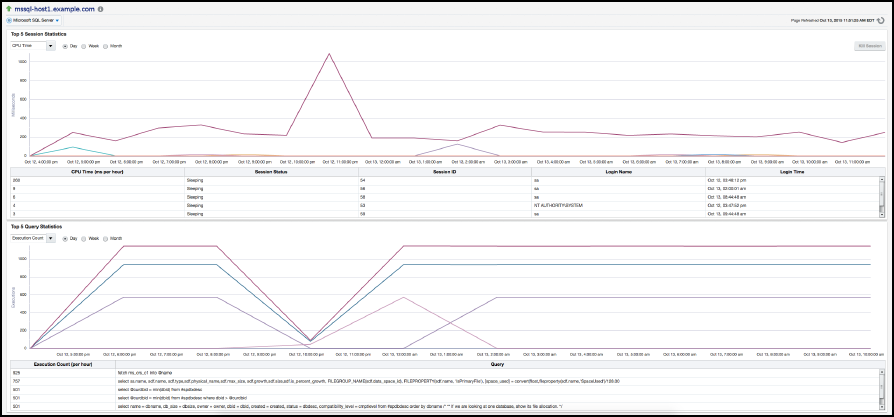
  7. View the Analysis Page by selecting the Microsoft SQL Server drop down under the target name and selecting Analysis. The Analysis page appears (Figure 3-6). The analysis page displayed SQL query and session information, as well as the "Kill Session" job button to quickly end any problematic sessions.

    Figure 3-6 Microsoft SQL Server Analysis Page


    microsoft sql server

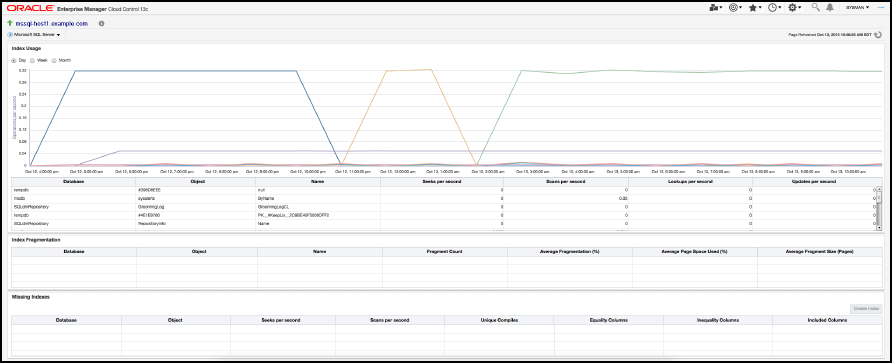
  8. View the indexes page by selecting the Microsoft SQL Server drop down under the target name and selecting Indexes. The indexes page appears (Figure 3-7). The indexes page displays metric graphs and tables about the database indexes. It also includes a Missing Indexes table that recommends indexes to be created. Click Create Index to create an index.

    Figure 3-7 Microsoft SQL Server Index Page


    microsoft sql server