Correcting Node Differences From Compare Results
Using the results from running a compare, you can correct differences and rationalize changes between two viewpoints. You can create or open a draft request and then make your changes or you can generate a new request based on the differences in the comparison.
Correcting Missing Nodes
For missing nodes, you can drag and drop nodes as a method of inserting them into a viewpoint. To drag and drop nodes from a source to a target, you need at least Participant(Read) permission on the source data object and at least Participant(Write) permission on the target data object.
To correct a missing node difference:
- Open two viewpoints in a side by side layout.
- Start a new request or open an existing request.
- In one of the viewpoints, select a node whose node type allows child nodes.
- Drag the node from that viewpoint to the other viewpoint.
Note:
The parent node where you are dropping the node must allow child nodes of this node type. If the viewpoints use different node types, node type converters must be set up for the drag and drop to be successful.-
If a node with the same name does not exist in the target node type, the new node is added to the viewpoint under the parent where it was dropped.
-
If a node with the same name does exist in the target node type and the hierarchy set being used allows shared nodes, then the existing node is inserted to the viewpoint under the parent where it was dropped.
-
Correcting Relationship and Property Differences
Use the Align feature to view existing nodes in both viewpoints with relationship or property differences, see Aligning Nodes.
Note:
The direction (Align Left or Right) is selected automatically based on the direction of the compare when you compare properties or relationships. When you click on a node in the compare results, the node is located in both viewpoints under the selected node that is being compared.
-
Relationship differences can be resolved by moving the node in either viewpoint or inserting a shared node (if allowed).
-
Property differences can be resolved by changing the value in either viewpoint or copying a value across viewpoints.
Creating Request Items from Comparison Results
Instead of making changes manually to correct differences between the viewpoints, you can create a request directly from the comparison results. After running a compare, you can create a request, generate request items and actions from the compare results, and then submit the request to commit the changes.
Note:
For nodes that are added or inserted where the parent is not known (for example, when the source viewpoint is a list and the target is a hierarchy), an administrator can define an expression to calculate the parent value for each request action and store it for the node in the viewpoint. See Calculated and Stored Properties.
Caution:
When comparing different hierarchies in the same viewpoint (see Using Duplicate Viewpoint Tabs), request items to insert nodes into the target viewpoint may not get created. Since the source hierarchy also exists in the target viewpoint, the generated request file rows to insert the nodes may be skipped because the nodes are already located under the parents in the source hierarchy.
To resolve this situation, you can download the request file attachment, change the Parent column to identify the proper parent in the target hierarchy, and load the modified file back into the request. Alternatively, you can manually insert the nodes into the target hierarchy (see Correcting Missing Nodes above).
To create request items from comparison results:
-
After running the comparison, click New Request or open a draft request.
-
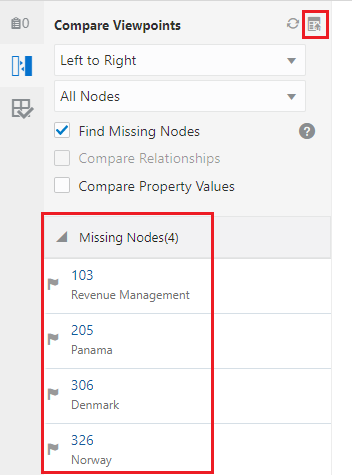
Click Create Request Items from Compare
 . See example below.

Note:
If you have filtered the viewpoint comparison by selecting specific nodes (bottom nodes only, for example) or specific properties, request items are created for the filtered compare results only.
-
When all changes have been added to the request, click Submit to commit the changes or Done to close the request without submitting.