Chapter 4 Installing Oracle VM Manager
Complete the procedures in this chapter to successfully install Oracle VM Manager.
This chapter also provides procedures to uninstall Oracle VM Manager.
4.1 Oracle VM Manager Components
The applications necessary to run Oracle VM Manager are packaged in the ISO image. Some or all of the following applications may be installed on the host computer when you install Oracle VM Manager:
- Oracle VM Manager
-
The Oracle VM Manager application provided as a Oracle WebLogic Server domain and container.
- Oracle WebLogic Server 12c
-
Oracle WebLogic Server 12c Standard Edition, including Application Development Framework (ADF) Release 12c, is included with the Oracle VM Manager. Use of Oracle WebLogic Server 12c Standard Edition is restricted to use with Oracle VM Manager. For more information about Oracle WebLogic Server, see the Oracle WebLogic Server 12c documentation:
- MySQL Enterprise Edition
-
MySQL Enterprise Edition is included for use as the Oracle VM Manager Management Repository. Use of MySQL Enterprise Edition, including without limitation MySQL Enterprise Backup, is restricted to use with Oracle VM Manager.
This MySQL database is installed locally using the packages that are bundled with the Oracle VM Manager installer. Oracle VM Manager makes use of its own version of MySQL 5.6 Enterprise Edition which is licensed for exclusive use by Oracle VM. MySQL is installed into the standard location with databases and configuration information located at
/u01/app/oracle/mysql/data. The MySQL server that is installed uses a non-standard TCP Port (49500) for exclusive use by Oracle VM Manager. Do not use the bundled database for other applications.To prevent potential conflicts with existing MySQL installations, The Oracle VM Manager installer requires that you remove any existing MySQL installation prior to installation. If you are running MySQL on the system where you are installing Oracle VM Manager, the installer exits to allow you to backup any existing databases and remove the existing MySQL instance before proceeding with the installation.
NoteOracle VM Manager Release 3.4 does not support the use of any database other than MySQL Enterprise Edition.
4.2 Minimum Hardware and Software Requirements
The following minimum system requirements must be met on the computer on which you want to install Oracle VM Manager.
4.2.1 Hardware Requirements
Before you install Oracle VM Manager, make sure that your computer meets the minimum hardware requirements listed in Table 4.1:
|
Items |
Minimum Value |
|---|---|
|
Memory |
8.0 GB |
|
Processor Type |
64 bit |
|
Processor Speed |
1.83 GHz*2 |
|
Swap Space |
2.1 GB |
|
Hard Disk Space |
5.5 GB in /u01 3 GB in /tmp 400 MB in /var 300 MB in /usr |
4.2.2 Software Requirements
Before you install Oracle VM Manager, make sure that your computer meets the following minimum software and configuration requirements.
4.2.2.1 Operating Systems
Oracle VM Manager is supported on the following operating systems:
-
Oracle Linux 6 64-bit or later.
-
Oracle Linux 7 64-bit or later.
-
Red Hat Enterprise Linux 6 64-bit or later.
-
Red Hat Enterprise Linux 7 64-bit or later.
You can download Oracle Linux from:
-
Oracle Software Delivery Cloud: https://edelivery.oracle.com/linux
-
Oracle Support site: https://support.oracle.com/
For more information about Oracle Linux, see:
4.2.2.2 Web Browsers
The Oracle VM Manager Web Interface is supported on the web browsers described in the Oracle VM Manager User's Guide
4.2.2.3 Prerequisite Packages
If you have a minimal installation of Oracle Linux, you may not have
all of the required packages installed. These packages are
required for the Oracle VM Manager installer to run and complete. For
all installations, the zip and unzip
and perl packages are required. To install these
packages, enter:
# yum install zip unzip perl
The Oracle VM Manager installer runs some additional checks for other
software packages that are required to complete the
installation. If a required package is missing, the installer
may exit with a warning message notifying you of the missing
package and the steps that you may need to take to install it.
Typically systems that have been installed as a 'minimal'
installation may be missing specific packages. For instance,
on Oracle Linux 6 and 7 you may be required to install the
libaio package, while on Oracle Linux 7 you must
additionally install the net-tools and
perl-Data-Dumper packages.
The Oracle VM Manager installer is responsible for installing a number of different software packages, some of which may have other dependencies. If you have not installed at least a minimal installation of Oracle Linux, the installer may exit at any point and notify you of missing dependencies. In this situation, you must ensure that dependency packages are installed before attempting to resume an installation.
Oracle VM Manager 3.4.7 and above, and MySQL 8.0, requires some packages that might not be installed. These packages are:
-
Oracle VM Manager 3.4.7 requires
polycoreutils-pythonfor Oracle Linux7. -
MySQL 8.0, included with Oracle VM Manager 3.4.7, requires the use of
openssl1.0.1 or above.
4.2.2.4 Removal of Pre-Existing MySQL Installations
If you have an existing MySQL installation on the system where you intend to install Oracle VM Manager you must backup your databases and uninstall it. Oracle VM Manager requires exclusive use of MySQL due to the specific tuning parameters that it applies to the configuration. Oracle VM Manager uses MySQL Enterprise Edition on a non-standard port. The licensing of the MySQL Enterprise Edition provided with Oracle VM Manager grants exclusive use to Oracle VM. You must not use the MySQL server provided for any other purpose. If an existing MySQL installation is present on the system, the installer exits with an error message informing you that you must remove this before continuing with the installation.
MariaDB installations and any associated libraries must equally be removed to avoid conflicts with the Oracle VM Manager MySQL database. If an existing MariaDB installation is present on the system, the installer exits with an error message informing you that you must remove this before continuing with the installation. You can remove conflicting MariaDB packages by entering:
# yum remove mariadb-libs
4.2.2.5 Network
The host computer on which you install Oracle VM Manager must have the
host name correctly configured
(pingable). Make sure the computer's host
name matches the host name in the
/etc/hosts file. Use the following
command to check the host name:
# hostname
Use a text editor to check the host name in the
/etc/hosts file. For example, to use VI
enter
# vi /etc/hosts
For example, if the computer's host name is
hostname1.example.com, and the IP address
is 10.1.1.1, the corresponding item in
the /etc/hosts file should be:
10.1.1.1 hostname1.example.com hostname1
Oracle VM Manager requires that the system time reported by all Oracle VM Servers is synchronized with the time reported by the Oracle VM Manager host. Therefore, Oracle VM Manager runs an NTP daemon that is used to update the system time on each Oracle VM Server. The NTP daemon on Oracle VM Manager must be able to synchronize with other NTP servers, or it will fail to promote itself to a stratum that the Oracle VM Servers can use to synchronize with. If you do not run NTP within your own environment, the Oracle VM Manager host must be able to communicate with other NTP servers on the Internet using UDP 123. Any firewalls preventing this can cause unexpected behavior within Oracle VM Manager, including the inability to properly perform server discovery.
When a VLAN is used for the management network, IPv6 should be disabled before installing Oracle VM Manager. IPv6 is not supported by Oracle VM and disabling it before installing Oracle VM Manager may help to avoid some problems with network configuration in general.
4.2.2.6 Firewall Configuration
A default Oracle Linux install has the firewall enabled. You can either open all the ports used by Oracle VM Manager, or open all ports by disabling the firewall, or open only the ports needed for Oracle VM Manager operation.
We recommend configuring the firewall to only open the required ports automatically,
using the environment configuration script provided with the Oracle VM Manager installer. As part
of the installation procedure, a script is included named
createOracle.sh. You can run this script to perform a number of
installation tasks in an automated way, including the standard firewall configuration.
See Section 4.3.1, “Configuring the Environment Before Installation” for information on using this script.
The diagram and table below illustrate the firewall rules and requirements for Oracle VM.
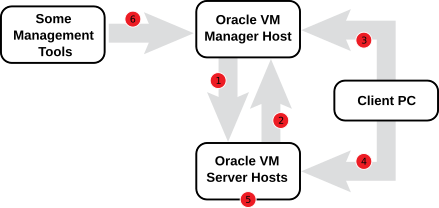
| No. | Component Relationship | Ports and Description | Optional |
|---|---|---|---|
|
1 |
Oracle VM Manager to Oracle VM Server |
|
No |
|
2 |
Oracle VM Server to Oracle VM Manager |
|
No |
|
3 |
Client PC to Oracle VM Manager |
|
No, although access to services should be limited to requirements |
|
4 |
Client PC to Oracle VM Server |
|
Yes |
|
5 |
Oracle VM Server to Oracle VM Server |
|
No |
|
6 |
Some Management Tools to Oracle VM Manager |
|
Yes |
The following instructions explain how to resolve any firewall requirements manually, and assume that you have decided not to use the environment configuration script provided with the Oracle VM Manager installer.
For Oracle Linux (or Red Hat Enterprise Linux) 6, if the iptables package
is installed, then the iptables rules are added during the
installation. However, for Oracle Linux (or Red Hat Enterprise Linux) 7 and beyond, if the
firewalld package is installed, then the firewalld
rules are added.
Note that if iptables or firewalld has been
disabled on the target host prior to the installation of Oracle VM Manager, the
createOracle.sh script does not automatically re-enable the
iptables or firewalld service. No rules are added
if the firewall managements tools are not installed. Any rules added
take effect when the service is enabled.
If firewall management tools are enabled, even if there are no rules defined, each packet is checked by the firewall management tools, which can have an impact on performance.
If you prefer or need to configure the firewall manually, follow these instructions.
iptables, open the required ports in
iptables as follows:-
Log on to the Oracle VM management server as the
rootuser. -
At the command prompt, enter the appropriate command for each port to be opened; for example:
# iptables -A INPUT -m state --state NEW -m tcp -p tcp --dport 7002 -j ACCEPT
# iptables -A INPUT -m state --state NEW -m udp -p udp --dport 123 -j ACCEPT
# iptables -A INPUT -m state --state NEW -m udp -p udp --dport 10000 -j ACCEPT
-
Save the
iptablesconfiguration.# service iptables save
This does not require
iptablesto be restarted as the commands open the ports whileiptablesis running. The save ensures they are opened on reboot/restart in future.
firewalld, open the required ports in
firewalld as follows:-
Log on to the Oracle VM management server as the
rootuser. -
At the command prompt, enter the appropriate command (which persists over reboot) for each port to be opened; for example:
# firewall-cmd --permanent --zone=public --add-port=7200/tcp
# firewall-cmd --permanent --zone=public --add-port=123/udp
# firewall-cmd --permanent --zone=public --add-port=10000/tcp
# firewall-cmd --reload
4.3 Installing Oracle VM Manager
It takes approximately 8-15 minutes to complete the installation of Oracle VM Manager, depending on the performance of the Oracle VM Manager host, and the installation type you choose.
Before you begin the installation, download the Oracle VM Manager software from:
http://edelivery.oracle.com/oraclevm
More information on obtaining the software is covered in Section 1.2, “Getting Installation ISOs and Packages”.
Once you have downloaded the Oracle VM Manager installation ISO you must either burn it to DVD-ROM and mount the DVD on the target host (see Section 1.3, “Installation From Bootable Physical Media”); or copy the ISO to the target host and perform a loopback mount of the ISO (see Section 1.4, “Loopback ISO Mounts”).
4.3.1 Configuring the Environment Before Installation
Oracle VM Manager requires a system user named oracle,
a group called dba, and a
/u01 directory with specific permissions on
installation folders. The Oracle VM Manager installation media includes a
shell script, createOracle.sh, that
automatically configures the environment. This script does the
following:
You must use the bash login shell with the oracle user to install
Oracle VM Manager.
The createOracle.sh script does the
following:
-
Creates the required operating system user,
oracle, and groups,dba.NoteThe script does not set a password for the
oracleuser as a security measure. Because the user does not have a password, it is not possible to log in as theoracleuser. If you want to allow login access, you must set the password manually. -
Creates the
/u01directory, if it does not already exist, and sets permissions on required installation folders.NoteThe
/u01directory must exist before you can install Oracle VM Manager. This directory must also have 2.4 GB of space available. -
Sets the required parameters in the
/etc/security/limits.conffile on a Linux system. -
Opens the required ports in the firewall on a Linux system.
You should run the createOracle.sh script
if you are installing Oracle VM Manager on the system for the first
time. You do not need to run this script if you are
reinstalling Oracle VM Manager on the same system.
To run createOracle.sh and configure the
environment, do the following:
-
Mount the Oracle VM Manager installation media. See Section 1.3, “Installation From Bootable Physical Media” or Section 1.4, “Loopback ISO Mounts”.
-
Change directory to the mount point, for example:
# cd /mnt/cdrom
-
As the root user, run
createOracle.sh# ./createOracle.sh
The createOracle.sh script does not automatically enable the
iptables or firewalld service. You should manually
confirm that the firewall service is enabled.
Manually Setting Up the Oracle User
To install Oracle VM Manager, you must have an
oracle user that is a member of a group
named dba and which has the correct
security limits set.
The environment configuration script automatically creates and
configures the oracle user. As an
alternative to using the script, you can set up the
oracle user with the following commands:
-
If the oracle user does not exist on the Oracle VM Manager host, enter the following commands as the root user to create the user, create the group, add the user to the group, and set the user's password:
# groupadd dba
# useradd -g dba oracle
-
If the oracle user already exists, add it to the dba group using the following command:
# usermod -g dba oracle
-
The oracle user must also have a
hard nofilesandsoft nofilesminimum of at least 8192, as well as some other security limits set. To set these, edit the/etc/security/limits.conffile to include the following:oracle hard nofile 8192 oracle soft nofile 8192 oracle soft nproc 4096 oracle hard nproc 4096 oracle soft core unlimited oracle hard core unlimited
4.3.2 Running the Oracle VM Manager Installer
To install Oracle VM Manager, change directory to the mount point where you have either mounted the DVD-ROM or where you have mounted the ISO file and start the installation by running the runInstaller script as the root user:
Please ensure that you have met the requirements outlined in
Section 4.2, “Minimum Hardware and Software Requirements”
before running the runInstaller.sh script. The runInstaller.sh
script attempts to check that these requirements are met
before running and may exit if a requirement is not met. It is
possible to disable prerequisite steps by running the script
with the -n or --noprereq
option, as described in
Section 4.6, “Oracle VM Manager Installation Script (runInstaller.sh)”.
# cd /mnt/ovm
# ./runInstaller.sh
Substitute /mnt/ovm with the path to
the mount point where the DVD-ROM or ISO image file is mounted
on your own system.
A set of installer options are displayed:
Please select an installation type:
   1: Install
   2: Upgrade
   3: Uninstall
   4: Help
At the command prompt, enter 1 to perform the installation. If you already have Oracle VM Manager installed and want to upgrade it, select 2 to Upgrade. If you already have Oracle VM Manager installed and want to remove it, select 3 to Uninstall.
See Section 4.3.2.1, “Installation” for information on installing Oracle VM Manager.
See Section 4.5, “Uninstalling Oracle VM Manager” for information on uninstalling Oracle VM Manager, and its components such as MySQL, Oracle WebLogic Server, ADF and Java.
Upgrading Oracle VM Manager is discussed in Chapter 5, Upgrading Oracle VM.
4.3.2.1 Installation
The Installation option installs MySQL Enterprise Edition, MySQL Enterprise Edition Backup, Oracle WebLogic Server, Oracle Application Development Framework (ADF), Java, and Oracle VM Manager on the local system. The following example shows the installation process.
If you have an existing MySQL installation on the system where you intend to install Oracle VM Manager you must backup your databases and uninstall it. Oracle VM Manager requires exclusive use of MySQL due to the specific tuning parameters that it applies to the configuration. Oracle VM Manager uses MySQL Enterprise Edition on a non-standard port. The licensing of the MySQL Enterprise Edition provided with Oracle VM Manager grants exclusive use to Oracle VM. You must not use the MySQL server provided for any other purpose. If MySQL is installed as a result of a previous installation of Oracle VM Manager the installation prompts you to provide the hostname, root password and port number that was used in the previous installation.
# ./runInstaller.sh Oracle VM Manager Release 3.x.xInstaller Oracle VM Manager Installer log file: /var/log/ovmm/filename.log Please select an installation type: 1: Install 2: Upgrade 3: Uninstall 4: Help Select Number (1-4): 1
The installation process starts, and the following is displayed:
Verifying installation prerequisites ...

Starting production with local database installation ...

One password is used for all users created and used during the installation.
Enter a password for all logins used during the installation:
Enter a password for all logins used during the installation (confirm):
A system-wide password is required during installation. This password is used for all components used by Oracle VM Manager including MySQL, Oracle WebLogic and the Oracle VM Manager application itself. Note that the password should at least adhere to the requirements for an Oracle WebLogic password as set out below:
-
Be between 8 and 16 characters in length.
-
Contain at least 1 lower case and 1 upper case letter.
-
Contain at least 1 numeric value or special character.
Enter the system-wide password and then enter it again when you are prompted to confirm your password.
Please enter your fully qualified domain name, e.g. ovs123.us.oracle.com, (or IP address)
of your management server for SSL certification generation, more than one IP address are
detected: 10.172.76.71 192.168.122.1 [10.172.76.71]:
Enter the fully qualified domain name or IP address of the host where you are installing Oracle VM Manager. This is used to generate the self-signed SSL certificate that is used by Oracle VM Manager to encrypt HTTPS communications. The domain name must either match the domain name returned when running the hostname -f command on your system, or must match a valid IP address for the host. The installer validates the IP address or hostname entered here by attempting to ping the entry before proceeding with the installation. If the ping fails, the installer prompts to re-enter a valid domain name or IP address. It is not possible to enter 'localhost' or '127.0.0.1' as a valid hostname.
Verifying configuration ...
Warnings may occur if not all recommendations are met.
The installer provides a final option to continue or to abort the installation process. Enter 1 to continue. Progress of the installation is output on your screen step by step, as shown below:
Start installing Oracle VM Manager:
   1: Continue
   2: Abort

   Select Number (1-2): 1

Step 1 of 7 : Database Software...
Installing Database Software...
Retrieving MySQL Database 5.6 ...
Unzipping MySQL RPM File ...
Installing MySQL 5.6 RPM package ...
Configuring MySQL Database 5.6 ...
Installing MySQL backup RPM package ...

Step 2 of 7 : Java ...
Installing Java ...

Step 3 of 7 : WebLogic and ADF...
Retrieving Oracle WebLogic Server 12c and ADF ...
Installing Oracle WebLogic Server 12c and ADF ...
Applying patches to Weblogic ...
Applying patch to ADF ...

Step 4 of 7 : Oracle VM  ...
Installing Oracle VM Manager Core ...
Retrieving Oracle VM Manager Application ...
Extracting Oracle VM Manager Application ...

Retrieving Oracle VM Manager Upgrade tool ...
Extracting Oracle VM Manager Upgrade tool ...
Installing Oracle VM Manager Upgrade tool ...

Retrieving Oracle VM Manager CLI tool ...
Extracting Oracle VM Manager CLI tool...
Installing Oracle VM Manager CLI tool ...
Installing Oracle VM Manager WLST Scripts ...

Step 5 of 7 : Domain creation ...
Creating domain ...

Step 6 of 7 : Oracle VM Tools ...

Retrieving Oracle VM Manager Shell & API ...
Extracting Oracle VM Manager Shell & API ...
Installing Oracle VM Manager Shell & API ...

Retrieving Oracle VM Manager Wsh tool ...
Extracting Oracle VM Manager Wsh tool ...
Installing Oracle VM Manager Wsh tool ...

Retrieving Oracle VM Manager Tools ...
Extracting Oracle VM Manager Tools ...
Installing Oracle VM Manager Tools ...

Retrieving ovmcore-console ...
Installing ovmcore-console RPM package ...
Copying Oracle VM Manager shell to '/usr/bin/ovm_shell.sh' ...
Installing ovm_admin.sh in '/u01/app/oracle/ovm-manager-3/bin' ...
Installing ovm_upgrade.sh in '/u01/app/oracle/ovm-manager-3/bin' ...

Step 7 of 7 : Start OVM Manager ...
Enabling Oracle VM Manager service ...
Shutting down Oracle VM Manager instance ...
Starting Oracle VM Manager instance ...

Please wait while WebLogic configures the applications...
Oracle VM Manager installed.
When the installation is complete a summary similar to the following is displayed:
Installation Summary
--------------------
Database configuration:
  Database type               : MySQL
  Database host name          : localhost
  Database name               : ovs
  Database listener port      : 49500
  Database user               : ovs

Weblogic Server configuration:
  Administration username     : weblogic

Oracle VM Manager configuration:
  Username                    : admin
  Core management port        : 54321
  UUID                        : 0004fb00000100007c08b684bd203388

Passwords:
There are no default passwords for any users. The passwords to use for Oracle VM Manager,
Database, and Oracle WebLogic Server have been set by you during this installation. In the
case of a default install, all passwords are the same.

Oracle VM Manager UI:
  https://hostname:7002/ovm/console
Log in with the user 'admin', and the password you set during the installation.

As of Oracle VM Release 3.4.5, the TLSv1.2 protocol is used for all connections and
management of 3.2.10/11 servers is not possible by default. TLSv1 protocol must be enabled,
which is less secure. For instructions, see the Oracle VM 3.4 Installation and Upgrade guide.

For more information about Oracle Virtualization, please visit:
  http://www.oracle.com/virtualization/

Oracle VM Manager installation complete.

Please remove configuration file /tmp/ovm_configid.
Make sure you delete the temporary configuration file created during the installation:
/tmp/ovm_config
id
This file is useful for debugging installation issues, but does contain some sensitive information that may present a security issue if left in place. This file is automatically deleted if you abort an installation.
When you have completed your installation, there are a number of additional steps that you should perform before you start using Oracle VM Manager to manage your deployment. Please see Chapter 7, What Next? to continue configuring your environment.
4.3.3 Installation Logs
If any errors occur during installation, check the Oracle VM Manager installation log file. Usually, this should be found in:
/var/log/ovmm/ovm-manager-3-install-
date.log
However, if the installer is unable to create this directory and file for some reason, such as inadequate permissions, the install file is located in:
/tmp/ovm-manager-3-install-
date.log
During installation, the installer self-extracts into the
/tmp directory, if the installer does not
exit properly, you may also find an installation log in this
location:
/tmp/ovmm-installer.selfextract_
id/ovm-manager-3-install-date.log
4.3.4 Installation Directories
The locations of the Oracle VM Manager components are listed in Table 4.3.
|
Component |
Location |
|---|---|
|
MySQL |
|
|
MySQL Enterprise Backup |
Backups are stored in:
|
|
Java |
|
|
Oracle WebLogic Server |
|
|
Oracle ADF |
|
|
Oracle VM Manager application |
|
|
Oracle WebLogic Server domain |
|
4.4 Running Oracle VM Manager as a Virtual Machine
Oracle VM Manager does not necessarily have to run on a separate physical server in your environment. Although this is the preferred deployment process, you can also run Oracle VM Manager as a virtiual machine in a carefully designed environment.
You can run Oracle VM Manager under another virtualization product, such as Oracle VM VirtualBox running on a bare metal Linux or Windows system. To do this, you should ensure that the memory and CPU specifications of the virtual machine meet or exceed the requirements for Oracle VM Manager. You should also install the operating system and Oracle VM Manager components in the same manner as on bare metal. For more information, see Section 4.2, “Minimum Hardware and Software Requirements”. Plan for the possibility of problems arising with this configuration. If the virtual machine experiences issues, it may need to use repair procedures specific to the virtualization product that you are using, which are not provided in this topic.
You can configure Oracle VM Manager as a virtual machine within an Oracle VM Server for x86 server pool. This allows Oracle VM Manager to benefit from all the typical advantages of virtualization: hardware consolidation, high availability, live migration and so on. As Oracle VM Manager is not associated with any one physical server, it leaves more physical resources for other applications, and at the same time it can be hot-cloned, backed up and migrated without downtime to other hardware when server maintenance is required.
Although running Oracle VM Manager on a virtual machine within an Oracle VM Server for x86 server pool is possible, support is limited and the following caveats apply:
-
Oracle VM Manager should not be run on a virtual machine that it is managing. This configuration may result in a single point of failure that it cannot recover from without significant manual intervention.
-
If multiple Oracle VM environments are in use, you should install each instance of Oracle VM Manager in a configuration that ensures it manages an environment other than the one it is directly managing. Typical deployments have an instance of Oracle VM Manager running on a virtual machine in each environment, which is used to manage a different Oracle VM Server environment. This configuration may require manual intervention if all instances of Oracle VM Manager are in a failure state at the same time, for example, if all environments use the same storage, and the storage fails.
-
It is strongly recommended that an Oracle VM virtual machine, which contains an instance of Oracle VM Manager has High Availability enabled. This ensures that the virtual machine restarts automatically on a different server in the event of a physical Oracle VM Server failure.
-
The virtual machine where you want to run Oracle VM Manager must comply with the prerequisite software and hardware requirements for installing Oracle VM Manager. See Section 4.2, “Minimum Hardware and Software Requirements”.
-
As stated previously, the procedure to install Oracle VM Manager as a virtual machine can be achieved using a virtualization product such as Oracle VM VirtualBox.
4.5 Uninstalling Oracle VM Manager
Before uninstalling Oracle VM Manager, you may want to back up Oracle VM Manager and the Oracle VM Manager database schema. For information on how to back up Oracle VM Manager, see Backing up the Oracle VM Manager Configuration File.
You perform the uninstall using the Oracle VM Manager installation script. You must start the installer from the installation media; you cannot perform an uninstall without the installation media as there is no installer located on the Oracle VM Manager host computer. See Section 4.3.2, “Running the Oracle VM Manager Installer” for information on starting the installer. Follow the prompts to uninstall Oracle VM Manager. See Section 4.6, “Oracle VM Manager Installation Script (runInstaller.sh)” for the full syntax to the installation script.
The following example shows an uninstall of a default Oracle VM Manager installation. Before you uninstall Oracle VM Manager, make sure both the Oracle VM Manager Command Line Interface and Oracle VM Manager are shut down:
# service ovmcli stop
# service ovmm stop
# ./runInstaller.sh -i Uninstall -y Oracle VM Manager Release 3.x.xInstaller Oracle VM Manager Installer log file: /tmp/filename.log Uninstall Oracle VM Manager DB component : MySQL RPM package MySQL RPM package installed by OVMM was found... Removing MySQL RPM package installation ... Product component : ovmcore-console RPM package ovmcore-console RPM Package is installed ... Removing ovmcore-console RPM Package installation ... Product component : Java in '/u01/app/oracle/java/' Java is installed ... Removing Java installation ... Product component : Oracle VM Manager in '/u01/app/oracle/ovm-manager-3/' Oracle VM Manager is installed ... Removing Oracle VM Manager installation ... Product component : Oracle WebLogic Server in '/u01/app/oracle/Middleware/' Oracle WebLogic Server is installed Removing Oracle WebLogic Server installation ... Service ovmm is deleted. Service ovmcli is deleted. Uninstall completed ...
The default behavior of an uninstall is to leave database backup
files in place, in case there is a need to recover the database
after a new installation. These files are located in
/u01/app/oracle/mysql/dbbackup. If you wish
to remove them after installation, you can do so manually.
4.6 Oracle VM Manager Installation Script (runInstaller.sh)
This section contains information about the Oracle VM Manager installation script, runInstaller.sh, and includes details on the usage, syntax and parameters. The runInstaller.sh script should always be run as the root user. Make sure you have met the requirements outlined in Section 4.2, “Minimum Hardware and Software Requirements” before running the runInstaller.sh script.
Syntax
runInstaller.sh
[
-h
|
--help
]
[
{
-c
|
--config=
}
configfile.yml-u
|
--uuid=
}
uuid-i
|
--installtype=
}
{
Install
|
Uninstall
|
Upgrade
}
] [
{
-y
|
--assumeyes
}
] [
{
-n
|
--noprereq
}
] [
{
-k
|
--cleanup
}
]
Options
Using the runInstaller.sh script with no options prompts you to enter any required options.
The following table shows the available options for this tool.
|
Option |
Description |
|---|---|
|
[
|
Display the runInstaller.sh command parameters and options. |
|
{
|
Specifies an install configuration file. This file is used to set install options in a silent installation. This command option is deprecated and should not be used. |
|
{
|
Sets the UUID for Oracle VM Manager.
|
|
{
|
Sets the install type to use without being prompted during the install. Use this option during a silent install. |
|
{
|
Sets each prompt during the install to respond as yes.
If combined with the
|
|
{
|
Sets the installer to ignore all prerequisite system checks such as memory or operating system requirements. |
|
{
|
Cleans up all temporary installation configuration files after the install completes. |
Running the installer without checking the host system prerequisites:
# ./runInstaller.sh --noprereq
Running the installer with the UUID of Oracle VM Manager to perform a recovery:
# ./runInstaller.sh --uuid=0004fb000000100002cb7f2dffa8d8