


Writing Robust JMS Applications
The following examples show how to use some of the more advanced features of the JMS API.
A Message Acknowledgment Example
The AckEquivExample.java client shows how both of the following scenarios ensure that a message will not be acknowledged until processing of it is complete:
Using an asynchronous message consumer (a message listener) in an AUTO_ACKNOWLEDGE session
Using a synchronous receiver in a CLIENT_ACKNOWLEDGE session
Note - In the Java EE platform, message listeners and CLIENT_ACKNOWLEDGE sessions can be used only in application clients, as in this example.
With a message listener, the automatic acknowledgment happens when the onMessage method returns (that is, after message processing has finished). With a synchronous receiver, the client acknowledges the message after processing is complete. If you use AUTO_ACKNOWLEDGE with a synchronous receive, the acknowledgment happens immediately after the receive call; if any subsequent processing steps fail, the message cannot be redelivered.
The example is in the following directory:
tut-install/examples/jms/advanced/ackequivexample/src/java/
The example contains an AsynchSubscriber class with a TextListener class, a MultiplePublisher class, a SynchReceiver class, a SynchSender class, a main method, and a method that runs the other classes’ threads.
The example uses the following objects:
jms/ConnectionFactory, jms/Queue, and jms/Topic: resources that you created for A Simple Example of Synchronous Message Receives.
jms/ControlQueue: an additional queue
jms/DurableConnectionFactory: a connection factory with a client ID (see Creating Durable Subscriptions for more information)
The new queue and connection factory are created at deployment time.
You can use either NetBeans IDE or Ant to build, package, deploy, and run ackequivexample.
To Run ackequivexample Using NetBeans IDE
- To build and package the client, follow these steps.
- From the File menu, choose Open Project.
- In the Open Project dialog, navigate to:
tut-install/examples/jms/advanced/
- Select the ackequivexample folder.
- Select the Open as Main Project check box.
- Click Open Project.
- In the Projects tab, right-click the project and select Build.
- To run the client, right-click the ackequivexample project and select Run.
The client output looks something like this (along with some additional output):
Queue name is jms/ControlQueue
Queue name is jms/Queue
Topic name is jms/Topic
Connection factory name is jms/DurableConnectionFactory
  SENDER: Created client-acknowledge session
  SENDER: Sending message: Here is a client-acknowledge message
  RECEIVER: Created client-acknowledge session
  RECEIVER: Processing message: Here is a client-acknowledge message
  RECEIVER: Now I’ll acknowledge the message
SUBSCRIBER: Created auto-acknowledge session
SUBSCRIBER: Sending synchronize message to control queue
PUBLISHER: Created auto-acknowledge session
PUBLISHER: Receiving synchronize messages from control queue; count = 1
PUBLISHER: Received synchronize message;  expect 0 more
PUBLISHER: Publishing message: Here is an auto-acknowledge message 1
PUBLISHER: Publishing message: Here is an auto-acknowledge message 2
SUBSCRIBER: Processing message: Here is an auto-acknowledge message 1
PUBLISHER: Publishing message: Here is an auto-acknowledge message 3
SUBSCRIBER: Processing message: Here is an auto-acknowledge message 2
SUBSCRIBER: Processing message: Here is an auto-acknowledge message 3
- After you run the client, you can delete the destination resource jms/ControlQueue
by using the following command:
asadmin delete-jms-resource jms/ControlQueue
You will need the other resources for other examples.
To Run ackequivexample Using Ant
- In a terminal window, go to the following directory:
tut-install/examples/jms/advanced/ackequivexample/
- To compile and package the client, type the following command:
ant
- To create needed resources, deploy the client JAR file to the GlassFish
Server, then retrieve the client stubs, type the following command:
ant getclient
Ignore the message that states that the application is deployed at a URL.
- Because this example takes no command-line arguments, you can run the client using
the following command:
ant run
Alternatively, you can type the following command:
appclient -client client-jar/ackequivexampleClient.jar
The client output looks something like this (along with some additional output):
Queue name is jms/ControlQueue
Queue name is jms/Queue
Topic name is jms/Topic
Connection factory name is jms/DurableConnectionFactory
  SENDER: Created client-acknowledge session
  SENDER: Sending message: Here is a client-acknowledge message
  RECEIVER: Created client-acknowledge session
  RECEIVER: Processing message: Here is a client-acknowledge message
  RECEIVER: Now I’ll acknowledge the message
SUBSCRIBER: Created auto-acknowledge session
SUBSCRIBER: Sending synchronize message to control queue
PUBLISHER: Created auto-acknowledge session
PUBLISHER: Receiving synchronize messages from control queue; count = 1
PUBLISHER: Received synchronize message;  expect 0 more
PUBLISHER: Publishing message: Here is an auto-acknowledge message 1
PUBLISHER: Publishing message: Here is an auto-acknowledge message 2
SUBSCRIBER: Processing message: Here is an auto-acknowledge message 1
PUBLISHER: Publishing message: Here is an auto-acknowledge message 3
SUBSCRIBER: Processing message: Here is an auto-acknowledge message 2
SUBSCRIBER: Processing message: Here is an auto-acknowledge message 3
- After you run the client, you can delete the destination resource jms/ControlQueue
by using the following command:
asadmin delete-jms-resource jms/ControlQueue
You will need the other resources for other examples.
A Durable Subscription Example
DurableSubscriberExample.java shows how durable subscriptions work. It demonstrates that a durable subscription is active even when the subscriber is not active. The example contains a DurableSubscriber class, a MultiplePublisher class, a main method, and a method that instantiates the classes and calls their methods in sequence.
The example is in the tut-install/examples/jms/advanced/durablesubscriberexample/src/java/ directory.
The example begins in the same way as any publish/subscribe client: The subscriber starts, the publisher publishes some messages, and the subscriber receives them. At this point, the subscriber closes itself. The publisher then publishes some messages while the subscriber is not active. The subscriber then restarts and receives those messages.
You can use either NetBeans IDE or Ant to build, package, deploy, and run durablesubscriberexample.
To Run durablesubscriberexample Using NetBeans IDE
- To compile and package the client, follow these steps:
- From the File menu, choose Open Project.
- In the Open Project dialog, navigate to:
tut-install/examples/jms/advanced/
- Select the durablesubscriberexample folder.
- Select the Open as Main Project check box.
- Click Open Project.
- In the Projects tab, right-click the project and select Build.
- To run the client, right-click the durablesubscriberexample project and select Run.
The output looks something like this (along with some additional output):
Connection factory without client ID is jms/ConnectionFactory
Connection factory with client ID is jms/DurableConnectionFactory
Topic name is jms/Topic
Starting subscriber
PUBLISHER: Publishing message: Here is a message 1
SUBSCRIBER: Reading message: Here is a message 1
PUBLISHER: Publishing message: Here is a message 2
SUBSCRIBER: Reading message: Here is a message 2
PUBLISHER: Publishing message: Here is a message 3
SUBSCRIBER: Reading message: Here is a message 3
Closing subscriber
PUBLISHER: Publishing message: Here is a message 4
PUBLISHER: Publishing message: Here is a message 5
PUBLISHER: Publishing message: Here is a message 6
Starting subscriber
SUBSCRIBER: Reading message: Here is a message 4
SUBSCRIBER: Reading message: Here is a message 5
SUBSCRIBER: Reading message: Here is a message 6
Closing subscriber
Unsubscribing from durable subscription
- After you run the client, you can delete the connection factory jms/DurableConnectionFactory
by using the following command:
asadmin delete-jms-resource jms/DurableConnectionFactory
To Run durablesubscriberexample Using Ant
- In a terminal window, go to the following directory:
tut-install/examples/jms/advanced/durablesubscriberexample/
- To compile and package the client, type the following command:
ant
- To create any needed resources, deploy the client JAR file to the GlassFish
Server, then retrieve the client stubs, type the following command:
ant getclient
Ignore the message that states that the application is deployed at a URL.
- Because this example takes no command-line arguments, you can run the client using
the following command:
ant run
Alternatively, you can type the following command:
appclient -client client-jar/durablesubscriberexampleClient.jar
- After you run the client, you can delete the connection factory jms/DurableConnectionFactory
by using the following command:
asadmin delete-jms-resource jms/DurableConnectionFactory
A Local Transaction Example
TransactedExample.java demonstrates the use of transactions in a JMS client application. The example is in the tut-install/examples/jms/advanced/transactedexample/src/java/ directory.
This example shows how to use a queue and a topic in a single transaction as well as how to pass a session to a message listener’s constructor function. The example represents a highly simplified e-commerce application in which the following actions occur.
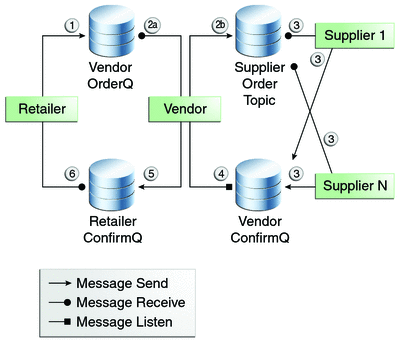
A retailer sends a MapMessage to the vendor order queue, ordering a quantity of computers, and waits for the vendor’s reply:
producer = session.createProducer(vendorOrderQueue);
outMessage = session.createMapMessage();
outMessage.setString("Item", "Computer(s)");
outMessage.setInt("Quantity", quantity);
outMessage.setJMSReplyTo(retailerConfirmQueue);
producer.send(outMessage);
System.out.println("Retailer: ordered " + quantity + " computer(s)");
orderConfirmReceiver = session.createConsumer(retailerConfirmQueue);
connection.start();
The vendor receives the retailer’s order message and sends an order message to the supplier order topic in one transaction. This JMS transaction uses a single session, so you can combine a receive from a queue with a send to a topic. Here is the code that uses the same session to create a consumer for a queue and a producer for a topic:
vendorOrderReceiver = session.createConsumer(vendorOrderQueue);
supplierOrderProducer = session.createProducer(supplierOrderTopic);
The following code receives the incoming message, sends an outgoing message, and commits the session. The message processing has been removed to keep the sequence simple:
inMessage = vendorOrderReceiver.receive();
// Process the incoming message and format the outgoing
// message
...
supplierOrderProducer.send(orderMessage);
...
session.commit();
For simplicity, there are only two suppliers, one for CPUs and one for hard drives.
Each supplier receives the order from the order topic, checks its inventory, and then sends the items ordered to the queue named in the order message’s JMSReplyTo field. If it does not have enough of the item in stock, the supplier sends what it has. The synchronous receive from the topic and the send to the queue take place in one JMS transaction.
receiver = session.createConsumer(orderTopic);
...
inMessage = receiver.receive();
if (inMessage instanceof MapMessage) {
    orderMessage = (MapMessage) inMessage;
}
// Process message
MessageProducer producer =
    session.createProducer((Queue) orderMessage.getJMSReplyTo());
outMessage = session.createMapMessage();
// Add content to message
producer.send(outMessage);
// Display message contentssession.commit();
The vendor receives the suppliers' replies from its confirmation queue and updates the state of the order. Messages are processed by an asynchronous message listener; this step shows the use of JMS transactions with a message listener.
MapMessage component = (MapMessage) message;
...
orderNumber = component.getInt("VendorOrderNumber");
Order order = Order.getOrder(orderNumber).processSubOrder(component);
session.commit();
When all outstanding replies are processed for a given order, the vendor message listener sends a message notifying the retailer whether it can fulfill the order.
Queue replyQueue = (Queue) order.order.getJMSReplyTo();
MessageProducer producer = session.createProducer(replyQueue);
MapMessage retailerConfirmMessage = session.createMapMessage();
// Format the message
producer.send(retailerConfirmMessage);
session.commit();
The retailer receives the message from the vendor:
inMessage = (MapMessage) orderConfirmReceiver.receive();
Figure 48-2 illustrates these steps.
Figure 48-2 Transactions: JMS Client Example
The example contains five classes: GenericSupplier, Order, Retailer, Vendor, and VendorMessageListener. The example also contains a main method and a method that runs the threads of the Retailer, Vendor, and two supplier classes.
All the messages use the MapMessage message type. Synchronous receives are used for all message reception except when the vendor processes the replies of the suppliers. These replies are processed asynchronously and demonstrate how to use transactions within a message listener.
At random intervals, the Vendor class throws an exception to simulate a database problem and cause a rollback.
All classes except Retailer use transacted sessions.
The example uses three queues named jms/AQueue, jms/BQueue, and jms/CQueue, and one topic named jms/OTopic.
You can use either NetBeans IDE or Ant to build, package, deploy, and run transactedexample.
To Run transactedexample Using NetBeans IDE
- In a terminal window, go to the following directory:
tut-install/examples/jms/advanced/transactedexample/
- To compile and package the client, follow these steps:
- From the File menu, choose Open Project.
- In the Open Project dialog, navigate to:
tut-install/examples/jms/advanced/
- Select the transactedexample folder.
- Select the Open as Main Project check box.
- Click Open Project.
- In the Projects tab, right-click the project and select Build.
- To deploy and run the client, follow these steps:
- Right-click the transactedexample project and select Properties.
- Select Run from the Categories tree.
- In the Arguments field, type a number that specifies the number of computers
to order:
3
- Click OK.
- Right-click the project and select Run.
The output looks something like this (along with some additional output):
Quantity to be ordered is 3 Retailer: ordered 3 computer(s) Vendor: Retailer ordered 3 Computer(s) Vendor: ordered 3 CPU(s) and hard drive(s) CPU Supplier: Vendor ordered 3 CPU(s) CPU Supplier: sent 3 CPU(s) CPU Supplier: committed transaction Vendor: committed transaction 1 Hard Drive Supplier: Vendor ordered 3 Hard Drive(s) Hard Drive Supplier: sent 1 Hard Drive(s) Vendor: Completed processing for order 1 Hard Drive Supplier: committed transaction Vendor: unable to send 3 computer(s) Vendor: committed transaction 2 Retailer: Order not filled Retailer: placing another order Retailer: ordered 6 computer(s) Vendor: JMSException occurred: javax.jms.JMSException: Simulated database concurrent access exception javax.jms.JMSException: Simulated database concurrent access exception at TransactedExample$Vendor.run(Unknown Source) Vendor: rolled back transaction 1 Vendor: Retailer ordered 6 Computer(s) Vendor: ordered 6 CPU(s) and hard drive(s) CPU Supplier: Vendor ordered 6 CPU(s) Hard Drive Supplier: Vendor ordered 6 Hard Drive(s) CPU Supplier: sent 6 CPU(s) CPU Supplier: committed transaction Hard Drive Supplier: sent 6 Hard Drive(s) Hard Drive Supplier: committed transaction Vendor: committed transaction 1 Vendor: Completed processing for order 2 Vendor: sent 6 computer(s) Retailer: Order filled Vendor: committed transaction 2 - After you run the client, you can delete the destination resources in NetBeans
IDE or by using the following commands:
asadmin delete-jms-resource jms/AQueue
asadmin delete-jms-resource jms/BQueue
asadmin delete-jms-resource jms/CQueue
asadmin delete-jms-resource jms/OTopic
To Run transactedexample Using Ant and the appclient Command
- In a terminal window, go to the following directory:
tut-install/examples/jms/advanced/transactedexample/
- To build and package the client, type the following command:
ant
- Create needed resources, deploy the client JAR file to the GlassFish Server, then
retrieve the client stubs:
ant getclient
Ignore the message that states that the application is deployed at a URL.
- Use a command like the following to run the client.
The argument specifies the number of computers to order.
appclient -client client-jar/transactedexampleClient.jar 3
The output looks something like this (along with some additional output):
Quantity to be ordered is 3 Retailer: ordered 3 computer(s) Vendor: Retailer ordered 3 Computer(s) Vendor: ordered 3 CPU(s) and hard drive(s) CPU Supplier: Vendor ordered 3 CPU(s) CPU Supplier: sent 3 CPU(s) CPU Supplier: committed transaction Vendor: committed transaction 1 Hard Drive Supplier: Vendor ordered 3 Hard Drive(s) Hard Drive Supplier: sent 1 Hard Drive(s) Vendor: Completed processing for order 1 Hard Drive Supplier: committed transaction Vendor: unable to send 3 computer(s) Vendor: committed transaction 2 Retailer: Order not filled Retailer: placing another order Retailer: ordered 6 computer(s) Vendor: JMSException occurred: javax.jms.JMSException: Simulated database concurrent access exception javax.jms.JMSException: Simulated database concurrent access exception at TransactedExample$Vendor.run(Unknown Source) Vendor: rolled back transaction 1 Vendor: Retailer ordered 6 Computer(s) Vendor: ordered 6 CPU(s) and hard drive(s) CPU Supplier: Vendor ordered 6 CPU(s) Hard Drive Supplier: Vendor ordered 6 Hard Drive(s) CPU Supplier: sent 6 CPU(s) CPU Supplier: committed transaction Hard Drive Supplier: sent 6 Hard Drive(s) Hard Drive Supplier: committed transaction Vendor: committed transaction 1 Vendor: Completed processing for order 2 Vendor: sent 6 computer(s) Retailer: Order filled Vendor: committed transaction 2 - After you run the client, you can delete the destination resources by using
the following commands:
asadmin delete-jms-resource jms/AQueue
asadmin delete-jms-resource jms/BQueue
asadmin delete-jms-resource jms/CQueue
asadmin delete-jms-resource jms/OTopic