Implementing JavaFX Best Practices
This document contains a collection of JavaFX best practices. It is based on code from the Henley Sales application, and presents a number of suggestions for you to keep in mind when writing your own applications. The Henley Sales application is large, and as such, complete inline code listings are not possible. However, it is not necessary to learn the entire implementation to understand the topics that are presented.
Best Practice: Use a Custom Preloader
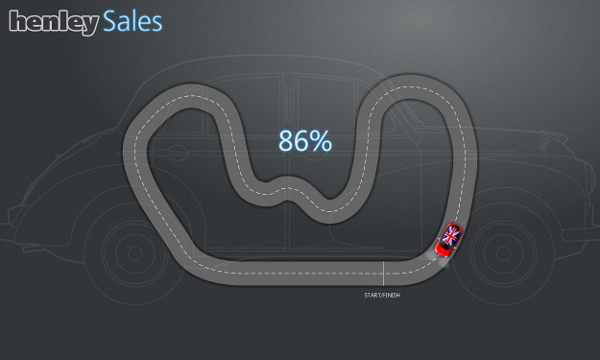
Upon launching the Henley Sales application, you will be greeted with a custom animation of a car driving around a race track. The car moves in relation to the amount of data loaded, which is also represented as a percentage in the center of the screen. Technically speaking, this screen is the preloader, a separate program that runs while your main application is starting up.
Preloaders are not necessary for programs that load quickly. But if your users will be forced to wait a significant amount of time (such as when loading large amounts of data, or downloading an application from the web), a custom preloader can improve their overall experience. This Henley preloader features the same look and feel as the main application, and has access to all available JavaFX API's.
So what does the preloader code look like? Figure 2 shows where its source files are located, as seen from within the NetBeans IDE.
Figure 2 DataAppPreloader Project Files in the NetBeans IDE
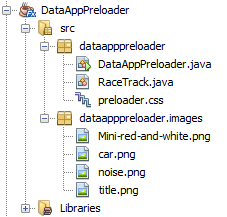
Description of "Figure 2 DataAppPreloader Project Files in the NetBeans IDE"
The first file to consider is DataAppPreloader.java. Examining it reveals that the DataAppPreloader class extends javafx.application.Preloader and overrides a few important methods of interest.
Example 1 DataAppPreloader.java: Overriding the init Method
@Override
    public void init() throws Exception {
        root = new StackPane();
        background = new StackPane();
        background.setId("Window");
        background.setCache(true);
        ImageView carImageView = new ImageView(new Image(
                DataAppPreloader.class.getResourceAsStream("images/car.png")));
        raceTrack = new RaceTrack();
        root.getChildren().addAll(background, raceTrack, carImageView);
        Platform.runLater(new Runnable() {

            @Override
            public void run() {
                preloaderScene = new Scene(root, 1250, 750);
                preloaderScene.getStylesheets().add(
                                     DataAppPreloader.class.getResource(
                                     "preloader.css").toExternalForm());
            }
        });
    }
The init method performs common initialization tasks, such creating the root node, populating it with children, and telling the system to create the preloader's scene on the JavaFX application thread. This particular implementation is typical of what you will find in most JavaFX applications, so will probably look familiar if you have written other applications in JavaFX before. The same can be said for the start method, as shown in Example 2.
Example 2 DataAppPreloader.java: Overriding the start Method
 @Override
    public void start(Stage stage) throws Exception {
        preloaderStage = stage;
        preloaderStage.setScene(preloaderScene);
        preloaderStage.show();

        if (DEMO_MODE) {
            ...
        }
    }
However, the DataAppPreloader class overrides a few preloader-specific methods as well, for handling various kinds of notifications received from the main application.
Example 3 DataAppPreloader.java: Overriding the handleProgressNotification Method
@Override
    public void handleProgressNotification(ProgressNotification info) {
        if (startDownload == -1) {
            startDownload = System.currentTimeMillis();
        }
        raceTrack.setProgress(info.getProgress() * 0.5);
    }
The handleProgressNotification method handles notifications about the main application's data loading progress. This particular implementation calls setProgress on the raceTrack object, based on information that is encapsulated within the received ProgressNotification object.
Example 4 DataAppPreloader.java: Overriding the handleStateChangeNotification Method
@Override
    public void handleStateChangeNotification(StateChangeNotification evt) {
        if (evt.getType() == StateChangeNotification.Type.BEFORE_INIT) {
            // check for fast download and restart progress
            if ((System.currentTimeMillis() - startDownload) < 500) {
                raceTrack.setProgress(0);
            }
            // we have finished downloading application, now we are
            // running application init() method, as we have no way
            // of calculating real progress
            // simplate pretend progress here
            simulatorTimeline = new Timeline();
            simulatorTimeline.getKeyFrames().add(
                    new KeyFrame(Duration.seconds(3),
                    new KeyValue(raceTrack.progressProperty(), 1)));
            simulatorTimeline.play();
        }
    }
The handleStateChangeNotification method is invoked when the main application changes state. As stated in the Preloader.StateChangeNotification API documentation, "A state change notification is sent to a preloader immediately prior to loading the application class (and constructing an instance), calling the application init method, or calling the application start method." The code in Example 4 plays the race car animation as the main application enters its init method.
Example 5 DataAppPreloader.java: Overriding the handleApplicationNotification Method
 @Override
    public void handleApplicationNotification(PreloaderNotification info) {
        if (info instanceof PreloaderHandoverEvent) {
            // handover from preloader to application
            final PreloaderHandoverEvent event = (PreloaderHandoverEvent) info;
            final Parent appRoot = event.getRoot();
            // remove race track
            root.getChildren().remove(raceTrack);
            // stop simulating progress
            simulatorTimeline.stop();
            // apply application stylsheet to scene
            preloaderScene.getStylesheets().setAll(event.getCssUrl());
            // enable caching for smooth fade
            appRoot.setCache(true);
            // make hide appRoot then add it to scene
            appRoot.setTranslateY(preloaderScene.getHeight());
            root.getChildren().add(1, appRoot);
            // animate fade in app content
            Timeline fadeOut = new Timeline();
            fadeOut.getKeyFrames().addAll(
                    new KeyFrame(
                    Duration.millis(1000),
                    new KeyValue(
                        appRoot.translateYProperty(), 0,
                        Interpolator.EASE_OUT)),
                        new KeyFrame(
                            Duration.millis(1500),
                            new EventHandler<ActionEvent>() {
                            @Override
                                public void handle(ActionEvent t) {
                                // turn off cache as not need any more
                                appRoot.setCache(false);
                                // done animation so start loading data
                                for (Runnable task : event.getDataLoadingTasks()){
                                    Platform.runLater(task);
                                }
                            }
                    }));
            fadeOut.play();
        }
    }
The handleApplicationNotification method is responsible for handling application-generated notifications. In Example 5, the code reacts to the transition period from when the preloader ends and the main application begins. This code implements transitional features such as removing the race track, stopping the progress animation, and performing the preloader fade-out.
A PreloaderHandoverEvent is instantiated in the start method of the main application (defined in a separate project under com.javafx.experiments.dataapp.client.DataApplication) , after its UI has finally finished loading. Example 6 shows the most relevant parts of that code.
Example 6 Notifying the Preloader (from DataApplication)
...
@Override public void start(Stage stage) throws Exception {
        // let preloader know we are done creating the ui
        notifyPreloader(new PreloaderHandoverEvent(root,
                DataApplication.class.getResource("dataapp.css").toExternalForm(),
                dataLoadingTasks));
    }
...
The race track animation itself is defined in the preloader project's RaceTrack.java file. As shown in Example 7, this class implements the code for drawing the race track, animating the car, and setting the percentage that appears in the center of the screen.
Example 7 Excerpts From the RaceTrack Class
public class RaceTrack extends Pane {

...
private Text percentage;
...

private DoubleProperty progress = new SimpleDoubleProperty() {
        @Override protected void invalidated() {
            final double progress = get();
            if (progress >= 0) {
                race.jumpTo(Duration.seconds(progress));
                percentage.setText(((int)(100d*progress))+"%");
            }
        }
    };
    public double getProgress() { return progress.get(); }
    public void setProgress(double value) { progress.set(value); }
    public DoubleProperty progressProperty() { return progress; }

...

    // Create path animation that we will use to drive the car along the track
    race = new PathTransition(Duration.seconds(1), road, raceCar);
    race.setOrientation(PathTransition.OrientationType.ORTHOGONAL_TO_TANGENT);
    race.play();
    race.pause();

...

}
The percentage that displays on screen is bound to the underlying progress property, so that the displayed value will change as the data loads. The car animation itself is achieved by playing a PathTransition animation.
There is a lot of code involved in this example, but the most important point to remember (in terms of best practices) is that custom preloaders are a good idea for applications that have a long startup time. For a detailed discussion of preloaders in general, see the "Preloaders" section of the JavaFX Deployment tutorial at http://docs.oracle.com/javafx/2/deployment/preloaders.htm.
Best Practice: Choose Meaningful Package Names
The next best practice becomes apparent when you examine the Henley Sales application from a high-level point of view. Choosing meaningful package names is a simple practice that will make your code more organized and easier to maintain.
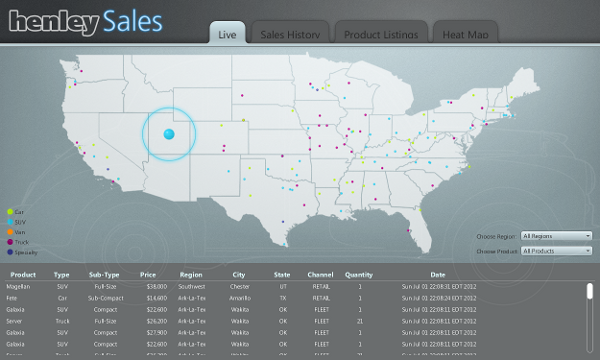
For example, consider the "Live" tab, which appears on screen after the preloader has finished running:
This tab provides a simulation of live sales data, as if they were occurring in real time. Navigation through the Henley Sales application is made possible through a number of such tabs, all of which appear along the top of the screen. Now look at the DataAppClient project and notice how the heat tab, history tab, live tab, and products tab source code are all defined within their own dedicated packages under com.javafx.experiments.datapp.client.
Figure 4 Package Names for the DataAppClient Project
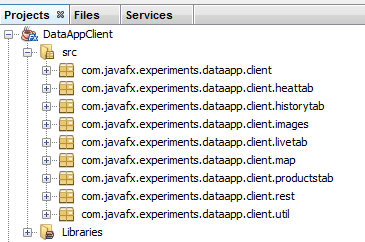
Description of "Figure 4 Package Names for the DataAppClient Project"
These descriptive and meaningful package names are good examples of appropriate package naming choices. Figure 4 shows other packages as well: an images package (for storing application image data), a map package (for code that draws the US map), a rest package (for RESTful web services code), and a util package for additional utility classes.
Figure 5 through Figure 7 provide screenshots of the remaining tabs.
Figure 5 The Henley Sales "Sales History" Tab
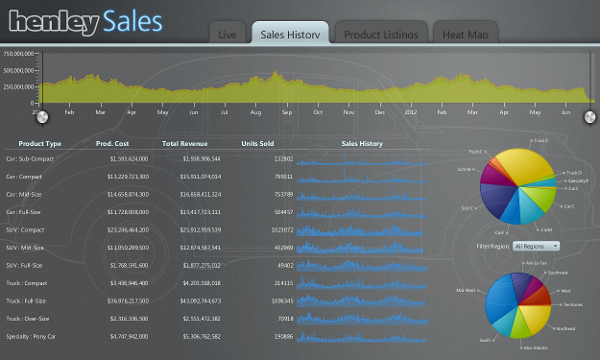
Description of "Figure 5 The Henley Sales "Sales History" Tab"
The "Sales History" tab shows various charts depicting vehicle sales over time. The user can change the date range by moving a pair of sliders along the top of the screen.
Figure 6 The Henley Sales "Product Listings" Tab
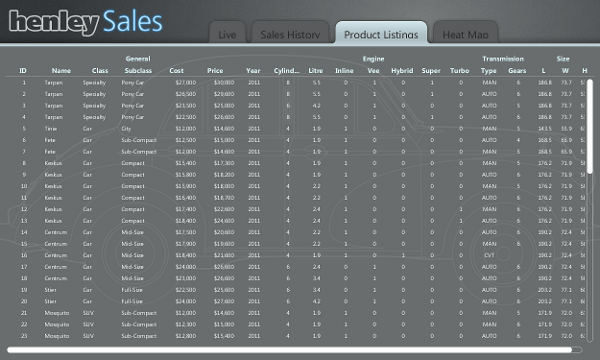
Description of "Figure 6 The Henley Sales "Product Listings" Tab"
The "Product Listing" tab provides a traditional looking data table, filled with information describing the vehicles that are currently for sale.
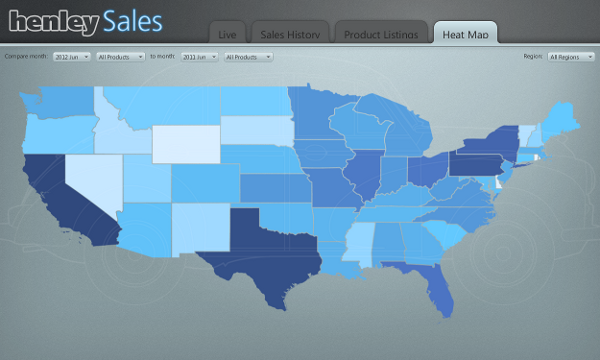
And finally, the "Heat Map" tab provides a color-coded representation of US sales by region. Each state is colored to represent the amount of units sold. Users can select the months and products to compare, plus zoom in on specific regions of interest.
Best Practice: Enforce Model-View-Controller (MVC) with FXML
JavaFX enables you to design with Model-View-Controller (MVC), through the use of FXML and Java. The "Model" consists of application-specific domain objects, the "View" consists of FXML, and the "Controller" is Java code that defines the GUI's behavior for interacting with the user. In the Henley Sales application, this pattern is implemented on all tabs.
Consider the Heat Tab GUI, as shown in Example 8.
Example 8 The 'View" as defined by heat-tab.fxml
<?import java.lang.*?>
<?import javafx.scene.*?>
<?import javafx.scene.layout.*?>
<?import javafx.scene.control.*?>
<?import com.javafx.experiments.dataapp.client.map.UnitedStatesMapPane?>

<Tab text="Heat Map" fx:id="heatTab"
fx:controller="com.javafx.experiments.dataapp.client.heattab.HeatTabController"
xmlns:fx="http://javafx.com/fxml">
    <content>
        <AnchorPane id="heatTab"><children>
            <UnitedStatesMapPane fx:id="map"
              AnchorPane.topAnchor="0"
              AnchorPane.rightAnchor="0"
              AnchorPane.bottomAnchor="0"
              AnchorPane.leftAnchor="0"/>
            <HBox AnchorPane.topAnchor="10"
              AnchorPane.leftAnchor="10" spacing="10">
                <children>
                    <Label text="Compare month:"/>
                    <ChoiceBox fx:id="compareMonthChoiceBox"/>
                    <ChoiceBox fx:id="compareProductChoiceBox"/>
                    <Label text="to month:"/>
                    <ChoiceBox fx:id="toMonthChoiceBox"/>
                    <ChoiceBox fx:id="toProductChoiceBox"/>
                </children>
            </HBox>
            <HBox AnchorPane.topAnchor="10"
             AnchorPane.rightAnchor="10" spacing="10">
                <children>
                    <Label text="Region:"/>
                    <ChoiceBox fx:id="regionChoiceBox"/>
                </children>
            </HBox>
        </children></AnchorPane>
    </content>
</Tab>
Inspecting this code reveals that the GUI components in the FXML markup map cleanly to what actually appears on screen. For example, the "Compare month:" and "to month:" labels (and their corresponding choice boxes) are children of an HBox that is anchored to the left side of the screen. And the "Region" label (and its corresponding choice box) are children of the HBox that is anchored to the right side of the screen. The most important thing to note about this code is that it simply defines the GUI; it does not implement any code to handle interaction with the user. However, the lines shown in Example 9 do indicate where such controller code can be found.
Example 9 Specifying the Controller file in heat-tab.fxml
<Tab text="Heat Map" fx:id="heatTab"
fx:controller="com.javafx.experiments.dataapp.client.heattab.HeatTabController"
xmlns:fx="http://javafx.com/fxml">
From this example, you can see that HeatTabController (a .java file) handles the behavior related to this tab. That file is far too large to insert here, but we can look at some of its sections to get a sense of the behavior that it provides.
Example 10 Excerpts from HeatTabController.java
...
@Override public void initialize(URL url, ResourceBundle rb) {
        // populate live data regions choicebox
        regionChoiceBox.setItems(DataApplication.getAmericanRegions());
        regionChoiceBox.getSelectionModel().selectFirst();
        regionChoiceBox.getSelectionModel().selectedItemProperty().
        addListener(new ChangeListener() {
            @Override public void changed(ObservableValue ov,
            Object t, Object newValue) {
                if (newValue instanceof Region) {
                    Region region = (Region)newValue;
                    Timeline fadeLabels = new Timeline();
...
           map.zoomRegion(region.getName());
           fadeLabels.play();
...

// this needs to be run on FX thread
        DataApplication.registerDataLoadingTask(new Runnable() {
            @Override public void run() {
                // create task to fetch range of available dates in background
                Task<HeatMapRange> getHeatMapRangeTask =
                 new Task<HeatMapRange>(){
...

                @Override protected HeatMapRange call() throws Exception {
                        hmc = new HeatMapClient();
                        return hmc.getDateRange_JSON(HeatMapRange.class);
                    }
                };
                // listen for results and then update ui, and fetch initial data
                getHeatMapRangeTask.valueProperty().
                addListener(new ChangeListener<HeatMapRange>() {
..
The code shown in Example 10 illustrates a few important points, such as adding a change listener to the "Region" choice box, or playing a fade animation, or fetching the range of available dates in the background. You can study the full source file within the NetBeans project, but the important thing to remember in terms of best practices is that all of this behavior is cleanly separated from the GUI code of heat-tab.fxml. You can follow the same approach when designing your own applications.
For additional reading about FXML in general, see "Getting Started with FXML" at http://docs.oracle.com/javafx/2/fxml_get_started/jfxpub-fxml_get_started.htm.
Best Practice: Use Cascading Style Sheets (CSS)
Another best practice worth remembering is to skin your GUI components with CSS. Doing so is a modern approach that enables you to change the application's look and feel by simply switching the style sheet that is currently in use. The Henley Sales application implements CSS skinning as defined in the DataApp.css file of the com.javafx.experiments.dataapp.client package.
Example 11 Excerpts from DataApp.css
...
#Window {
 -fx-padding: 0;
 -fx-background-color: radial-gradient(center 70% 5%, radius 60%, #767a7b,#2b2f32);
 -fx-background-image: url("images/noise.png"),
      url("images/title.png");
 -fx-background-repeat: repeat, no-repeat;
 -fx-background-position: left top, left 19px top 15px ;
}
...

/* =============== STYLE ALL SCROLL BARS ================= */
.scroll-bar {
    -fx-background-color: transparent;
    -fx-background-insets: 0;
    -fx-padding: 5;
}
.scroll-bar .thumb {
    -fx-background-color: white;
    -fx-background-insets: 0;
    -fx-background-radius: 0.5em;
}
.scroll-bar .track  {
    -fx-background-color: transparent;
    -fx-background-insets:  0;
    -fx-border-color: rgba(255,255,255,0.5);
    -fx-border-radius: 0.5em;
}
.scroll-bar .increment-button {
    -fx-background-color: null;

...

/* =============== STYLE ALL TABLES ====================== */
.table-view {
    -fx-background-color: transparent;
    -fx-background-insets: 0;
    -fx-padding: 10;
}
.table-view .column-header-background {
    -fx-background-color: transparent;
    -fx-border-color: transparent transparent rgba(255,255,255,0.3) transparent;
    -fx-border-width: 1;
    -fx-background-insets: 0;
...
}
The CSS excerpts shown in Example 11 affect background colors, borders, padding, fonts, etc. Note that by convention, this .css file is located in the same package as the main class of the application. This file is referenced in the DataApplication's start method, as shown in Example 12.
Example 12 DataApplication.java: Overriding the start Method
@Override public void start(Stage stage) throws Exception {
        // let preloader know we are done creating the ui
        notifyPreloader(new PreloaderHandoverEvent(root,
        DataApplication.class.getResource("dataapp.css").toExternalForm(),
        dataLoadingTasks));
    }
Here, the .css file is used when the main application tells the preloader that it has finished creating the UI. It passes the css url as the second parameter to the new PreloaderHandoverEvent.
You will also notice that the preloader itself defines and uses its own .css file. This file is less complicated, and is shown in its entirety in Example 13.
Example 13 The preloader.css File
#Window {
  -fx-padding: 0;
  -fx-background-color: radial-gradient(center 70% 5%, radius 60%, #767a7b,#2b2f32);
  -fx-background-image: url("images/noise.png") , url("images/title.png");
  -fx-background-repeat: repeat, no-repeat;
  -fx-background-position: left top, left 19px top 15px ;
}
A closer inspection of the DataAppPreloader.java file shows that this .css file is used in its init() method:
Example 14
@Override public void init() throws Exception {
        root = new StackPane();
        background = new StackPane();
        background.setId("Window");
...

DataAppPreloader.class.getResource("preloader.css").toExternalForm());
            }
        });
    }
For details about JavaFX/CSS styling in general, see "Skinning JavaFX Applications with CSS" at http://docs.oracle.com/javafx/2/css_tutorial/jfxpub-css_tutorial.htm.
Best Practice: Run Tasks on a Background Thread
There may be times when your application will need to process large amounts of data. If doing so would cause the user to wait a significant amount of time, you should perform this work inside a new task that runs on a background thread.
The Henley Sales application uses this pattern in a number of different places, as demonstrated in the following three code excerpts.
Example 15 DataApplication.java: Fetching Product Types
...
// fetch available product types in the background
Task<ProductType[]> getProductTypes = new Task<ProductType[]>(){
    @Override protected ProductType[] call() throws Exception {
        ProductTypeClient ptClient = new ProductTypeClient();
        ProductType[] types = ptClient.findAll_JSON(ProductType[].class);
        ptClient.close();
        return types;
    }
};
...
new Thread(getProductTypes).start();
...
Example 16 HeatTabController.java: Fetching Available Dates
...
// create task to fetch range of available dates in background
Task<HeatMapRange> getHeatMapRangeTask =  new Task<HeatMapRange>(){
    @Override protected HeatMapRange call() throws Exception {
        hmc = new HeatMapClient();
        return hmc.getDateRange_JSON(HeatMapRange.class);
      }
};

// start background task
new Thread(getHeatMapRangeTask).start();
...
Example 17 HistoryTabController.java: Fetching Initial Data
...
// fetch initial data in the background
final Task<TransitCumulativeSales[]> getCumulativeSales =
    new Task<TransitCumulativeSales[]>() {
    @Override protected TransitCumulativeSales[] call()
        throws Exception {
        return clsClient.findAll_JSON(TransitCumulativeSales[].class);
    }
};

// start fetching data for time range selector
new Thread(getCumulativeSales).start();
...
While the actual work performed varies in all three examples, the overall pattern remains the same: a javafx.concurrent.Task object is defined and instantiated that overrides call() to return an application-specific object; a new java.lang.Thread object is created (passing in the task as an argument to its constructor); the new thread is started by invoking its start() method.
For more information about threading in JavaFX, see the Concurrency in JavaFX tutorial at http://docs.oracle.com/javafx/2/threads/jfxpub-threads.htm.
 Scott has been documenting JavaFX since its inception in 2007. Prior to that, he has contributed
extensively to both the Java Tutorial and Java platform documentation.
