| C H A P T E R 1 |
|
Overview |
This chapter introduces test pack development, including descriptions of the kinds of test packs and tests you can write. The Java Device Test Suite Administration Guide describes how to install a test pack that you have written.
The chapter covers the following subjects:
Read this chapter for an introduction to essential concepts and terms. If you prefer to begin with interactive examples, start by reading Chapter 2and Chapter 3 and then return to this chapter.
The test pack is the fundamental unit of test development. It is a collection of tests that evaluate a coherent set of device capabilities, that is, those which have a close functional relationship. Often these tests are derived from a single specification. For example, the MMAPI test pack that Sun supplies with the Java Device Test Suite contains tests of facilities defined in the Mobile Media API specification (JSR 135). A test pack is also the unit that you can install with the administrator edition of the harness or by a designated Java Device Test Suite administrator.
Independent of its functional orientation, every test pack is one of three types:
Because runtime, OTA, and benchmark tests must be separated into different test packs, you must develop three test packs for a given specification if you want to test performance, provisioning, and on-device functions.
Specify a test pack’s type in the test pack’s testsuite.info file (see Chapter 6). The test pack type tells the harness how to run the tests in a test pack.
Each type of test pack can contain tests of one or more test types. The pack type determines the possible test types. Tests of different types implement or extend different APIs and behave differently when they run.
The descriptions in this section are for test devices whose Java technology-based implementations can communicate with the harness. Users run tests differently on so-called offline devices, which do not have working Java technology-based communications methods. See the harness online help for more information on offline device testing.
The Java Device Test Suite supports these runtime test types:
Automated tests run without user intervention and automatically return passed or failed status. FIGURE 1-1 shows how the user, the test device, and Java Device Test Suite interact to run an automated test.
FIGURE 1-1 Runtime Automated Test Flow
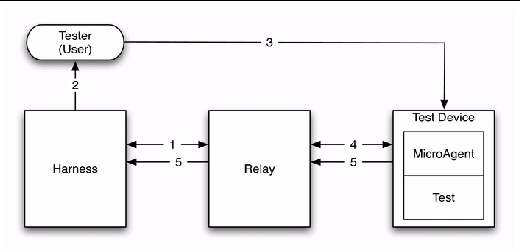
1. After the tester selects tests and presses the harness’s Start button, the harness creates and sends the test bundle to the Relay. The Relay provides the harness with the test bundle’s URL address. A test bundle contains a Java Device Test Suite MicroAgent and one or more tests. The MicroAgent provides infrastructure for the tests and communicates with the Relay. The Relay is an intermediary between the harness and the test device that simplifies communication across firewalls. The Relay also hosts the test server manager (TSM) and servers used by some tests.
2. The harness displays the URL to the tester.
3. The tester discloses the test bundle URL to the test device and initiates the test bundle download process on the device.
4. The test device requests the test bundle, downloads it from the Relay, and launches the MicroAgent. (If the device supports the autotest protocol, it initiates the bundle download automatically.) There are several ways to download bundles, depending on the capabilities of the test device. The online help describes test downloading in detail. The MicroAgent starts the test.
5. The test runs and returns a result of passed or failed to the MicroAgent. The MicroAgent sends the result to the Relay, which sends it to the harness.
Interactive tests require the user to operate test device features and to decide if the implementation passes or fails the test. FIGURE 1-2 shows how the user’s role expands for interactive tests.
FIGURE 1-2 Runtime Interactive Test Flow
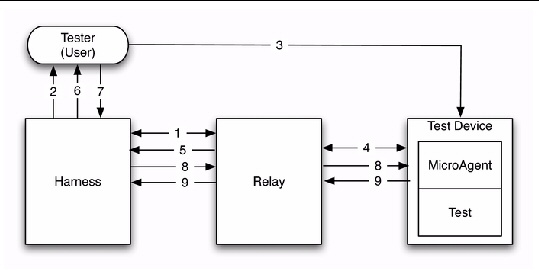
1. As for an automated test, after the tester selects tests and presses the harness’s Start button, the harness creates and sends the test bundle to the Relay. The Relay provides the harness with the test bundle’s URL address.
2. The harness displays the URL to the tester.
3. The tester discloses the location of the test bundle (URL) to the test device and initiates the test bundle download process on the device.
4. The device downloads the bundle and launches the MicroAgent. (If the device supports the autotest protocol, it initiates the bundle download automatically.) The MicroAgent starts the test in a new thread, tells the Relay to display the test instructions, and begins polling the Relay for the test result.
5. The Relay tells the harness to display the test instructions.
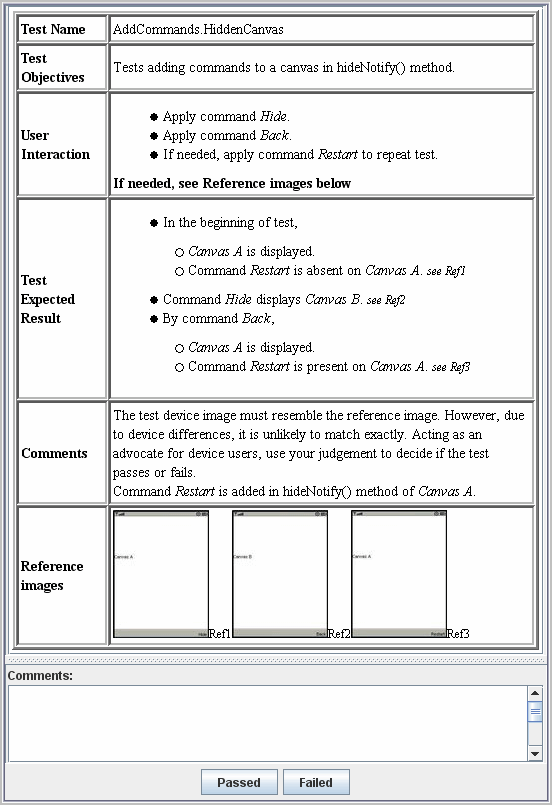
6. The harness displays test instructions and evaluation buttons for the test. The test developer has created these instructions in an HTML file. FIGURE 1-3 shows an example of what the tester sees. The tester follows the instructions, manipulating the device and observing its response.
FIGURE 1-3 Example Interactive Test Evaluation Dialog Box
7. The tester clicks the Passed or Failed button, which sends a message to the harness.
8. The harness forwards the result to the Relay, which forwards it to the MicroAgent the next time the MicroAgent polls.
9. As in an automated test, the MicroAgent returns the result to the Relay, which returns it to the harness.
From a user’s perspective, a network test is identical to a runtime automated test. From a developer’s perspective, a network test has a more complex implementation than an ordinary automated test. A network test has two parts. One part, called the client, is a runtime automated test. The other part, called the server, runs on the Relay. It emulates a message sender, a message receiver, or both. Network tests by definition can send and receive messages, such as HTTP messages or push notifications.
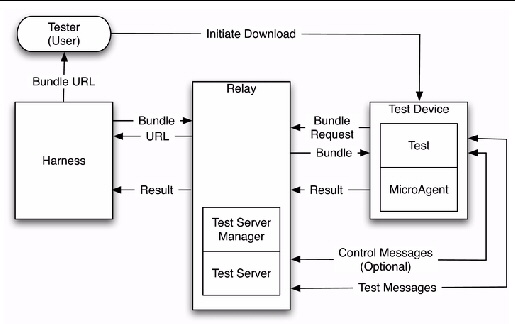
The Java Device Test Suite Relay provides infrastructure for the server side of the network tests. You write only the server code that is specific to your tests. The two parts can optionally communicate through a control channel you supply and typically implement with HTTP. For example, a client uses the control channel to tell the server what kind of message to send or what kind of message to expect from the client. Without a control channel, the server part does just one thing (for example, invariably sends a particular message or expects to receive a particular message).
A distributed test (see FIGURE 1-5) tests the interaction between different devices. Multiple devices are necessary because the method of communication, such as Bluetooth or SMS, cannot be emulated by a test server running in the Relay.
FIGURE 1-5 Distributed Test Flow
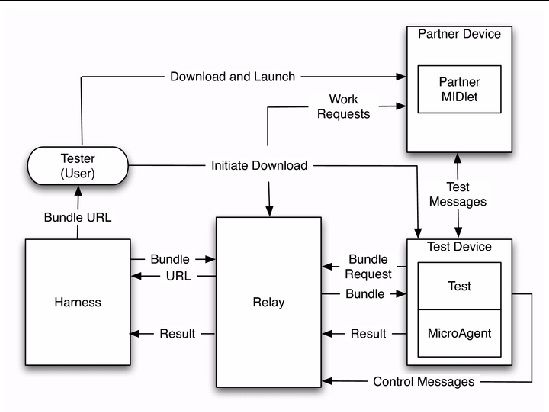
A distributed test has one developer-written part that interacts with two other parts provided by Sun. The developer part (the test itself) is a runtime automated test that runs on the test device. The test interacts with the Relay by sending control messages that indirectly influence the partner MIDlet, which is provided by Sun. The partner MIDlet runs on a partner device (another phone) and communicates with the Relay and the test. A few tests use more than one partner device, for example, to test sending an MMS message to multiple recipients.
1. The tester downloads the partner MIDlet into the partner device, launches it, and configures it.
2. The partner MIDlet begins polling the Relay for work to do.
3. The test is downloaded to the test device in the usual way and begins to run.
4. The test sends a control message to the Relay which asks the partner MIDlet to perform some work, such as sending a message or waiting for a message.
5. When it receives the next polling request from the partner MIDlet, the Relay passes the test’s request to the partner MIDlet.
6. The test and the partner MIDlet communicate to execute the work of the test.
7. The test returns a passed or failed result to the MicroAgent, which in turn returns the result to the Relay, which passes it to the harness, which displays and saves the result.
From a user’s point of view, benchmark tests behave like automated runtime tests (see Automated Tests). However, for an implementation to pass or fail a benchmark test, the test must have a threshold against which the user evaluates the test run. Users create the threshold by running the test against a reference device and recording the result in a threshold file. The Java Device Test Suite Tester’s Guide has instructions for creating threshold data, and the Java Device Test Suite Administration Guide describes how to create a threshold file from that data. A benchmark test returns one or more measurements to the harness. The harness displays the measurements. If the test has a threshold, the harness also displays the test’s pass or fail status.
Over-the-air (OTA) provisioning tests verify that a test device’s Application Management System (AMS) operates correctly and interacts correctly with the provisioning emulator on the Relay. The provisioning emulator supplies applications over the air to wireless devices.
An OTA provisioning test has two parts. One part is the OTA test management Relay’s infrastructure. The other part is a MIDlet (application) that you write and the user downloads from the provisioning server, located within the Relay, to the test device. In fact, a test might have multiple MIDlets, but for simplicity only one is considered here. The MIDlet can be merely a placeholder for an application that a test device obtains from a real provisioning server. Or the MIDlet can perform operations on the test device. For example, a MIDlet can verify that the test device correctly grants it permission to use certain APIs.
Java Device Test Suite has two OTA provisioning test types: interactive and semi-automated tests.
From a user’s perspective, an interactive OTA provisioning test is similar to a runtime interactive test (see Interactive Tests). An interactive OTA provisioning test might test the user-visible aspects of provisioning, for example, downloading, installing, and removing a MIDlet. Or, after being installed and launched by the user, the MIDlet might perform more elaborate tests. FIGURE 1-6 shows the interactions.
FIGURE 1-6 OTA Interactive Test Flow
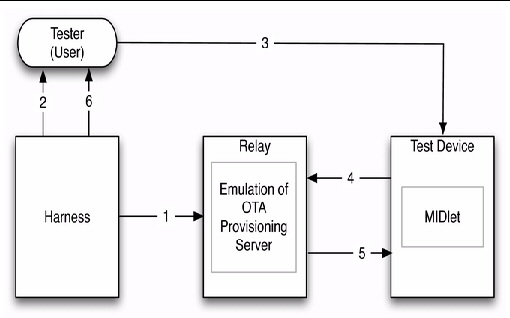
1. The server manages the execution of the test according to developer-specified properties. The user does not download OTA tests but does download MIDlets associated with OTA tests. The harness coordinates with the server much as if the server were the MicroAgent on a test device. After the user selects a test and clicks the harness’s Start button, an interactive window displays that specifies the URL; the tester then commands the device to download an application from the specified URL. The server handles this application request.
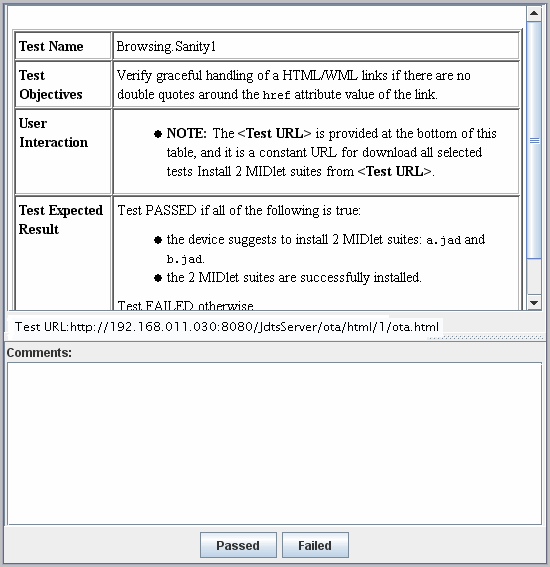
2. The harness displays test instructions and evaluation buttons to the tester. These are similar to runtime interactive test instructions (FIGURE 1-7 shows an example).
FIGURE 1-7 Sample OTA Provisioning Interactive Test Evaluation Dialog Box
3. Following the instructions, the tester directs the test device to download the MIDlet whose URL is provided in the instructions.
4. The test device sends a request for the MIDlet to the Relay.
5. The Relay usually returns a Java Application Descriptor (JAD) file to the test device. The test device uses the JAD file to download and install the MIDlet. The Relay can also return a Java Archive (JAR) file, depending on the nature of the test. The JAR file installs in the test device immediately.
6. The tester launches the MIDlet. If the MIDlet displays its own instructions on the test device, the user follows them and evaluates the test device’s response. The user presses the Passed or Failed button in the test instructions accordingly. The results are then displayed in the harness and saved in the Relay.
Semi-automated OTA tests are similar to interactive OTA tests with the following differences:
FIGURE 1-8 shows how a user, a test device, and the Java Device Test Suite components interact.
FIGURE 1-8 OTA Semi-Automated Test Flow
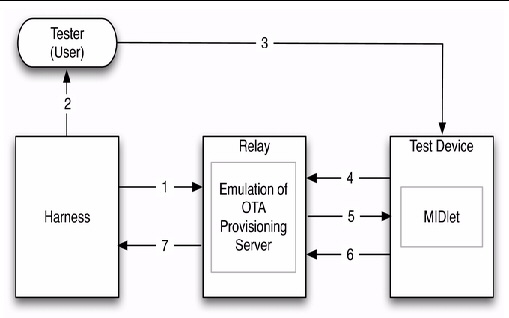
1. After the tester selects a semi-automated OTA provisioning test and presses the harness’s Start button, the harness directs the server to start the test.
2. The harness displays the test’s test instructions. These are identical to interactive OTA test instructions (see FIGURE 1-7) except that they do not have Passed and Failed buttons. They have a Skip button that the tester can use if a test hangs.
3. The tester directs the test device to download, install, and launch the MIDlet whose URL is given in the instructions.
4. Responding to the user’s manipulations, the test device send a request to the Relay for a MIDlet.
5. The Relay returns a JAD file that describes the MIDlet. The test device uses the JAD file to download and install the MIDlet.
6. The test device sends a notification to the server as required by the OTA provisioning specification.
7. The server compares the notification to an expected value (specified in a property) and returns a passed or failed result to the harness.