8 JavaFX Interoperability with SWT
This article shows how to add a JavaFX scene graph to a Standard Widget Toolkit (SWT) application, and how to make SWT and JavaFX controls interoperate.
Introduction
If you develop SWT applications, you know that SWT uses the native operating system controls and cannot easily be configured to use advanced GUI features, such as animation. You can quickly add sparkle to an SWT application by integrating JavaFX with SWT. All you need is the FXCanvas class from the javafx.embed.swt package. The javafx.embed.swt package can be found in jfxswt.jar, which is located in the JDK_Home/jre/lib/ directory. FXCanvas is a regular SWT canvas that can be used anywhere that an SWT canvas can appear. It's that simple.
In this article, you will see how to create an interactive SWT button and JavaFX button, shown in Figure 8-1.
When the user clicks either button, the text is changed in the other button, as shown in Figure 8-2 and Figure 8-3. This example shows how the SWT code and JavaFX code can interoperate.
Figure 8-2 Clicking the SWT Button Changes the JavaFX Button Label

Description of "Figure 8-2 Clicking the SWT Button Changes the JavaFX Button Label"
Figure 8-3 Clicking the JavaFX Button Changes the SWT Button Label

Description of "Figure 8-3 Clicking the JavaFX Button Changes the SWT Button Label"
Adding JavaFX Content to an SWT Component
In JavaFX, the Java code that creates and manipulates JavaFX classes runs in the JavaFX User thread. In SWT, code that creates and manipulates SWT widgets runs in the event loop thread. When JavaFX is embedded in SWT, these two threads are the same. This means that there are no restrictions when calling methods defined in one toolkit from the other.
Example 8-1 shows the code to create the SWT button and JavaFX button shown in Figure 8-1. As shown in the code, you set JavaFX content into an FXCanvas with the setScene() method in the FXCanvas class. To force SWT to lay out the canvas based on the new JavaFX content, resize the JavaFX content first. To do this, get the JavaFX Window that contains the JavaFX content and call sizeToScene(). When JavaFX is embedded in SWT, a new preferred size is set for FXCanvas, enabling SWT to resize the embedded JFX content in the same manner as other SWT controls.
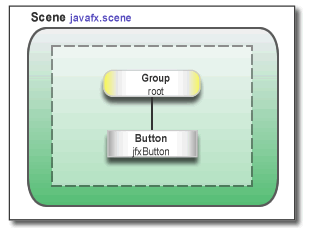
JavaFX constructs content in terms of a hierarchical scene graph, placed inside a scene. The code in Example 8-1 places the JavaFX button into a scene with the scene graph shown in Figure 8-4 and described in comments in the code example.
Figure 8-4 JavaFX Scene Graph in SWT Application

Description of "Figure 8-4 JavaFX Scene Graph in SWT Application"
Example 8-1 Java Code for Plain SWT and JavaFX Buttons
import javafx.embed.swt.FXCanvas;
import javafx.event.ActionEvent;
import javafx.event.EventHandler;
import javafx.scene.Group;
import javafx.scene.Scene;
import javafx.scene.control.Button;
import javafx.scene.paint.Color;

import org.eclipse.swt.SWT;
import org.eclipse.swt.graphics.Point;
import org.eclipse.swt.layout.RowLayout;
import org.eclipse.swt.widgets.Display;
import org.eclipse.swt.widgets.Event;
import org.eclipse.swt.widgets.Listener;
import org.eclipse.swt.widgets.Shell;

public class TwoButtons {

    public static void main(String[] args) {
        final Display display = new Display();
        final Shell shell = new Shell(display);
        final RowLayout layout = new RowLayout();
        shell.setLayout(layout);

        /* Create the SWT button */
        final org.eclipse.swt.widgets.Button swtButton =
                new org.eclipse.swt.widgets.Button(shell, SWT.PUSH);
        swtButton.setText("SWT Button");

        /* Create an FXCanvas */
        final FXCanvas fxCanvas = new FXCanvas(shell, SWT.NONE) {

                @Override
                public Point computeSize(int wHint, int hHint, boolean changed) {
                getScene().getWindow().sizeToScene();
                int width = (int) getScene().getWidth();
                int height = (int) getScene().getHeight();
                return new Point(width, height);
            }
        };
        /* Create a JavaFX Group node */
        Group group = new Group();
        /* Create a JavaFX button */
        final Button jfxButton = new Button("JFX Button");
        /* Assign the CSS ID ipad-dark-grey */
        jfxButton.setId("ipad-dark-grey");
        /* Add the button as a child of the Group node */
        group.getChildren().add(jfxButton);
        /* Create the Scene instance and set the group node as root */
        Scene scene = new Scene(group, Color.rgb(
                shell.getBackground().getRed(),
                shell.getBackground().getGreen(),
                shell.getBackground().getBlue()));
        /* Attach an external stylesheet */
        scene.getStylesheets().add("twobuttons/Buttons.css");
        fxCanvas.setScene(scene);

        /* Add Listeners */
        swtButton.addListener(SWT.Selection, new Listener() {

            @Override
            public void handleEvent(Event event) {
                jfxButton.setText("JFX Button: Hello from SWT");
                shell.layout();
            }
        });
        jfxButton.setOnAction(new EventHandler<ActionEvent>() {

            @Override
            public void handle(ActionEvent event) {
                swtButton.setText("SWT Button: Hello from JFX");
                shell.layout();
            }
        });

        shell.open();
        while (!shell.isDisposed()) {
            if (!display.readAndDispatch()) {
                display.sleep();
            }
        }
        display.dispose();
    }
}
The button style is based on a blog by Jasper Potts at the following location:
http://fxexperience.com/2011/12/styling-fx-buttons-with-css/
Creating SWT-JavaFX Applications in an IDE
Creating an SWT-JavaFX application in an IDE is simply a matter of adding the following libraries to your project:
-
swt.jar, from an SWT zip download, available at
http://eclipse.org/swt -
jfxswt.jar, from theJDK_HOME/jre/libdirectory:-
For example, for a default JDK installation on Windows, the full path is:
C:\Program Files\Java\jdk1.8.0\jre\lib
-
Note:
Ensure that all JAR files are either 32 bit or 64 bit, as required for your environment.
Packaging SWT-JavaFX Applications
How you package your SWT-JavaFX application depends on whether JavaFX is bundled with the JDK (7u6 and later) or installed in a different location (for releases prior to JDK 7u6).
Packaging the Application when JavaFX is Bundled with the JDK
If you use NetBeans IDE 7.2 or later, no special handling is required to package your application, provided you have added the libraries as described in Creating SWT-JavaFX Applications in an IDE. You can simply do a Clean and Build, which produces a double-clickable JAR file in the /dist directory of the project.
Packaging the Application with a Standalone JavaFX Installation
When an SWT-JavaFX application is built, the JAR file must be packaged as a JavaFX application so the application on startup will look for the standalone JavaFX Runtime on the user's system. The SWT library (swt.jar) must be included as a resource (32-bit or 64-bit to match the target system).


