2 Prepare for This Tutorial
This chapter provides information about requirements and recommendations to prepare your development environment before you create the sample IssueTrackingLite FXML layout that you will build in this tutorial using JavaFX Scene Builder.
As you build the layout, the FXML code for the designed GUI is automatically generated. JavaFX Scene Builder provides a straightforward interface that can help you quickly prototype interactive applications that connect GUI components to the application logic. For the purpose of this tutorial, you will use a NetBeans project named IssueTrackingLite to illustrate the integration between NetBeans IDE and JavaFX Scene Builder. This tutorial also includes information that steps you through the creation of the IssueTrackingLite FXML layout without the use of NetBeans IDE.
Note:
JavaFX Scene Builder does not have dependency on any particular IDE. However, since this tutorial was prepared using NetBeans IDE, it is recommended that you use NetBeans IDE to complete this tutorial. If Eclipse or IntelliJ IDEA is your preferred IDE, see Using JavaFX Scene Builder with Java IDEs for more information. You can also use Scene Builder as a standalone tool to create your GUI layout and edit the resulting FXML file using a text editor of your choice. If you choose to work with this tutorial outside of any IDEs, there are sections in this tutorial that highlight what you need to do to use the Apache Ant utility to connect the layout that you build to the sample application's Java source code, apply the style sheet, and run the sample application.
Use the following requirements and recommendations before continuing with this tutorial:
-
(Required) Install all the required software before you use JavaFX Scene Builder. See JavaFX Scene Builder Installation Guide for more details.
-
(Required) Download the JavaFX Scene Builder samples from the Additional Resources section of the download page at
https://www.oracle.com/technetwork/java/javase/downloads/index.html. Extract the contents of thejavafx_scenebuilder_samples-2_0.zipfile, which includes the IssueTrackingLite sample folder. TheIssueTrackingLitefolder you extract contains a completed version of the FXML layout that you will build using this tutorial. The issue-tracking system enables you to query existing sample project issues, modify them, or add new issue. -
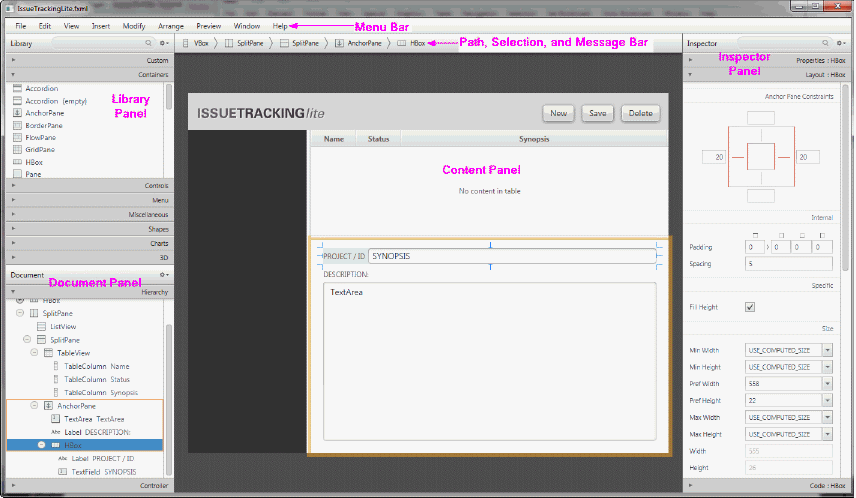
(Recommended) Use JavaFX Scene Builder User Guide to familiarize yourself with the JavaFX Scene Builder user interface that is shown in Figure 2-1.
-
(Recommended) Install NetBeans IDE 8, which is used in this tutorial to illustrate the integration between NetBeans IDE and JavaFX Scene Builder. As mentioned in the Note above, you can also create the IssueTrackingLite GUI layout using other Java IDEs, such as Eclipse or IntelliJ IDEA, or a standalone instance of Scene Builder.
-
(Recommended) Familiarize yourself with the JavaFX concepts by reading the available documents on the JavaSE Client Technologies page at
http://docs.oracle.com/javase/8/javase-clienttechnologies.htm. In particular, learn about the FXML concepts by reading Using FXML to Create a User Interface and get familiar with layouts using Working with Layouts in JavaFX.
Figure 2-1 Main Window for JavaFX Scene Builder

Description of "Figure 2-1 Main Window for JavaFX Scene Builder"

