20 Collaborating on Documents
This chapter describes different ways to collaborate on documents, both during the development of a document, or when a document is available to all users of a portal. This includes joint authoring, sharing, reviewing, approving, editing, and so on.
This chapter includes the following topics:
-
Section 20.1, "Collaborating on Documents Using the Documents Page and Documents Viewers"
-
Section 20.2, "Collaborating on Documents through Workflows"
-
Section 20.3, "Collaborating on Documents Using Oracle AutoVue"
Permissions:
To perform the tasks in this chapter, you need the portal-level permissionsCustomize Pages and Edit Content and Create Documents (which includes delete permissions on documents that you create), granted by the portal moderator. To delete documents that are not your own, you must have Delete Documents permission.
To set security on a document, you must have Documents: Administration permission, granted by the portal moderator.
Note:
The Documents page in a portal is only shown with Content Server 11g. If the connected content repository is Content Server 10g, the Documents page will not be available; to use Documents functionality, you can create a page in a portal and add Documents viewers to the page.20.1 Collaborating on Documents Using the Documents Page and Documents Viewers
The Documents page and Documents viewers provide features for accessing, adding, and managing folders and files; configuring and viewing file and folder properties; and searching file and folder content in the connected content repositories.
The following features enable you to collaborate on documents:
-
Viewing a document in-place. See Section 19.6.2, "Opening a File."
-
Tagging a document. See Section 19.15, "Managing Tags on Files."
-
Linking to supporting documents. See Section 19.18, "Managing Document Links."
-
Viewing recommendations for similar documents. See Section 19.19, "Viewing Document Recommendations."
-
Commenting on a document. See Section 15.4, "Commenting on Items."
-
Sharing the link to a document. See Section 19.21, "Sharing the URL for a Folder or File."
-
Subscribing to a document. See Section 19.23, "Subscribing to a File."
-
Liking a document. See Section 19.24, "Liking a File."
-
Adding a document to your list of favorites. See Section 19.25, "Adding a Folder or File to Your Favorites."
-
Adding wiki documents to WebCenter Portal, allowing multiple users to collaborate to create content that is relevant, useful, and up-to-date. See Chapter 17, "Working with Wikis."
-
Adding blogs to record experiences and opinions, and allowing multiple users to contribute through blog posts. See Chapter 18, "Working with Blogs."
20.2 Collaborating on Documents through Workflows
While a document is being developed, it must typically be reviewed and approved by a number of people. To assist in managing this process, WebCenter Portal provides a built-in workflow capability to move a document through required approvals by assigned approvers. This capability is available when the connected content repository is Content Server.
For information about viewing and participating in document workflows, see the "Working with Workflow-Enabled Content" chapter in Building Portals with Oracle WebCenter Portal.
20.3 Collaborating on Documents Using Oracle AutoVue
In addition to the wide range of functionality offered by WebCenter Portal to manage and collaborate on documents through workflows, wiki documents, and portals, you also have the option to use Oracle AutoVue.
Note:
To enable Oracle AutoVue functionality, verify with your system administrator that the following requirements are met:-
You must access the WebCenter Portal application through Oracle HTTP Server (OHS) to expose Content Server and the WebCenter Portal application under the same host and port. For information about setting up OHS as the front-end to WebCenter Portal, see the "Configuring Content Server" section in Administering Oracle WebCenter Portal.
-
The AutoVue VueLink Integration servlet must be mapped through the same OHS front-end that is configured for Content Server and WebCenter Portal. For more information, see the "Enabling the iFraming UI in WebCenter Portal" section in Administering Oracle WebCenter Portal.
-
SSO should be set up between Content Server and the WebCenter Portal application to allow for single sign-off, and avoid unexpected reuse of Content Server sessions. See the "Configuring Single Sign-on" section in Administering Oracle WebCenter Portal.
-
WebCenter Portal must be connected to a Content Server repository, with the
webContextRootparameter set to a Content Server host name. For information on settingwebContextRoot, see the "Registering Content Repositories" section in Administering Oracle WebCenter Portal. To setwebContextRootthrough WLST, see the "createJCRContentServerConnection" and "setJCRContentServerConnection" sections in WebLogic Scripting Tool Command Reference.
Oracle AutoVue, packaged separately from WebCenter Portal, integrates easily with a Content Server back-end repository to provide document review and collaboration features. AutoVue supports a wide range of file types, including Word, Excel, PDF, as well as 2D and 3D CAD file types. For more information about Oracle AutoVue, see the library of documents at http://www.oracle.com/us/products/applications/autoVue/index.html.
To use Oracle AutoVue to review and collaborate on a file:
-
Open the file in the Document Viewer preview pane, click the File menu, and select Annotate with AutoVue.
The AutoVue file viewer in Content Server opens.
Note:
if SSO is not set up, you will need to log into Content Server to see the AutoVue viewer. -
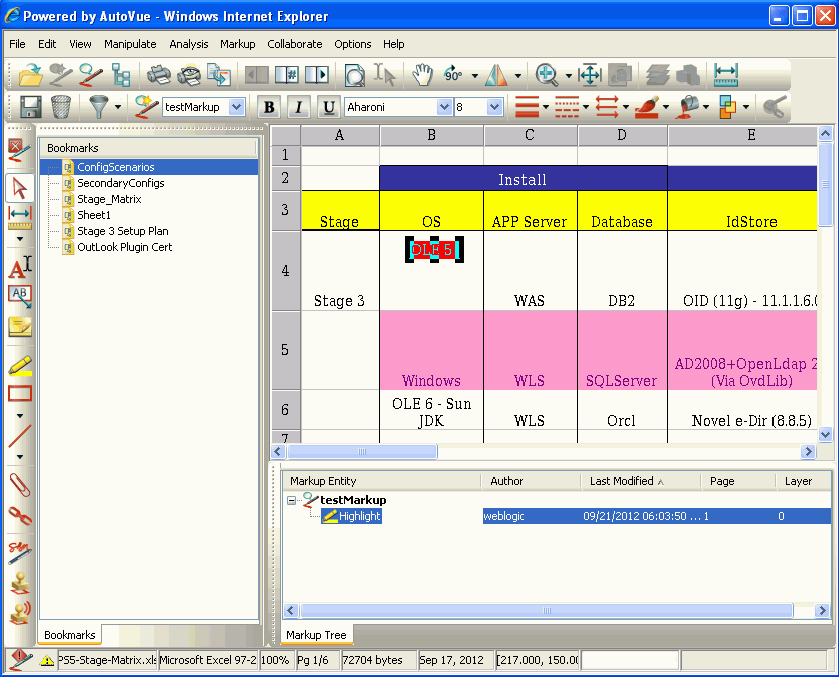
In the AutoVue file viewer (Figure 20-1), enter comments and individualized mark-up, and save your changes.
Figure 20-1 AutoView File Viewer in Content Server

Description of ''Figure 20-1 AutoView File Viewer in Content Server''
-
To view the file containing the AutoVue markup in WebCenter Portal, click the AutoVue tab at the bottom of the Document Viewer preview pane (Figure 20-2), then click the name of the AutoVue version of the file.
Note:
There may be multiple marked-up versions of the file listed in the AutoVue pane. Click the version you require.Figure 20-2 Document Viewer: AutoVue Pane

Description of ''Figure 20-2 Document Viewer: AutoVue Pane''