9 Managing Content Repositories
This chapter describes how to configure and manage content repositories used by WebCenter Portal and Portal Framework applications.
This chapter includes the following topics:
-
Section 9.2, "Configuring an Oracle WebCenter Content Server Repository"
-
Section 9.3, "Configuring a Microsoft SharePoint Repository"
-
Section 9.7, "Changing the Active (or Default) Content Repository Connection"
-
Section 9.8, "Modifying Content Repository Connection Details"
-
Section 9.10, "Setting Connection Properties for WebCenter Portal's Default Content Repository"
-
Section 9.13, "Troubleshooting Issues with Content Repositories"
Permissions:
To perform the tasks in this chapter, you must be granted the WebLogic ServerAdmin role through the Oracle WebLogic Server Administration Console and the Administrator role in the deployed application:
-
WebCenter Portal:
Administratorrole granted through Portal Builder Administration. -
Portal Framework application:
Administratorrole granted through the Administration Console.
For more information about roles and permissions, see Section 1.8, "Understanding Administrative Operations, Roles, and Tools."
9.1 About Content Repositories
Oracle WebCenter Portal's support of the JCR 1.0 open document standard enables integration with multiple back-end content stores. Oracle WebCenter Portal supports the following content repositories: Oracle WebCenter Content Server (Content Server), Microsoft SharePoint, Oracle Portal, and a file system
Oracle WebCenter Portal enables content integration through:
-
Content Repository data controls, which enable read-only access to a content repository, and maintain tight control over the way the content displays in WebCenter Portal and Portal Framework applications.
-
Documents tools, which enable users to view and manage documents and other types of content in your organization's content repositories.
-
Content Presenter, which enables end users to select content in a variety of ways and then display those items using available display templates. A Content Presenter task flow can be added during portal development or can be added to editable pages in WebCenter Portal and Portal Framework applications at runtime.
To use these content integration features, at least one connection to a content repository must be configured for WebCenter Portal or your Portal Framework application.
About Content Repository Connections
Portal users need to store, publish, and share files. Documents tools provide content management and storage capabilities for WebCenter Portal and Portal Framework applications, including content upload, file and folder creation and management, file check out, versioning, and so on. To use document tools, you must configure at least one content repository connection and mark it as active (also referred to as the default content repository):
Note:
Both WebCenter Portal and Portal Framework applications support multiple content repository connections.However, iFraming is supported only for the default Content Server connection. Therefore, when portal managers set properties for Documents task flows or Content Presenter, they cannot specify a non-default Content Server connection if these task flows will use iFrames to display file content, such as PDF files.
-
WebCenter Portal - Any portal (including the Home portal) that enables the documents tool has their own document folder on WebCenter Portal's default Content Server. While WebCenter Portal requires the default content repository to be a Content Server, you can also connect WebCenter Portal to any of the other supported repositories.
For information about setting the default content repository, see Section 9.7, "Changing the Active (or Default) Content Repository Connection". For information about setting additional properties for WebCenter Portal's default content repository, see Section 9.10, "Setting Connection Properties for WebCenter Portal's Default Content Repository".
-
Portal Framework applications - When a content repository is made active (see Section 9.7, "Changing the Active (or Default) Content Repository Connection"), document task flows use that content repository in instances where no specific connection details are provided. There is no particular requirement on the default content repository used.
When Content Server is the default content repository (mandatory for WebCenter Portal), the Content Server must be connected to the same identity store that is used by WebCenter Portal or your Portal Framework application.
Just like other service connections, postdeployment content repository connections are registered and managed through Fusion Middleware Control or using the WLST command-line tool. Connection information is stored in configuration files and in the MDS repository. For more information, see Section 1.3.5, "Oracle WebCenter Portal Configuration Considerations."
Always use Fusion Middleware Control or the WLST command-line tool to review and configure back-end services for WebCenter Portal and Portal Framework applications. All changes that you make, postdeployment, are stored in the Oracle Metadata Service (MDS) repository as customizations.
Note:
Content repository configuration changes that you make through Fusion Middleware Control or using WLST are not dynamic; you need to restart the managed server on which WebCenter Portal or your Portal Framework application is deployed for your changes to take effect. See Section 7.2, "Starting and Stopping Managed Servers for WebCenter Portal Application Deployments".Once connection details are defined, users can expose the content of the connected content repositories through several ADF Faces components, such as <af:image>, <af:inlineFrame>, and <af:goLink>, and built-in Documents task flows (Document Manager, Folder Viewer, and Recent Documents). For more information, see "Working with Web Development Components on a Page" and "Working with Documents" in Using Oracle WebCenter Portal.
About Content Repository Configuration Requirements
Prerequisite configuration for the various types of content repository types supported by WebCenter Portal and Portal Framework application are described in the following sections. Before connecting to your repository, ensure that you complete the content repository configuration described here:
-
Section 9.2, "Configuring an Oracle WebCenter Content Server Repository"
-
Section 9.3, "Configuring a Microsoft SharePoint Repository"
Related Information in Other Guides
For more information about managing and including content in WebCenter Portal and Portal Framework applications, see also:
-
"Working with Documents" in Using Oracle WebCenter Portal to work with documents and document task flows at runtime in WebCenter Portals and Portal Framework applications.
For more information about adding document services to Portal Framework applications and WebCenter Portal using Oracle JDeveloper, see also:
-
"Configuring Content Repository Connections" in Developing Portals with Oracle WebCenter Portal and Oracle JDeveloper to configure content repository connections that provide access to decentralized content.
-
"Creating Content Presenter Display Templates" in Developing Portals with Oracle WebCenter Portal and Oracle JDeveloper to create custom display templates to integrate and publish decentralized content in WebCenter Portal or Portal Framework applications using Content Presenter.
-
"Integrating Documents" in Developing Portals with Oracle WebCenter Portal and Oracle JDeveloper to integrate documents in Portal Framework applications to provide end users with a user-friendly interface to manage, display, and search documents at runtime.
9.2 Configuring an Oracle WebCenter Content Server Repository
This section provides step-by-step instructions for configuring an Oracle WebCenter Content Server 11g (Content Server) content repository for WebCenter Portal and Portal Framework applications. Unless otherwise noted, these instructions are common to both WebCenter Portal and Portal Framework applications.
This section contains the following subsections:
9.2.1 Prerequisites to Configuring Content Server
Read this section to understand the prerequisites and other considerations before continuing with Section 9.2.3, "Configuring Content Server."
This section includes the following subsections:
9.2.1.1 Installation Prerequisites
Before configuring Content Server 11g, you should already have installed Content Server. Content Server is installed as a part of Oracle WebCenter Content, which is an Oracle Fusion Middleware component, and is described in Installing and Configuring Oracle WebCenter Content.
If you already have an earlier version of Content Server installed, upgrade your installation to Oracle WebCenter Content Server 11g prior to configuring it. For information about upgrading to Oracle WebCenter Content Server 11g, see the "Upgrading Your Oracle WebCenter Content Environment" chapter in Upgrade Guide for Oracle WebCenter Content.
Oracle recommends that you also install Oracle WebCenter Content: Inbound Refinery (Inbound Refinery) as part of the installation. Inbound Refinery is a conversion server that manages file conversions for electronic assets such as documents, digital images, and motion videos. It also provides thumbnail functionality for documents and images and storyboarding for videos. You can use Inbound Refinery to convert content items stored in Content Server. Installing Inbound Refinery is also described in the Installing and Configuring Oracle WebCenter Content.
Note:
Content Server and Inbound Refinery must be installed in the same domain. Oracle recommends that you install Content Server and Inbound Refinery in the same domain as WebCenter Portal or your Portal Framework application. When they are installed in the same domain, no additional configuration is required to use an external LDAP authentication provider.9.2.1.2 Configuration Prerequisites
After installing Content Server and Inbound Refinery, you should also have configured the initial post-installation settings described in "Configuring the Content Server Instance" in the Installing and Configuring Oracle WebCenter Content. Settings should be configured for both Content Server and Inbound Refinery including the additional WebCenter Portal-specific instructions provided in the tables below. Be sure to restart the servers after updating the settings.
| Setting | Description |
|---|---|
| Server Socket Port | This is the intradoc port that we connect to using RIDC (defaults to 4444). This value is stored in the configuration file (../config/config.cfg) for the Content Server Managed Server as IntradocServerPort. |
| Incoming Socket Connection Address Security Filter | Server filter specifying what machines can access Content Server through a socket connection. This value is stored in the configuration file for the Managed Server as SocketHostAddressSecurityFilter. |
| Full Text Search
(Optional, but strongly recommended) |
Specifies the full-text search engine. "Internal" is the recommended value. |
| Setting | Description |
|---|---|
| Server Socket Port | This port is used for communication between Content Server and Inbound Refinery. This value was entered on the post-installation configuration page, and can be found on the Inbound Refinery configuration information page under Server Port. You can also find it in the MW_HOME/user_projects/domains/ucm_domain/ucm/ibr/config/config.cfg file as IntradocServerPort. |
| Incoming Socket Connection Address Security Filter | Server filter specifying what machines can access Inbound Refinery through RIDC. This value is stored in the configuration file for the Managed Server as SocketHostAddressSecurityFilter. |
| Full Text Search
(Optional, but strongly recommended) |
Specifies the full-text search engine. "Internal" is the recommended value. |
9.2.1.3 Security Prerequisites
Content Server must be configured to use the same identity store LDAP server as WebCenter Portal or your Portal Framework application. For information on how to reassociate the identity store with an external LDAP server, see Section 31.1, "Reassociating the Identity Store with an External LDAP Server."
Content Server and Inbound Refinery must be installed in the same domain. Oracle recommends that you install Content Server and Inbound Refinery in the same domain as WebCenter Portal or your Portal Framework application. When they are installed in the same domain, no additional configuration is required to use an external LDAP authentication provider.
9.2.2 Configuration Roadmap for Content Server
The flow chart in Figure 9-1 provides an overview of the prerequisites and tasks required to get Content Server working in WebCenter Portal and Portal Framework applications. The steps in the flow chart are described in Table 9-1 and the subsections in Section 9.2.3, "Configuring Content Server."
Figure 9-1 Configuring Content Server for WebCenter Portal and Portal Framework applications
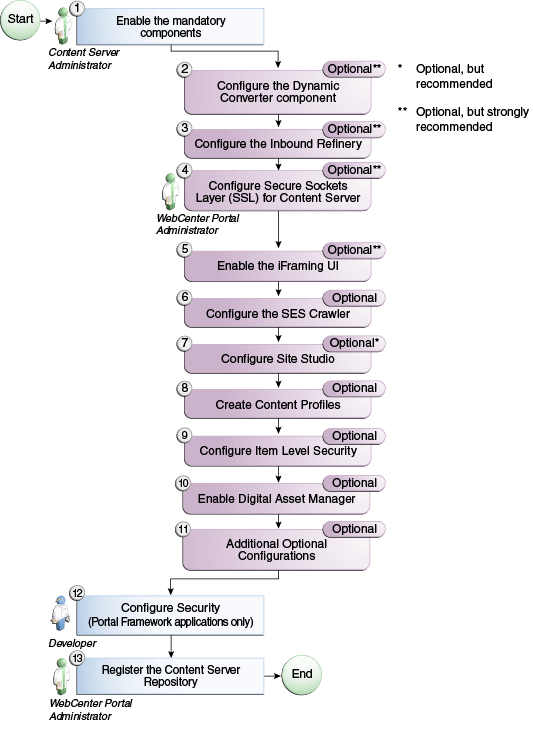
Description of ''Figure 9-1 Configuring Content Server for WebCenter Portal and Portal Framework applications''
Table 9-1 WebCenter Portal Configuration Tasks for Content Server
| Task | Description | Documentation |
|---|---|---|
|
Enable the mandatory components |
Mandatory You must enable the WebCenterConfigure component (which configures an instance of Content Server for WebCenter Portal and Portal Framework applications). You must also enable either the Folders_g or the FrameworkFolders component (which provide a hierarchical folder interface to content in Content Server). |
|
|
Configure the Dynamic Converter component |
Optional, but strongly recommended This component enables HTML renditions. Slide Previewer is available in WebCenter Portal when both DynamicConverter and the WebCenterConfigure components are installed. |
See Section 9.2.3.2, "Configuring the Dynamic Converter Component." |
|
Configure the Inbound Refinery |
Optional, but strongly recommended This is a conversion server that manages file conversions for electronic assets such as documents, digital images, and motion videos. It also provides thumbnail functionality for documents and images and storyboarding for videos. You can use Inbound refinery to convert content items stored in Content Server. |
|
|
Configure Secure Sockets Layer (SSL) for Content Server |
Optional, but strongly recommended To ensure secure identity propagation, you should set up SSL for Content Server. |
See Section 35.7, "Securing the WebCenter Portal Connection to Content Server with SSL." Also see Section 9.2.3.4, "Setting Up SSL for Content Server." |
|
Enable the iFraming UI |
Optional, but strongly recommended If iFraming is not configured, some functionality, such as Document Manager document rendition support, advanced metadata edit, the IFRAME functionality, and so on, will not be available. |
See Section 9.2.3.5, "Enabling the iFraming UI." For more information, also see Appendix B, "Oracle HTTP Server Configuration for WebCenter Portal." |
|
Configure the SES Crawler |
Optional You can override the default search adapters and use Oracle SES to get unified ranking results for WebCenter Portal resources such as documents, pages, people, and so on. |
See Section 18.5.2, "Setting Up Oracle WebCenter Content Server for Oracle SES." |
|
Configure Site Studio |
Optional, but strongly recommended Configuring Site Studio lets you use Site Studio to create and use Site Studio assets (region definitions and display templates) in Content Presenter. Unless you are absolutely sure you will not need Site Studio, we strongly recommend installing and configuring it so you don't have to come back to it later. |
See Section 9.2.3.7, "Setting Up Site Studio." For information, see also the "Enabling or Disabling a Component Using the Component Manager" section in Administering Oracle WebCenter Content and the section "Publishing Content Using Content Presenter" in Building Portals with Oracle WebCenter Portal. See also Administrator and Manager's Guide for Site Studio. |
|
Create Content Profiles |
Optional When iFraming is enabled in WebCenter Portal, users have the option to upload content based on Content Server Profiles |
See Section 9.2.3.8, "Creating Content Profiles in Content Server." For more information about creating content profiles, see the "Managing Content Profiles" chapter in Managing Oracle WebCenter Content. |
|
Configure Item Level Security |
Optional Documents tools can use Item Level Security (ILS) to override the default WebCenter Portal document security model, or to expose Content Server document security in a Portal Framework application. Using ILS allows Content Server folders (and their children) or individual documents to have unique security permissions. |
See Section 9.2.3.9, "Configuring Item Level Security." See also the "Setting Security Options on a Folder or File" section in Using Oracle WebCenter Portal |
|
Enable Digital Asset Manager |
Optional If you want to use Content Presenter to use different renditions of images in your portal, you may want to enable Digital Asset Manager (DAM) in Content Server. |
See Section 9.2.3.10, "Enabling Digital Asset Manager." See also the "Working With Image and Video Conversions" chapter in Managing Oracle WebCenter Content. |
|
Additional Optional Configurations |
Optional After completing the rest of your configuration, you can optionally configure the FileStore Provider component and set up Node Manager. |
|
|
Configure Security between the Content Server and the Portal Framework application |
Mandatory for Portal Framework applications (not applicable to WebCenter Portal) To configure Content Server to work with a Portal Framework application, you must first set up content security and users in a development environment and then migrate them to a production environment. |
|
|
Register the Content Server Repository |
Mandatory For WebCenter Portal, although in most cases the connection will be configured when WebCenter Portal first starts up, you should at least test it to make sure it has been configured correctly for your environment, and that data has been correctly seeded. For Portal Framework applications, you must configure the connection from the application to Content Server. |
For WebCenter Portal, see Section 9.2.3.14.2, "Configuring a Content Server Connection for WebCenter Portal." For WebCenter Portal, be sure to also check the seeded data as described in Section 9.2.3.14.3, "Checking the WebCenter Portal Data Seeded in Content Server." For Portal Framework applications, see Section 9.2.3.14.1, "Configuring a Content Server Connection for Portal Framework applications." |
9.2.3 Configuring Content Server
After installing or upgrading to Content Server 11g, perform the configuration tasks listed in Table 9-1. Unless otherwise noted, these tasks are common to both WebCenter Portal and Portal Framework applications.
Note:
Prior to beginning the configuration you must have completed the installation and configuration steps described in Section 9.2.1, "Prerequisites to Configuring Content Server" that define the starting point for the configuration steps in this section.Caution:
To avoid conflicts and ensure you can migrate documents between multiple Content Server instances, make sure that you've entered a unique Auto Number Prefix for your Content Server instance. To check that the Auto Number Prefix is unique across Content Server instances, log into Content Server and navigate to Administration > Admin Server > General ConfigurationThis section includes the following subsections:
-
Section 9.2.3.2, "Configuring the Dynamic Converter Component"
-
Section 9.2.3.8, "Creating Content Profiles in Content Server"
-
Section 9.2.3.11, "Showing and Hiding the Wiki Markup Tab in the Rich Text Editor"
-
Section 9.2.3.14, "Registering the Content Server Repository"
9.2.3.1 Enabling Mandatory Components
A component is a functional unit that can be plugged into Content Server to provide additional features or to modify existing functionality. To prepare Content Server for WebCenter Portal or a Portal Framework application, you must enable Folders_g or FrameworkFolders, and WebCenterConfigure.
9.2.3.1.1 Considerations for Enabling FrameworkFolders or Folders_g
Oracle WebCenter Content offers two folder solutions: Folders_g and FrameworkFolders. Previously, Oracle WebCenter Portal only supported Folders_g but now, in this release, Oracle WebCenter Portal offers support for FrameworkFolders also.
The Folders_g component (or the Contribution Folders interface) provides a hierarchical folder interface to content on Content Server. The FrameworkFolders component (or the Folders interface) also provides a hierarchical folder interface similar to a conventional file system, for organizing and locating some or all of the content in the repository. However, Folders is a scalable, enterprise solution and is designed to replace Contribution Folders as the folder service for Content Server.
In the Folders_g setup, Item Level Security (ILS) can be set on files and folders. ILS on folders is inherited by all files within a folder unless a file has its own ILS defined. In the FrameworkFolders-enabled WebCenter Portal instances, ILS can be set only on files. ILS cannot be set on folders.
For new installations of Oracle WebCenter Portal, it is recommended that you enable the FrameworkFolders component on Content Server. For an Oracle WebCenter Portal instance patched from an earlier release that used the Folders_g component, you can continue to use Folders_g or choose to migrate to the FrameworkFolders interface. Oracle recommends that you migrate to the FrameworkFolders interface for better performance and so that you can use any new Content Server features. For information about migrating to the FrameworkFolders interface, see Appendix H, "Migrating Folders_g to FrameworkFolders."
When enabling FrameworkFolders, ensure that both Oracle WebCenter Portal and Oracle WebCenter Content are at 11g Release 11.1.1.9.0. Both FrameworkFolders and Folders_g must not be enabled at the same time unless you are migrating from the Folders_g to the FrameworkFolders setup.
9.2.3.1.2 Enabling the Folders_g Component
For existing Oracle WebCenter Portal installations patched to the latest release, you can continue to use Folders_g as the folder service on Content Server. Folders_g is incompatible with FrameworkFolders. Therefore, ensure that FrameworkFolders is disabled unless you are migrating from the Folders_g to FrameworkFolders setup.
Note:
For better performance, Oracle recommends that you enable FrameworkFolders instead of Folders_g.To enable the Folders_g component:
-
Log on to WebCenter Content as an administrator.
-
Click Administration, Expand Admin Server, and click Component Manager in the main menu.
-
On the Component Manager page, make sure that the FrameworkFolders check box is not selected.
-
Click Advanced Component Manager.
-
On the Advanced Component Manager page, from the Disabled Components list box, select Folders_g and click Enable.
-
Restart the Content Server instance.
9.2.3.1.3 Enabling the FrameworkFolders Component
In this release, it is recommended that you enable FrameworkFolders instead of Folders_g.
Note:
For an existing Oracle WebCenter Portal instance patched to the latest release, you can choose to migrate from Folders_g to FrameworkFolders. For information about the migration procedure, see Appendix H, "Migrating Folders_g to FrameworkFolders."To enable the FrameworkFolders component:
-
Log on to WebCenter Content as an administrator.
-
Click Administration, expand Admin Server, and click Component Manager in the main menu.
-
On the Component Manager page, select the FrameworkFolders check box.
-
Click Update.
-
Click Advanced Component Manager.
-
On the Advanced Component Manager page, ensure that the Folders_g check box is not selected.
-
Restart the Content Server instance.
9.2.3.1.4 Enabling the WebCenterConfigure Component
You must enable the WebCenterConfigure component to configure Content Server for WebCenter Portal and Portal Framework applications. Table 9-2 describes the tasks performed in Content Server when you enable this component.
To enable the WebCenterConfigure component:
-
Log on to WebCenter Content as an administrator.
-
Choose Administration, then Admin Server, then Component Manager from the Main menu.
-
On the Component Manager page, select the WebCenterConfigure check box.
Tip:
On the Component Manager page, you can choose to select other components like Dynamic Converter if you plan to use them as you'll otherwise need to enable them later. -
Click Update.
-
Restart the Content Server instance.
Enabling the WebCenterConfigure component performs certain tasks in Content Server. Table 9-2 describes these tasks.
Table 9-2 Tasks Associated with the WebCenterConfigure Component
| Tasks | Pointers to Verify the Completion of Tasks |
|---|---|
|
Enables accounts |
Content Server > Administration > Admin Server > General Configuration > Enable Accounts checkbox or
|
|
Allows updates to documents that are yet to be released |
Content Server > Administration > Admin Server > General Configuration > Additional Configuration Variables or
The setting is |
|
Disables the cache for folders |
If the or See the The setting is |
|
Adds metadata fields:
|
You can view, edit, and add metadata fields here: Content Server > Administration > Admin Applets > Configuration Manager > Information Fields tab. |
|
Sets Folder settings if the
|
Content Server > Administration > Folder Configuration > System Default Information Field Configuration Content Server > Administration > Folder Configuration > Information Field Inherit Configuration |
|
Adds the |
Content Server > Administration > Admin Applets > Workflow Admin > Options > Tokens menu |
|
Adds three |
If the
|
|
Overrides certain behavior of the Site Studio Switch Content wizard to make Site Studio work in WebCenter Portal and Portal Framework applications |
This provides access to the Site Studio Switch Content wizard and the Site Studio Contributor editor from within Content Presenter to allow for adding and editing Site Studio documents from WebCenter Portal or Portal Framework applications.
|
|
Upgrades the PersonalSpace role and default attributes to current format |
If Content Server contains an older version (11.1.1.5.0 and earlier) of the PersonalSpace role format, then enabling WebCenterConfigure upgrades the PersonalSpace role and default attributes to the current format 11.1.1.5.0 and earlier format: Roles:
Default Attributes:
Current format: Roles:
Default Attributes:
|
9.2.3.1.5 Enabling Full-Text Search
Although nominally optional, Oracle recommends that you implement full-text search using the OracleTextSearch option. By default, the database used by Content Server is set up to provide metadata-only searching and indexing capabilities. However, you can modify the default configuration of the database to additionally support full-text searching and indexing.
Note that this option should only be used in conjunction with an Oracle database; the OracleTextSearch index must always be in an Oracle database, regardless of the database type used for the main schema. For more information, see the "Configuring OracleTextSearch for Content Server" section in Installing and Configuring Oracle WebCenter Content, and the "Site Studio Integration" section in Managing Oracle WebCenter Content.
9.2.3.2 Configuring the Dynamic Converter Component
Optional, but strongly recommended
This configuration is required for the Slide Previewer capability in WebCenter Portal and Portal Framework applications, which make use of the HTML renditions generated on the fly by the Dynamic Converter.
Note:
The Inbound Refinery must also be configured or any previews will fail. See Section 9.2.3.3, "Configuring the Inbound Refinery" for the steps to configure the Inbound Refinery.The configuration for the Dynamic Converter consists of two steps: enabling the Dynamic Converter, and defining the file types for which the Dynamic Converter is available. If you enabled the Dynamic Converter previously when you were enabling the mandatory components, you can skip the steps to enable it and go directly to the steps for defining the file types.
Enabling the Dynamic Converter
To enable the Dynamic Converter:
-
Log onto the Administration server and open the Admin Server page.
You can access the Admin Server page through Content Server by going to Administration > Admin Server.
-
On the Component Manager page check the DynamicConverter checkbox.
-
Click Update.
-
Restart the Content Server instance.
Setting the file types to be sent to the Dynamic Converter
To define the file types for which Dynamic Converter is available:
-
Log in to the Content Server and select Administration > Dynamic Converter Admin > Configuration Settings > Conversion Formats.
Note that the Dynamic Converter Admin menu option will not be visible until after you restart the Content Server instance after enabling the Dynamic Converter component.
-
Select the file formats from the dropdown list for which the Dynamic Converter will be enabled. Choose all the document formats for which you want HTML renditions such as Word, Excel, PowerPoint, and PDF.
9.2.3.3 Configuring the Inbound Refinery
Optional, but strongly recommended
The Inbound Refinery is a conversion server that manages file conversions for electronic assets such as documents, digital images, and motion videos. It also provides thumbnail functionality for documents and images and storyboarding for videos. You can use Inbound Refinery to convert content items stored in Content Server. Note that if you enabled the DynamicConverter component (used to generate slide previews), you must also configure the IBR.
To configure Inbound Refinery, you must set up an outgoing provider from Content Server to Inbound Refinery, and specify the file types that will be converted. You also need to enable PDFExportConverter and set other conversion settings on Inbound Refinery. Although optional, you may also want to enable the conversion of wikis and blogs to PDF.
Prior to configuring Inbound Refinery, you should have:
-
Installed Inbound Refinery, as described in Section 9.2.1.1, "Installation Prerequisites"
-
Completed the initial post-install configuration as described in Section 9.2.1.2, "Configuration Prerequisites"
This section contains the following subsections:
-
Section 9.2.3.3.2, "Enabling PDFExportConverter in Inbound Refinery"
-
Section 9.2.3.3.3, "Selecting the File Formats To Be Converted"
-
Section 9.2.3.3.4, "Enabling the Conversion of Wikis and Blogs into PDFs"
9.2.3.3.1 Creating an Outbound Provider
Before Content Server can send files to Inbound Refinery for conversion, you must set up an outgoing provider from Content Server to Inbound Refinery with the Handles Inbound Refinery Conversion Jobs option checked.
To create an outbound provider:
-
From the Content Server Administration menu, select Providers.
-
In the Create a New Provider section of the Providers page, click Add in the outgoing row.
-
Enter values for these fields:
-
Provider Name: Any short name with no spaces describing the Inbound Refinery instance the outgoing provider is for. It is a good idea to use the same name as the Inbound Refinery Instance Name.
-
Provider Description: A description of the outgoing provider.
-
Server Host Name: The name of the host machine where the Inbound Refinery instance is running (for example,
myhost.example.com). -
HTTP Server Address: The address of the Inbound Refinery instance (for example,
http://myhost.example.com:16250where16250is the Web port). -
Server Port: The IntradocServerPort value for the Inbound Refinery instance. This value was entered on the post-installation configuration page, and can be found on the Inbound Refinery configuration information page under Server Port. You can also find it in the
MW_HOME/user_projects/domains/ucm_domain/ucm/ibr/config/config.cfgfile asIntradocServerPort.To display the Inbound Refinery configuration information page:
-
Log in to the Content Server and choose Administration > Configuration for <instanceName>.
-
Click Server Configurations to display the server configurations.
Or log into the IBR at Administration > Admin Server > General Configuration.
-
-
Instance Name: The instance name for Inbound Refinery (the
IDC_Namevalue in theconfig.cfgfile). This value was entered on the post-installation configuration page as Server Instance Name. To find the instance name, log into the Inbound Refinery, and navigate to Administration -> Configuration for <instanceName>. -
Relative Web Root: The web root of the Inbound Refinery instance (for example,
/ibr/).
-
-
Under Conversion Options, check Handles Inbound Refinery Conversion Jobs. Do not check Inbound Refinery Read Only Mode.
-
Click Add.
-
Restart Content Server.
-
Go back to the Providers page, and check that the Connection State value is
goodfor the provider.If the value is not good, double-check that you entered all the preceding entries correctly, and check that the Content Server and Inbound Refinery instances can ping each other.
9.2.3.3.2 Enabling PDFExportConverter in Inbound Refinery
PDFExportConverter uses OutsideIn to convert documents directly to PDF files. The conversion can be cross-platform and does not require any third-party product. You can enable PDFExportConverter for Inbound Refinery as a server feature.
To enable PDFExportConverter on Inbound Refinery:
-
From the Inbound Refinery Administration menu, select Admin Server and then Component Manager.
-
Select
PDFExportConverter, and click Update. -
Click OK to enable this feature.
-
Restart Inbound Refinery.
To set the PDF converter settings:
-
Log in to Inbound Refinery again.
-
Select Conversion Settings, then select Primary Web Rendition.
-
Check Convert to PDF using PDF Export.
-
Select Conversion Settings, then select Additional Renditions.
-
Check Create Thumbnail Images using Outside In.
-
Select Conversion Settings > Third Party Application Settings > General OutsideIn Filter Options > Options.
-
Set the Path to fonts to the fonts on the Inbound Refinery system.
-
Select Use internal graphics rendering under UNIX Rendering Options.
-
Click Update.
For more information, see the "Setting PDF Files as the Primary Web-Viewable Rendition" section in Managing Oracle WebCenter Content.
9.2.3.3.3 Selecting the File Formats To Be Converted
To tell Content Server which files to send to Inbound Refinery to be converted, you need to select the file formats.
To select the file formats to be converted:
-
From the Content Server Administration menu, select Refinery Administration and then File Formats Wizard.
Note:
Refinery Administration is not listed when there is no valid outgoing provider to an Inbound Refinery instance.Content Server displays the File Formats Wizard page. This page configures which file formats will be sent to Inbound Refinery for conversion when they are checked into Content Server.
-
Select the formats you want converted.
Make sure you check all the file types you want sent to Inbound Refinery for conversion. Do not to check HTML, and also do not check wiki and blog unless you have enabled their conversion through the WebCenterConversions component as described in Section 9.2.3.3.4, "Enabling the Conversion of Wikis and Blogs into PDFs."
-
Click Update.
9.2.3.3.4 Enabling the Conversion of Wikis and Blogs into PDFs
Optional
Before you can enable the conversion of wikis and blogs into PDFs in WebCenter Portal and Portal Framework applications, you must first:
-
Set up the OpenOffice integration with Inbound Refinery. For information, see the "Configuring Inbound Refinery to Use OpenOffice" section in Managing Oracle WebCenter Content.
-
Perform the steps described in the "Setting Classpath to OpenOffice Class Files" section (see also: "Using OpenOffice Without Logging In to Host") in Managing Oracle WebCenter Content.
Enabling the conversion of wikis and blogs into PDFs requires you to first install the WebCenterConversions component, then configure OpenOffice, which converts HTML to PDF, in the Inbound Refinery server and Content Server respectively. The WebCenterConversions component adds the HtmToPDFOpenOffice conversion option, which makes use of OpenOffice conversion in Inbound Refinery (and therefore requires OpenOffice to be configured for that Inbound Refinery).
Note that you must complete the steps below in sequence. If you enable Wiki and Blogs by selecting them in the file Formats Wizard without first installing and enabling the Inbound Refinery the Wiki and Blogs documents will be stuck in the Inbound Refinery conversion queues.
Note:
Only images that have been added through the Rich Text Editor (RTE) using the Embed Image feature are visible in the generated PDF. Images referenced with an external URL do not display in the PDF. For information on the RTE, see the "Using the Rich Text Editor (RTE)" section in Using Oracle WebCenter Portal.PDF conversion works only for the new blogs and wikis created after conversion is enabled. Blogs and wikis created before the conversion was enabled cannot be converted to PDFs.
To install the WebCenterConversion component:
-
Log in to the Inbound Refinery server.
-
Click Administration and then select Admin Server.
The Inbound Refinery Admin Server page displays.
-
In the Component Manager, click the advanced component manager link.
The Advanced Component Manager page displays.
-
In the Install New Component section, select WebCenterConversions.zip from the Oracle WebCenter Companion CD, then click Install.
The WebCenterConversion component displays in the Disabled Components box.
-
Select WebCenterConversion and click Enable.
-
Restart the Inbound Refinery server.
To enable the WebCenterConversion component:
-
In the Inbound Refinery server, under Conversion Settings, click the Conversion Listing link.
This displays the Conversion Listing page.
-
In the Conversions table, select the Accept checkbox for
HtmToPDFOpenOffice, and click Update.
The Wiki and Blog options will now appear in Content Server's File Formats Wizard in the associated Content Server instance.
To enable Wiki and Blogs to be converted to PDFs in Content Server:
-
Log in to Content Server.
-
Expand the Administration node, then Refinery Administration, and then click File Formats Wizard.
-
Under Select File Types, select the Wiki and Blogs checkboxes and click Update.
To enable the PDF conversion in Inbound Refinery:
-
Log in to the Inbound Refinery server again.
-
Select Conversion Settings, and then select Primary Web Rendition.
-
Check the Convert to PDF using Open Office option.
-
Click Update.
9.2.3.4 Setting Up SSL for Content Server
If WebCenter Portal (or a Portal Framework application) and the Content Server you intend to create a repository connection to are not on the same system or the same trusted private network, then identity propagation is not secure. To ensure secure identity propagation you must also configure SSL for Content Server. For a step-by-step description of how to set up SSL for Content server, see Section 35.7, "Securing the WebCenter Portal Connection to Content Server with SSL."
9.2.3.5 Enabling the iFraming UI
Optional, but strongly recommended
WebCenter Portal and Portal Framework applications use Content Server user interface presented in an iFrame for certain functionality, such as Document Manager document rendition and advanced metadata editing. iFrame does not support cross-domain communications, so if WebCenter Portal (or a Portal Framework application) and Content Server are not in the same domain (in terms of their web address) you must configure the Oracle HTTP Server (OHS) as described below, or iFraming functionality not be available.
Notes:
-
Before enabling support for iFraming, you should already have installed and configured the Oracle HTTP Server (OHS) as described Section 33.2.5, "Installing and Configuring the Oracle HTTP Server."
-
While the Documents task flows allow specifying a different Content Server connection, iFraming is supported only for the default Content Server connection. Therefore, you cannot specify a non-default Content Server connection if the Documents task flows added to the portal will use iFrames to display file content, such as PDF files.
To enable the iFraming UI in WebCenter Portal and Portal Framework applications:
-
Open the
mod_wl_ohs.conffile and make sure it points to the right Content Server instance.The default location of this file is:
OHS_HOME/Oracle_WT1/instances/instance1/config/OHS/ohs1/mod_wl_ohs.conf -
Update the connection property of the Content Server to:
webContextRoot='/cs'Note that this setting should never be set if OHS is not set up or it is not working correctly.
-
Configure OHS by updating the
mod_wl_ohs.conffile with the Content Server and adfAuthentication protected URI information. For example:<Location /cs> SetHandler weblogic-handler WeblogicHost example.com WeblogicPort 9400 </Location> <Location /adfAuthentication> SetHandler weblogic-handler WeblogicHost example.com WeblogicPort 9400 </Location>
If your Content Server is configured with the Oracle AutoVue VueLink servlet, include the additional entry:
<Location /vuelink>
SetHandler weblogic-handler
WeblogicHost example.com  # Same as /cs entry
WeblogicPort 9400    # Same as /cs entry
</Location>
For more information about configuring OHS through the
mod_wl_ohs.conffile, see Appendix B, "Oracle HTTP Server Configuration for WebCenter Portal." -
Log in to WebCenter Portal or your Portal Framework application and check that the iFraming functionality is available.
Note that since WebCenter Portal (or your Portal Framework application) is now front-ended by OHS, when you access WebCenter Portal or the Portal Framework application you need to do so through OHS. Consequently, you would access your application using the following URL:
http://host:OHSPort/appname
For example:
http://example.com:7777/webcenter
9.2.3.6 Configuring the SES Crawler
Optional
Follow the steps in Section 18.5.2, "Setting Up Oracle WebCenter Content Server for Oracle SES" to configure the SES crawler.
9.2.3.7 Setting Up Site Studio
Optional, but strongly recommended
Although configuring Site Studio is strictly speaking optional, without it you will not be able to create and use Site Studio-related assets in Content Presenter. Unless you are absolutely sure you will not need Site Studio, we strongly recommend installing and configuring it now rather than having to come back to it later.
To enable Site Studio:
-
Log in to Content Server and open the Admin Server Page.
The Component Manager Page displays.
-
Click All Features.
All components from the Document Management, Folders, Inbound Refinery, Integration, and Web Content Management categories are displayed.
-
Select the checkbox for each component you want to enable. The following components should be enabled:
-
LinkManager
-
SiteStudio
-
SiteStudioExternalApplications
-
DBSearchContainsOpSupport (required for Full Text Search)
-
-
Click Update.
-
Restart the Content Server instance.
-
Log back into Content Server and open the Administration page.
-
Select Site Studio Administration, and then Set Default Project Document Information.
-
Accept the defaults and click Update.
-
Select Site Studio Administration, and then Set Default Web Asset Document Information.
-
Accept the defaults and click Update.
-
(For Portal Framework applications only) Configure the cookie path to the context root of your application to prevent losing your session when editing Site Studio content every time the iFrame closes. To do this add a session descriptor to the
weblogic.xmlfile (in the WEB-INF folder) and specify the cookie path (which is the context root of your application):<session-descriptor> <cookie-path>/app_name</cookie-path> </session-descriptor> -
To use the Site Studio Designer, log into the Content Server console, navigate to My Content Server > My Downloads, then download and install Site Studio Designer.
9.2.3.8 Creating Content Profiles in Content Server
Optional
When iFraming is enabled in WebCenter Portal or your Portal Framework application, users have the option to upload content using Content Server Profiles. For more information on Content Server Profiles, see "Managing Content Profiles" in Managing Oracle WebCenter Content.
In addition to the mandatory fields needed to upload files to Content Server, for the upload profiles to work correctly in Document Library and WebCenter Portal, the Content Server profiles should also contain the following fields:
-
xCollectionID- for the folder name to be persisted -
xIdcProfile- for the profile value to be persisted -
dRevLabel- required by theCHECKIN_SEL_FORMAPI to enable a new version to be checked in
These fields can be added as hidden fields to the profile.
9.2.3.9 Configuring Item Level Security
Optional
Document tools can use Item Level Security (ILS) to override the default document security model in WebCenter Portal, or to expose Content Server document security in a Portal Framework application. Using ILS allows Content Server folders (and their children) or individual documents to have unique security permissions.
This section includes the following sections:
9.2.3.9.1 About Item Level Security
WebCenter Portal and Portal Framework applications allow custom permissions to be set on a file or a folder. This feature is referred to as Item level Security (ILS). Once configured, the feature can be accessed in your application, for example, from the Documents page of a portal.
Note:
In WebCenter Portal, using ILS as the primary security mechanism for a portal may become difficult to administer when the number of users grow. Moreover, ILS may not be as efficient as the WebCenter Portal security model. Therefore, Oracle recommends using ILS only to define security for the documents or folders that do not fit within the WebCenter Portal security model (for example, documents and folders to which only a restricted set of users have access). For information about security, see Chapter 49, "Managing Security Across Portals."ILS can be used to replace the existing file or folder security with a custom set of permissions.
-
When applied to a file, the custom permissions affect only that file.
-
When applied to a folder, the updated security is propagated to all child files and folders recursively, stopping when a folder is encountered with its own custom permissions. The propagation does not affect a file with its own custom permissions, if already set.
Note:
In WebCenter Portal, ILS cannot be applied to the root folder of a portal. This is so that the portal's security can be correctly restored on a file or folder when its item level security is removed.In the Folders_g setup, ILS can be set on files and folders. In the FrameworkFolders setup, ILS can be set only on files, and not on folders.
Within the Content Server, ILS is implemented as a combination of ACL, account, and other metadata field settings. Content Server must be correctly configured to enable ILS. See, Section 9.2.3.9, "Configuring Item Level Security" and Section 9.2.3.13, "Configuring Security Between Content Server and WebCenter Portal Framework Applications."
What Happens in Content Server on Setting Custom Permissions
The following occurs in Content Server on setting custom permissions for a file or folder from the Item Level Security dialog:
-
The account is changed to account
WCILS/original_account.All
AUTHENTICATEDusers are by default grantedRWDAon accountWCILS, and allPUBLICusers are grantedRon the accountWCILS. Changing the account toWCILS/original_accountensures that only the custom permissions determine the security on the content. -
The ACL content metadata fields,
xClbraUserListandxClbraRoleListare updated with the custom permissions. (xClbraUserListcontains the permissions a user has on a document or folder, andxClbraRoleListcontains the permissions a group has on the document or folder.) -
The content metadata field,
xInhibitUpdateis set totrue, to prevent ILS from overwriting an item's own custom security with a parent folder's custom permissions.
What Happens in Content Server on Removing Custom Permissions
Removing custom permissions from a folder or file attempts to revert the security on that item to the security set on the item's parent folder. When you remove custom permissions, the following changes take place within Content Server:
-
The item's account is changed to be the account of its parent folder.
-
The item's ACL content metadata fields,
xClbraUserListandxClbraRoleListare cleared. -
The content metadata field,
xInhibitUpdateis set tofalse.
These changes are propagated in the same way as when the item level security is set.
Prerequisites for Using Item Level Security in WebCenter Portal and WebCenter Portal Framework Applications
For WebCenter Portal or Portal Framework applications, the Item Level Security (ILS) feature is supported only if the application's Content Server security configuration meets certain prerequisites. In most scenarios ILS is not required, and therefore, it should not be enabled unless explicitly needed. Typical reasons for using ILS are application situations when the Content Server security models need to be overridden or supplemented to handle exception cases to security policies for individual users or groups of users, on a per document basis. Please be aware that there are performance impacts and additional administrative overhead when using ILS.
Note:
Oracle recommends using Content Server security because it is efficient and scales easily for a large number of users and content objects compared with item level security. From an administrative perspective, Content Server's security is also easier to maintain. For information about configuring security, see Section 9.2.3.13, "Configuring Security Between Content Server and WebCenter Portal Framework Applications."The following are Content Server security ILS prerequisites for WebCenter Portal or a Portal Framework application:
-
Security is based on Content Server Accounts alone.
Since all content must also have a security group, this means all application users must have
RWDpermissions granted to the application's security group. This is necessary because of how ILS works, that is, on setting the custom permissions, the account automatically changes toWCILS/original_account, which is an account all users haveRWDAgranted to. This is so that the custom permissions alone determine the security on the document or folder. -
The content metadata field,
xForceFolderSecurityis set totruefor the entire application content. That is,Foldersecurity settings are enforced on child folders and documents. This is necessary to support the propagation of custom permissions.
9.2.3.9.2 Configuring Item Level Security
To configure Item Level Security (ILS):
-
Log on to your Content Server instance.
-
From the Administration menu, select Admin Server to open Component Manager.
-
In the Component Manager section, click the Advanced Component Manager link.
-
In the Advanced Component Manager page, scroll down to the Disabled Components list, select RoleEntityACL, as shown in Figure 9-2, and then click Enable.
Figure 9-2 Advanced Component Manager - RoleEntityACL Component
Description of ''Figure 9-2 Advanced Component Manager - RoleEntityACL Component''
-
From the Options pane on left, select General Configuration.
-
Under the General Configuration page, in the Additional Configuration Variables box, add the following parameters:
UseEntitySecurity=1
SpecialAuthGroups=PersonalSpaces,securityGroup
where:
SpecialAuthGroupsis a comma separated list (no spaces allowed between values) of security groups. The ILS option is enabled only on content in these security groups.-
For Portal Framework applications, the
securityGroupis the name of the security group in which content is created. -
For WebCenter Portal, the name of the security group that contains the WebCenter Portal data is the same as application name you configured to identify WebCenter Portal in the Content Server. You can find this application name using either Fusion Middleware Control or WLST.
In Fusion Middleware Control, the Application Name property displays in the Add/Edit Content Repository Connection page for the default Content Server connection for WebCenter Portal.
Using WLST, you can display the application name using the
listDocumentsSpacesPropertiescommand. For example:listDocumentsSpacesProperties(appName='webcenter') The Documents Spaces container is "/myspacesroot" The Documents repository administrator is "weblogic" The Documents application name is "myWebCenterPortalApp" <- applicationName The Documents primary connection is "myContentServer"
-
-
Restart Content Server and the managed server on which WebCenter Portal or your Portal Framework application is running.
9.2.3.9.3 Configuring Additional Settings for WebCenter Portal Framework Applications
For a Portal Framework application, in addition to the steps described in Section 9.2.3.9.2, "Configuring Item Level Security", ensure that all users by default are granted RWDA on the WCILS account. To do this, use the SET_DEFAULT_ATTRIBUTES service. For information about the SET_DEFAULT_ATTRIBUTES service, see the "SET_DEFAULT_ATTRIBUTES" section in Services Reference for Oracle WebCenter Content.
To run the SET_DEFAULT_ATTRIBUTES service through a browser:
-
From a browser, log into Content Server as an administrative user.
-
View the source for the page, and find the value of the idcToken by searching for a line containing
var idcToken =(for example,var idcToken = 1316188662243:6FE5F809A3B122277B7A1D19912FBB5). -
While in the same browser window, enter the URL in the format:
http://host:port/cs/idcplg?IdcService=SET_DEFAULT_ATTRIBUTES&dECPropSubKey=<Security Group>&dDefAttribs=account,WCILS,15&idcToken=<idcToken>&IsSoap=1For example:
http://myhost.com:4444/cs/idcplg?IdcService=SET_DEFAULT_ATTRIBUTES&dECPropSubKey=Custom&dDefAttribs=account,WCILS,15&idcToken=1291297336399:6E324367FC9D2F8BE525F4CEBF4463FC&IsSoap=1
9.2.3.10 Enabling Digital Asset Manager
Optional
For full image rendition support, the Content Server where your images are checked in must have Digital Asset Manager (DAM) enabled. If DAM is not enabled, there is limited support only for separate web and thumbnail renditions through the Inbound Refinery.
For example, you may want to use a large, high resolution image when the page containing the image is displayed using a desktop browser; a smaller, lower resolution image for display on a mobile phone; and a medium-sized, but still low resolution image for display on a tablet.
When DAM is enabled, different renditions are automatically created when an image is checked in, determined by the rendition set specified during check in. DAM provides some built-in rendition sets but the Content Server administrator can also create new rendition sets. The individual renditions can then be referenced by name in Content Presenter display templates by using the appropriate EL expression.
For more information about enabling DAM and creating rendition sets, see the "Working With Image and Video Conversions" chapter of Managing Oracle WebCenter Content.
Note:
WebCenter Portal supports multiple renditions for images only, not video.9.2.3.11 Showing and Hiding the Wiki Markup Tab in the Rich Text Editor
Optional
When creating or editing a wiki document in the Rich Text Editor (RTE), the Wiki Markup tab is hidden by default. To show and hide the Wiki Markup tab, you can edit the configuration file blog-wiki-config.xml.xml.
WARNING:
Switching between the Wiki Markup tab and other tabs in the RTE may cause data loss. For this reason, the Wiki Markup tab is disabled by default. Before you enable the Wiki Markup tab, consider potential issues that may result.
For a WebCenter Portal application
To show and hide the Wiki Markup tab for portals:
-
Export the latest configuration file
blog-wiki-config.xml.xmlfrom MDS:exportMetadata(application='webcenter', server='WC_Spaces', toLocation='/scratch/aime1', docs='/oracle/webcenter/doclib/config/mdssys/cust/site/webcenter/blog-wiki-config.xml.xml')
-
If the configuration file is not found, create it at the path specified in Step 1, then edit the file to add the following code:
<?xml version='1.0' encoding='UTF-8'?> <mds:customization version="11.1.1.64.86" xmlns:mds="http://xmlns.oracle.com/mds" motype_local_name="adf-blogwiki-config" motype_nsuri="http://xmlns.oracle.com/webcenter/blogwiki/config"> <mds:modify element="(xmlns(mds_ns1=http://xmlns.oracle.com/webcenter/blogwiki/config))/mds_ns1:adf-blogwiki-config/mds_ns1:properties/mds_ns1:property[@name='wiki.markup.enabled']"> <mds:attribute name="value" value="false"/> </mds:modify> </mds:customization> -
Edit the configuration file to change the value of element
wiki.markup.enabled:<mds:modify element="(xmlns(mds_ns1=http://xmlns.oracle.com/webcenter/blogwiki/config))/mds_ns1:adf-blogwiki-config/mds_ns1:properties/mds_ns1:property[@name='wiki.markup.enabled']"><mds:attribute name="value" value="true"/></mds:modify>where:
-
true: show the Wiki Markup tab -
false(default): hide the Wiki Markup tab
-
-
Import the updated file to MDS:
importMetadata(application='webcenter', server='WC_Spaces', fromLocation='/scratch/aime1', docs='/oracle/webcenter/doclib/config/mdssys/cust/site/webcenter/blog-wiki-config.xml.xml')
For a Portal Framework application
To show and hide the Wiki Markup tab for a Portal Framework application:
-
Export the latest configuration file
blog-wiki-config.xml.xmlfrom MDS:exportMetadata(application='webcenter', server='WC_Spaces', toLocation='/scratch/aime1', docs='/oracle/webcenter/doclib/config/mdssys/cust/site/webcenter/blog-wiki-config.xml.xml')
-
If the configuration file is not found, create it at the path specified in Step 1, then edit the file to add the following code:
<?xml version='1.0' encoding='UTF-8'?>
<mds:customization version="11.1.1.64.86" xmlns:mds="http://xmlns.oracle.com/mds" motype_local_name="adf-blogwiki-config" motype_nsuri="http://xmlns.oracle.com/webcenter/blogwiki/config">
<mds:modify element="(xmlns(mds_ns1=http://xmlns.oracle.com/webcenter/blogwiki/config))/mds_ns1:adf-blogwiki-config/mds_ns1:properties/mds_ns1:property[@name='wiki.markup.enabled']">
<mds:attribute name="value" value="false"/>
</mds:modify>
</mds:customization>
-
Edit the configuration file to change the value of element
wiki.markup.enabled:<mds:modify element="(xmlns(mds_ns1=http://xmlns.oracle.com/webcenter/blogwiki/config))/mds_ns1:adf-blogwiki-config/mds_ns1:properties/mds_ns1:property[@name='wiki.markup.enabled']"> <mds:attribute name="value" value="true"/> </mds:modify>where:
-
true: show the Wiki Markup tab -
false(default): hide the Wiki Markup tab
-
-
Import the updated file to MDS:
importMetadata(application='myPortalFrameworkApp', server='WC_CustomPortal', fromLocation='/scratch/aime1', docs='/oracle/webcenter/doclib/config/mdssys/cust/site/site/blog-wiki-config.xml.xml')
9.2.3.12 Additional Optional Configurations
This section describes additional optional configurations that are not required for Content Server to function correctly, but nonetheless offer value and comprise best practices for a Content Server enterprise installation.
This section includes the following subsections:
9.2.3.12.1 Configuring the File Store Provider
A file store for data management is used in the Content Server system instead of the traditional file system for storing and organizing content. The File Store Provider component is installed, enabled, and upgraded by default for a new Content Server instance (with no documents in it). The File Store Provider component automatically upgrades the default file store (DefaultFileStore) to make use of functionality exposed by the component, including modifying the web, vault, and web URL path expressions.
The File Store Provider component exposes the file store functionality in the Content Server interface and allows additional configuration options. For example, you can configure the Content Server instance to use binary large object (BLOB) data types to store content in a database, instead of using a file system.
With File Store Provider, checked-in content and associated metadata are examined and assigned a storage rule based on criteria established by a system administrator. Criteria can include metadata, profiles, or other considerations. The storage rule determines how vault and web files are stored by the Content Server system and how they are accessed by a web server.
The File Store Provider component enables you to define data-driven rules to store and access content managed by the Content Server system. The configuration steps below create a storage rule that ensures content is stored in the database rather than on the file system.
To create a storage rule:
-
Log in to the Content Server instance as system administrator.
-
Select Administration, then Providers.
The Providers Page displays.
-
Click Info in the Action column next to the
DefaultFileStoreprovider.The File Store Provider Information Page displays.
-
Specify a name for the rule (for example,
DBStorage) and select JDBC Storage. -
Click OK.
The Edit File Store Provider Page displays.
-
Click Update.
-
Restart the Content Server instance.
9.2.3.12.2 Setting Up Node Manager
As an additional step to configuring and managing Content Server and the other servers in the domain in which it resides, you may want to consider using Oracle WebLogic Server Node Manager. Node Manager lets you start and stop WebLogic Server instances remotely, monitor them, and automatically restart them after an unexpected failure. You can configure Content Server, the Administration Server, and Node Manager to work together in a WebLogic Server domain. Node Manager is installed on all the machines that host any server instance. For more information about using Node Manager, see "Using Node Manager with Oracle WebCenter Content" in the Installing and Configuring Oracle WebCenter Content.
9.2.3.13 Configuring Security Between Content Server and WebCenter Portal Framework Applications
Mandatory for Portal Framework applications
To configure Content Server to work with a Portal Framework application, you must first set up content security and users in a development environment and then migrate them to a production environment. For detailed information about security, see also the "Advanced Administration: Security" part in Administering Oracle WebCenter Content.
This section describes the following mandatory steps:
-
Creating security groups: All content items, whether that be a folder or a document, must reside in a security group. Security groups are required for folders so the folder content can be restricted or its access can be customized based on who should view, edit, or manage the folder content. To create security groups follow the steps in Section 9.2.3.13.1, "Creating a Security Group Using the Content Server Console."
-
Creating roles: Roles are created with different permissions such as, read, write, delete, administer, and are used to define permissions on security groups. First, create the roles in Content Server, as described in Section 9.2.3.13.2, "Creating Roles Using the Content Server Console," and then for the Portal Framework application, as described in Section 9.2.3.13.3, "Creating Roles (Groups) for the Portal Framework application."
-
Creating folders: Folders include content such as files, subfolders, images. To create folders, follow the steps in Section 9.2.3.13.4, "Creating a Folder Using the Content Server Console."
-
Creating users: Users are assigned different roles based on their roles and responsibilities in their organizations. Create users as described in Section 9.2.3.13.5, "Creating Users for an External LDAP" or Section 9.2.3.13.6, "Creating Users for the Embedded LDAP," and then grant roles to these users, as described in Section 9.2.3.13.7, "Granting a Role to an External LDAP User" or Section 9.2.3.13.8, "Granting a Role to an Embedded LDAP User."
-
Migrating security: Migrate these security groups, folders, users, and roles to your production environment. For information, see Section 9.2.3.13.9, "Migrating Security to a Production Environment."
-
Checking the configuration: check that the security groups and roles have been created correctly as described in Section 9.2.3.13.10, "Checking Your Security Group and Roles Configuration."
The procedures described in this section apply to the Documents service (including wikis and blogs) and Content Presenter.
9.2.3.13.1 Creating a Security Group Using the Content Server Console
To create a security group:
-
Log into the Content Server Console as an administrator.
-
From the Administration menu, select Admin Applets.
-
On the Administration Applet page, click User Admin to display the User Admin dialog.
-
From the Security menu, select Permissions by Group.
-
In the Permission By Group dialog, click Add Group.
-
In the Add New Group dialog, enter a group name, for example,
WikiBlog. -
Click OK.
The security group, which you will use when you create a folder in Section 9.2.3.13.4, "Creating a Folder Using the Content Server Console," is created.
9.2.3.13.2 Creating Roles Using the Content Server Console
This section describes how to set up two roles in Content Server that mimic those you'll set up in the Portal Framework application: one granting only read permission to the security group, and another granting all permissions to the security group.
To create roles:
-
Log into the Content Server Console as an administrator.
-
From the Administration menu, select Admin Applets.
-
On the Administration Applet page, click User Admin to display the User Admin dialog.
-
Create a new role with full access:
-
From the Security menu, select Permissions by Role.
-
In the Permission By Group dialog, click Add New Role.
-
In the Add New Role dialog, enter a name, for example,
WikiBlog. -
Click OK. This displays the Permission By Role dialog.
-
In the Groups/Rights column, select the security group that you created earlier (for example,
WikiBlog), as described in Section 9.2.3.13.1, "Creating a Security Group Using the Content Server Console." -
Click Edit Permissions.
-
In the Edit Permissions dialog, select all checkboxes: Read, Write, Delete, and Admin, and click OK.
RWDA access is enabled, as shown in Figure 9-3.
-
-
Create another role (for example
WikiBlogRO) with only Read access following steps 4a to 4f and selecting the Read checkbox in the Edit Permissions dialog in step 4g.
9.2.3.13.3 Creating Roles (Groups) for the Portal Framework application
This section steps you through creating two roles in the Portal Framework application: one role with read access, and another with full access (read, write, delete, administer).
To create roles (groups):
-
Log into Fusion Middleware Control as an administrator.
-
Under Domain Structure, click Security Realms.
-
In the table under the Summary of Security Realms section, click myrealm, for example.
IMPORTANT: myrealm uses the embedded LDAP that ships with Oracle WebCenter Portal. If your installation uses a different LDAP, such as OID, you must select that instead of the one used by the embedded LDAP.
-
Select the Users and Groups tab and then the Groups subtab.
-
Under the Groups section, click New to display the Create a New Group section.
-
In the Name field, enter the name of the role to which you granted full access in Content Server (for example,
WikiBlog), as described in Section 9.2.3.13.2, "Creating Roles Using the Content Server Console," and click OK. -
Create a role or group with the read permission (for example,
WikiBlogRO) by performing steps 5 and 6. The name of this role must match that you specified in Content Server, as described in Section 9.2.3.13.2, "Creating Roles Using the Content Server Console."
9.2.3.13.4 Creating a Folder Using the Content Server Console
To create a folder:
-
Log into the Content Server Console as an administrator.
-
From the Browse Content menu, select Contribution Folders to display the root directory in which you will create a folder.
-
On the Contribution Folders page, from the New Item menu, select New Folder to display the Hierarchy Folder Configuration page.
-
In the Virtual Folder Name field, enter a meaningful name (for example
WikiBlog). -
Under the Folder Information section, in the Title field, enter a meaningful title (for example,
WikiBlog). -
From the Security Group dropdown, select the security group that you created as described in Section 9.2.3.13.1, "Creating a Security Group Using the Content Server Console."
All items in this folder will inherit the security from this security group.
-
Click Save.
9.2.3.13.5 Creating Users for an External LDAP
This section steps you through creating a user using an LDIF file that you can add to an external LDAP such as Oracle Internet Directory (OID). Note that OID users are more typically managed using ODSM (described in the section on "Managing Directory Entries" in the Administrator's Guide for Oracle Internet Directory).
To create a user:
-
Create an LDIF file as based on the following example:
dn: uid=john.doe,ou=people,ou=oidrealm,dc=wc_domain
description: John Doe
cn: john.doe
uid: john.doe
sn: Doe
objectclass: wlsUser
objectclass: organizationalperson
objectclass: inetOrgPerson
objectclass: person
objectclass: top
userpassword: MyPassword
displayName: John Doe
employeeNumber: 12345
employeeType: Regular
givenName: John
homePhone: 650-555-1212
mail: john.doe@example.com
title: Manager
manager: uid=mary.jones,ou=people,ou=myrealm,dc=wc_domain
preferredLanguage: en
departmentNumber: tools
facsimiletelephonenumber: 650-555-1200
mobile: 650-500-1200
pager: 650-400-1200
telephoneNumber: 650-506-1212
postaladdress: 200 Oracle Parkway
l: Redwood Shores
homepostaladdress: 123 Main St., Anytown 12345
-
Run the following
ldapaddcommand to add the user to OID:ldapadd -D <user_dn> -w <password> -h <myhost.mycompany.com> -p <port> -vf <file_name.ldif>
For example:
ldapadd -D cn=john.doe -w MyPassword -h abcd123.example.com -p 1234 -vf
newusers.ldif
9.2.3.13.6 Creating Users for the Embedded LDAP
This section steps you through creating two embedded LDAP users: a user for the read role, and a role for the full access (read, write, delete, administer) role.
To create users:
-
Log into Fusion Middleware Control as an administrator.
-
Under Domain Structure, click Security Realms.
-
In the table under the Summary of Security Realms section, click myrealm, the built-in realm that works with the embedded LDAP.
-
Select the Users and Groups tab and then the Users subtab.
-
Under the Users section, click New to display the Create a New User section.
-
In the Name field, specify a name, for example
Joe. -
In the Password field, specify a password.
-
In the Confirm Password field, enter the password again, and then click OK.
-
Create another user by performing steps 4 to 8.
9.2.3.13.7 Granting a Role to an External LDAP User
To grant a role to a user:
-
Create an LDIF file based on the following example containing groups with users assigned to each group:
dn: cn=WikiBlog,cn=Groups,dc=us,dc=example,dc=com
objectclass: wlsUser
objectclass: organizationalperson
objectclass: inetOrgPerson
objectclass: person
objectclass: top
cn: WikiBlog
description: Group of WikiBlog
displayname:WikiBlog group
uniquemember: cn=john.doe,cn=users,dc=example,dc=com
-
Run the following
ldapaddcommand to add the user to OID.ldapadd -D <user_dn> -w <password> -h <myhost.mycompany.com> -p <port> -vf <file_name.ldif>
For example:
ldapadd -D cn=john.doe -w MyPassword -h abc123.example.com -p 1234 -vf
addnewusers.ldif
Note that no restart is required for the managed servers.
9.2.3.13.8 Granting a Role to an Embedded LDAP User
This section steps you through granting the roles you created in Section 9.2.3.13.3, "Creating Roles (Groups) for the Portal Framework application" to the users you created in Section 9.2.3.13.6, "Creating Users for the Embedded LDAP".
To grant a role to a user:
-
Log into Fusion Middleware Control as an administrator.
-
Under Domain Structure, click Security Realms.
-
In the table under the Summary of Security Realms section, click myrealm, the built-in realm that works with the embedded LDAP.
-
Select the Users and Groups tab and then the Users subtab.
-
In the table under the Users section, click the name of the user you created in Section 9.2.3.13.6, "Creating Users for the Embedded LDAP," to display the settings section.
-
Select the Groups tab.
-
Under Parent Groups, in the Available column, select the role with the read permission (for example,
WikiBlogRO) that you created in Section 9.2.3.13.3, "Creating Roles (Groups) for the Portal Framework application." -
Move this role to the Chosen column and click Save.
-
Repeat steps 5 to 8 and grant the role with the full access permission to another user you created.
9.2.3.13.9 Migrating Security to a Production Environment
For information about migrating security from a development environment to a production environment, see Section 30.2.5, "Post-deployment Security Configuration Tasks."
9.2.3.13.10 Checking Your Security Group and Roles Configuration
After completing your configuration, follow the steps below to check that the security group and roles have been created correctly, and that a root folder has been created.
To verify that the security group and roles have been created:
-
Log in to the Content Server Console as an administrator.
-
From the Administration menu, select Admin Applets.
-
On the Administration Applet page, click User Admin to display the User Admin dialog.
-
From the Security menu, select Permissions by Group.
-
In the Permission By Group dialog, make sure that the security group is listed in the Groups list. The name of the security group ID should be the same as the Application Name in the Document properties.
-
Select the security group in the groups list.
-
Check that the Roles list contains the two roles:
<applicationName>Userand<applicationName>AuthenUserwithRandRWDpermissions for the application respectively.
To verify that the root folder has been created:
-
Log in to the Content Server Console as an administrator.
-
From the Browse Content menu, check that the root folder is listed and select it.
-
Verify that the child folder
spacetemplateis listed -
Click Info to display the Hierarchical Folder Information screen.
-
Verify that the Security Group is correct.
9.2.3.14 Registering the Content Server Repository
Mandatory for Portal Framework applications/Optional, but strongly recommended for WebCenter Portal
For Portal Framework applications, before you can use the configured Content Server, you must configure the connection between the application and Content Server. For WebCenter Portal, although the connection should be configured for you when the application first starts up, you should at least test the connection and check that the expected data has been properly seeded.
This section includes the following subsections:
-
Section 9.2.3.14.1, "Configuring a Content Server Connection for Portal Framework applications"
-
Section 9.2.3.14.2, "Configuring a Content Server Connection for WebCenter Portal"
-
Section 9.2.3.14.3, "Checking the WebCenter Portal Data Seeded in Content Server"
9.2.3.14.1 Configuring a Content Server Connection for Portal Framework applications
After installing and configuring Content Server, continue by configuring the connection between the Portal Framework application and Content Server. For more information about configuring the connection, see Section 9.6.2, "Registering Content Repositories Using Fusion Middleware Control" or Section 9.6.3, "Registering Content Repositories Using WLST."
9.2.3.14.2 Configuring a Content Server Connection for WebCenter Portal
A default connection between WebCenter Portal and Content Server is automatically configured when the application first starts up, however, you should test the connection and check that it has been appropriately configured for your environment. For high availability environments, or for single sign-on environments, you may have to modify the WebCenter Portal host and port settings.
After installing and configuring Content Server, and restarting WebCenter Portal, check the connection between WebCenter Portal and Content Server is properly configured as described in Section 9.11.1, "Testing Content Server Connections." If your connection was not properly configured, then configure it as shown in Section 9.10, "Setting Connection Properties for WebCenter Portal's Default Content Repository."
Some WebCenter Portal components, such as the documents tools, rely on the data seeded in Content Server when WebCenter Portal first starts up. Before configuring other components with WebCenter Portal, check that the expected data has been properly seeded as described in Section 9.2.3.14.3, "Checking the WebCenter Portal Data Seeded in Content Server."
9.2.3.14.3 Checking the WebCenter Portal Data Seeded in Content Server
When WebCenter Portal first starts up, a set of default data is seeded in Content Server. The data seeded in Content Server for a WebCenter Portal instance is based on several properties that are set on the active (or default) content repository connection. For example:
Root folder = /WebCenter1
Application Name= WC1
If the data is not correct, or has only been partially seeded, check the WebCenter Portal log and your Content Server configuration, make the necessary corrections to these properties, and then restart the WebCenter Portal instance to reseed the data. For information about setting the default content repository, and setting additional properties required for WebCenter Portal's content repository, see Section 9.10, "Setting Connection Properties for WebCenter Portal's Default Content Repository."
Table 9-3 illustrates the WebCenter Portal data that is seeded (Seeded Data), the naming for the data seeded (Naming) and how to check that the data is created in Content Server (Verify).
Table 9-3 Data Seeded in WebCenter Portal
| Seeded Data | Naming | Verify |
|---|---|---|
|
Security Group |
One security group is seeded:
For example: |
In Content Server, go to Administration > Admin Applets > User Admin > Security> Permission by Group |
|
Roles |
Two roles are seeded:
For example: |
In Content Server, go to Administration > Admin Applets > User Admin > Security > Permission by Role |
|
Root Folder name |
For example: |
Browse content (folder will be listed as a top-level folder) |
|
Default Attributes - Public users |
All public users have:
|
Query the |
|
Default Attributes - Authenticated users |
All Authenticated users have:
|
Query the |
|
Workflows |
Three workflows are seeded:
For example, |
In Content Server, go to Administration > User Admin > Workflow Admin > Criteria tab |
Table 9-4 illustrates the data that is seeded for the Home portal (Seeded Data), the naming for the data seeded (Naming) and how to check that the data is created in Content Server (Verify). Note that the Home portal data is seeded only once in a Content Server, regardless of how many WebCenter Portal instances are using the same Content Server. Therefore, if you have multiple WebCenter Portal instances using the same Content Server, they will all share the same Home portal data.
Table 9-4 Data Seeded for the Home Portal
| Seeded Data | Naming | Verify |
|---|---|---|
|
Security Group |
One security group is seeded:
|
In Content Server, go to Administration > Admin Applets > User Admin > Security > Permission by Group |
|
Roles |
Two roles are seeded:
|
In Content Server, go to Administration > Admin Applets > User Admin > Security > Permission by Role |
|
Root Folder name |
|
Browse content (folder will be listed as a top-level folder) |
|
Default Attributes - Public users |
All public users have:
|
Query the |
|
Default Attributes - Authenticated users |
All Authenticated users have:
|
Query the |
9.3 Configuring a Microsoft SharePoint Repository
If you want to access a Microsoft SharePoint content repository from WebCenter Portal or Portal Framework application, you must install the Oracle WebCenter Adapter for Microsoft SharePoint.The Oracle WebCenter Adapter for Microsoft SharePoint supports the following features:
-
Reading content and metadata from the Microsoft SharePoint repository
-
Writing files and folders to the SharePoint document libraries
-
Running queries on the Microsoft SharePoint system
-
Enabling SharePoint security settings for the accessed content by leveraging native Microsoft SharePoint authentication and authorization
All features are implemented using native Microsoft SharePoint web services as the interface to Microsoft SharePoint content and services.
This section discusses prerequisites for connecting WebCenter Portal or Portal Framework applications to Microsoft SharePoint:
-
Section 9.3.3, "Microsoft SharePoint - Security Considerations"
-
Section 9.3.4, "Microsoft SharePoint - Limitations in WebCenter Portal"
-
Section 9.3.5, "Managing Microsoft SharePoint Connections Using WLST"
Note:
To enable Microsoft SharePoint connections in WebCenter Portal, read the whitepaper "Integrating the SharePoint 2007 Adapter with WebCenter Spaces" available from Oracle Technology Network athttp://www.oracle.com/technetwork/middleware/webcenter/owcs-ps3-sharepoint-wcs-wp-335282.pdf.9.3.1 Microsoft SharePoint - Installation
This section includes the following:
-
Section 9.3.1.1, "About Microsoft SharePoint Server Installation"
-
Section 9.3.1.2, "Installing Oracle WebCenter Adapter for Microsoft SharePoint"
-
Section 9.3.1.3, "Installing WLST Command Scripts for Managing Microsoft SharePoint Connections"
9.3.1.1 About Microsoft SharePoint Server Installation
Oracle WebCenter Portal supports the following Microsoft SharePoint versions:
-
Microsoft Office SharePoint Server (MOSS) 2007 SP2
-
Microsoft Windows SharePoint Services (WSS) version 3 SP2
Note:
A Microsoft SharePoint site configured foranonymous access is not supported by the adapter.Refer to the appropriate Microsoft SharePoint documentation for installation information.
Oracle WebCenter Portal supports the following Microsoft SharePoint 2007 Document Library version settings:
-
Require Check Out: No
-
Content Approval: No
-
Document Version History: No versioning
If any other version settings are configured, Oracle WebCenter adapter for Microsoft SharePoint does not function correctly. For example, if Require CheckOut is set to yes, upload operations fail. Similarly, if document version history or content approval is enabled, new versions or documents have restricted visibility.
9.3.1.2 Installing Oracle WebCenter Adapter for Microsoft SharePoint
The files for Oracle WebCenter Adapter for Microsoft SharePoint are located in the Oracle WebCenter Companion DVD in the ofm_wc_generic_jcr_sharepoint_adapter_11.1.1.4.0.zip file. When you extract this ZIP file to a temporary location, you will find the adapter files in the TEMP_LOCATION/WebCenter/services/content/adapters directory.
The adapter for Microsoft SharePoint must be installed in the same managed server as WebCenter Portal or your Portal Framework application. If you have not done so already, create a managed server suitable for your WebCenter Portal or Portal Framework application deployment.
To install WebCenter adapter for Microsoft SharePoint for a WebCenter Portal application:
-
Log in to the WLS Administration Console.
For information on logging into the WLS Administration Console, see Section 1.13.2, "Oracle WebLogic Server Administration Console."
-
Navigate to the WLS Administration Console's Home page.
-
From the Domain Structure pane, click Deployments.
-
In the Summary of Deployments section, under Control, click Install.
-
In Install Application Assistant, in Note, click the upload your file(s) link in the body of the text.
-
Click Browse next to Deployment Archive, select the
oracle.webcenter.content.jcr.sharepoint.earfile from theTEMP_LOCATION/WebCenter/services/content/adaptersdirectory. This is the temporary directory in which you extracted the contents of theofm_wc_generic_jcr_sharepoint_adapter_11.1.1.4.0.zipfile from the Oracle WebCenter Companion DVD. Click Next. -
After you see the message that the EAR file has been uploaded successfully, as shown in Figure 9-4, click Next.
Figure 9-4 Install Application Assistant
Description of ''Figure 9-4 Install Application Assistant''
-
Select Install this deployment as a library, if not already selected, and click Next.
-
In Select deployment targets, select the managed server on which WebCenter Portal or your Portal Framework application is deployed.
For Portal Framework applications, this must be a custom managed server (based on the Custom Portal template), not one of WebCenter Portal's out-of-the-box managed servers. For details, see the "Extending a Domain to Create Custom Managed Servers" in Installation Guide for Oracle WebCenter Portal.
-
Click Next.
-
In Optional Settings, accept the defaults and click Finish.
9.3.1.3 Installing WLST Command Scripts for Managing Microsoft SharePoint Connections
-
Extract the files
DocLibSharePointWLST.pyandDocLibGenericWLST.pyfrom the ofm_wc_generic_jcr_sharepoint_adapter_11.1.1.4.0.zip file located in the Oracle WebCenter Companion DVD. These files are in the/WebCenter/services/content/adaptersdirectory. -
Copy the extracted
DocLibSharePointWLST.pyandDocLibGenericWLST.pyfiles and paste them in theORACLE_COMMON_HOME/common/wlstdirectory. -
To run WLST commands, see Section 1.13.3.1, "Running Oracle WebLogic Scripting Tool (WLST) Commands."
For information about managing connections using WLST, see Section 9.3.5, "Managing Microsoft SharePoint Connections Using WLST."
9.3.2 Microsoft SharePoint - Configuration
You must perform the following tasks to enable Microsoft SharePoint connections in WebCenter Portal or Portal Framework applications:
-
Install Oracle WebCenter adapter for Microsoft SharePoint in the same managed server whereWebCenter Portal or your Portal Framework application is (or will be) deployed.
-
For Portal Framework applications:
-
In JDeveloper, configure a connection to your Microsoft SharePoint repository. This must be an application connection created in Application Resources in the Application Navigator.
-
(Optional) In JDeveloper, include a Documents task flow that uses the Microsoft SharePoint repository connection.
-
Deploy your Portal Framework application.
After deployment, you can access the Microsoft SharePoint repository that you configured in JDeveloper in your Portal Framework application.
-
-
To reconfigure Microsoft SharePoint connection details for a Portal Framework application postdeployment or to configure a connection for WebCenter Portal:
-
Install WLST command scripts for managing Microsoft SharePoint connections postdeployment. For details, see Section 9.3.1.3, "Installing WLST Command Scripts for Managing Microsoft SharePoint Connections".
-
Create a new Microsoft SharePoint repository connection (
createJCRSharePointConnection) or modify existing connection details (setJCRSharePointConnection) as required.See also, Section 9.3.5, "Managing Microsoft SharePoint Connections Using WLST".
Note:
To enable Microsoft SharePoint connections in WebCenter Portal, read the whitepaper "Integrating the SharePoint 2007 Adapter with WebCenter Spaces" available from Oracle Technology Network athttp://www.oracle.com/technetwork/middleware/webcenter/owcs-ps3-sharepoint-wcs-wp-335282.pdf. -
9.3.3 Microsoft SharePoint - Security Considerations
Authentication through identity propagation is not supported on Microsoft SharePoint connections. However, you can use an external application to authenticate users against the Microsoft SharePoint repository. Use the WLST argument extAppId to specify the external application to use. For details, see Section 9.3.5.1, "createJCRSharePointConnection." Note that if the extAppId refers to an external application connection for which neither public nor shared credentials are defined, then Documents task flows will prompt for credentials. This allows per-user mapping of credentials as an alternative to identity propagation.
9.3.4 Microsoft SharePoint - Limitations in WebCenter Portal
WebCenter Portal does not support Microsoft SharePoint as the default content repository for portals, and therefore, you must use Oracle WebCenter Content instead.
9.3.5 Managing Microsoft SharePoint Connections Using WLST
Use the commands listed in Table 9-5 to manage connections to SharePoint content repositories, postdeployment.
Configuration changes made using these WLST commands are only effective after you restart the Managed Server on which WebCenter Portal or your Portal Framework application is deployed. For details, see Section 7.2, "Starting and Stopping Managed Servers for WebCenter Portal Application Deployments."
Table 9-5 SharePoint Content Repository WLST Commands
| Use this command... | To... | Use with WLST... |
|---|---|---|
|
Create a Microsoft SharePoint 2007 repository connection. |
Online |
|
|
Edit a Microsoft SharePoint 2007 repository connection. |
Online |
|
|
List all Microsoft SharePoint 2007 connections that are configured for WebCenter Portal or aPortal Framework application. |
Online |
For information about how to install WLST scripts for Microsoft SharePoint, see Section 9.3.1.3, "Installing WLST Command Scripts for Managing Microsoft SharePoint Connections."
9.3.5.1 createJCRSharePointConnection
The createJCRSharePointConnection WLST command creates a connection to a Microsoft SharePoint 2007 repository. For syntax and other information about this WLST command, see "createJCRSharePointConnection" in the WebLogic Scripting Tool Command Reference.
Note:
For Portal Framework applications, thecreateJCRSharePointConnection command works only if the application was developed to support Microsoft SharePoint connections in the first place. If the original Portal Framework application deployment does not include a Microsoft SharePoint connection, then the application will not contain the code necessary to support any new Microsoft SharePoint connections that you may want to create using this command. See also, Section 9.3.2, "Microsoft SharePoint - Configuration."9.3.5.2 setJCRSharePointConnection
This WLST command edits an existing Microsoft SharePoint 2007 repository connection. For syntax and other information about this WLST command, see "setJCRSharePointConnection" in the WebLogic Scripting Tool Command Reference.
9.3.5.3 listJCRSharePointConnections
This WLST command lists all of the SharePoint connections that are configured for a named application. For syntax and other information about this WLST command, see "listJCRSharePointConnections" in the WebLogic Scripting Tool Command Reference.
9.4 Configuring an Oracle Portal Repository
This section discusses the prerequisites for an Oracle Portal content repository in the following subsections:
9.4.1 Oracle Portal - Installation
For information on installing Oracle Portal, see Installation Guide for Oracle Portal, Forms, Reports and Discoverer.
9.4.2 Oracle Portal - Configuration
Oracle Portal must be up-to-date with all the latest patches. For additional information about patches, see the product release notes. See also the Administrator's Guide for Oracle Portal.
9.4.3 Oracle Portal - Security Considerations
None.
9.4.4 Oracle Portal - Limitations in Oracle WebCenter Portal
Oracle Portal integration with Oracle WebCenter Portal is read-only. It is not possible to create content using WebCenter Portal or your Portal Framework application.
You can expose Oracle Portal pages in WebCenter Portal or Portal Framework applications through the Federated Portal Adapter by publishing them as portlets in Oracle Portal. The following are not returned by the Federated Portal Adapter, and therefore not visible in Oracle WebCenter Portal:
-
Seeded page groups:
-
Oracle Portal repository
-
Oracle Portal design-time pages
-
-
Pages of the following types:
-
Mobile
-
URL
-
Navigation pages
-
-
Items of the following types:
-
Navigation items
-
PLSQL items
-
Portlet
-
Portlet instance
-
URL items
-
Mobile items
-
Page links
-
Item links
-
-
Items defined as:
-
Expired
-
Hidden
-
9.5 Configuring a File System Repository
This section discusses the prerequisites for connecting to a file system content repository in the following subsections:
Caution:
Only use file system connections during the development of Portal Framework applications. File system connections must not be used in production or enterprise application deployments. This feature is provided for development purposes only.WebCenter Portal does not support file system connections.
9.5.1 File System - Security Considerations
All operations are executed as the system user under which the JVM is running and therefore inherit its permissions.
9.5.2 File System - Limitations
File system connections must not be used in production or enterprise application deployments, and search capabilities are limited and slow due to the absence of an index. This feature is provided for development purposes only.
9.6 Registering Content Repositories for WebCenter Portal or Portal Framework Applications
This section contains the following subsections:
-
Section 9.6.1, "About Registering Content Repositories for WebCenter Portal"
Section 9.6.2, "Registering Content Repositories Using Fusion Middleware Control"
-
Section 9.6.3, "Registering Content Repositories Using WLST"
9.6.1 About Registering Content Repositories for WebCenter Portal
Consider the following when registering Content Server repositories for WebCenter Portal:
-
At start up, WebCenter Portal creates seed data (if it does not already exist) in the primary/active/default repository for WebCenter Portal.
-
For WebCenter Portal, a Content Server repository connection must always be provided as a primary connection, even if another repository such as Microsoft SharePoint is made available.
-
A user name with administrative rights for the Content Server instance is required (
Content Administrator). This user will be used to create and maintain folders for portal content, security groups and roles, and manage content access rights. The default content administrator issysadmin.Administrative privileges are required for this connection so that operations can be performed on behalf of WebCenter Portal users.
-
Root FolderandApplication Namevalues:-
For the active connection in WebCenter Portal, the
Root FolderandApplication Namevalues are used to create the seed data in the WebCenter Portal repository to enable storage of portal-related data.WARNING:
You should never change the
Root FolderorApplication Namevalues separately; you should always change both. That is, if you change theRoot Foldervalue after configuring and running WebCenter Portal, then you must also change theApplication Namevalue, and vice versa. That is, you must change both values (Root FolderandApplication Name) to unique values if WebCenter Portal already contains the seed data.When you change these values, the existing seed data is not renamed in the Content Server repository. Instead, new seed data is created using the new values, when you start the application. Once the application is started, new WebCenter Portal data is created under the new
Root Folderand existing data under the oldRoot Folderis no longer available. This means that the documents tools will now be disabled in WebCenter Portal where the documents tools were previously enabled, prior to changing theRoot Folder.Note:
Although theRoot FolderandApplication Namevalues change, the old root content repository folder still appears in search results, like any other root folder in Content Server. -
The
Root Foldervalue is used as the name for the root folder within the content repository under which all WebCenter Portal content is stored. For theRoot Foldervalue, you must specify a content repository folder that does not yet exist. Use the format:/foldername. For example:/MyWebCenterSpaces. TheRoot Foldercannot be/, the root itself, and it must be unique across different portals. The folder specified is created for you when the WebCenter Portal starts up. Invalid entries include:/,/foldername/,/foldername/subfolder. -
The
Application Name, identifies a WebCenter Portal instance within this content repository and must have a unique value (for example:MyWCPApp). The name must be 14 characters or less, begin with an alphabetical character, followed by any combination of alphanumeric characters or the underscore character. The name specified here is also used to name document-related workflows, as follows:<applicationName><WorkflowName>and<applicationName><WorkflowStepName>. When naming workflows, only the first 14 characters of theApplication Nameare used.The
Application Namevalue is used for the following:-
To separate data when multiple WebCenter Portal instances share the same content repository and should be unique across applications.
-
As the prefix to the seeded workflow and workflow steps.
-
As the name of the security group in which all data created in that WebCenter Portal instance is stored.
-
As the prefix for the role (the name format is
applicationNameUserandapplicationNameAuthenUser). -
To stripe users permissions on accounts for the particular WebCenter Portal instance.
-
To stripe default attributes for the particular WebCenter Portal instance.
For information about security groups and roles, see the "Advanced Administration: Security" part in Administering Oracle WebCenter Content. For information about folders, see the "Organizing Content" chapter in Managing Oracle WebCenter Content.
-
-
9.6.2 Registering Content Repositories Using Fusion Middleware Control
Follow the steps below to register a Content Server, Oracle Portal, or file system content repository using Fusion Middleware Control. Note that to register a SharePoint repository you must use WLST as described in Section 9.6.3, "Registering Content Repositories Using WLST." For information on how to register a Content Server repository using WLST, see Section 9.10.2, "Setting Connection Properties for WebCenter Portal's Default Content Repository Using WLST."
To register a Content Server, Oracle Portal, or file system content repository:
-
Log in to Fusion Middleware Control and navigate to the home page for WebCenter Portal or Portal Framework application:
-
Do one of the following:
-
For WebCenter Portal - From the WebCenter Portal menu, select Settings > Service Configuration.
-
For WebCenter Portal Framework applications - From the Application Deployment menu, select WebCenter Portal > Service Configuration.
-
-
From the list of services on the WebCenter Service Configuration page, select Content Repository.
-
To connect to a new content repository, click Add (Figure 9-5).
-
Enter a unique name for this connection, specify the content repository type, and indicate whether this connection is the active (or default) connection for the application. See Table 9-6.
Table 9-6 Manage Content Repository Connections
Field Description Connection Name
Enter a unique name for this content repository connection. The name must be unique (across all connection types) within WebCenter Portal or Portal Framework application.
Repository Type
Choose the type of repository you want to connect to. Select one of the following:
-
Content Server - an Oracle Universal Content Management repository. See Section 9.2, "Configuring an Oracle WebCenter Content Server Repository".
-
Oracle Portal - an Oracle Portal content repository. See Section 9.4, "Configuring an Oracle Portal Repository."
-
File System - a computer file system. See Section 9.5, "Configuring a File System Repository."
Caution: File system connections must not be used in production or enterprise application deployments. This feature is provided for development purposes only.
(WebCenter Portal) If you are setting up the back-end content repository for WebCenter Portal, that is, the repository used to store portal-related documents, you must select Content Server.
Active Connection
Select to make this the default or primary content repository for WebCenter Portal or your Portal Framework application.
You can connect WebCenter Portal or your Portal Framework application to multiple content repositories; all connections are used. One connection must be designated the default (or active) connection. Do one of the following:
-
For WebCenter Portal:
Select to make this the active connection for the back-end repository that WebCenter Portal uses to store portal-related documents. The active connection must be to a Content Server repository.
If this is the default content repository for WebCenter Portal, some additional configuration is required -- see Section 9.10.1, "Setting Connection Properties for WebCenter Portal's Default Content Repository Using Fusion Middleware Control."
-
For Portal Framework applications:
Select to make this the active connection; that is, the default connection for Content Presenter, Document Manager, Document List Viewer, and Recent Documents task flows. When no specific connection details are provided for these task flows, this default (also called primary, active) connection is used.
Deselecting this option does not disable the content repository connection. If a content repository is no longer required, you must delete the connection.
-
-
(For the active connection in WebCenter Portal only.) Enter additional details for the WebCenter Portal repository. For information, see Section 9.6.1, "About Registering Content Repositories for WebCenter Portal."
-
Enter connection details for the content repository. For detailed parameter information, see:
Table 9-7 Content Server Connection Parameters
Field Description RIDC Socket Type
Specify whether Content Server connects on the content server listener port or the Web server filter, and whether the listener port is SSL enabled. Choose from:
-
Socket - Uses an
intradocsocket connection to connect to the Content Server. The client IP address must be added to the list of authorized addresses in Content Server. In this case, the client is the machine on which Oracle WebCenter Portal is running. -
Socket SSL - Uses an
intradocsocket connection to connect to Content Server that is secured using the SSL protocol. The client's certificates must be imported in the server's trust store for the connection to be allowed. This is the most secure option, and the recommended option whenever identity propagation is required (for example, in WebCenter Portal). -
Web - Uses an HTTP(S) connection to connect to Content Server. For WebCenter Portal, the Web option is not suitable for the active connection, that is, the back-end Content Server repository that is being used to store portal-related documents because it does not allow identity propagation.
Server Host
Enter the host name of the machine where Content Server is running.
For example:
mycontentserver.mycompany.comServer Host is required when the RIDC Socket Type is set to Socket or Socket SSL.
Server Port
Enter the port on which the Content Server listens:
-
Socket - Port specified for the
incomingprovider in the server. -
Socket SSL - Port specified for the
sslincomingprovider in the server.
This property corresponds to the IntradocServerPort setting in the Content Server configuration file, which defaults to port
4444. You can find the current value by logging onto the Content Server and navigating to Administration > Admin Server > General Configuration >Additional Configuration Variables > IntradocServerPort.Server Port is required when the RIDC Socket Type is set to Socket or Socket SSL.
Web URL
Enter the Web server URL for the Content Server.
Use the format:
http://hostname:portnumber/web_root/plugin_rootFor example:
http://mycontentserver/cms/idcplgWeb URL is applicable when the RIDC Socket Type is set to Web.
Connection Timeout (ms)
Specify the length of time (in milliseconds) allowed to log in to WebCenter Content Server before issuing a connection timeout message, and set the socket timeout for the underlying RIDC connection for all service requests.
Note: The RIDC socket timeout only applies to Socket, Socket SSL, and Web connection types.
If the Connection Timeout property is not set, the following values are used:
-
Login timeout - the default concurrency timeout is configure for the oracle.webcenter.content resource is used (30s or 30000ms). Refer to "Configuring Concurrency Management" in Performance Tuning Guide for more information.
-
RIDC socket timeout - the default RIDC socket timeout (60s or 60000ms) is used for all service requests for connection types Socket, Socket SSL, and Web.
If the Connection Timeout property is set and the connection type is Socket, Socket SSL, or Web, Oracle recommends that you do not specify a value less than 60000ms, as this would reduce the RIDC socket timeout and increase the likelihood that long running requests time out. For example, timeouts may occur during long running searches, long file uploads, or long copy operations.
Authentication Method
Choose from:
-
Identity Propagation - Content Server and WebCenter Portal (or Portal Framework application) use the same identity store to authenticate users.
(WebCenter Portal) Identity propagation is required on the active connection for WebCenter Portal (that is, for the content repository being used to store portal-related documents).
-
External Application - An external application authenticates users against the Content Server. Select this option if you want to use public, shared, or mapped credentials. See also, "Setting Security for the Documents Tool" in the Developing Portals with Oracle WebCenter Portal and Oracle JDeveloper.
If an external application is used for authentication, use the Associated External Application drop down list to identify the application. If the application you want is not listed, select Create New to define the external application now.
Web Server Context Root
Enter the Web server context root for Content Server. Use the format
/<context_root>. For example,/cs.When specified, several Content Server features based on iFrame are available in WebCenter Portal or your Portal Framework application. This includes:
-
Associating a content profile with files when uploading new or updated files to Content Server.
For more information, see "Uploading Files" and "Uploading a New Version of an Existing File" in Using Oracle WebCenter Portal.
-
Using the document review functionality available in Oracle AutoVue.
For more information, see "Collaborating on Documents Using Oracle AutoVue" in Using Oracle WebCenter Portal.
-
Editing advanced document properties.
For more information, see "Viewing Files in Workflow" in Using Oracle WebCenter Portal.
-
Viewing folder and file workflow details.
For more information, see "Viewing Files in Workflow" in Building Portals with Oracle WebCenter Portal.
-
Previewing files in a slide viewer.
For more information, see "Opening a File" in Using Oracle WebCenter Portal.
-
Site Studio integration
Without OHS (and WebContextRoot configuration), it is still possible to create or edit Site Studio content from within Content Presenter, but the create and edit actions launch new browser windows (or tabs) rather than opening within the Content Presenter task flow. For more information, see "Creating or Editing Site Studio Content in the Content Presenter Configuration Dialog" in Building Portals with Oracle WebCenter Portal.
The Web Server Context Root property is only applicable when the Authentication Method is set to Identity Propagation.
Note: Specifying the Web Server Context Root is an indicator that WebCenter Portal or your Portal Framework application is front-ended by OHS. If you specify the Web Server Context Root and do not connect through OHS, a 404 error occurs while you attempt to edit the advanced metadata in the Document Viewer, upload using a profile, or click Details for a content item in a workflow in a portal. For information about setting up OHS to front-end WebCenter Portal or Portal Framework applications, see Appendix B, "Oracle HTTP Server Configuration for WebCenter Portal."
If WebCenter Portal or your Portal Framework application is connected to multiple Content Server servers, Oracle recommends that each Content Server server has a unique Web Server Context Root so that OHS re-direction works correctly.
Associated External Application
Select the external application used to authenticate users against Content Server.
Associated External Application is applicable when RIDC Socket Type is set to Web and also when the RIDC Socket Type is Socket or Socket SSL (with Authentication Method set to External Application).
Administrator User Name
Enter a user name with administrative rights for this Content Server instance. This user will be used to fetch content type information based on profiles and track document changes for cache invalidation purpose.
Defaults to
sysadmin.Administrator Password
Enter the password for the Content Server administrator.
Key Store Location
Specify the location of key store that contains the private key used to sign the security assertions. The key store location must be an absolute path.
For example:
D:\keys\keystore.xyzKey Store Location is required when the RIDC Socket Type is set to Socket SSL.
Key Store Password
Enter the password required to access the keystore.
For example:
T0PS3CR3TKey Store Password is required when the RIDC Socket Type is set to Socket SSL.
Private Key Alias
Enter the client private key alias in the keystore. The key is used to sign messages to the server. The public key corresponding to this private key must be imported in the server keystore.
Ensure that the alias does not contain special characters or white space. For example:
enigmaPrivate Key Alias is required when the RIDC Socket Type is set to Socket SSL.
Private Key Password
Enter the password to be used with the private key alias in the key store.
For example:
c0d3bR3ak3RPrivate Key Password is required when the RIDC Socket Type is set to Socket SSL.
Table 9-8 Connection - Content Server - Cache Details
Element Description Cache Invalidation Interval (minutes)
Specify the time between checks for external Content Server content changes (in minutes). WebCenter Portal automatically clears items that have changed from the cache. The minimum interval is 2 minutes.
By default, cache invalidation is disabled so no periodic check is made for content changes (shown as
0).Maximum Cached Document Size (bytes)
Enter a maximum cacheable size (in bytes) for Content Server binary documents. Documents larger than this size are not cached by WebCenter Portal.
The default is 102400 bytes (100K).
Tune this value based on your machine's memory configuration and the types of binary documents that you expect to cache. Be aware that, unless Coherence is enabled, there is no maximum total size for the cache.
If you are using Coherence you can additionally specify the total amount of memory to be used for binary caches. For this reason, using Coherence for any type of production environment is strongly recommended, and is a requirement for High Availability (HA) environments. For more information, see Section 9.8.3, "Modifying Cache Settings for Content Presenter."
Note: Most documents stored in Content Server are considered binary content, that is, images, plain text, Word documents, and so on. The only exception is Site Studio content which is stored in CDF data files and cached separately in a Virtual Content Repository (VCR) cache (or node cache).
Table 9-9 Oracle Portal Connection Parameters
Field Description Data Source Name
Enter the JNDI DataSource location used to connect to Oracle Portal.
For example:
jdbc/MyPortalDSThe datasource must be on the server where WebCenter Portal or your Portal Framework application is deployed.
Connection Timeout (ms)
Specify the length of time (in milliseconds) allowed to log in to Oracle Portal before issuing a connection timeout message.
If no timeout is set, the default concurrency timeout for the oracle.webcenter.content resource is used (30s or 30000ms). Refer to "Configuring Concurrency Management" in Performance Tuning Guide for more information.
Authentication Method
Specify how to authenticate users against Oracle Portal. Choose from:
-
Identity Propagation - Select this option when WebCenter Portal (or your Portal Framework application) and Oracle Portal both use the same user identity store.
-
External Application - Use an external application to authenticate users against Oracle Portal. Select this option if you want to use public, shared, or mapped credentials.
If an external application is used for authentication, use the Associated External Application dropdown list to identify the application.
Associated External Application
Associate Oracle Portal with an external application. External application credential information is used to authenticate Oracle Portal users.You can select an existing external application from the dropdown list, or click Create New to configure a new external application now.
Table 9-10 File System Connection Parameters
Field Description Base Path
Enter the full path to a folder on a local file system in which your content is placed. For example:
C:\MyContentCaution: File system content must not be used in production or enterprise application deployments. This feature is provided for development purposes only.
-
Click OK to save this connection.
-
Click Test to verify if the connection you created works. For a successful connection, the Test Status message displays the advice that to start using the new (active) connection, you must restart the managed server on which WebCenter Portal or your Portal Framework application is deployed.
The registered connections are now available to Documents and Content Presenter task flows, which you can add to pages in WebCenter Portal or your Portal Framework application. See also, "Working with Document Task Flows and Document Components" in Building Portals with Oracle WebCenter Portal.
9.6.3 Registering Content Repositories Using WLST
Use the following WLST commands to register new content repository connections for Portal Framework applications:
-
Content Server -
createJCRContentServerConnection -
File System -
createJCRFileSystemConnection -
Oracle Portal -
createJCRPortalConnection -
Microsoft SharePoint - createJCRSharePointConnection
For command syntax and examples, see the WebLogic Scripting Tool Command Reference.
To configure a particular connection as the default connection, set isPrimary='1'. See Section 9.7, "Changing the Active (or Default) Content Repository Connection."
Note:
You must set additional connection properties for WebCenter Portal's default Content Server repository, see Section 9.10.2, "Setting Connection Properties for WebCenter Portal's Default Content Repository Using WLST."For information on how to run WLST commands, see Section 1.13.3.1, "Running Oracle WebLogic Scripting Tool (WLST) Commands."
Note:
To start using the new (active) connection you must restart the managed server on which WebCenter Portal or your Portal Framework application is deployed. See "Starting and Stopping Managed Servers Using WLST" in the Administrator's Guide. Note that if you are using the documents tools, Content Server should be started first to allow for initial provisioning to take place.9.7 Changing the Active (or Default) Content Repository Connection
WebCenter Portal and Portal Framework applications support multiple content repository connections but only one content repository connection can be designated the active (or default) connection.
In WebCenter Portal, the active connection becomes the default back-end repository for portal documents (including the Home portal) and the repository must be Content Server. The active connection is also used as the default connection for Documents and Content Presenter task flows.
For Portal Framework applications, the active connection becomes the default connection for Content Presenter, Document Manager, Document List Viewer, and Recent Documents, and so on. When no specific connection details are provided for these task flows, the default (active) connection is used.
This section contains the following subsections:
9.7.1 Changing the Active (or Default) Content Repository Connection Using Fusion Middleware Control
To change the active (or default) content repository connection:
-
Log in to Fusion Middleware Control and navigate to the home page for WebCenter Portal or the Portal Framework application:
-
Do one of the following:
-
For WebCenter Portal - From the WebCenter Portal menu, select Settings > Service Configuration.
-
For Portal Framework applications - From the Application Deployment menu, select WebCenter Portal > Service Configuration.
-
-
From the list of services on the WebCenter Portal Services Configuration page, select Content Repository.
The Manage Content Repository Connections table indicates the current active connection (if any).
-
Select the connection you want to become the active (or default) connection, and then click Edit.
-
Select the Active Connection checkbox.
Before saving your changes, be sure to provide values for the Content Administrator, Root Folder and Application Name fields.
-
Click OK to update the connection.
-
Click Test to verify if the connection you activated works. For a successfully activated connection, the Test Status message displays the advice that to start using the updated connection you must restart the managed server on which the WebCenter Portal or your Portal Framework application is deployed.
9.7.2 Changing the Active (or Default) Content Repository Connection Using WLST
Use the following WLST commands with isPrimary='1' to designate an existing content repository connection as the default connection:
-
Content Server -
setJCRContentServerConnection -
File System -
setJCRFileSystemConnection -
Oracle Portal -
setJCRPortalConnection -
Microsoft SharePoint - setJCRSharePointConnection
See also, listJCRSharePointConnections
For command syntax and examples, see the WebLogic Scripting Tool Command Reference.
To subsequently disable a default content repository connection, run the same WLST command with isPrimary='false'. Connection details are retained but the connection is no longer named as the primary connection in adf-config.xml.
For information on how to run WLST commands, see Section 1.13.3.1, "Running Oracle WebLogic Scripting Tool (WLST) Commands."
Note:
To start using the new (active) connection you must restart the managed server on which WebCenter Portal or your Portal Framework application is deployed. See, "Starting and Stopping Managed Servers Using WLST" in the Administrator's Guide.9.8 Modifying Content Repository Connection Details
This section contains the following subsections:
-
Section 9.8.1, "Modifying Content Repository Connection Details Using Fusion Middleware Control"
-
Section 9.8.2, "Modifying Content Repository Connection Details Using WLST"
-
Section 9.8.3, "Modifying Cache Settings for Content Presenter"
-
Section 9.8.4, "Configuring the Cache to Check for External Content Server Changes"
9.8.1 Modifying Content Repository Connection Details Using Fusion Middleware Control
To update content repository connection details:
-
Log in to Fusion Middleware Control and navigate to the home page for WebCenter Portal or the Portal Framework application:
-
Do one of the following:
-
For WebCenter Portal - From the WebCenter Portal menu, select Settings > Service Configuration.
-
For Portal Framework applications - From the Application Deployment menu, select WebCenter Portal > Service Configuration.
-
-
From the list of services on the WebCenter Portal Services Configuration page, select Content Repository.
-
Select the connection name, and click Edit.
-
Edit connection details, as required. For detailed parameter information, see:
-
Click OK to save your changes.
-
Click Test to verify if the updated connection works. For a successfully updated connection, the Test Status message displays the advice that to start using the updated connection, you must restart the managed server on which WebCenter Portal or your Portal Framework application is deployed.
9.8.2 Modifying Content Repository Connection Details Using WLST
Use the following WLST commands to edit content repository connections:
-
Oracle WebCenter Content Server -
setJCRContentServerConnection -
File System -
setJCRFileSystemConnection -
Oracle Portal -
setJCRPortalConnection
For command syntax and examples, see the WebLogic Scripting Tool Command Reference.
To configure a particular connection as the active (or default) connection, set isPrimary='1'. See Section 9.7, "Changing the Active (or Default) Content Repository Connection."
For information on how to run WLST commands, see Section 1.13.3.1, "Running Oracle WebLogic Scripting Tool (WLST) Commands."
Note:
To start using the updated (active) connection details, you must restart the managed server on which WebCenter Portal or your Portal Framework application is deployed. See "Starting and Stopping Managed Servers Using WLST" in the Administrator's Guide.9.8.3 Modifying Cache Settings for Content Presenter
Content Presenter, by default, is configured to use a local (in-memory) cache. However, using Coherence for any type of production environment is strongly recommended, and is a requirement for High Availability (HA) environments. This section describes how you can enable and test content caching using Coherence.
Note:
Your Coherence license may or may not support multi-node environments depending on the license option you have purchased. To check what your license agreement provides, see the "Oracle Coherence" section in Licensing Information.This section contains the following subsections:
Note:
For Portal Framework applications, you will also need to add the Coherence configuration file to the application (EAR) classpath or server's system classpath. For the steps to configure Coherence for Framework applications, see "Configuring Coherence as the Caching Mechanism" in the Developing Portals with Oracle WebCenter Portal and Oracle JDeveloper.9.8.3.1 Modifying the Coherence Configuration File
To modify the Coherence configuration file:
-
Open the
ORACLE_HOME/webcenter/modules/oracle.webcenter.content.integration_11.1.1/content-app-lib.earfile and copy thesample-content-coherence-cache-config.xmlfile fromORACLE_HOME/webcenter/modules/oracle.webcenter.content.integration_11.1.1/content-app-lib.ear. You'll find thesample-content-coherence-cache-config.xmlfile under/content-app-lib.ear/APP-INF/classes/sample-content-coherence-cache-config.xml. -
Copy the
sample-content-coherence-cache-config.xmlfile toMW_HOME/user_projects/applications/<Domain_Name>/custom.webcenter.spaces.fwk/APP-INF/classes/and rename it ascontent-coherence-cache-config.xml. -
Modify the Coherence configuration file for your local environment based on the example file (Example 9-1) and entry descriptions (Table 9-11).
-
If you want to test that Coherence is being used for caching, as shown in Section 9.8.3.2, "Testing the Coherence Configuration," add the following to the
setDomainEnv.shfile:JAVA_OPTIONS="${JAVA_OPTIONS} -Dtangosol.coherence.management=all" export JAVA_OPTIONS -
Restart the
WC_Spacesserver.
Example 9-1 Sample Coherence Configuration File
<!DOCTYPE cache-config SYSTEM "cache-config.dtd">
<cache-config>
  <caching-scheme-mapping>
    <cache-mapping>
      <cache-name>repo.ucm.nodeUidCache.*</cache-name>
      <scheme-name>ContentNodeCaches</scheme-name>
    </cache-mapping>
    <cache-mapping>
      <cache-name>repo.ucm.nodePathToUidCache.*</cache-name>
      <scheme-name>ContentNodeCaches</scheme-name>
    </cache-mapping>
    <cache-mapping>
      <cache-name>repo.ucm.securityInfoCache.*</cache-name>
      <scheme-name>ContentNodeCaches</scheme-name>
    </cache-mapping>
    <cache-mapping>
      <cache-name>repo.ucm.typeNameCache.*</cache-name>
      <scheme-name>ContentTypeCaches</scheme-name>
    </cache-mapping>
   <cache-mapping>
      <cache-name>repo.ucm.typeNamesCache.*</cache-name>
      <scheme-name>ContentTypeCaches</scheme-name>
    </cache-mapping>
    <cache-mapping>
      <cache-name>binaryCache.*</cache-name>
      <scheme-name>ContentBinaryCaches</scheme-name>
    </cache-mapping>
    <cache-mapping>
      <cache-name>repo.ucm.searchCriteriaCache.*</cache-name>
      <scheme-name>ContentSearchCaches</scheme-name>
    </cache-mapping>
    <cache-mapping>
      <cache-name> repo.ucm.indexedFieldsCache.*</cache-name>
      <scheme-name>ContentSearchCaches</scheme-name>
    </cache-mapping>
    <cache-mapping>
      <cache-name>repo.ucm.securityUserCache.*</cache-name>
      <scheme-name>ContentSecurityCaches</scheme-name>
    </cache-mapping>
    <cache-mapping>
      <cache-name>repo.ucm.profileTriggerValueCache.*</cache-name>
      <scheme-name>ContentProfileCaches</scheme-name>
    </cache-mapping>
    <cache-mapping>
      <cache-name>binaryContentTypeCache.*</cache-name>
      <scheme-name>ContentBinaryCaches</scheme-name>
    </cache-mapping>
  </caching-scheme-mapping>
  <caching-schemes>
<!--    The following schemes are all local.  For a clustered deployment,
    a distributed, replcated, or other clustered scheme is recommended.
    See Coherence documentation for more information.
    -->
    <local-scheme>
      <scheme-name>ContentNodeCaches</scheme-name>
      <expiry-delay>1m</expiry-delay>
      <high-units>100</high-units>
    </local-scheme>
    <local-scheme>
      <scheme-name>ContentTypeCaches</scheme-name>
      <expiry-delay>30m</expiry-delay>
      <high-units>50</high-units>
    </local-scheme>
    <local-scheme>
      <scheme-name>ContentBinaryCaches</scheme-name>
      <expiry-delay>1m</expiry-delay>
      <high-units>100000</high-units>
      <unit-calculator>
        <class-scheme>
          <class-name>com.tangosol.net.cache.SimpleMemoryCalculator</class-name>
        </class-scheme>
      </unit-calculator>
    </local-scheme>
    <local-scheme>
      <scheme-name>ContentSearchCaches</scheme-name>
      <expiry-delay>5m</expiry-delay>
      <high-units>50</high-units>
    </local-scheme>
   <local-scheme>
      <scheme-name>ContentSecurityCaches</scheme-name>
      <expiry-delay>10m</expiry-delay>
      <high-units>50</high-units>
    </local-scheme>
   <local-scheme>
      <scheme-name>ContentProfileCaches</scheme-name>
      <expiry-delay>1h</expiry-delay>
      <high-units>100</high-units>
    </local-scheme>
    <!--
    <class-scheme>
      <scheme-name>ContentDisabledCaches</scheme-name>
      <class-name>com.tangosol.util.NullImplementation$NullMap</class-name>
    </class-scheme>
    -->
  </caching-schemes>
</cache-config>
Table 9-11 Cache Entries in content-coherence-cache-config.xml
| Cache Entry Name | Description |
|---|---|
|
|
Stores a list of nodes for a repository based on an ID. The size of this cache entry depends upon the number of nodes in the active repository.This cache expires based on when the node data is refreshed and how many times the data is modified from another application. Key - Node UID - String Value - A Content Server Node object |
|
|
Stores a list of nodes for a repository based on a path. The size of this cache depends upon the number of nodes in the active repository.This cache entry expires based on when the node data is refreshed and how many times the data is modified from another application. The size and expiration time must be the same as that of Key - Node path - String Value - Node UID - String |
|
|
Stores cached security information for a node. The size of this cache depends upon the number of nodes in the repository. This cache expires based on the frequency of node security data updates. Key - Node UID - String Value - Security information for a node |
|
|
Caches Content Type information. The size of this cache depends upon the number of types in the repository. This cache expires based on when the type information is refreshed and how many times the types are modified from another application. Key - Content Type UID - String Value - A ContentType object |
|
|
Caches all the type names known to Content Server. All type names are cached together (one key), and thus all expire at the same time. This cache expires based on the frequency of new types being created or removed. Key - There is only one key to this cache: " Value - An |
|
|
Caches binary property data. Only binaries that are smaller than the repository configuration property The size of this cache either depends on the number and frequency of the smaller binary properties (smaller than the This cache expires based on when the binary data is refreshed and how many times this data is modified from another application. Key - The Node UID and binary Property UID ( Value - The binary stream data - Note: Most documents stored in Content Server are considered binary content, that is, images, plain text, Word documents, and so on. The only exception is Site Studio content which is stored in CDF data files and cached separately in a Virtual Content Repository (VCR) cache (or node cache). |
|
|
Caches a set of search query to parameters based on the Content Server search grammar. The size of this cache depends upon the number of unique searches expected to be repeatedly performed. The expiration must be set to eventually expire unused searches and save on the cache memory. Key - A set of search query parameters. Value - A set of search query parameters, in Content Server terms. |
|
|
Holds the indexed (searchable) system properties for the repository. There are three keys in this cache:
This cache expires based on the frequency of the indexed fields changes. Key - String Value - |
|
|
Caches the mapping between local user names (current application) and the name of the same user in Content Server. The size of this cache depends upon the number of simultaneous and/or frequent users. This cache expires based on the frequency of user identity mapping updates. Key - Local user Id - String Value - Content Server user Id - String |
|
|
Caches the profile trigger value for a given profile, so it is available when documents are created. The maximum number of entries in this cache is implicitly limited to the maximum number of profiles on the Content Server server. The cache entry size is small. The primary entry to vary is the expiration, which depends upon how often the profile trigger field values are modified in Content Server. These values change rarely once a profile is configured on the Content Server system. Therefore, the expiration should be set appropriately. Key - The Content Server profile name - String Value - The Content Server profile trigger value - String |
9.8.3.2 Testing the Coherence Configuration
After restarting the Managed Server where your application is deployed, connect to it by entering jconsole from the command line and choosing the process corresponding to WC_Spaces to open JConsole. In JConsole, check for Coherence in the MBeans tab. You should also see something like the following output in the WC_Spaces-diagnostic.log file:
2013-06-26 14:45:47.321/1278.178 Oracle Coherence GE 3.6.0.4 <Info>
 (thread=[ACTIVE] ExecuteThread: '1' for queue: 'weblogic.kernel.Default
 (self-tuning)', member=n/a): Loaded cache configuration from
 "zip:/oracle/app/admin/domains/webcenter/servers/WC_CustomPortal/tmp/_WL_
 user/WebCenterPortalCoherence_application1_
 V2.0/i092wg/APP-INF/lib/portal-coherence.jar!/content-coherence-cache-config.xml"
9.8.4 Configuring the Cache to Check for External Content Server Changes
This section describes how you can change the Content Server's Cache Invalidation Interval so that changes are picked up.
This section contains the following topics:
-
Section 9.8.4.1, "Modifying Content Server's Contributor Data Files"
-
Section 9.8.4.2, "Modifying Content Server's Cache Invalidation Interval"
9.8.4.1 Modifying Content Server's Contributor Data Files
The Content Presenter task flow lets WebCenter Portal users with Page-Edit permissions customize the selection and presentation of content. Content Presenter lets you select a single item of content, contents under a folder, a list of items, or a query for content and then select a Content Presenter template with which to render that content on a page in WebCenter Portal.
As well as displaying Content Server folders and the files, Content Presenter also integrates with Oracle Site Studio to let you to create, access, edit, and display Site Studio contributor data files (i.e., a Content Server document) in either a Site Studio region template, or in a custom Content Presenter display template. For more information about creating Content Presenter display templates, see the "Creating Content Presenter Display Templates" section in Developing Portals with Oracle WebCenter Portal and Oracle JDeveloper.
In some cases you may want to modify Content Server's contributor data files directly through Content Server. This operation is completely supported. However, if a contributor data file is being modified through the back door, a running WebCenter Portal page that also uses the same data file would not immediately see those updates. This is due to the WebCenter Portal page using Content Presenter to display the contents of the data file while WebCenter Portal is using the cached version of the data file. Fortunately, there is a way to configure the cache so that back door changes like this are picked up quickly and automatically.
9.8.4.2 Modifying Content Server's Cache Invalidation Interval
By changing the Content Server's Cache Invalidation Interval, you can enable the cache to be monitored by the cache sweeper utility. The cache sweeper queries for changes in Content Server, flagging the cache as "dirty" if there have been any changes. This causes the application to retrieve a new copy of the document from the Content Server that replaces the cached version.
By default, the initial value for the Cache Invalidation Interval is set to 0 (minutes). This means that the sweeper has been turned off. To turn the sweeper on, you need to set a value (in minutes). The minimal value that can be set is 2 (minutes). You can do this from the Cache Details page in Fusion Middleware Control or using a WLST command as described in:
-
Section 9.8.4.2.1, "Modifying the Cache Invalidation Interval Using Fusion Middleware Control"
-
Section 9.8.4.2.2, "Modifying the Cache Invalidation Interval Using a WLST Command"
9.8.4.2.1 Modifying the Cache Invalidation Interval Using Fusion Middleware Control
To change the Cache Invalidation Interval using Fusion Middleware Control:
-
In Fusion Middleware Control, open the Content Repository Connection page for editing:
Figure 9-6 Edit Content Repository Connection Page
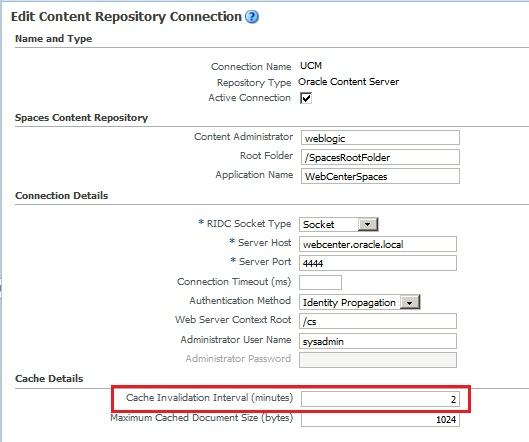
Description of ''Figure 9-6 Edit Content Repository Connection Page''
-
In the Cache Details section, set the Cache Invalidation Interval to 2 (the shortest time allowed) or similarly low value.
Note:
In some instances, once the value of the Cache Invalidation Interval has been set (and saved) in Fusion Middleware Control, it becomes sticky and the interval value can only be set back to 0 using a WLST command.9.8.4.2.2 Modifying the Cache Invalidation Interval Using a WLST Command
You can also update the value for the Cache Invalidation Interval using the following WLST command:
setJCRContentServerConnection(appName, name, [socketType, url, serverHost, serverPort, keystoreLocation, keystorePassword, privateKeyAlias, privateKeyPassword, webContextRoot, clientSecurityPolicy, cacheInvalidationInterval, binaryCacheMaxEntrySize, adminUsername, adminPassword, extAppId, timeout, isPrimary, server, applicationVersion])
To get the required parameter values to execute the command, you can use the listJCRContentServerConnections('webcenter',verbose=true) command. The following is a sample output from command:
UCM
——————
Connection Name: UCM
Connection Type: JCR
External Appliction ID:
Timeout: (not set)
CIS Socket Type: socket
CIS Server Hostname: webcenter.oracle.local
CIS Server Port: 4444
CIS Keystore Location:
CIS Private Key Alias:
CIS Web URL:
Web Server Context Root: /cs
Client Security Policy:
Admin User Name: sysadmin
Cache Invalidation Interval: 2
Binary Cache Maximum Entry Size: 1024
The Documents primary connection is "UCM"
Based on the example above, the corresponding setJCRContentServerConnection command would be:
setJCRContentServerConnection(appName='webcenter',name='UCM', socketType='socket', serverHost='webcenter.oracle.local', serverPort='4444?, webContextRoot='/cs', cacheInvalidationInterval='0?, binaryCacheMaxEntrySize='1024?,adminUsername='sysadmin',isPrimary=1)
Note:
The WebCenter Portal managed server (WC_Spaces) must be restarted for the change to take effect.9.8.4.3 Testing the Cache Settings
Once the sweeper is turned ON, only cache objects that have been changed will be invalidated. To test this out, configure the Content Server so that it monitors and reports on events.
To configure the Content Server to monitor and report on events:
-
Log into the Content Server console application, and under the Administration menu item, select System Audit Information. If your console is using the left menu display option, the Administration link will be located there.
Figure 9-7 Content Server Console - System Audit Information Page
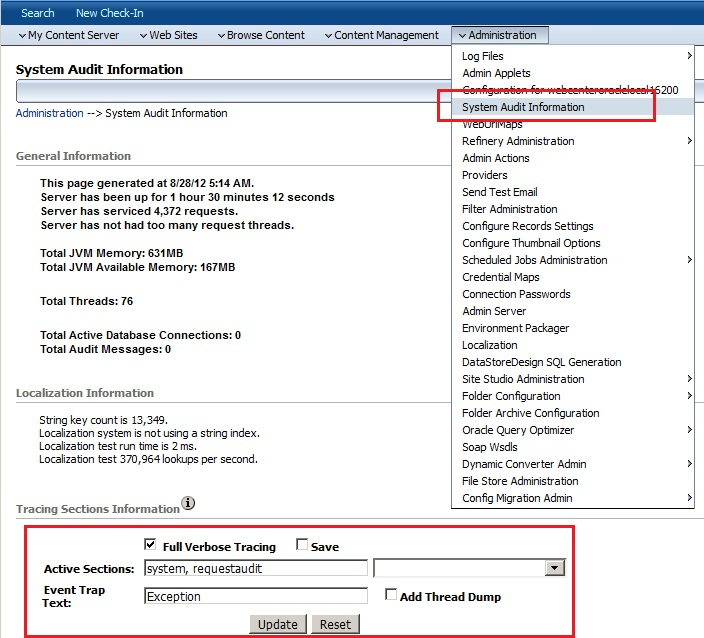
Description of ''Figure 9-7 Content Server Console - System Audit Information Page''
-
Under the Tracing Sections Information, add in only system and requestaudit in the Active Sections. Check Full Verbose Tracing, check Save, then click the Update button. Once this is done, select the View Server Output menu option. This will change the browser view to display the log. This is all that is needed to configure the Content Server.
Figure 9-8 System Audit Information Page - View Server Output

Description of ''Figure 9-8 System Audit Information Page - View Server Output''
For example, the following is the View Server Output with the cache invalidation interval set to 2(minutes) Note the time stamp:
requestaudit/6 08.30 09:52:26.001  IdcServer-68    GET_FOLDER_HISTORY_REPORT [dUser=sysadmin][IsJava=1] 0.016933999955654144(secs)
requestaudit/6 08.30 09:52:26.010  IdcServer-69    GET_FOLDER_HISTORY_REPORT [dUser=sysadmin][IsJava=1] 0.006134999915957451(secs)
requestaudit/6 08.30 09:52:26.014  IdcServer-70    GET_DOCUMENT_HISTORY_REPORT [dUser=sysadmin][IsJava=1] 0.004271999932825565(secs)
… other trace info …
requestaudit/6 08.30 09:54:26.002  IdcServer-71    GET_FOLDER_HISTORY_REPORT [dUser=sysadmin][IsJava=1] 0.020323999226093292(secs)
requestaudit/6 08.30 09:54:26.011  IdcServer-72    GET_FOLDER_HISTORY_REPORT [dUser=sysadmin][IsJava=1] 0.017928000539541245(secs)
requestaudit/6 08.30 09:54:26.017  IdcServer-73    GET_DOCUMENT_HISTORY_REPORT [dUser=sysadmin][IsJava=1] 0.010185999795794487(secs)
-
Once the tracing logs are reporting correctly, the next step is set up WebCenter Portal to test the sweeper. You can do this by setting up two pages with Content Presenter task flows, with each task flow using a different custom Content Presenter display template, and assigning each page a different contributor data file (document in the cache).
When the WebCenter Portal pages containing the content is loaded in the browser for the first time, you can see the tracing information in the Content Server output viewer. For example:
requestaudit/6 08.30 11:51:12.030 IdcServer-129 CLEAR_SERVER_OUTPUT [dUser=weblogic] 0.029171999543905258(secs)
requestaudit/6 08.30 11:51:12.101 IdcServer-130 GET_SERVER_OUTPUT [dUser=weblogic] 0.025721000507473946(secs)
requestaudit/6 08.30 11:51:26.592 IdcServer-131 VCR_GET_DOCUMENT_BY_NAME [dID=919][dDocName=DF_UCMCACHETESTER][dDocTitle=DF_UCMCacheTester][dUser=weblogic][RevisionSelectionMethod=LatestReleased][IsJava=1] 0.21525299549102783(secs)
requestaudit/6 08.30 11:51:27.117 IdcServer-132 VCR_GET_CONTENT_TYPES [dUser=sysadmin][IsJava=1] 0.5059549808502197(secs)
requestaudit/6 08.30 11:51:27.146 IdcServer-133 VCR_GET_CONTENT_TYPE [dUser=sysadmin][IsJava=1] 0.03360399976372719(secs)
requestaudit/6 08.30 11:51:27.169 IdcServer-134 VCR_GET_CONTENT_TYPE [dUser=sysadmin][IsJava=1] 0.008806000463664532(secs)
requestaudit/6 08.30 11:51:27.204 IdcServer-135 VCR_GET_CONTENT_TYPE [dUser=sysadmin][IsJava=1] 0.013265999965369701(secs)
requestaudit/6 08.30 11:51:27.384 IdcServer-136 VCR_GET_CONTENT_TYPE [dUser=sysadmin][IsJava=1] 0.18119299411773682(secs)
requestaudit/6 08.30 11:51:27.533 IdcServer-137 VCR_GET_CONTENT_TYPE [dUser=sysadmin][IsJava=1] 0.1519480049610138(secs)
requestaudit/6 08.30 11:51:27.634 IdcServer-138 VCR_GET_CONTENT_TYPE [dUser=sysadmin][IsJava=1] 0.10827399790287018(secs)
requestaudit/6 08.30 11:51:27.687 IdcServer-139 VCR_GET_CONTENT_TYPE [dUser=sysadmin][IsJava=1] 0.059702999889850616(secs)
requestaudit/6 08.30 11:51:28.271 IdcServer-140 GET_USER_PERMISSIONS [dUser=weblogic][IsJava=1] 0.006703000050038099(secs)
requestaudit/6 08.30 11:51:28.285 IdcServer-141 GET_ENVIRONMENT [dUser=sysadmin][IsJava=1] 0.010893999598920345(secs)
requestaudit/6 08.30 11:51:30.433 IdcServer-142 GET_SERVER_OUTPUT [dUser=weblogic] 0.017318999394774437(secs)
requestaudit/6 08.30 11:51:41.837 IdcServer-143 VCR_GET_DOCUMENT_BY_NAME [dID=508][dDocName=113_ES][dDocTitle=Landing Home][dUser=weblogic][RevisionSelectionMethod=LatestReleased][IsJava=1] 0.15937699377536774(secs)
requestaudit/6 08.30 11:51:42.781 IdcServer-144 GET_FILE [dID=326][dDocName=WEBCENTERORACL000315][dDocTitle=Duke][dUser=anonymous][RevisionSelectionMethod=LatestReleased][dSecurityGroup=Public][xCollectionID=0] 0.16288499534130096(secs)
The highlighted sections show where the two example data files DF_UCMCACHETESTER and 113_ES were called by the WebCenter Portal VCR connection to the Content Server. Note the VCR_GET_DOCUMENT_BY_NAME invocation.
On subsequent refreshes of these two pages, you will notice (after you refresh the Content Server's View Server Output) that there are no further traces of the same VCR_GET_DOCUMENT_BY_NAME invocations. This is because the pages are getting the documents from the cache.
-
The next step is to go through the back door and change one of the documents through the Content Server console. To do this, locate the data file document, and from the Content Information page, select Edit Data File.
Figure 9-9 Content Server Console - Content Information Page
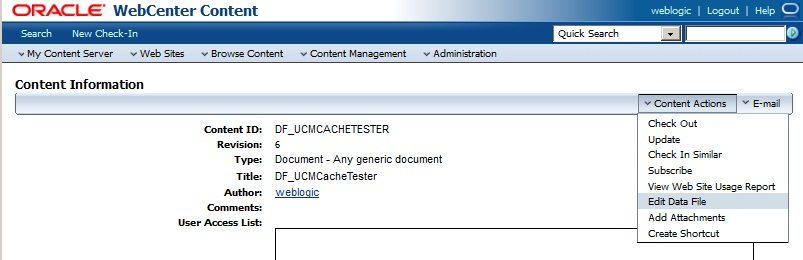
Description of ''Figure 9-9 Content Server Console - Content Information Page''
This invokes the Site Studio Contributor, where you can make some modifications.
When you refresh the Content Server View Server Output, the tracing displays the operations performed on the document.
requestaudit/6 08.30 11:56:59.972 IdcServer-255 SS_CHECKOUT_BY_NAME [dID=922][dDocName=DF_UCMCACHETESTER][dUser=weblogic][dSecurityGroup=Public] 0.05558200180530548(secs)
requestaudit/6 08.30 11:57:00.065 IdcServer-256 SS_GET_CONTRIBUTOR_CONFIG [dID=922][dDocName=DF_UCMCACHETESTER][dDocTitle=DF_UCMCacheTester][dUser=weblogic][dSecurityGroup=Public][xCollectionID=0] 0.08632399886846542(secs)
requestaudit/6 08.30 11:57:00.470 IdcServer-259 DOC_INFO_BY_NAME [dID=922][dDocName=DF_UCMCACHETESTER][dDocTitle=DF_UCMCacheTester][dUser=weblogic][dSecurityGroup=Public][xCollectionID=0] 0.02268899977207184(secs)
requestaudit/6 08.30 11:57:10.177 IdcServer-264 GET_FOLDER_HISTORY_REPORT [dUser=sysadmin][IsJava=1] 0.007652000058442354(secs)
requestaudit/6 08.30 11:57:10.181 IdcServer-263 GET_FOLDER_HISTORY_REPORT [dUser=sysadmin][IsJava=1] 0.01868399977684021(secs)
requestaudit/6 08.30 11:57:10.187 IdcServer-265 GET_DOCUMENT_HISTORY_REPORT [dUser=sysadmin][IsJava=1] 0.009367000311613083(secs)
(internal)/6 08.30 11:57:26.118 IdcServer-266 File to be removed: /oracle/app/admin/domains/webcenter/ucm/cs/vault/~temp/703253295.xml
(internal)/6 08.30 11:57:26.121 IdcServer-266 File to be removed: /oracle/app/admin/domains/webcenter/ucm/cs/vault/~temp/703253295.xml
requestaudit/6 08.30 11:57:26.122 IdcServer-266 SS_SET_ELEMENT_DATA [dID=923][dDocName=DF_UCMCACHETESTER][dDocTitle=DF_UCMCacheTester][dUser=weblogic][dSecurityGroup=Public][xCollectionID=0][StatusCode=0][StatusMessage=Successfully checked in content item 'DF_UCMCACHETESTER'.] 0.3765290081501007(secs)
requestaudit/6 08.30 11:57:30.710 IdcServer-267 DOC_INFO_BY_NAME [dID=923][dDocName=DF_UCMCACHETESTER][dDocTitle=DF_UCMCacheTester][dUser=weblogic][dSecurityGroup=Public][xCollectionID=0] 0.07942699640989304(secs)
requestaudit/6 08.30 11:57:30.733 IdcServer-268 SS_GET_CONTRIBUTOR_STRINGS [dUser=weblogic] 0.0044570001773536205(secs)
After refreshing the first page, you should see that the updates have been applied. Note that the refresh time may vary since the Cache Invalidation Interval (set to 2 minutes) is not determined by when changes occur. The sweeper just runs every two minutes.
When you refresh the Content Server View Server Output, for this example, the tracing displays the following information:
requestaudit/6 08.30 11:59:10.171 IdcServer-270 GET_FOLDER_HISTORY_REPORT [dUser=sysadmin][IsJava=1] 0.00952600035816431(secs)
requestaudit/6 08.30 11:59:10.179 IdcServer-271 GET_FOLDER_HISTORY_REPORT [dUser=sysadmin][IsJava=1] 0.011118999682366848(secs)
requestaudit/6 08.30 11:59:10.182 IdcServer-272 GET_DOCUMENT_HISTORY_REPORT [dUser=sysadmin][IsJava=1] 0.007447000127285719(secs)
requestaudit/6 08.30 11:59:16.885 IdcServer-273 VCR_GET_DOCUMENT_BY_NAME [dID=923][dDocName=DF_UCMCACHETESTER][dDocTitle=DF_UCMCacheTester][dUser=weblogic][RevisionSelectionMethod=LatestReleased][IsJava=1] 0.0786449983716011(secs)
After the specified Cache Invalidation Interval time, the sweeper is invoked (tracked by the
GET_calls). Since a change has been noted, the next call is to theVCR_GET_DOCUMENT_BY_NAMEto retrieve a new version of the modified data file.Navigating back to the second page and viewing the server output, there are no further
VCR_GET_DOCUMENT_BY_NAMEto retrieve the data file. This simply means that the data file was just retrieved from the cache. Looking at the example server output, we can see that there was only one request for theVCR_GET_DOCUMENT_BY_NAME:requestaudit/6 08.30 12:08:00.021 Audit Request Monitor Request Audit Report over the last 120 Seconds for server webcenteroraclelocal16200**** requestaudit/6 08.30 12:08:00.021 Audit Request Monitor -Num Requests 8 Errors 0 Reqs/sec. 0.06666944175958633 Avg. Latency (secs) 0.02762500010430813 Max Thread Count 2 requestaudit/6 08.30 12:08:00.021 Audit Request Monitor 1 Service VCR_GET_DOCUMENT_BY_NAME Total Elapsed Time (secs) 0.09200000017881393 Num requests 1 Num errors 0 Avg. Latency (secs) 0.09200000017881393 requestaudit/6 08.30 12:08:00.021 Audit Request Monitor 2 Service GET_PERSONALIZED_JAVASCRIPT Total Elapsed Time (secs) 0.054999999701976776 Num requests 1 Num errors 0 Avg. Latency (secs) 0.054999999701976776 requestaudit/6 08.30 12:08:00.021 Audit Request Monitor 3 Service GET_FOLDER_HISTORY_REPORT Total Elapsed Time (secs) 0.028999999165534973 Num requests 2 Num errors 0 Avg. Latency (secs) 0.014499999582767487 requestaudit/6 08.30 12:08:00.021 Audit Request Monitor 4 Service GET_SERVER_OUTPUT Total Elapsed Time (secs) 0.017999999225139618 Num requests 1 Num errors 0 Avg. Latency (secs) 0.017999999225139618 requestaudit/6 08.30 12:08:00.021 Audit Request Monitor 5 Service GET_FILE Total Elapsed Time (secs) 0.013000000268220901 Num requests 1 Num errors 0 Avg. Latency (secs) 0.013000000268220901 requestaudit/6 08.30 12:08:00.021 Audit Request Monitor ****End Audit Report*****
9.9 Deleting Content Repository Connections
This section contains the following subsections:
-
Section 9.9.1, "Deleting Content Repository Connections Using Fusion Middleware Control"
-
Section 9.9.2, "Deleting Content Repository Connections Using WLST"
Caution:
Delete a content repository connection only if it is not in use. If a connection is marked as active, it should first be removed from the active list, and then deleted.9.9.1 Deleting Content Repository Connections Using Fusion Middleware Control
To delete a content repository connection:
-
Log in to Fusion Middleware Control and navigate to the home page for WebCenter Portal or the WebCenter Portal Framework application:
-
Do one of the following:
-
For WebCenter Portal - From the WebCenter Portal menu, select Settings > Service Configuration.
-
For Portal Framework applications - From the Application Deployment menu, select WebCenter Portal > Service Configuration.
-
-
From the list of services on the WebCenter Portal Services Configuration page, select Content Repository.
-
Select the connection name, and click Delete.
-
To effect this change you must restart the managed server on which WebCenter Portal or your Portal Framework application is deployed.
9.9.2 Deleting Content Repository Connections Using WLST
Use the WLST command deleteConnection to remove a content repository connection. For command syntax and examples, see "deleteConnection" in the WebLogic Scripting Tool Command Reference.
For information on how to run WLST commands, see Section 1.13.3.1, "Running Oracle WebLogic Scripting Tool (WLST) Commands."
Note:
To effect this change you must restart the managed server on which WebCenter Portal or your Portal Framework application is deployed. See, "Starting and Stopping Managed Servers Using WLST" in the Administrator's Guide.9.10 Setting Connection Properties for WebCenter Portal's Default Content Repository
You can view, modify, and delete connection properties for the back-end Content Server repository that is being used by WebCenter Portal to store portal documents (including the Home portal documents). Specifically, you can define the root folder under which portal content is stored, the name of the content repository administrator, and a unique application identifier for separating application data on Content Server.
This section contains the following subsections:
9.10.1 Setting Connection Properties for WebCenter Portal's Default Content Repository Using Fusion Middleware Control
To set content repository connection properties for WebCenter Portal:
-
Log in to Fusion Middleware Control and navigate to the home page for WebCenter Portal. See Section 6.2, "Navigating to the Home Page for WebCenter Portal."
-
From the WebCenter Portal menu, select Settings > Service Configuration.
-
From the list of services on the WebCenter Portal Services Configuration page, select Content Repository.
-
Select the connection name, and click Edit.
-
(For the active connection in WebCenter Portal only.) Set connection properties for the WebCenter Portal repository. For information, see Section 9.6.1, "About Registering Content Repositories for WebCenter Portal."
-
Click OK to save your changes.
-
To start using the updated (active) connection properties, you must restart the managed server on which WebCenter Portal is deployed (
WC_Spacesby default).
9.10.2 Setting Connection Properties for WebCenter Portal's Default Content Repository Using WLST
The following commands are valid only for the WebCenter Portal application to view, set, and delete properties for the Content Server repository that is being used by WebCenter Portal to store portal documents:
For command syntax and detailed examples, see the WebLogic Scripting Tool Command Reference.
For information on how to run WLST commands, see Section 1.13.3.1, "Running Oracle WebLogic Scripting Tool (WLST) Commands."
9.11 Testing Content Repository Connections
After setting up content repository connections, you can test them to make sure that you can access the content repository, as described in the following sections:
9.11.1 Testing Content Server Connections
To verify a connection of the socket type web, log in to the Web interface of Content Server as administrator. You can obtain the URL of a socket type connection through Fusion Middleware Control as follows:
-
In Fusion Middleware Control, from the WebCenter Portal menu, select Settings and select Service Configuration (Figure 9-11).
-
On the Manage Content Repository Connections page, select the connection and click Edit (Figure 9-12).
-
On the Edit Content Repository Connection page, copy the Web URL (Figure 9-13).
Note:
Remove the/idcplg/suffix from the URL before using it.The URL format is:
http://host_name/web_root/For example:
http://mycontentserver/cms/


9.11.2 Testing Oracle Portal Connections
To verify the full state of an Oracle Portal connection:
-
In the Oracle WebLogic Administration Console, under Domain Structure, expand Services > JDBC, then double-click Data Sources (Figure 9-14).
-
On the Summary of JDBC Data Sources page, select the data source you intend to test (Figure 9-15).
-
In the Settings for datasource_name section, select the tabs Monitoring, then Testing. Select the data source target server, then click Test Data Source to test the connection (Figure 9-16).
9.12 Changing the Maximum File Upload Size
By default, the maximum upload size for files is:
-
2 MB for Portal Framework applications. This default is imposed by Apache MyFaces Trinidad, which handles uploading files from a browser to the application server.
Portal Framework application developers can customize the maximum file upload size at design time by setting the
org.apache.myfaces.trinidad.UPLOAD_MAX_DISK_SPACEparameter in theweb.xmlfile. For more information, see "Setting Parameters to Upload Files to Content Repositories" in the Developing Portals with Oracle WebCenter Portal and Oracle JDeveloper. See also, Section A.1.2, "web.xml." -
2 GB for WebCenter Portal.
System administrators can customize the maximum file upload size by editing the
uploadedFileMaxDiskSpaceparameter in thewebcenter-config.xmlfile. For details, see Section A.1.3, "webcenter-config.xml."
9.13 Troubleshooting Issues with Content Repositories
This section includes the following subsections:
9.13.1 Documents Service Unavailable In WebCenter Portal
If document tools are not available in WebCenter Portal, that is, the Documents tab is not available in your Home portal or other portals, there may be a connection issue to the backend Content Server, or the Content Server does not contain some required WebCenter Portal data.
To diagnose the problem, follow these steps:
-
Check that the Content Server is up and running. Ensure the server has the Server Port (
intradoc) configured and the Server IP Filter allows WebCenter Portal to connect:-
Log in to the Content Server.
-
Click Administration.
-
Click Configuration for <instance name>.
-
Click the Server Configurations link under System Configuration.
-
Ensure that Server Port is listed and that Server IP Filter allows access from WebCenter Portal.
-
-
Check the connection between WebCenter Portal and the WebCenter Content Server that is being used as the backend document store:
-
Login to Fusion Middleware Control, and navigate to Content Repository Connection settings. For details, see Section 9.6.2, "Registering Content Repositories Using Fusion Middleware Control."
-
Select and edit the required connection.
-
Ensure the Active Connection check box is selected.
-
Ensure that Content Administrator, Root Folder and Application Name are specified correctly:
-
Content Administrator - the Content Administrator must have administration rights on the Content Server. This user will be used to create and maintain folders for portal content, security groups and roles, and manage content access rights.
-
Root Folder and Application Name - both must be unique and not used by any other WebCenter Portal instance using the same Content Server. If you change these values, ensure that both values are changed and not just one of them.
-
Application Name - must be 14 characters or less as it is used as a prefix for items created in Content Server, such as workflows, which have a limit on the length of the item name.
-
-
If you make changes, click OK to save the connection.
-
Click Test to verify that the connection works.
-
If you made changes, you must restart
WC_Spaces, the managed server on which WebCenter Portal is deployed. -
Log in to WebCenter Portal to see if the documents tools are available after your connection updates.
-
-
If the Document service is still not available, check log messages around WebCenter Portal start-up for any errors connecting to the Content Server or saving data on the Content Server.
For details, see Section 28.2.1, "Viewing and Configuring WebCenter Portal Logs."
-
If the log does not show any useful log information, increase the logging level for the Content Server, and then restart WebCenter Portal to investigate the messages in more detail:
-
-
Use Fusion Middleware Control (or edit the
logging.xmlfile) to increase logging fororacle.webcenter.doclib.internal.modelandoracle.webcenter.doclib.internal.spaces.See also, Section 28.2.1, "Viewing and Configuring WebCenter Portal Logs."
-
Restart WebCenter Portal.
-
View the logs again:
If WebCenter Portal data already exists on Content Server, the following message is logged at TRACE level:
Content Server already contains the Space container, therefore no need to seed any data
If WebCenter Portal data is not yet seeded, the following message is logged at TRACE level:
Creating WebCenter Seeded Data
-
-