8 Using JPA with Coherence
In this exercise, you learn how to use Java Persistence API (JPA) to perform object-relational mapping. It highlights the use of the Coherence memory-based backing map and Oracle TopLink Grid.
This chapter contains the following sections:
You must have a working version of the Oracle Database Express Edition (also known as the OracleXE database) installed on your system. If you do not have the database, you can download it from this URL:
8.1 Introduction
JPA defines how relational data is mapped to Java objects (persistent entities), the way that these objects are stored in a relational database so that they can be accessed at a later time, and the continued existence of an entity's state even after the application that uses it ends. In addition to simplifying the entity persistence model, the JPA standardizes object-relational mapping.
To determine how data is stored within a Coherence cluster, a backing map is used. By default, Coherence uses a memory-based backing map. To persist data, there are several backing map implementations.
The JPA implementation used in this exercise provides Object Relational Mapping (ORM) from the Java world to the database world. It also allows you to use standard Coherence get and put methods, and have Coherence calls translated into database calls using JPA and Oracle TopLink (based on the open source EclipseLink project).
Oracle TopLink is a persistence framework including development tools and run-time capabilities for providing transformation, mapping, and persistence operations in Java SE and Java EE environments. The core technology of TopLink is provided by EclipseLink, the open-source persistence framework from the Eclipse Foundation.
TopLink includes additional features beyond EclipseLink. One of the additional components provided by TopLink is TopLink Grid.
Oracle TopLink Grid is a feature used for integrating the TopLink JPA implementation, provided by EclipseLink, with Oracle Coherence.
You can use the Coherence API with caches backed by TopLink Grid to access relational data with special cache loader and cache store interfaces which have been implemented for JPA. In this traditional Coherence approach, TopLink Grid provides the CacheLoader and CacheStore implementations in the oracle.eclipselink.coherence.standalone package that are optimized for EclipseLink JPA.
You can build applications using JPA and transparently use the power of the data grid for improved scalability and performance. TopLink Grid provides the means for scaling JPA applications using Oracle Coherence. Applications can be scaled in a number of ways, ranging from using Coherence as a distributed shared (L2) cache up to directing JP QL queries to Coherence for parallel execution across the grid to reduce database load. In this JPA on the Grid approach, TopLink Grid provides a set of cache and query configuration options that allow you to control how EclipseLink JPA uses Coherence. These implementations reside in the oracle.eclipselink.coherence.integrated package.
The TopLink Grid cache store and cache loader implementations are shipped in the toplink-grid.jar file. TopLink Grid uses the standard JPA run-time configuration file persistence.xml and the JPA mapping file orm.xml. The Coherence cache configuration file coherence-cache-config.xml must be specified to override the default Coherence settings and to define the cache store caching scheme.
This project uses the TopLink Grid cache store and cache loader classes which are optimized for EclipseLink JPA and designed for use by Coherence applications. These classes can be found in the oracle.eclispelink.coherence.standalone package. For more information on "Using Coherence Caches Backed by TopLink Grid" in Oracle Fusion Middleware Integrating Oracle Coherence.
The JPA on the Grid approach is not illustrated in this project. For information on this technique, see "Integrating TopLink Grid with Oracle Coherence" in Oracle Fusion Middleware Integrating Oracle Coherence.
8.2 Mapping Relational Data to Java Objects with JPA
In this exercise, you use Eclipse to perform the following tasks:
8.2.1 Unlock the OracleXE Database
Unlock the HR account in your pre-installed OracleXE database.
You must have the OracleXE database installed on your system and be able to access the HR schema. To unlock the HR account, follow these steps:
-
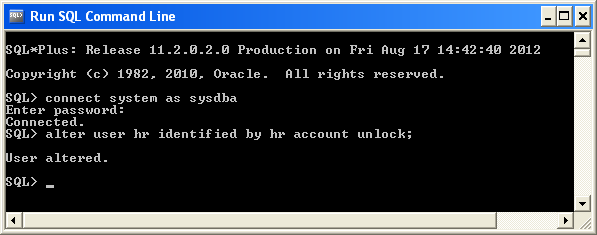
Navigate to Start then All Programs then Oracle Database 11g Express Edition then Run SQL Command Line.
-
Enter
connectsystemassysdba, and then enterwelcome1when prompted for the password. (Note: your user name issystemand your password iswelcome1.) -
Enter the command to unlock the account:
alter user hr identified by hr account unlock;
These commands are illustrated in Figure 8-1.
8.2.2 Configure the Project for JPA
Create a new project in Eclipse IDE called JPAProject. See "Creating a New Project in the Eclipse IDE" for detailed information.
-
In the Eclipse IDE, click Window then Open Perspective then Other to open the Open Perspective dialog box. Select the JPA perspective, as illustrated in Figure 8-2.
Figure 8-2 Selecting the JPA Perspective in the Open Perspective Dialog Box
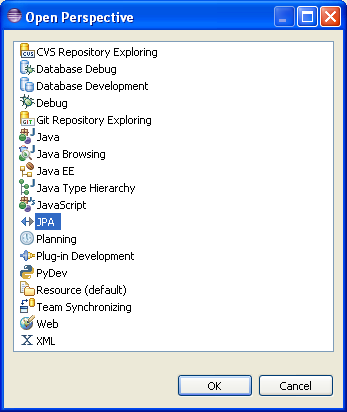
Description of "Figure 8-2 Selecting the JPA Perspective in the Open Perspective Dialog Box"
-
Select File then New then JPA Project. Enter
JPAProjectas the project name. Ensure that the default location points tohome\oracle\workspace\JPAProject. Click Modify in the Configuration field to open the Project Facets dialog box. -
Select the Oracle Coherence facet. The JPA and Java facets should already be selected.
-
Click Save As in the Configuration field. Enter
JPAConfigurationin the Save Preset dialog box and click OK. The contents of the Project Facets dialog box should look similar to Figure 8-3.Figure 8-3 Project Facets for a JPA Project
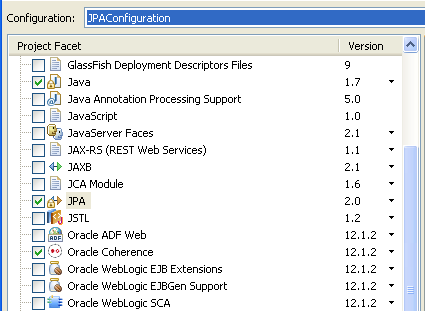
Description of "Figure 8-3 Project Facets for a JPA Project"
The contents of the New JPA Project dialog box should look similar to Figure 8-4. Click Next to go to the Java page.
Figure 8-4 Contents of the New JPA Project Dialog Box
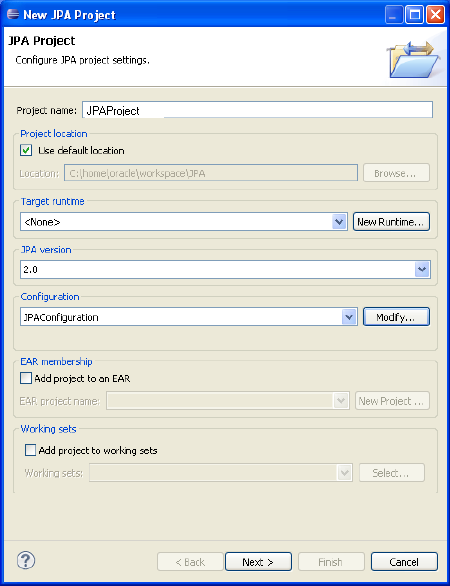
Description of "Figure 8-4 Contents of the New JPA Project Dialog Box"
-
Click Next in the Java page to accept the default output folder location.
-
In the JPA Facet page, select EclipseLink 2.4.x in the Platform drop-down list. Click the Manage Libraries icon to add the TopLink Grid, EclipseLink, and Java Persistence files.
-
Click New in the Preferences dialog box. In the New User Library dialog box, enter TopLink. Select the System library checkbox, as illustrated in Figure 8-5.
Figure 8-5 Adding the EclipseLink JPA Library
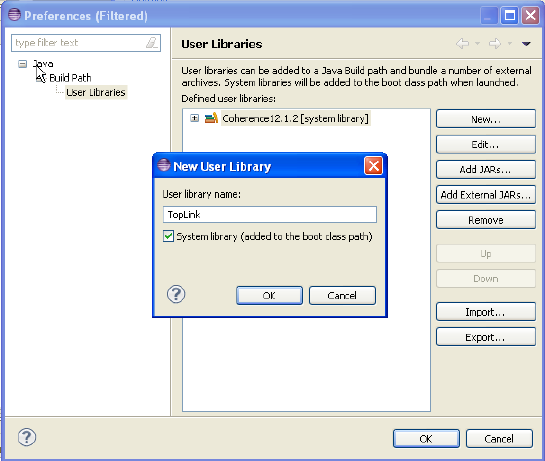
Description of "Figure 8-5 Adding the EclipseLink JPA Library"
-
Click OK to dismiss the New User Library dialog box.
-
In the Preference dialog box, select TopLink[system library] and click Add External JARS.
-
Navigate to the Oracle_Home\oracle_common\modules\oracle.toplink_12.1.2 folder. Select the
toplink-grid.jarandeclipselink.jarfiles and click Open. Thetoplink-grid.jarandeclipselink.jarfiles are added to the TopLink library. Click Add External JARS again and navigate to the Oracle_Home\oracle_common\modules folder. Select thejavax.persistence_2.0.0.0_2-0.jarfile and click Open. When you are finished, User Libraries should look similar to Figure 8-6.Figure 8-6 Adding Toplink Grid, Eclipselink, and Java Persistence JAR Files to the TopLink User Library
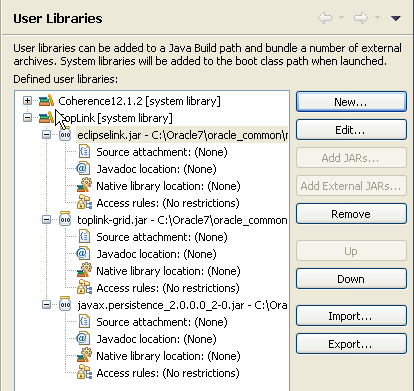
Description of "Figure 8-6 Adding Toplink Grid, Eclipselink, and Java Persistence JAR Files to the TopLink User Library"
-
Click OK to dismiss the Preferences dialog box. Select the TopLink user library. The JPA Facet page should now look similar to Figure 8-7.
Figure 8-7 TopLink Libraries Added to the JPA Facet Page
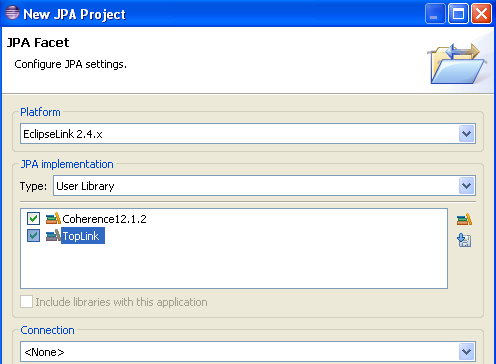
Description of "Figure 8-7 TopLink Libraries Added to the JPA Facet Page"
-
Create a connection to the Oracle XE Database. Click Add connection.
-
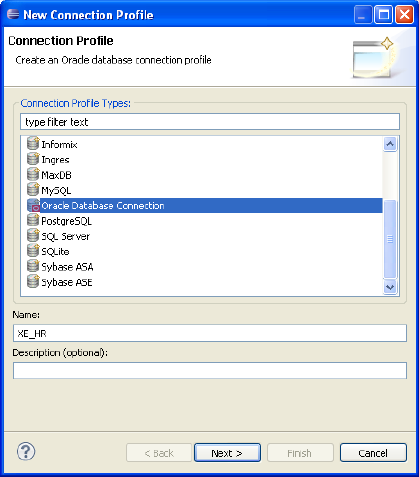
In Connection Profile dialog box, select Oracle Database Connection. and enter
XE_HRin the Name field, as illustrated in Figure 8-8. Click Next. -
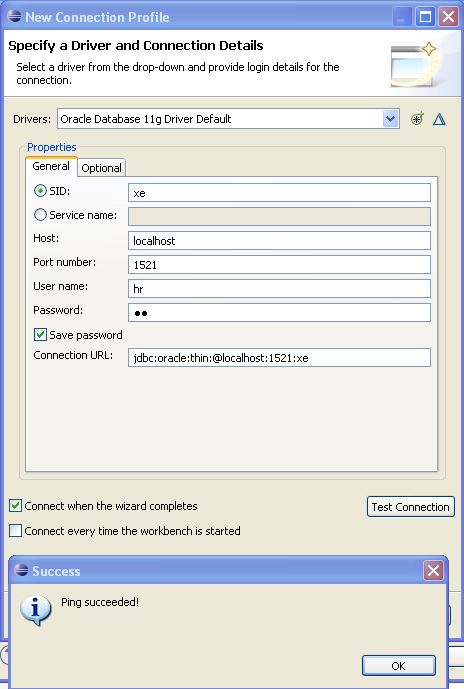
Select Oracle Database 11g Driver Default in the Drivers field. Edit the General tab. Enter
hrin the User name field andhrin the Password field. Select the Save Password check box. Enterlocalhostin the Host field. Select the Connect when the wizard completes check box. Click Test Connection button. The test should return an alert box with a success message, as illustrated in Figure 8-9. Click OK, then Next to see the Summary Page. Click Finish.Figure 8-9 The New Connection Profile Dialog Box and the Success Message
Description of "Figure 8-9 The New Connection Profile Dialog Box and the Success Message"
-
In the JPA Facet page, click Add driver library to build path, then click Next.
-
-
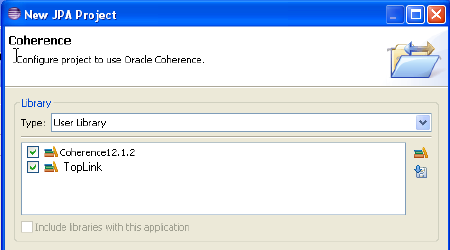
In the Coherence page, ensure that the Coherence 12.1.2 and TopLink user libraries are present and selected. Click Finish.
Figure 8-10 Coherence Page of the New JPA Project Wizard
Description of "Figure 8-10 Coherence Page of the New JPA Project Wizard"
8.2.3 Create the JPA Persistence Unit and Entities
A persistence unit provides an easy way to identify the set of metadata files, classes, and JARs that contain all classes that need to be persisted as a group. The name of the persistence unit is used to identify it. Entities contain persistent data, and that can be saved in persistent data stores. The JPA entity can belong to a persistence unit. The persistence unit is described by the persistence.xml file.
To create the JPA persistence unit and the JPA entities:
-
Right-click the
JPAProjectproject and select New then select JPA Entities from Tables. The Select Tables dialog box opens. -
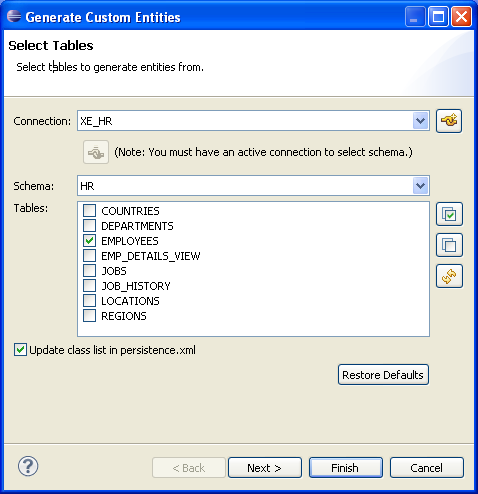
Select the
EMPLOYEEStable, as illustrated in Figure 8-11 and click Next.Figure 8-11 Selecting the Database Tables
Description of "Figure 8-11 Selecting the Database Tables"
-
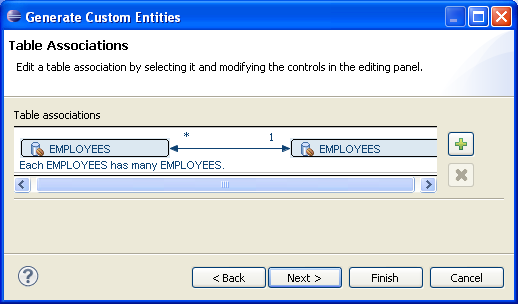
In the Table Associations page, illustrated in Figure 8-12, click Next to accept the defaults.
Figure 8-12 Associations for the EMPLOYEES Table
Description of "Figure 8-12 Associations for the EMPLOYEES Table"
-
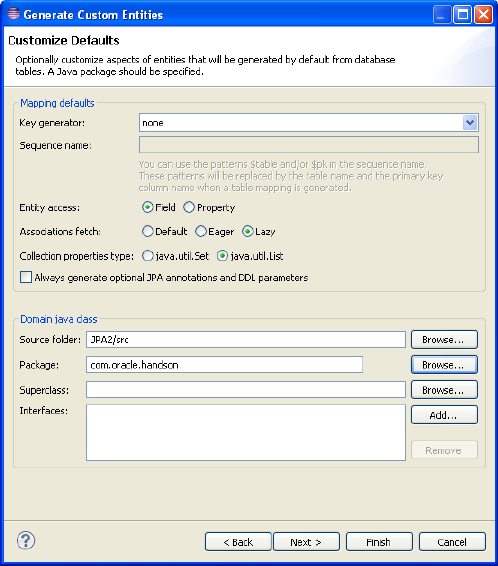
In the Customize Defaults page, select Collection properties type
java.util.List, Entercom.oracle.handsonin the Package field. Select Lazy in the Associations fetch field.When you are finished, the Customize Default Entity Generation page should look similar to Figure 8-13. Click Next.
Figure 8-13 Customize Default Entity Generation Page
Description of "Figure 8-13 Customize Default Entity Generation Page"
-
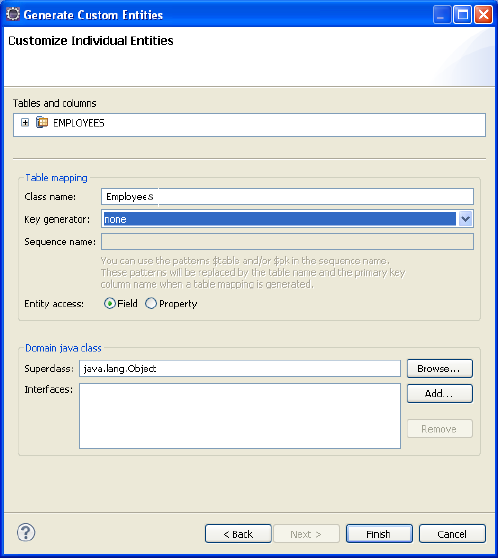
In the Customize Individual Entities page, enter
java.lang.Objectin the Superclass field. Change the Class name fromEmployeetoEmployees, as illustrated in Figure 8-14.Figure 8-14 Customize Individual Entities Page
Description of "Figure 8-14 Customize Individual Entities Page"
-
Click Finish to generate the JPA Entities. An
Employees.javafile is generated in theJPAProject/src/com.oracle.handsonnode in the Project Explorer.
8.2.4 Edit the persistance.xml File
The persistence.xml file defines one or more persistence units. Use the persistence.xml Editor tool in the Eclipse IDE to edit the persistence.xml file.
-
Open the
persistence.xmlfile in the Eclipse editor. -
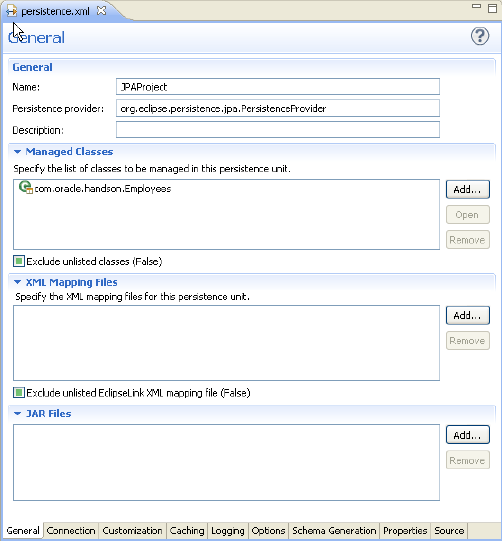
Click the General tab. Enter the name of the persistence provider if it is not already provided. It will be
org.eclipse.persistence.jpa.PersistenceProvider.Figure 8-15 General Tab in the persistence.xml Editor
Description of "Figure 8-15 General Tab in the persistence.xml Editor"
-
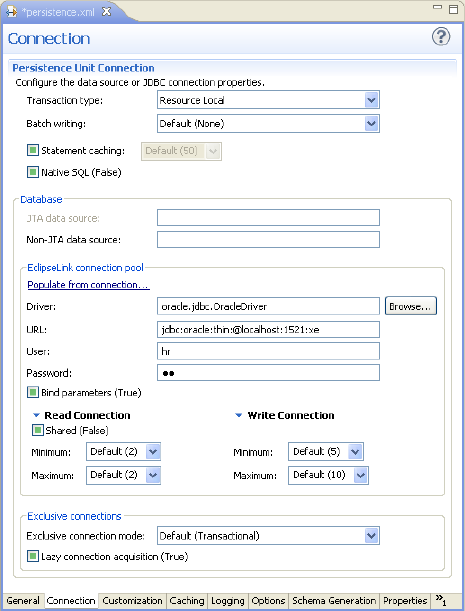
In the Connection tab, select Resource Local from the Transaction type drop down list.
In EclipseLink connection pool section, click Populate from connection link, then click the XE_HR item in the Connection Selection dialog box. The values in this field will be provided from the database connection you defined in "Configure the Project for JPA". The Connection Properties tab should look similar to Figure 8-16.
Figure 8-16 Connection Properties Tab in the persistence.xml Editor
Description of "Figure 8-16 Connection Properties Tab in the persistence.xml Editor"
-
Open the Logging tab and select Fine from the Logging level drop down list.
Select the Exceptions checkbox. Deselect the Timestamp, Thread, Session, and Connection checkboxes. When you are finished, the Logging tab should look similar to
Figure 8-17 Logging Tab in the persistence.xml Editor
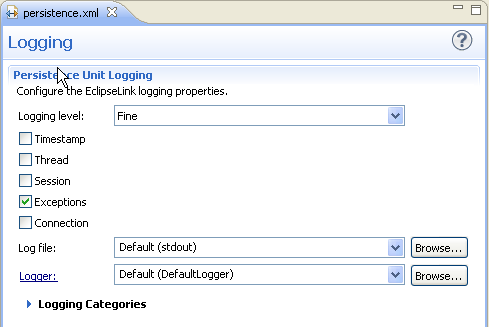
Description of "Figure 8-17 Logging Tab in the persistence.xml Editor "
-
Inspect the Properties tab. The contents should look similar to Figure 8-18.
Figure 8-18 Properties Tab in the persistence.xml Editor
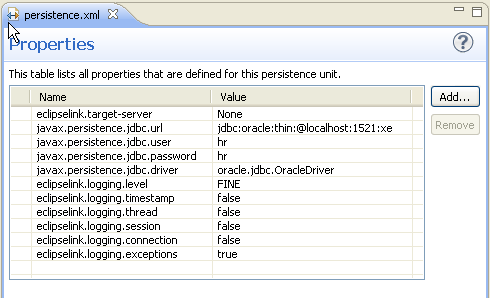
Description of "Figure 8-18 Properties Tab in the persistence.xml Editor"
-
Open the Source tab. The
persistence.xmlfile should look similar to Example 8-1. Save the file.Example 8-1 Generated persistence.xml File
<?xml version="1.0" encoding="UTF-8"?>
<persistence version="2.0" xmlns="http://java.sun.com/xml/ns/persistence" xmlns:xsi="http://www.w3.org/2001/XMLSchema-instance" xsi:schemaLocation="http://java.sun.com/xml/ns/persistence http://java.sun.com/xml/ns/persistence/persistence_2_0.xsd">
  <persistence-unit name="JPAProject" transaction-type="RESOURCE_LOCAL">
    <provider>org.eclipse.persistence.jpa.PersistenceProvider</provider>
    <class>com.oracle.handson.Employees</class>
    <properties>
      <property name="eclipselink.target-server" value="None"/>
      <property name="javax.persistence.jdbc.url" value="jdbc:oracle:thin:@localhost:1521:xe"/>
      <property name="javax.persistence.jdbc.user" value="hr"/>
      <property name="javax.persistence.jdbc.password" value="hr"/>
      <property name="javax.persistence.jdbc.driver" value="oracle.jdbc.OracleDriver"/>
      <property name="eclipselink.logging.level" value="FINE"/>
      <property name="eclipselink.logging.timestamp" value="false"/>
      <property name="eclipselink.logging.thread" value="false"/>
      <property name="eclipselink.logging.session" value="false"/>
      <property name="eclipselink.logging.connection" value="false"/>
      <property name="eclipselink.logging.exceptions" value="true"/>
    </properties>
  </persistence-unit>
</persistence>
8.2.5 Create the Cache Configuration File for JPA
Create a cache configuration file for the JPA project.
-
Right click
coherence-cache-config.xmlfile in the project and select Open. -
Enter the code illustrated in Example 8-2. Use Rename or Save As to save the file as
jpa-cache-config.xml. The file will be saved to thehome\oracle\workspace\JPAProject\srcfolder. -
Ensure that the original
coherence-cache-config.xmlfile no longer appears in Project Explorer.In Example 8-2, note the use of
distributed-eclipselinkas the value of thescheme-nameelement,EclipseLinkJPAas the value of theservice-nameelement, andoracle.eclipselink.coherence.standalone.EclipseLinkJPACacheStoreas the value of theclass-namesubelement of thecachestore-schemeelement.Example 8-2 Cache Configuration for JPA
<?xml version="1.0"?>

<cache-config xmlns:xsi="http://www.w3.org/2001/XMLSchema-instance"
              xmlns="http://xmlns.oracle.com/coherence/coherence-cache-config"
              xsi:schemaLocation="http://xmlns.oracle.com/coherence/coherence-cache-config http://xmlns.oracle.com/coherence/coherence-cache-config/1.2/coherence-cache-config.xsd">

  <defaults>
    <serializer system-property="tangosol.coherence.serializer"/>
    <socket-provider system-property="tangosol.coherence.socketprovider"/>
  </defaults>
  <caching-scheme-mapping>
    <cache-mapping>
      <!-- Set the name of the cache to be the entity name  -->
      <cache-name>Employees</cache-name>
      <!-- Configure this cache to use the scheme defined below  -->
      <scheme-name>distributed-eclipselink</scheme-name>
    </cache-mapping>
  </caching-scheme-mapping>
  <caching-schemes>
    <distributed-scheme>
      <scheme-name>distributed-eclipselink</scheme-name>
      <service-name>EclipseLinkJPA</service-name>
      <backing-map-scheme>
        <read-write-backing-map-scheme>
          <!--
      Define the cache scheme
      -->
          <internal-cache-scheme>
            <local-scheme/>
          </internal-cache-scheme>
          <cachestore-scheme>
            <class-scheme>
              <class-name>oracle.eclipselink.coherence.standalone.EclipseLinkJPACacheStore</class-name>
              <init-params>
                <!--
            This param is the entity name
            This param should match the value of the
            persistence unit name in persistence.xml
            -->
                <init-param>
                  <param-type>java.lang.String</param-type>
                  <param-value>{cache-name}</param-value>
                </init-param>
                <init-param>
                  <param-type>java.lang.String</param-type>
                  <param-value>JPAProject</param-value>
                </init-param>
              </init-params>
            </class-scheme>
          </cachestore-scheme>
        </read-write-backing-map-scheme>
      </backing-map-scheme>
      <autostart>true</autostart>
    </distributed-scheme>
  </caching-schemes>
</cache-config>
8.2.6 Create a Cache Server Start-Up Configuration
Create a configuration to start the cache server for the JPA project.
-
Right click the project and select Run As then Run Configurations. Double click the Oracle Coherence icon in the Run Configurations dialog box to create a new launch configuration.
-
In the Main tab, enter
JPAServerin the Name field. Click Browse in the Project field and select the JPAProject project in the Project Selection dialog box. Select the Include system libraries when searching for a main class checkbox and click Search. EnterDefaultCacheServerin the Select Type field and select com.tangosol.net.DefaultCacheServer. Click Apply. The Main tab should look similar to Figure 8-19.Figure 8-19 Main Tab for the JPA Cache Server
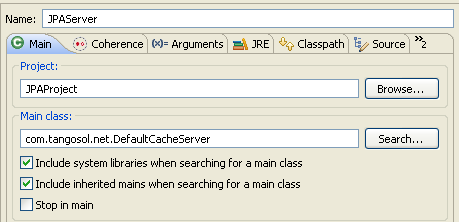
Description of "Figure 8-19 Main Tab for the JPA Cache Server"
-
In the General tab of the Coherence tab, identify the path to the cache configuration file under Cache configuration descriptor. Click the Browse button to navigate to the Absolute file path of the JPA cache configuration file
C:\home\oracle\workspace\JPAProject\src\jpa-cache-config.xml. Select Enabled (cache server) under Local storage. Enter a unique value, such as3155, for the Cluster port.In the Other tab, ensure that the tangosol.pof.config item is set to the default
pof-config.xml. -
In the Common tab, select Shared file and browse to the \JPA project.
-
The Classpath tab should look similar to Figure 8-20.
Figure 8-20 Classpath Tab for the JPA Cache Server Executable
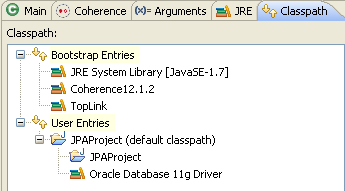
Description of "Figure 8-20 Classpath Tab for the JPA Cache Server Executable"
You will start the cache server in a later step: "Run the JPA Example".
8.2.7 Create a Class to Interact with the Data Object
Create a new class in the JPAProject project to interact with the Employees object. The objective of the class will be to change the value of an employee's salary.
-
Create a new class with a
mainmethod calledRunEmployeeExample. See "Creating a Java Class" for detailed information. -
Create the code to perform the following:
-
Get an employee using the
EMPLOYEE_IDattribute.EMPLOYEE_IDis alongdata type. -
Display the salary.
-
Give the employee a 10% pay raise.
-
Get the value again to confirm the pay raise.
Example 8-3 illustrates a possible implementation of the
RunEmployeeExampleclass.Example 8-3 Sample Employee Class File
package com.oracle.handson; import com.tangosol.net.CacheFactory; import com.tangosol.net.NamedCache; import java.math.BigDecimal; public class RunEmployeeExample { public RunEmployeeExample() { } public static void main(String[] args) { long empId = 190L; // emp 190 - Timothy Gates NamedCache employees = CacheFactory.getCache("Employees"); Employees emp = (Employees)employees.get(empId); System.out.println("Employee " + emp.getFirstName() + " " + emp.getLastName() + ", salary = $" + emp.getSalary() ); // give them a 10% pay rise emp.setSalary(emp.getSalary().multiply(BigDecimal.valueOf(1.1))); employees.put(empId, emp); Employees emp2 = (Employees)employees.get(empId); System.out.println("New Employee details are " + emp2.getFirstName() + " " + emp2.getLastName() + ", salary = $" + emp2.getSalary() ); } } -
8.2.8 Create a Run Configuration for RunEmployeeExample
To create a run configuration, modify the run-time properties and edit the class path in Eclipse.
-
Right click
RunEmployeeExample.javain the Project Explorer and choose Run As then Run Configurations. In the Run Configurations dialog box, double-click the Oracle Coherence icon to create a new launch configuration. -
In the Main tab, enter
RunEmployeein the Name field. Click Browse and select theJPAProjectproject. In the Main class field, click Search and choosecom.oracle.handson.RunEmployeeExample. Click Apply. -
In the General tab of the Coherence tab, browse to the
C:\home\oracle\workspace\JPAProject\src\jpa-cache-config.xmlfile in the Cache configuration descriptor field. Select the Disabled (cache client) button. Enter3155in the Cluster port field. Click Apply. -
In the Other tab, ensure that the default
pof-config.xmlappears in thetangosol.pof.configfield. -
In the Common tab, select Shared file and browse to the \JPAProject project.
The Classpath tab should look similar to Figure 8-21.
Figure 8-21 Classpath Tab for the RunEmployee Executable

Description of "Figure 8-21 Classpath Tab for the RunEmployee Executable"
8.2.9 Run the JPA Example
Now that the Employee class has been annotated to persist to the database using JPA, and you have included the persistence.xml file to tell JPA where your database is, Coherence employs a CacheStore implementation that uses TopLink Grid to load and store objects in the database. When you use the get(Object key) method, the following happens:
-
Coherence looks for the entry with the key.
-
if the entry is not already in the cache, or if it is expired from the cache, then Coherence calls the backing map, which uses the TopLink Grid cache store, to retrieve the data.
-
if the entry is in the cache, Coherence returns the entry directly to the application without going through the TopLink Grid cache store. When you use the
put(object key,object value)method, Coherence uses EclipseLink JPA through TopLink Grid to persist any changes to the database.
In the Run Configurations dialog box, select the JPAServer launch configuration and click Run to start the cache server. After the cache server starts, select the RunEmployee configuration and click Run. The output from the executable should look similar to Example 8-4.
Example 8-4 Output from the RunEmployee Executable
...
Group{Address=224.12.1.0, Port=3155, TTL=4}

MasterMemberSet(
  ThisMember=Member(Id=2, Timestamp=2013-02-22 13:59:12.203, Address=192.168.0.102:8090, MachineId=18578, Location=site:,machine:tpfaeffl-lap7,process:5436, Role=OracleHandsonRunEmployeeExample)
  OldestMember=Member(Id=1, Timestamp=2013-02-22 13:58:41.89, Address=192.168.0.102:8088, MachineId=18578, Location=site:,machine:tpfaeffl-lap7,process:4152, Role=CoherenceServer)
  ActualMemberSet=MemberSet(Size=2
    Member(Id=1, Timestamp=2013-02-22 13:58:41.89, Address=192.168.0.102:8088, MachineId=18578, Location=site:,machine:tpfaeffl-lap7,process:4152, Role=CoherenceServer)
    Member(Id=2, Timestamp=2013-02-22 13:59:12.203, Address=192.168.0.102:8090, MachineId=18578, Location=site:,machine:tpfaeffl-lap7,process:5436, Role=OracleHandsonRunEmployeeExample)
    )
  MemberId|ServiceVersion|ServiceJoined|MemberState
    1|12.1.2|2013-02-22 13:58:41.89|JOINED,
    2|12.1.2|2013-02-22 13:59:12.203|JOINED
  RecycleMillis=1200000
  RecycleSet=MemberSet(Size=0
    )
  )

TcpRing{Connections=[1]}
IpMonitor{Addresses=0}

2013-02-22 13:59:12.625/1.860 Oracle Coherence GE 12.1.2.0.0 <D5> (thread=Invocation:Management, member=2): Service Management joined the cluster with senior service member 1
2013-02-22 13:59:12.656/1.891 Oracle Coherence GE 12.1.2.0.0 <Info> (thread=main, member=2): Loaded Reporter configuration from "jar:file:/C:/Oracle7/coherence/lib/coherence.jar!/reports/report-group.xml"
2013-02-22 13:59:12.843/2.078 Oracle Coherence GE 12.1.2.0.0 <D5> (thread=DistributedCache:EclipseLinkJPA, member=2): Service EclipseLinkJPA joined the cluster with senior service member 1
Employee Timothy Gates, salary = $4245.89
New Employee details are Timothy Gates, salary = $4670.47
The response from the cache server displays a successful login to retrieve information from the database, as illustrated in Example 8-5. Note the logging information returned (in bold).
Example 8-5 Cache Server Response to Logging In to the Database
...
Started DefaultCacheServer...

2013-02-22 13:59:12.390/31.953 Oracle Coherence GE 12.1.2.0.0 <D5> (thread=Cluster, member=1): Member(Id=2, Timestamp=2013-02-22 13:59:12.203, Address=192.168.0.102:8090, MachineId=18578, Location=site:,machine:tpfaeffl-lap7,process:5436, Role=OracleHandsonRunEmployeeExample) joined Cluster with senior member 1
2013-02-22 13:59:12.640/32.203 Oracle Coherence GE 12.1.2.0.0 <D5> (thread=Invocation:Management, member=1): Member 2 joined Service Management with senior member 1
2013-02-22 13:59:12.875/32.438 Oracle Coherence GE 12.1.2.0.0 <D5> (thread=DistributedCache:EclipseLinkJPA, member=1): Member 2 joined Service EclipseLinkJPA with senior member 1
[EL Config]: metadata: The access type for the persistent class [class com.oracle.handson.Employees] is set to [FIELD].
[EL Config]: metadata: The target entity (reference) class for the many to one mapping element [field employee] is being defaulted to: class com.oracle.handson.Employees.
[EL Config]: metadata: The target entity (reference) class for the one to many mapping element [field employees] is being defaulted to: class com.oracle.handson.Employees.
[EL Config]: metadata: The alias name for the entity class [class com.oracle.handson.Employees] is being defaulted to: Employees.
[EL Config]: metadata: The table name for entity [class com.oracle.handson.Employees] is being defaulted to: EMPLOYEES.
[EL Config]: metadata: The column name for element [email] is being defaulted to: EMAIL.
[EL Config]: metadata: The column name for element [salary] is being defaulted to: SALARY.
[EL Config]: metadata: The primary key column name for the mapping element [field employee] is being defaulted to: EMPLOYEE_ID.
[EL Info]: EclipseLink, version: Eclipse Persistence Services - 2.4.2.v20130131-a7b9798
[EL Fine]: connection: Detected database platform: org.eclipse.persistence.platform.database.oracle.Oracle11Platform
[EL Config]: connection: connecting(DatabaseLogin(
   platform=>OraclePlatform
   user name=> "hr"
   datasource URL=> "jdbc:oracle:thin:@localhost:1521:xe"
))
[EL Config]: connection: Connected: jdbc:oracle:thin:@localhost:1521:xe
   User: HR
   Database: Oracle  Version: Oracle Database 11g Express Edition Release 11.2.0.2.0 - Production
   Driver: Oracle JDBC driver  Version: 11.1.0.7.0-Production
[EL Warning]: metadata: Reverting the lazy setting on the OneToOne or ManyToOne attribute [employee] for the entity class [class com.oracle.handson.Employees] since weaving was not enabled or did not occur.
[EL Info]: connection: file:/C:/home/oracle/workspaceNov/JPAProject/build/classes/_JPAProject login successful
[EL Fine]: sql: SELECT EMPLOYEE_ID, COMMISSION_PCT, DEPARTMENT_ID, EMAIL, FIRST_NAME, HIRE_DATE, JOB_ID, LAST_NAME, PHONE_NUMBER, SALARY, MANAGER_ID FROM EMPLOYEES WHERE (EMPLOYEE_ID = ?)
   bind => [190]
[EL Fine]: sql: SELECT EMPLOYEE_ID, COMMISSION_PCT, DEPARTMENT_ID, EMAIL, FIRST_NAME, HIRE_DATE, JOB_ID, LAST_NAME, PHONE_NUMBER, SALARY, MANAGER_ID FROM EMPLOYEES WHERE (EMPLOYEE_ID = ?)
   bind => [122]
[EL Fine]: sql: SELECT EMPLOYEE_ID, COMMISSION_PCT, DEPARTMENT_ID, EMAIL, FIRST_NAME, HIRE_DATE, JOB_ID, LAST_NAME, PHONE_NUMBER, SALARY, MANAGER_ID FROM EMPLOYEES WHERE (EMPLOYEE_ID = ?)
   bind => [100]
[EL Fine]: sql: SELECT EMPLOYEE_ID, COMMISSION_PCT, DEPARTMENT_ID, EMAIL, FIRST_NAME, HIRE_DATE, JOB_ID, LAST_NAME, PHONE_NUMBER, SALARY, MANAGER_ID FROM EMPLOYEES WHERE (EMPLOYEE_ID = ?)
   bind => [190]
[EL Fine]: sql: SELECT EMPLOYEE_ID, COMMISSION_PCT, DEPARTMENT_ID, EMAIL, FIRST_NAME, HIRE_DATE, JOB_ID, LAST_NAME, PHONE_NUMBER, SALARY, MANAGER_ID FROM EMPLOYEES WHERE (EMPLOYEE_ID = ?)
   bind => [122]
[EL Fine]: sql: SELECT EMPLOYEE_ID, COMMISSION_PCT, DEPARTMENT_ID, EMAIL, FIRST_NAME, HIRE_DATE, JOB_ID, LAST_NAME, PHONE_NUMBER, SALARY, MANAGER_ID FROM EMPLOYEES WHERE (EMPLOYEE_ID = ?)
   bind => [100]
[EL Fine]: sql: UPDATE EMPLOYEES SET SALARY = ? WHERE (EMPLOYEE_ID = ?)
   bind => [4670.47, 190]
2013-02-22 13:59:20.875/40.438 Oracle Coherence GE 12.1.2.0.0 <D5> (thread=Cluster, member=1): TcpRing disconnected from Member(Id=2, Timestamp=2013-02-22 13:59:12.203, Address=192.168.0.102:8090, MachineId=18578, Location=site:,machine:tpfaeffl-lap7,process:5436, Role=OracleHandsonRunEmployeeExample) due to a peer departure; removing the member.
2013-02-22 13:59:20.875/40.438 Oracle Coherence GE 12.1.2.0.0 <D5> (thread=Cluster, member=1): Member(Id=2, Timestamp=2013-02-22 13:59:20.875, Address=192.168.0.102:8090, MachineId=18578, Location=site:,machine:tpfaeffl-lap7,process:5436, Role=OracleHandsonRunEmployeeExample) left Cluster with senior member 1
2013-02-22 13:59:20.875/40.438 Oracle Coherence GE 12.1.2.0.0 <D5> (thread=DistributedCache:EclipseLinkJPA, member=1): Member 2 left service EclipseLinkJPA with senior member 1
2013-02-22 13:59:20.875/40.438 Oracle Coherence GE 12.1.2.0.0 <D5> (thread=Invocation:Management, member=1): Member 2 left service Management with senior member 1
