31 Displaying Master-Detail Data
This chapter describes how to create master-detail objects with data modeled from ADF Business Components, using ADF data controls and ADF Faces components. It describes how to display master-detail data by using prebuilt master-detail widgets, tables, trees and tree tables and how to work with selection events.
This chapter includes the following sections:
For information about using a selection list to populate a collection with a key value from a related master or detail collection, see Chapter 32, "Creating Databound Selection Lists and Shuttles".
31.1 About Displaying Master-Detail Data
There are many instances where data needs to be presented in a hierarchical manner. In a master-detail relationship, when the user changes the selected item in the master data object, the data set displayed in the detail data object changes with it. For example, selecting the television categories in the master object would display all the models of televisions in the detail object.
When using ADF Model in combination with ADF Faces UI components, you can declaratively create master-detail pages that display the data from multiple objects simultaneously when those objects have a master-detail relationship defined. ADF iterator bindings automatically manage the synchronization of the detail data objects displayed for a selected master data object.
In ADF Business Components, a master-detail relationship is established when a view link is created to associate two view object instances. As described in Section 5.1, "About View Objects", a view link represents the relationship between two view objects, which is usually, but not necessarily, based on a foreign-key relationship between the underlying data tables. The view link associates a row of one view object instance (the master object) with one or more rows of another view object instance (the detail object).
31.1.1 Master-Detail Tables, Forms, and Trees Use Cases and Examples
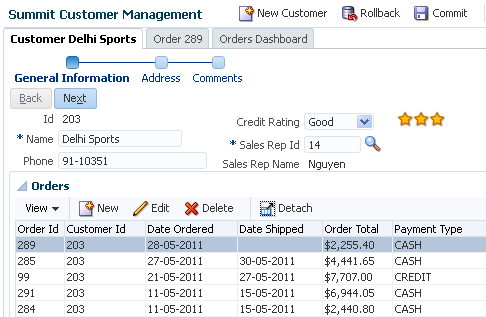
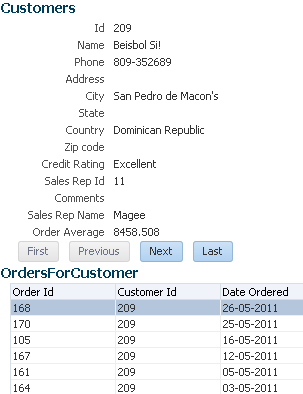
When objects have a master-detail relationship, you can declaratively create pages that display the data from both objects simultaneously. For example, the page shown in Figure 31-1 displays an entry for a customer in a form at the top of the page and a table of the customer's orders at the bottom of the page. This is possible because the objects have a master-detail relationship. In this example, the Customers view object is the master object and OrdersForCustomer is the detail object. ADF iterators automatically manage the synchronization of the detail data objects displayed for a selected master data object. Iterator bindings simplify building user interfaces that allow scrolling and paging through collections of data and drilling-down from summary to detail information.
You display master and detail objects in forms, tables, trees, and tree tables. You can display these objects on the same page or on separate pages. For example, you can display the master object in a table on one page and detail objects in a read-only form on another page.
A master object can have many detail objects, and each detail object can in turn have its own detail objects, down to many levels of depth. If one of the detail objects in this hierarchy is dropped from the Applications window as a master-detail form on a page, only its immediate parent master object displays on the page. The hierarchy will not display all the way up to the topmost parent object.
If you display the detail object as a tree or tree table object, it is possible to display the entire hierarchy with multiple levels of depth, starting with the topmost master object, and traversing detail children objects at each node.
Figure 31-1 shows an example of a master form with detail table. When the user navigates through the customers using the command buttons, the table lists the orders that the customer has made.
Figure 31-2 shows a tree that has two levels of nodes. You can use trees to display hierarchical information. In this example, a tree is used to display customers grouped by countries. The user can expand nodes to traverse down a branch of the tree to access the leaf items.
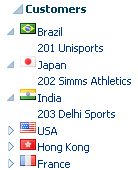
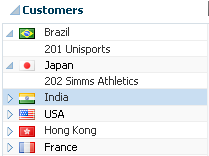
Figure 31-3 shows the same grouping of customers by country, but using a tree table instead of a tree. In addition to the hierarchical node levels of a tree, a tree table can also display column information for each node. You can also focus on subtrees as well as collapsing and expanding the elements.
31.1.2 Additional Functionality for Master-Detail Tables, Forms, and Trees
You may find it helpful to understand other Oracle ADF features before you configure or use the ADF Model layer. Additionally, you may want to read about what you can do with your model layer configurations. Following are links to other functionality that may be of interest.
-
ADF view objects and view links: Much of how the components display and function in the form is controlled by the corresponding view objects. For more information about creating view objects and establishing a master-detail hierarchy in your data model with view links, see Section 6.2, "Working with Multiple Tables in a Master-Detail Hierarchy."
-
ADF application modules: The Data Controls panel, from which you drag databound components to your pages, is populated with representations of view objects that you have added to application modules. For more information, see Chapter 13, "Implementing Business Services with Application Modules."
-
Adapter-based data controls: If you are using other types of business services, such as EJB components or web services, you can create data control for those business service as described in Developing Applications with Oracle ADF Data Controls.
-
ADF Model and data binding: When you create forms in an ADF web application, you use ADF Model and data binding. For more information, see Chapter 17, "Using ADF Model in a Fusion Web Application."
-
ADF Faces: You also use ADF Faces UI components. For detailed information about developing with ADF Faces, see Developing Web User Interfaces with Oracle ADF Faces.
-
ADF forms and tables: If you want to modify the default forms or tables, see Section 28.3, "Creating Basic Forms Using Data Control Collections" or Section 29.2, "Creating a Basic Table."
-
Task flows: If your form takes part in a transaction, then you may need to use an ADF task flow to invoke certain operations before or after the form is rendered. For more information, see Part V, "Creating ADF Task Flows".
-
Event handling: You may need to write listener methods to process client-side events. For more information, see the "Handling Events" chapter of Developing Web User Interfaces with Oracle ADF Faces.
-
Managed beans: You may need to create managed beans for event handling and other front-end processing. For more information about creating and using managed beans, see Section 26.4, "Using a Managed Bean in a Fusion Web Application."
31.2 Prerequisites for Master-Detail Tables, Forms, and Trees
Master-detail tables, forms, trees, and tree tables require a master-detail relationship to be established in the data model. That master-detail relationship is then reflected in the Data Controls panel, from where you can drag and drop objects to declaratively create pages that display master-detail data.
In an ADF Business Components application, you indicate a master-detail relationship by creating a view link between two view objects. Then you add the master view object and the detail view object instances to the application module data model. For more information, see Section 6.2.4, "How to Enable Active Master-Detail Coordination in the Data Model."
Note:
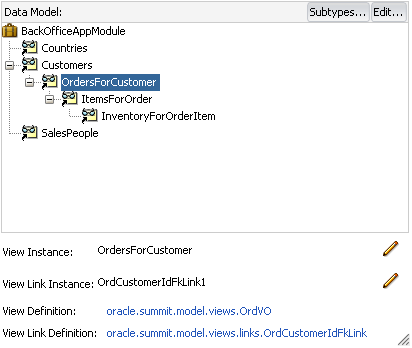
For data controls based on other business services, such as web services or EJB session beans, the master-detail relationship is typically inferred from standard mechanisms within those services, such as definition files for web services orJoinColumn annotations in JPA-based beans.For example, in the Summit sample application for Oracle ADF, there is a view link from the CustomerVO view object to the OrdVO view object based on the CustomerId attribute, both contained in the application module data model, as shown in Figure 31-4. A change in the current row of the master view object instance causes the row set of the detail view object instance to refresh to include the details for the current master.
Note:
In the Summit ADF sample application, the view link between theCustomerVO view object and OrdVO view object is a one-way relationship. If the view link were bidirectional and both sets of master and detail view objects were added to the application module data model, then the Data Controls panel would also display the OrdersForCustomer collection at the same node level as the Customers collection, and the detail instance of the OrdersForCustomer collection as a child of the Customers collection.31.2.1 How to Identify Master-Detail Objects on the Data Controls Panel
You can identify master-detail objects by looking at the hierarchy in the Data Controls panel.
It may help to understand the basics of master-detail relationships. For more information, see Section 31.2, "Prerequisites for Master-Detail Tables, Forms, and Trees."
You may also find it useful to understand additional functionality that can be used with master-detail tables and trees. For more information, see Section 31.1.2, "Additional Functionality for Master-Detail Tables, Forms, and Trees."
You will need to complete this task:
-
Create an application module that contains instances of the view objects and view links that establish the desired master-detail hierarchy, as described in Section 13.2, "Creating and Modifying an Application Module." Alternatively, if you are using another type of business service, create a data control for that business service as described in "Exposing Business Services with Data Controls" in Developing Applications with Oracle ADF Data Controls.
To identify master-detail objects:
-
In the Applications window, open the Data Controls panel, expand any collection nodes, and look for collection child nodes of those collections.
Any child collection node of a collection node represents the detail part of a master-detail relationship with the parent node. A parent collection can be part of a master-detail relationship with multiple child collections. And collections can be nested in multiple layers, meaning that a collection can be the detail part of one master-detail relationship and the master part of another master-detail relationship.
Figure 31-5 shows two master-detail related collections in the Data Controls panel of the Summit ADF sample application. The Customers collection is an instance of the CustomerVO view object, and the OrdersForCustomer collection, which appears as a child of the Customers collection, is an instance of the OrdVO view object.
Note:
The master-detail hierarchy displayed in the Data Controls panel does not reflect the cardinality of the relationship (that is, one-to-many, one-to-one, many-to-many). The hierarchy simply shows which collection (the master) is being use to retrieve one or more objects from another collection (the detail).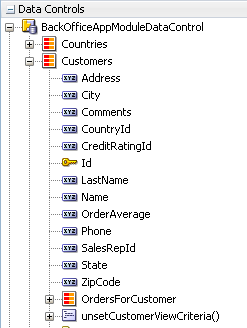
The master-detail hierarchy on the Data Controls panel reflects the hierarchy defined in the application module data model, as shown in Figure 31-4. For more information about the icons displayed on the Data Controls panel, see Section 17.4.1, "How to Use the Data Controls Panel."
31.3 Using Tables and Forms to Display Master-Detail Objects
You can create master-detail functionality on a page with form and table components. You can do so either by creating individual form and table components or by using pre-built widgets that encompass both the master and detail components.
The pre-built widgets enable you to create a read-only master-detail browse page in a single declarative action using the Data Controls panel. All you have to do is drop the detail collection on the page and choose the type of widget you want to use. The generated components include range navigation that enables the end user to scroll through the data objects in collections. You can delete unwanted attributes by removing the text field or column from the page.
Figure 31-6 shows an example of prebuilt master-detail widget, which displays general order information in a form at the top of the page and order details in a table at the bottom of the page. When the user clicks the Next button to scroll through the records in the master data at the top of the page, the page automatically updates to display the detail data for the currently displayed master record.
There are some cases when the pre-built master-detail UI components that JDeveloper provides cannot provide the functionality you require. For example, you may need to make a component editable or bind components programatically instead of using the master-detail UI components. In these cases, you can create master-detail pages by creating forms and tables separately. When components are created from a collection and nested collection, the nested collection's iterator binding manages coordination between the master and detail component automatically. For more information, see Section 31.3.2, "How to Create Master-Detail Forms from Separate Components" and Section 31.3.5, "How to Display Master-Detail Components on Separate Pages."
Note:
You can also use thedetailStamp facet of a master table to display the detail for selected rows. See Section 29.6.4, "How to Create a Dynamic Table with a detailStamp Facet" for information on doing so with a dynamic component.31.3.1 How to Display Master-Detail Objects in Tables and Forms Using Master-Detail Widgets
The Data Controls panel enables you to create both the master and detail widgets on one page with a single declarative action using prebuilt master-detail forms and tables. These prebuilt master-detail widgets are read-only. For information about displaying master and detail data on separate pages, see Section 31.3.2, "How to Create Master-Detail Forms from Separate Components." For information about displaying master and detail data on separate pages, see Section 31.3.5, "How to Display Master-Detail Components on Separate Pages."
It may help to understand the options that are available to you when you create a master-detail table and form. For more information, see Section 31.3, "Using Tables and Forms to Display Master-Detail Objects."
You may also find it useful to understand additional functionality that can be used with master-detail tables and trees. For more information, see Section 31.1.2, "Additional Functionality for Master-Detail Tables, Forms, and Trees."
You will need to complete these tasks:
-
Create an application module that contains instances of the view objects and view links that establish the desired master-detail hierarchy, as described in Section 13.2, "Creating and Modifying an Application Module." Alternatively, if you are using another type of business service, create a data control for that business service as described in "Exposing Business Services with Data Controls" in Developing Applications with Oracle ADF Data Controls.
-
Create a JSF page as described in Section 26.3, "Creating a Web Page."
To create a master-detail page using the prebuilt ADF master-detail forms and tables:
-
From the Data Controls panel, locate the detail object, as described in Section 31.2.1, "How to Identify Master-Detail Objects on the Data Controls Panel."
-
Drag and drop the detail object onto the JSF page.
-
From the Master-Detail submenu of the context menu, choose one of the following components:
-
ADF Master Table, Detail Form: Displays the master objects in a read-only table and the detail objects in a read-only form under the table.
When a specific data object is selected in the master table, the first related detail data object is displayed in the form below it. The user must use the form navigation to scroll through each subsequent detail data object.
-
ADF Master Form, Detail Table: Displays the master objects in a read-only form and the detail objects in a read-only table under the form.
When a specific master data object is displayed in the form, the related detail data objects are displayed in a table below it.
-
ADF Master Form, Detail Form: Displays the master and detail objects in separate read-only forms.
When a specific master data object is displayed in the top form, the first related detail data object is displayed in the form below it. The user must use the form navigation to scroll through each subsequent detail data object.
-
ADF Master Table, Detail Table: Displays the master and detail objects in separate read-only tables.
When a specific master data object is selected in the top table, the first set of related detail data objects is displayed in the table below it.
If you want to modify the default forms or tables, see Section 28.10, "Modifying the UI Components and Bindings on a Form" and Section 29.7, "Modifying the Attributes Displayed in the Table."
-
31.3.2 How to Create Master-Detail Forms from Separate Components
Instead of using the pre-built master-detail widgets to create master-detail forms, you can create table and form components separately from data control objects that have a master-detail relationship and take advantage of the detail object's iterator bindings to provide the master-detail coordination. Creating master-detail forms from separate components enables you more flexibility in how the components and their bindings are generated.
It may help to understand the options that are available to you when you create a master-detail table and form. For more information, see Section 31.3, "Using Tables and Forms to Display Master-Detail Objects."
You may also find it useful to understand additional functionality that can be used with master-detail tables and trees. For more information, see Section 31.1.2, "Additional Functionality for Master-Detail Tables, Forms, and Trees."
You will need to complete these tasks:
-
Create an application module that contains instances of the view objects and view links that establish the desired master-detail hierarchy, as described in Section 6.2.2, "How to Create a Master-Detail Hierarchy Based on View Objects Alone." Alternatively, if you are using another type of business service, create a data control for that business service as described in "Exposing Business Services with Data Controls" in Developing Applications with Oracle ADF Data Controls.
-
Create a JSF page as described in Section 26.3, "Creating a Web Page."
To create a master-detail form with individual components:
-
Create the detail widget by dragging a child collection from the Data Controls panel and dropping it as a table or a form on the JSF page or fragment that corresponds to the detail view activity. For more information, see Section 31.2.1, "How to Identify Master-Detail Objects on the Data Controls Panel."
For more information on creation of the individual components, see Section 28.3, "Creating Basic Forms Using Data Control Collections" and Section 29.2, "Creating a Basic Table."
-
Create the master widget by dragging the collection that is the parent of the collection in step 1 and dropping it as a table or a form on the JSF page or fragment that corresponds to the master view activity.
31.3.3 What Happens When You Create Master-Detail Tables and Forms
When you drag and drop a collection from the Data Controls panel, JDeveloper does many things for you, including adding code to the JSF page and the corresponding entries in the page definition file. For a general description of what happens and what is created when you use the Data Controls panel, see Section 17.4.2, "What Happens When You Use the Data Controls Panel."
31.3.3.1 Code Generated in a Master-Detail JSF Page
The JSF code generated for a prebuilt master-detail widget is similar to the JSF code generated when you use the Data Controls panel to create a read-only form or table. If you are building your own master-detail widgets, you might want to consider including similar components that are automatically included in the prebuilt master-detail tables and forms.
The tables and forms in the prebuilt master-detail widgets include a panelHeader tag that contains the name of the data control populating the master form or table. You can change this label as needed using a string or an EL expression that binds to a resource bundle.
If there is more than one object in a collection, a form in a prebuilt master-detail widget includes four button tags for range navigation: First, Previous, Next, and Last. These range navigation buttons enable the user to scroll through the objects in the collection. The actionListener attribute of each button is bound to a data control operation, which performs the navigation. The execute property used in the actionListener binding, invokes the operation when the button is clicked. (If the form displays a single object, JDeveloper automatically omits the range navigation components.) For more information about range navigation, see Section 28.5, "Incorporating Range Navigation into Forms."
Tip:
If you drop an ADF Master Table, Detail Form or ADF Master Table, Detail Table widget on the page, the parent tag of the detail component (for example,panelHeader tag or table tag) automatically has the partialTriggers attribute set to the id of the master component (see Section 29.4.1, "How to Create an Input Table" for more information about partial triggers). At runtime, the partialTriggers attribute causes only the detail component to be rerendered when the user makes a selection in the master component, which is called partial page rendering. Partial page rendering is used because only the detail component needs to be rerendered to display the new data. The table does not need to be rerendered when the user simply makes a selection in the facet.31.3.3.2 Binding Objects Defined in a Master-Detail Page Definition File
Example 31-1 shows the page definition file created for a master-detail page that was created by dropping the OrdersFromCustomer collection, which is a detail object under the Customers object, on the page as an ADF Master Form, Detail Table.
The executables element defines two iterators: one for the master object and one for the detail object. At runtime, the data model and the row set iterator for the detail view object instance keep the row set of the detail view object refreshed to the correct set of rows for the current master row as that current row changes. For more information, see Section 31.3.4, "What Happens at Runtime: ADF Iterator for Master-Detail Tables and Forms".
The bindings element defines the value bindings for the form and the table. The attribute bindings that populate the text fields in the form are defined in the attributeValues elements. The id attribute of the attributeValues element contains the name of each data attribute, and the IterBinding attribute references an iterator binding to display data from the master object in the text fields.
The range navigation buttons in the form are bound to the action bindings defined in the action elements. As in the attribute bindings, the IterBinding attribute of the action binding references the iterator binding for the master object.
The table, which displays the detail data, is bound to the table binding object defined in the table element. The IterBinding attribute references the iterator binding for the detail object.
For more information about the elements and attributes of the page definition file, see Section A.8, "pageNamePageDef.xml."
Example 31-1 Binding Objects Defined in the Page Definition for a Master-Detail Page
<executables>
  <variableIterator id="variables"/>
  <iterator Binds="Customers" RangeSize="25" DataControl="BackOfficeAppModuleDataControl" id="CustomersIterator"
            ChangeEventPolicy="ppr"/>
  <iterator Binds="OrdersForCustomer" RangeSize="25" DataControl="BackOfficeAppModuleDataControl"
            id="OrdersForCustomerIterator" ChangeEventPolicy="ppr"/>
</executables>
<bindings>
  <action IterBinding="CustomersIterator" id="First" RequiresUpdateModel="true" Action="first"/>
  <action IterBinding="CustomersIterator" id="Previous" RequiresUpdateModel="true" Action="previous"/>
  <action IterBinding="CustomersIterator" id="Next" RequiresUpdateModel="true" Action="next"/>
  <action IterBinding="CustomersIterator" id="Last" RequiresUpdateModel="true" Action="last"/>
  <attributeValues IterBinding="CustomersIterator" id="Id">
    <AttrNames>
      <Item Value="Id"/>
    </AttrNames>
  </attributeValues>
  <attributeValues IterBinding="CustomersIterator" id="Name">
    <AttrNames>
      <Item Value="Name"/>
    </AttrNames>
  </attributeValues>
  <attributeValues IterBinding="CustomersIterator" id="Phone">
    <AttrNames>
      <Item Value="Phone"/>
    </AttrNames>
  </attributeValues>
. . .
  <tree IterBinding="OrdersForCustomerIterator" id="OrdersForCustomer">
    <nodeDefinition DefName="oracle.summit.model.views.OrdVO"
                    Name="OrdersForCustomer0">
      <AttrNames>
        <Item Value="Id"/>
        <Item Value="CustomerId"/>
        <Item Value="DateOrdered"/>
...
      </AttrNames>
    </nodeDefinition>
  </tree>
</bindings>
Note:
For data controls that are based on other types of business services, such as EJB session beans,accessorIterator elements are used instead of iterator elements to handle the iterator binding.31.3.4 What Happens at Runtime: ADF Iterator for Master-Detail Tables and Forms
At runtime, an ADF iterator determines which row from the master table object to display in the master-detail form. When the form first displays, the first master table object row appears highlighted in the master section of the form. Detail table rows that are associated with the master row display in the detail section of the form.
As described in Section 31.3.3.2, "Binding Objects Defined in a Master-Detail Page Definition File," ADF iterators are associated with underlying rowsetIterator objects. These iterators manage which data objects, or rows, currently display on a page. At runtime, the row set iterators manage the data displayed in the master and detail components.
Both the master and detail row set iterators listen to row set navigation events, such as the user clicking the range navigation buttons, and display the appropriate row in the UI. In the case of the default master-detail components, the row set navigation events are the command buttons on a form (First, Previous, Next, Last).
The row set iterator for the detail collection manages the synchronization of the detail data with the master data. Because of the underlying view link from the master view object to the detail view object, the detail row set iterator listens for row navigation events in both the master and detail collections. If a row set navigation event occurs in the master collection, the detail row set iterator automatically executes and returns the detail rows related to the current master row.
31.3.5 How to Display Master-Detail Components on Separate Pages
The default master-detail components display the master-detail data on a single page. However, using the master and detail objects on the Data Controls panel, you can also display the collections on separate pages (or on separate fragments on the same page), and still have the binding iterators manage the synchronization of the master and detail objects.
It may help to understand the options that are available to you when you create a master-detail table and form. For more information, see Section 31.3, "Using Tables and Forms to Display Master-Detail Objects."
You may also find it useful to understand additional functionality that can be used with master-detail tables and trees. For more information, see Section 31.1.2, "Additional Functionality for Master-Detail Tables, Forms, and Trees."
You will need to complete this task:
-
Create an application module that contains instances of the view objects and view links that establish the desired master-detail hierarchy, as described in Section 6.2.2, "How to Create a Master-Detail Hierarchy Based on View Objects Alone." Alternatively, if you are using another type of business service, create a data control for that business service as described in "Exposing Business Services with Data Controls" in Developing Applications with Oracle ADF Data Controls.
To create master and detail objects on separate pages:
-
Create an ADF task flow as described in Section 20.2.1, "How to Create a Task Flow."
If you plan to use page fragments to hold the master and detail components, select the Create with Page Fragments checkbox in this step.
-
Add two view activities to the task flow, one for the master view and one for the detail view, as described in Section 20.3.1, "How to Add an Activity to a Task Flow."
-
In the task flow definition file, add a control flow case from the master view to the detail view, and a control flow case to return from the detail view to the master view. For more information, see Section 20.4.1, "How to Add a Control Flow Rule to a Task Flow."
-
Create two JSF pages or two JSF fragments to hold the master and detail components.
You can create a page or fragment for a view activity by clicking on the view activity in the overview editor for task flow.
If you already have pages or fragments that you want to map to the view activities, you can do so by selecting the view activity in the overview editor for the task flow, navigating to the Properties window, and specifying the JSF page or fragment in the
Pageproperty. -
Create the detail component by dragging a child collection from the Data Controls panel and dropping it as a table or a form on the JSF page or fragment that corresponds to the detail view activity. For more information, see Section 31.2.1, "How to Identify Master-Detail Objects on the Data Controls Panel."
For more information on creating forms and tables, see Section 28.3, "Creating Basic Forms Using Data Control Collections" and Section 29.2, "Creating a Basic Table."
-
Create the master component by dragging the collection that is the parent of the collection in step 5 and dropping it as a table or a form on the JSF page or fragment that corresponds to the master view activity.
-
Add command buttons or links to each page.
-
In the
actionattribute of each button, specify the control flow case that is used to navigate to the other page. You can get this value from thefrom-outcomeproperty of the corresponding control flow case.
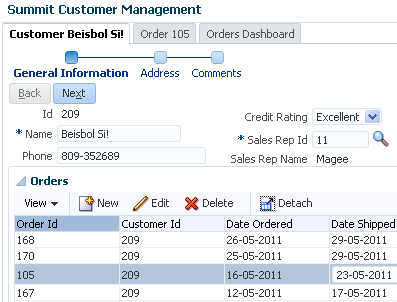
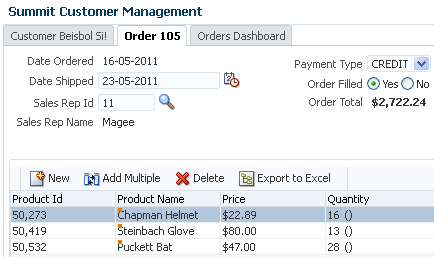
For example, in the Summit ADF sample application, the Customers.jsff fragment contains a table created from the OrdersFromCustomer collection. That table serves as both a detail view of customer orders and a master view for the Order Items table that is created from the ItemsFromOrder collection and is located inOrders.jsff (and appears on the Order tab). Figure 31-7 shows the Orders table as a detail view for a customer, and Figure 31-8 shows the order that is selected in that table and displays that order's detail. Though the OrdersFromCustomer collection is used in both the Customers.jsff and Orders.jsff fragments, it does not have to be used in both places to maintain master-detail coordination. The iterator binding for the ItemsFromOrder maintains the master -detail coordination, even across the page fragments.
31.4 Using Trees to Display Master-Detail Objects
In addition to tables and forms, you can also display master-detail data in hierarchical trees. The ADF Faces tree component is used to display hierarchical data. It can display multiple root nodes that are populated by a binding on a master object. Each root node in the tree may have any number of branches, which are populated by bindings on detail objects. A tree can have multiple levels of nodes, each representing a detail object of the parent node. Each node in the tree is indented to show its level in the hierarchy.
The tree component includes mechanisms for expanding and collapsing the tree nodes; however, it does not have focusing capability. If you need to use focusing, consider using the ADF Faces treeTable component (for more information, see Section 31.5, "Using Tree Tables to Display Master-Detail Objects"). By default, the icon for each node in the tree is a folder; however, you can use your own icons for each level of nodes in the hierarchy.
Figure 31-9 shows an example of a tree located in the Customers.jsff fragment of the Summit ADF sample application. The tree displays two levels of nodes: root and branch. The root nodes display countries. The branch nodes display customers.
31.4.1 How to Display Master-Detail Objects in Trees
A tree consists of a hierarchy of nodes, where each subnode is a branch off a higher level node. Each node level in a databound ADF Faces tree component is populated by a different data collection. In JDeveloper, you define a databound tree using the Edit Tree Binding dialog, which enables you to define the rules for populating each node level in the tree. There must be one rule for each node level in the hierarchy. Each rule defines the following node-level properties:
-
The data collection that populates that node level
-
The attributes from the data collection that are displayed at that node level
To enable creation of the Customers tree in the Summit ADF sample application as shown in Figure 31-9, a view object, CountryVO was first created to return a list of countries. Another view object, CustomerVO was then created to return customers. And a view link was created from CountryVO to CustomerVO in order to establish a master-detail relationship.
In this case, it is also possible to add a third-level and fourth-level nodes, since CustomerVO has a view link to the view object OrdVO, and OrdVO has a view link to ItemVO.
In the case where a branch of the tree is recursive, a single view object accompanied by a self-referential view link must be defined in the data model project. For example, take a collection defined by EmployeesView, where the root node of each branch is specified by the ManagerId attribute and the child nodes of the same branch are the employees (also known as "direct reports") who are related to the ManagerId. The source and destination view object named by the self-referential view link are both defined as EmployeesView, but the destination can be renamed to DirectReports for clarify. For more information about creating self-referential view links, see Section 6.3.1, "How to Create a Recursive Master-Detail Hierarchy for an Entity-Based View Object."
Note:
When your business services are based on ADF Business Components, you can programmatically access a master view object's view link accessor attribute to return a detail object to be displayed as a branch of the current node level. For information about view link accessors, see Section 6.2.6, "How to Access the Detail Collection Using the View Link Accessor."It may help to understand the options that are available to you when you create a master-detail table and form. For more information, see Section 31.4, "Using Trees to Display Master-Detail Objects."
You may also find it useful to understand additional functionality that can be used with master-detail tables and trees. For more information, see Section 31.1.2, "Additional Functionality for Master-Detail Tables, Forms, and Trees."
You will need to complete these tasks:
-
Create the master-detail view objects and view links in the data model project, optimize the performance of row set access for tree components, and add the master view object (and optionally the detail view object) to the application module. For details about setting the optimization flag Retain Row Set, see Section 6.2.6.3, "Optimizing View Link Accessor Access to Display Master-Detail Data." For information on creating the master-detail hierarchy and adding it to the application module, see Section 6.2.2, "How to Create a Master-Detail Hierarchy Based on View Objects Alone."
Alternatively, if you are using another type of business service, create a data control for that business service as described in "Exposing Business Services with Data Controls" in Developing Applications with Oracle ADF Data Controls.
-
Create a JSF page as described in Section 26.3, "Creating a Web Page."
To display master-detail objects in a tree:
-
Drag the master object from the Data Controls panel, and drop it onto the page. This should be the master data that will represent the root level of the tree.
-
From the context menu, choose Tree > ADF Tree.
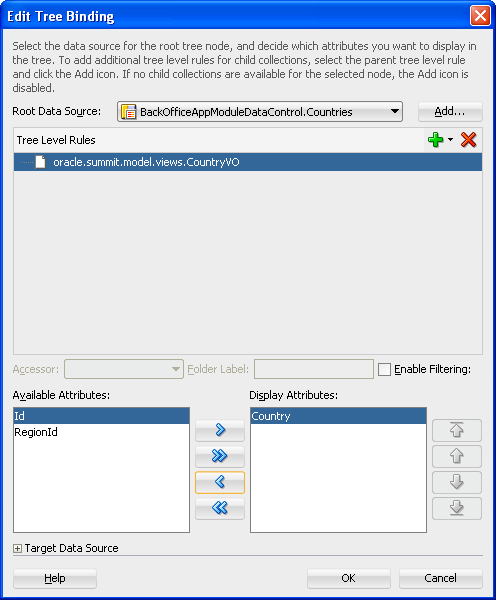
JDeveloper displays the Edit Tree Binding dialog, as shown in Figure 31-10. You use the binding editor to define a rule for each level that you want to appear in the tree.
When the dialog first appears, the collection that you dragged is displayed in the Root Data Source dropdown list and the corresponding view object is displayed in the Tree Level Rules list. This will represent the master data collection.
Tip:
If you don't see the data collection you want in the Root Data Source list, click the Add button. In the Add Data Source dialog, select a data control and an iterator name to create a new data source. Then click the Add Rule icon and select Add Rule to add the master rule. -
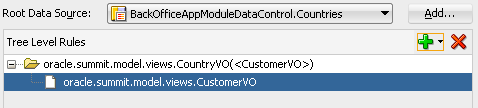
Click the Add Rule icon and then select a detail collection to add to the Tree Level Rules list.
A detail data source should appear under the master data source, as shown in Figure 31-11.
If you are creating a tree with a recursive master-detail hierarchy, then you only need to define a rule that specifies a data source with a self accessor. A recursive tree displays root nodes based on a single collection and displays the child nodes from the attributes of a self accessor that recursively fetches data from that collection. The recursive tree differs from a typical master-detail tree because it requires only a single rule to define the branches of the tree. A recursive data source should display the data source followed by the name of the self accessor in brackets, as shown in Figure 31-12.
Repeat this step for any additional nodes (or further levels of hierarchy) that you want to add to the tree.
-
In the Tree Level Rules list, select one of the rules.
-
In the bottom part of the dialog, set the attribute or attributes that you want to be used for the node's display by shuttling those attributes to the to the Display Attributes list.
-
Click OK.

31.4.2 What Happens When You Create an ADF Databound Tree
When you drag and drop from the Data Controls panel, JDeveloper does many things for you. For a general description of what happens and what is created when you use the Data Controls panel, see Section 17.4.1, "How to Use the Data Controls Panel."
When you create a databound tree using the Data Controls panel, JDeveloper adds binding objects to the page definition file, and it also adds the tree tag to the JSF Page. The resulting UI component is fully functional and does not require any further modification.
31.4.2.1 Code Generated in the JSF Page
Example 31-2 shows the code generated in a JSF page when you use the Data Controls panel to create a tree. This sample tree displays two levels of nodes: countries and customers. The Countries collection was used to populate the root node.
Example 31-2 Code in a JSF Page for a Databound Tree
<af:tree value="#{bindings.Countries.treeModel}"
          var="node"
          selectionListener="#{bindings.Countries.treeModel.makeCurrent}"
          rowSelection="single" id="t1"
   <f:facet name="nodeStamp">
      <af:outputText value="#{node}" id="ot1"/>
   </f:facet>
</af:tree>
By default, the af:tree tag is created inside a form. The value attribute of the tree tag contains an EL expression that binds the tree component to the Countries tree binding object in the page definition file. The treeModel property in the binding expression refers to an ADF class that defines how the tree hierarchy is displayed, based on the underlying data model. The var attribute provides access to the current node.
In the f:facet tag, the nodeStamp facet is used to display the data for each node. Instead of having a component for each node, the tree repeatedly renders the nodeStamp facet, similar to the way rows are rendered for the ADF Faces table component.
The ADF Faces tree component uses an instance of the oracle.adf.view.faces.model.PathSet class to display expanded nodes. This instance is stored as the treeState attribute on the component. You may use this instance to programmatically control the expanded or collapsed state of an element in the hierarchy. Any element contained by the PathSet instance is deemed expanded. All other elements are collapsed. For more information, see "What You May Need to Know About Programmatically Expanding and Collapsing Nodes" in Developing Web User Interfaces with Oracle ADF Faces.
31.4.2.2 Binding Objects Defined in the Page Definition File
Example 31-3 shows the binding objects defined in the page definition file that pertain to the Countries ADF databound tree in the Summit ADF sample application.
Example 31-3 Binding Objects Defined in the Page Definition File for a Databound Tree
<executables>
...
      <iterator Binds="Countries" RangeSize="25"
                DataControl="BackOfficeAppModuleDataControl"
                id="CountriesIterator"/>
</executables>
<bindings>
...
   <tree IterBinding="CountriesIterator" id="Countries">
      <nodeDefinition DefName="oracle.summit.model.views.CountryVO"
                      Name="Countries0">
         <AttrNames>
            <Item Value="Country"/>
         </AttrNames>
         <Accessors>
            <Item Value="CustomerVO"/>
         </Accessors>
      </nodeDefinition>
      <nodeDefinition DefName="oracle.summit.model.views.CustomerVO"
                      Name="Countries1"
                      TargetIterator="${bindings.CustomersIterator}">
         <AttrNames>
            <Item Value="Id"/>
            <Item Value="Name"/>
         </AttrNames>
      </nodeDefinition>
   </tree>
</bindings>
The page definition file contains the rule information defined in the Tree Binding Editor. In the executables element, notice that although the tree displays two levels of nodes, only one iterator binding object is needed. This iterator iterates over the master collection, which populates the root nodes of the tree. The accessor you specified in the node rules returns the detail data for each branch node.
The tree element is the value binding for all the attributes displayed in the tree. The iterBinding attribute of the tree element references the iterator binding that populates the data in the tree. The AttrNames element within the tree element defines binding objects for all the attributes in the master collection. However, the attributes that you select to appear in the tree are defined in the AttrNames elements within the nodeDefinition elements.
The nodeDefinition elements define the rules for populating the nodes of the tree. There is one nodeDefinition element for each node, and each one contains the following attributes and subelements:
-
DefName: An attribute that contains the fully qualified name of the data collection that will be used to populate the node. -
id: An attribute that defines the name of the node. -
AttrNames: A subelement that defines the attributes that will be displayed in the node at runtime. -
Accessors: A subelement that defines the accessor attribute that returns the next branch of the tree.
The order of the nodeDefintion elements within the page definition file defines the order or level of the nodes in the tree, where the first nodeDefinition element defines the root node. Each subsequent nodeDefinition element defines a subnode of the one before it.
For more information about the elements and attributes of the page definition file, see Appendix A, "pageNamePageDef.xml."
31.4.3 What Happens at Runtime: How an ADF Databound Tree Is Displayed
Tree components use org.apache.myfaces.trinidad.model.TreeModel to access data. This class extends CollectionModel, which is used by the ADF Faces table component to access data. For more information about the TreeModel class, refer to the ADF Faces Javadoc.
When a page with a tree is displayed, the iterator binding on the tree populates the root nodes. When a user collapses or expands a node to display or hide its branches, a DisclosureEvent event is sent. The isExpanded method on this event determines whether the user is expanding or collapsing the node. The DisclosureEvent event has an associated listener.
The DisclosureListener attribute on the tree is bound to the accessor attribute specified in the node rule defined in the page definition file. This accessor attribute is invoked in response to the DisclosureEvent event; in other words, whenever a user expands the node the accessor attribute populates the branch nodes.
31.4.4 How to Synchronize Other Parts of a Page With a Tree Selection
In addition to synchronizing a detail view with a master view, you can synchronize other parts of a page with a tree selection. For each node definition (rule), you can specify an optional TargetIterator property and set it to an EL expression for an iterator binding in the current binding container. The expression is evaluated at runtime when the user selects a row in the tree. The iterator binding's view row key attributes match (in order, number, and data type) the view row key of the iterator from which the nodeDefinition type's rows are retrieved for the tree. At runtime, when the tree control receives a selectionChanged event, it passes in the list of keys for each level of the tree. These keys uniquely identify the selected node.
Note:
You can view a page'snodeDefinition elements by expanding a node binding in the page definition editor. These are the same tree binding rules that you can configure in the tree binding dialog.The tree binding starts at the top of the tree. For each tree level whose key is present in the Currently Selected Tree Node Keys list, if there is a TargetIterator property configured for that nodeDefinition, the tree binding performs a setCurrentRowWithKey() operation on the selected target iterator. It uses the key from the appropriate level of the Currently Selected Tree Node Keys list.
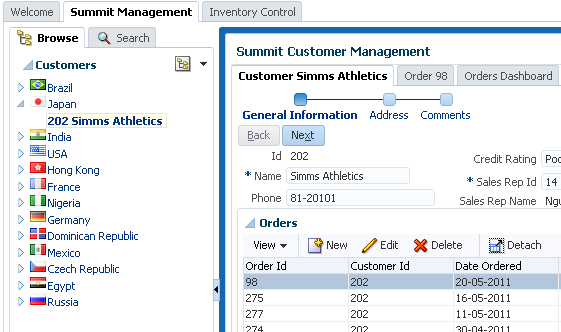
For example, the Summit ADF sample application contains a tree that displays countries at the top node and customers at the second level. When a user selects a customer in the tree, a form displaying the customer information is displayed in the Summit Customer Management panel of the page as shown in Figure 31-13. This functionality consists of a tree that was created from the Countries data control object, a form created from the Customers object, and a detail table created from the OrdersFromCustomer object (which is nested under Customers in the Data Controls panel).
It may help to understand the options that are available to you when you create a tree. For more information, see Section 31.4, "Using Trees to Display Master-Detail Objects."
You may also find it useful to understand additional functionality that can be used with master-detail tables and trees. For more information, see Section 31.1.2, "Additional Functionality for Master-Detail Tables, Forms, and Trees."
You will need to complete these tasks:
-
Create the master-detail view objects and view links in the data model project, optimize the performance of row set access for tree components, and add the master view object (and optionally the detail view object) to the application module. For details about setting the optimization flag Retain Row Set, see Section 6.2.6.3, "Optimizing View Link Accessor Access to Display Master-Detail Data." For information on creating the master-detail hierarchy and adding it to the application module, see Section 6.2.2, "How to Create a Master-Detail Hierarchy Based on View Objects Alone."
Alternatively, if you are using another type of business service, create a data control for that business service as described in "Exposing Business Services with Data Controls" in Developing Applications with Oracle ADF Data Controls.
-
Create a JSF page as described in Section 26.3, "Creating a Web Page."
To synchronize another part of the page with the tree selection:
-
From the Data Controls panel, drag the detail collection from which a record will be displayed based on the user selection in a tree, and drop it as a form or another databound component.
-
From the Data Controls panel, drag the parent collection of the detail collection that you just dropped and choose Create > Tree > ADF Tree (or ADF Tree Table).
-
In the Edit Tree Binding dialog, configure tree binding rules for all of the levels of the tree hierarchy as described in Section 31.4.1, "How to Display Master-Detail Objects in Trees," and leave the dialog open.
-
Select the detail tree-level rule that corresponds to the same collection that is used in step 1.
-
Expand the Target Data Source node and click the EL Picker button.
-
In the Variables dialog, expand ADF Bindings, expand bindings, and select the iterator binding for the component that you created in step 1.
The expression will display in the Expression text area. The expression should look something like
${bindings.CustomersIterator}. This expression will then be used to set the target iterator when a user clicks a detail node. -
Click OK to exit the Variables dialog, and click OK to exit the Edit Tree Binding dialog.
31.5 Using Tree Tables to Display Master-Detail Objects
Use the ADF Faces treeTable component to display a hierarchy of master-detail collections in a table. The advantage of using a treeTable component rather than a tree component is that the treeTable component provides a mechanism that enables users to focus the view on a particular node in the tree.
For example, you can create a tree table that displays levels of nodes for countries and customers where each root node represents an individual country. The branches off the root nodes display the customers for that country. As with trees, to create such a tree table, it is necessary to have master-detail relationships between the collections in the hierarchy.
A databound ADF Faces treeTable displays one root node at a time, but provides navigation for scrolling through the different root nodes. Each root node can display any number of branch nodes. Every node is displayed in a separate row of the table, and each row provides a focusing mechanism in the leftmost column.
You can edit the following treeTable component properties in the Properties window:
-
Range navigation: The user can click the Previous and Next navigation buttons to scroll through the root nodes.
-
List navigation: The list navigation, which is located between the Previous and Next buttons, enables the user to navigate to a specific root node in the data collection using a selection list.
-
Node expanding and collapsing mechanism: The user can open or close each node individually or use the Expand All or Collapse All command links. By default, the icon for opening and closing the individual nodes is an arrowhead with a plus or minus sign. You can also use a custom icon of your choosing.
-
Focusing mechanism: When the user clicks on the focusing icon (which is displayed in the leftmost column) next to a node, the page is redisplayed showing only that node and its branches. A navigation link is provided to enable the user to return to the parent node.
31.5.1 How to Display Master-Detail Objects in Tree Tables
The steps for creating an ADF Faces databound tree table are exactly the same as those for creating an ADF Faces databound tree, except that you drop the data collection as an ADF Tree Table instead of an ADF Tree. For more information, see Section 31.4.1, "How to Display Master-Detail Objects in Trees."
31.5.2 What Happens When You Create a Databound Tree Table
When you drag and drop from the Data Controls panel, JDeveloper does many things for you. For a full description of what happens and what is created when you use the Data Controls panel, see Section 17.4.1, "How to Use the Data Controls Panel."
When you create a databound tree table using the Data Controls panel, JDeveloper adds binding objects to the page definition file, and it also adds the treeTable tag to the JSF Page. The resulting UI component is fully functional and does not require any further modification.
31.5.2.1 Code Generated in the JSF Page
Example 31-4 shows the code generated in a JSF page when you use the Data Controls panel to create a tree table. This sample tree table displays two levels of nodes: countries and customers.
By default, the treeTable tag is created inside a form. The value attribute of the treeTable tag contains an EL expression that binds the tree component to the binding object that will populate it with data. The treeModel property refers to an ADF class that defines how the tree hierarchy is displayed, based on the underlying data model. The var attribute provides access to the current node.
Example 31-4 Code Generated in the JSF Page for a Databound ADF Faces Tree Table
<af:treeTable value="#{bindings.Countries.treeModel}" var="node"
              selectionListener="#{bindings.Countries.treeModel.makeCurrent}"
              rowSelection="single"
              id="tt1">
    <f:facet name="nodeStamp">
        <af:column id="c1">
            <af:outputText value="#{node}" id="ot1"/>
        </af:column>
    </f:facet>
    <f:facet name="pathStamp">
        <af:outputText value="#{node}" id="ot2"/>
    </f:facet>
</af:treeTable>
The nodeStamp facet is used to display the data for each node. Instead of having a component for each node, the tree repeatedly renders the nodeStamp facet, similar to the way rows are rendered for the ADF Faces table component. The pathStamp facet renders the column and the path links above the table that enable the user to return to the parent node after focusing on a detail node.
31.5.2.2 Binding Objects Defined in the Page Definition File
The binding objects created in the page definition file for a tree table are exactly the same as those created for a tree. For more information, see Section 31.4.2.2, "Binding Objects Defined in the Page Definition File."
31.5.3 What Happens at Runtime: Events for Tree Tables
Tree components use oracle.adf.view.faces.model.TreeModel to access data. This class extends CollectionModel, which is used by the ADF Faces table component to access data. For more information about the TreeModel class, refer to the ADF Faces Javadoc.
When a page with a tree table is displayed, the iterator binding on the treeTable component populates the root node and listens for a row navigation event (such as the user clicking the Next or Previous buttons or selecting a row from the range navigator). When the user initiates a row navigation event, the iterator displays the appropriate row.
If the user changes the view focus (by clicking on the component's focus icon), the treeTable component generates a focus event (FocusEvent). The node to which the user wants to change focus is made the current node before the event is delivered. The treeTable component then modifies the focusPath property accordingly. You can bind the FocusListener attribute on the tree to a method on a managed bean. This method will then be invoked in response to the focus event.
When a user collapses or expands a node, a disclosure event (DisclosureEvent) is sent. The isExpanded method on the disclosure event determines whether the user is expanding or collapsing the node. The disclosure event has an associated listener, DisclosureListener. The DisclosureListener attribute on the tree table is bound to the accessor attribute specified in the node rule defined in the page definition file. This accessor attribute is invoked in response to a disclosure event (for example, the user expands a node) and returns the collection that populates that node.
The treeTable component includes Expand All and Collapse All links. When a user clicks one of these links, the treeTable sends a DisclosureAllEvent event. The isExpandAll method on this event determines whether the user is expanding or collapsing all the nodes. The table then expands or collapses the nodes that are children of the root node currently in focus. In large trees, the expand all command will not expand nodes beyond the immediate children. The ADF Faces treeTable component uses an instance of the oracle.adf.view.faces.model.PathSet class to determine expanded nodes. This instance is stored as the treeState attribute on the component. You can use this instance to programmatically control the expanded or collapsed state of a node in the hierarchy. Any node contained by the PathSet instance is deemed expanded. All other nodes are collapsed. This class also supports operations like addAll() and removeAll().
For more information about the ADF Faces treeTable component, refer to the oracle.adf.view.faces.component.core.data.CoreTreeTable class in the ADF Faces Javadoc.
31.6 Using List Views to Display Master-Detail Objects
Use the ADF Faces listView component to display a hierarchy of master-detail collections in a simple tree table. The attributes of each object are displayed in a group or grid within a single row and single column.
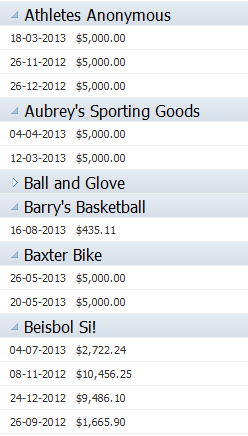
For example, as shown in Figure 31-14, you can create a listView that displays orders and groups them by customer.
For more information on using databound list views, see Section 29.5, "Creating a List View of a Collection."
31.6.1 How to Display Master-Detail Objects in List Views
You use the Create List View wizard to create your list. This wizard allows you to choose between a panelGroupLayout or a panelGridLayout component to arrange the components for your list item.
It may help to understand the options that are available to you when you create a master-detail list view. For more information, see Section 31.6, "Using List Views to Display Master-Detail Objects."
You may also find it useful to understand additional functionality that can be used with master-detail tables and trees. For more information, see Section 31.1.2, "Additional Functionality for Master-Detail Tables, Forms, and Trees."
You will need to complete these tasks:
-
Create an application module that contains instances of the view objects and view links that establish the desired master-detail hierarchy, as described in Section 13.2, "Creating and Modifying an Application Module." Alternatively, if you are using another type of business service, create a data control for that business service as described in "Exposing Business Services with Data Controls" in Developing Applications with Oracle ADF Data Controls.
-
Create a JSF page as described in Section 26.3, "Creating a Web Page."
-
From the Data Controls panel, locate the detail object, as described in Section 31.2.1, "How to Identify Master-Detail Objects on the Data Controls Panel."
-
From the Data Controls panel, drag the detail collection onto the page and choose Table/List View > ADF List View.
-
On the first page of the create List View wizard, select a layout component and select Include header using parent collection.
-
If you have selected the Panel Grid Layout option on the first page the wizard, use the next two pages of the wizard to organize the size and arrangement of the grid cells.
For more information about using these wizard pages, press the F1 key or click Help.
-
On the List Item Data page, determine which fields to display for the detail data by setting the bindings and setting the corresponding components to use for each.
-
In the same page, click the Group Header Data tab, and set the bindings and components for the master data.
-
Click Finish.
-
Use the Properties window to further configure the layout components.
For complete information about using the
panelGridLayoutcomponent, see the "Arranging Content in a Grid" section of the Developing Web User Interfaces with Oracle ADF Faces. For more information about thepanelGroupLayoutcomponent, see the "Grouping Related Items" section of the Developing Web User Interfaces with Oracle ADF Faces.
31.6.2 What Happens When You Create a Master-Detail List View
When you use the wizard to create a listView component with group headers, JDeveloper creates and configures the listView, listItem, and layout components. The listView contains a listItem for the detail items and a facet for the group header stamp, which in turn contains a listItem for the master items.
The bindings are the same as for a table—the listView component is bound to the parent of the collection dropped from the Data Controls panel. The value of the var attribute on this component is used by the outputFormatted components to access the data, in the same way as a table. For more information about the page definition code and the JSP code for collections, see Section 29.2.2, "What Happens When You Create a Table."
Example 31-5 shows the page code for the simple table shown in Figure 31-14.
Example 31-5 Page Code for a List View with Group Headers
<af:form id="f1">
  <af:panelGridLayout id="pgl1">
    <af:gridRow height="100%" id="gr1">
      <af:gridCell width="100%" halign="stretch" valign="stretch" id="gc1">
        <!-- Content -->
        <af:listView value="#{bindings.Customers.treeModel}" var="item"
                     emptyText="#{bindings.Customers.viewable ? 'No data to
                                  display.' : 'Access Denied.'}"
                     fetchSize="#{bindings.Customers.rangeSize}" id="lv1">
          <af:listItem id="li1">
            <af:panelGroupLayout layout="horizontal" id="pgl2">
              <f:facet name="separator">
                <af:spacer width="10" id="s1"/>
              </f:facet>
              <af:outputFormatted
                    value="#{item.bindings.DateOrdered.inputValue}" id="of1">
                <af:convertDateTime
                    pattern="#{bindings.Customers.hints.DateOrdered.format}"/>
              </af:outputFormatted>
              <af:outputFormatted value="#{item.bindings.Total.inputValue}"
                                  id="of2">
                <af:convertNumber groupingUsed="false"
                           pattern="#{bindings.Customers.hints.Total.format}"/>
              </af:outputFormatted>
            </af:panelGroupLayout>
          </af:listItem>
          <f:facet name="groupHeaderStamp">
            <af:listItem id="li2" inlineStyle="font-size:medium;">
              <af:panelGroupLayout layout="horizontal" id="pgl3">
                <f:facet name="separator">
                  <af:spacer width="10" id="s2"/>
                </f:facet>
                <af:outputFormatted value="#{item.bindings.Name.inputValue}"
                                    id="of3"/>
              </af:panelGroupLayout>
            </af:listItem>
          </f:facet>
        </af:listView>
      </af:gridCell>
    </af:gridRow>
  </af:panelGridLayout>
</af:form>
31.7 About Selection Events in Trees and Tree Tables
There may be cases when you need to determine which node in a tree or tree table has been selected in order to handle some processing in your application. For example, an application might require processing to determine the products that match a product category node that is selected by the user.
Whenever a user selects a node in a tree (or a row in a table), the component triggers selection events. A selectionEvent event reports which rows were just deselected and which rows were just selected. The current selection, that is, the selected row or rows, is managed by the RowKeySet object, which keeps track of all currently selected nodes by adding and deleting the associated key for the row into or out of the key set. When a user selects a new node, and the tree or table is configured for single selection, then the previously selected key is discarded and the newly selected key is added. If the tree or table is configured for multiple selection, then the newly selected keys are added to the set, and the previously selected keys may or may not be discarded, based on how the nodes were selected. For example, if the user pressed the CTRL key, then the newly selected nodes would be added to the current set.
For more information on selection events, see "What You May Need to Know About Performing an Action on Selected Rows in Tables" in Developing Web User Interfaces with Oracle ADF Faces.
Note:
In cases where you merely need to synchronize the row currency between the selected node and other UI components on the page, you can do so declaratively using theTargetIterator property for each node definition. For more information, see Section 31.4.4, "How to Synchronize Other Parts of a Page With a Tree Selection."Selection changes in a tree or table will also trigger contextual events for communicating between regions within a page. For more information, see Chapter 40, "Using Contextual Events."