3 Upgrading to SOA Suite and Business Process Management 12c (12.1.3)
This chapter provides the end-to-end procedure for upgrading a single-node, production SOA Suite with Business Process Management 11g Release 1 (11.1.1.6 or 11.1.1.7) installation to SOA Suite with Business Process Management 12c (12.1.3).
-
Creating the Required 12c (12.1.3) Schemas for Oracle SOA Suite and BPM
-
Upgrading the Domain Component Configurations Using the Upgrade Assistant
-
Managing Your Upgraded Oracle Fusion Middleware 12c Software
CAUTION:
Oracle strongly recommends that you create a copy of your actual production environment, upgrade the cloned environment, verify that the upgraded components work as expected, and then (and only then) upgrade your production environment.Identifying potential upgrade issues in a cloned environment can eliminate unnecessary downtime of your production environment.
For more information, see Section 2.1.1, "Creating, Upgrading, and Testing a Development Copy of Your Production Environment".
3.1 Installing Oracle SOA Suite and Business Process Management
Before you can upgrade your existing SOA and Business Process Management (BPM) 11g components, you must first install the SOA Suite and Business Process Management 12c (12.1.3) distribution. Follow the instructions described in Installing and Configuring Oracle SOA Suite Foundation and Business Process Management.
Note:
If your SOA domain has other SOA-integrated components, you must install those distributions as well. See the Oracle Fusion Middleware documentation library for a complete list of installation guides. Be sure to review any of the component-specific chapters in this book to determine if additional pre-upgrade steps for your additional installations.During the installation process, you will be instructed to configure the newly installed domain. When upgrading, however, do not use the Configuration Wizard to configure the SOA 12.1.3 domain. The Configuration Wizard is used to configure a new domain installation. During an upgrade, however, you will be upgrading your existing domain using the Reconfiguration Wizard described later in this guide.
3.2 Creating the Required 12c (12.1.3) Schemas for Oracle SOA Suite and BPM
As described in Section 2.5.2, "Creating the Required Schemas Before You Upgrade", if you are upgrading from SOA 11g, you must create the required 12c schemas before you begin the upgrade.
Specifically, run the 12c (12.1.3) Repository Creation Utility (RCU) to create the following schemas:
-
Audit Services
_IAU(IAU_APPENDandIAU_VIEWER) -
Service Table
_STB(new in 12c) -
Web
_WLF(required when upgrading Business Activity Monitoring (BAM) 11.1.1.6 and 11.1.1.7)Note:
Oracle Fusion Middleware only supports schemas in a byte-mode database. The nls_length_semantics initialization parameter, on the database where the schemas reside, must be set toBYTE; setting this parameter toCHARis not supported.To check the values of this parameter using SQL*Plus, you can use the
show parameterscommand:prompt> sqlplus "sys/<password> as sysdba"SQL> show parameters nls_length_semantics
Replace <password> with the actual password for the SYS user.
Alternatively, you can check the values by querying the V$PARAMETER view:
prompt> sqlplus "sys/password as sysdba"SQL> select name,value from v$parameter;
For more information, refer to you database administration documentation.
3.3 Generating Log Files During Schema Upgrade (Recommended)
To facilitate troubleshooting the upgrade, Oracle recommends that you generate log files when upgrading _SOAINFRA schema. Logging is disabled by default.
To enable logging:
-
Create the soainfra user directory with the name
UPGRADE_DIR -
Enable debugging logs by calling function
set_LogLevel(1)orALTER PROCEDURE log_debug COMPILE PLSQL_CCFLAGS = 'debug_on:TRUE';
You can also launch the Upgrade Assistant with logging parameters as shown in the UNIX example below:
./ua [-logLevel <log_level>] [-logDir <log_directory>]
For more information on generating and using log files, see "Launching the Upgrade Assistant with Optional Arguments" in Upgrading with the Upgrade Assistant
3.4 Upgrading SOA Schemas Using the Upgrade Assistant
Follow the instructions in this section to upgrade SOA and BPM schemas and instances using the Upgrade Assistant.
Caution:
Do not start the Upgrade Assistant if purge scripts or scheduled database jobs are running.Wait until the purge or upgrade is complete before starting the upgrade process. The upgrade will fail if the purge scripts or instance upgrade jobs are running while using the Upgrade Assistant to upgrade your schemas.
If you must start the Upgrade Assistant, stop the purge and be sure to disable any scheduled jobs as described in Enabling and Disabling Background Control Job (Option 6).
- Task 1 Start the Upgrade Assistant
-
Complete the following steps to start the Upgrade Assistant:
-
Change directory to
ORACLE_HOME/oracle_common/upgrade/bin(on UNIX operating systems) orORACLE_HOME\oracle_common\upgrade\bin(on Windows operating systems). -
Enter the following command to start the Upgrade Assistant.
(UNIX) ./ua
(Windows)
ua.bat
Oracle recommends that you run the Upgrade Assistant with logging enabled as shown in the example below.
./ua [-logLevel <log_level>] [-logDir <log_directory>]
-
- Task 2 Upgrade the Schemas
-
The Upgrade Assistant displays a sequence of screens listed in Table 3-1 when upgrading schemas. Perform the respective action(s) for each of the screens. When Oracle SOA is selected, the
_IAU,_MDS,_OPSS,_SOAINFRA, and_UMSschemas will be included in the upgrade.Table 3-1 Upgrade Assistant Screens: Upgrading Schemas
Screen Description and Action Required This screen provides an overview of the Upgrade Assistant and some information about important pre-upgrade tasks.
Select Schemas.
This screen provides a list of installed Oracle Fusion Middleware components that have schemas that can be upgraded. When you select a component, the schemas and any dependencies are automatically selected. For example, when Oracle SOA is selected, the
_IAU,_MDS,_OPSS,_SOAINFRA, and_UMSschemas will be included in the upgrade.NOTE: By default, the Oracle Platform Security Services (OPSS) and Audit Services schemas are selected. Most component upgrades requires these schemas. Do not deselect these options unless you are certain your upgrade does not require these schemas.
If you are upgrading AIAFP, see Chapter 7, "Upgrading to SOA Core Extension 12c (12.1.3)".
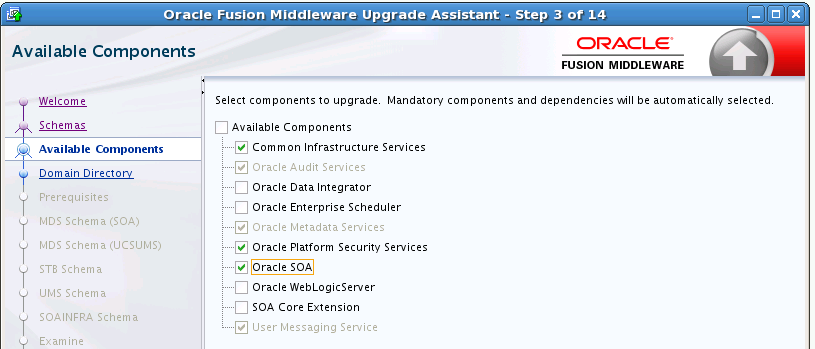
Description of the illustration 1213_ua_avail_comp_soa_crop.pngThis screen appears if you selected Oracle Platform Security Services or Oracle Audit Services on the Available Components screen.
Enter the absolute path to the existing WebLogic domain directory, or click Browse to navigate to and select the 11g domain directory you are upgrading.
Check that the prerequisites for schema upgrade are met. You must select each prerequisite before you click Next.
CAUTION: Upgrade Assistant will NOT verify that these prerequisites have been met.
Use this screen to enter database connection details for each of the schemas you are upgrading.
-
Select a the database type from the Database Type drop-down menu.
-
Enter the database connection details, and click Connect.
-
Select the schema you want to upgrade from the Schema User Name drop-down menu, and then enter the password for the schema.
In some cases, such as
_ORASDPM, you will need to manually enter the Schema User Name and password.NOTE: The UCSUMS schema is not auto-populated. Enter prefix
_ORASDPMas the user. Upgrade environment uses _ORASDPM as the schema name, whereas in the 12c environment it is referred to as the _UMS schema. -
Click Next.
Notes:
-
The following schemas require elevated login credentials (
AS SYSDBA):_OPSS,_IAU,_MDS, and_ODI -
The title of Schema Credentials screen varies, depending upon the schemas you are upgrading. For example, if you are upgrading the _SOAINFRA schema, the screen title appears as "SOAINFRA Schema".
-
For information on the fields required to connect to the database, click Help, or refer to "Schema Credentials" in Upgrading with the Upgrade Assistant.
Review the status of the Upgrade Assistant as it examines each component, verifying that the component is ready for upgrade.
Verify that the Source Version displayed for each schema is listing the correct version number for the schema to be upgraded.
Review the summary of the options that you have selected for schema upgrade. Verify that the correct Source and Target versions are listed for each schema you intend to upgrade.
Click Upgrade to upgrade the schemas, or click Back if you wish to change the configurations.
Review the status of the current upgrade process.
NOTE: The progress bar on this screen displays the progress of the current upgrade procedure. It does not indicate the time remaining for the upgrade.
Click Next when the upgrade is complete.
Click Close if the Upgrade was successful.
If the upgrade failed or if you canceled the upgrade before it completed successfully, you should review the log files, restore the backed up environment, and restart the Upgrade Assistant.
-
- Task 3 Verify the Schema Upgrade
-
Use the following SQL command to verify that the schema version in
schema_version_registryhas been properly updated.SET LINE 120 COLUMN MRC_NAME FORMAT A14 COLUMN COMP_ID FORMAT A20 COLUMN VERSION FORMAT A12 COLUMN STATUS FORMAT A9 COLUMN UPGRADED FORMAT A8 SELECT MRC_NAME, COMP_ID, OWNER, VERSION, STATUS, UPGRADED FROM SCHEMA_VERSION_REGISTRY ORDER BY MRC_NAME, COMP_ID ;
Check that the number in the VERSION column matches the latest version number for that schema. See Table 1-1, "Schemas That Require an Upgrade" in Upgrading with the Upgrade Assistant to verify that the updated version number is correct for your schema(s).
In the query result, the STATUS field will be either UPGRADING or UPGRADED during the schema patching operation, and will become VALID when the operation is completed.
If the status appears as INVALID, the schema update failed. You should examine the logs files to determine the reason for the failure.
- Task 4 Verify the Instance Upgrade (if applicable)
-
If instances were upgraded as part of your schema upgrade, verify that there were no errors with the instances.
-
If the Upgrade Assistant reports that there are no additional instances to be upgraded, then simply close the Upgrade Assistant UI and continue with the remaining upgrade procedures (launching the Reconfiguration Wizard for example).
-
If the Upgrade Assistant reports that there was an error during the instance upgrade, then correct the error(s) and resubmit the database job to complete the upgrade. You can also use the Report Upgrade Summary administration script (Option 1) to check the
UPGRADE ERROR COUNTsection of the report. For more information, see Section 9.10, "Resolving Instance Upgrade Errors". -
If there are still closed instances to be upgraded, then you will be notified that the upgrade of the closed instances will continue in the background after you close the Upgrade Assistant. Do not close the Upgrade Assistant until UA reports it is finished and you see the following:
Oracle SOA
1. The Upgrade Assistant has successfully upgraded all active instances. You can now close the Upgrade Assistant.
2. The automated upgrade of closed instances will continue in the background after the Upgrade Assistant is exited and until the SOA server is started,at which point the upgrade will stop. You can schedule the upgrade of any remaining closed instances for a time when the SOA server is less busy.
Close the Upgrade Assistant and use the instance data administration scripts to administer and monitor the overall progress of this automated upgrade. For more information see "Administering and Monitoring the Upgrade of SOA Instance Data" in Upgrading SOA Suite and Business Process Management.
-
- Task 5 Check for Invalid Database Objects
-
If you are using an Oracle database, you should recompile database objects after running the Upgrade Assistant by connecting to the database as
SYSand running the following from SQL*Plus:SQL>@?/rdbms/admin/utlrp.sqlThis will compile the database objects that were upgraded by Upgrade Assistant.
Then issue the following query to ensure there are no longer any invalid database objects:
SELECT owner, object_name FROM all_objects WHERE status='INVALID';None of the database objects for the upgraded schema should be invalid at this point. If there are any, run the utlrp.sql command again and check again. If the problem persists, you should file a service request.
3.5 Reconfiguring the Domain Using the Reconfiguration Wizard
Follow the instructions in this section to reconfigure the existing 11g domain using the Reconfiguration Wizard. For general information about how the domain is reconfigured, see "Reconfiguring WebLogic Domains" in Upgrading Oracle WebLogic Server.
- Task 1 Starting the Reconfiguration Wizard
-
Start the Reconfiguration Wizard in graphical mode by doing the following:
-
Log in to the system on which the domain resides.
-
Open the command shell (on UNIX operating systems) or open a command prompt window (on Windows operating systems).
-
Edition Based Database Users Only: If your schemas are configured with EBR database, a default edition name must be manually supplied before you run the Reconfiguration Wizard.
Run the following SQL command to set the default edition:
ALTER DATABASE DEFAULT EDITION = edition_name;
where
edition_nameis the name of the child edition name. -
Go to the following directory:
(UNIX)
ORACLE_HOME/oracle_common/common/bin(Windows)
ORACLE_HOME\oracle_common\common\binwhere
ORACLE_HOMEis your Oracle home directory. -
Execute the following command:
(UNIX) ./reconfig.sh -log=<log_file> -log_priority=ALL
(Windows) reconfig.cmd -log=<log_file> -log_priority=ALL
Replace log_file with the absolute path of the log file you'd like to create for the domain reconfiguration session. This can be helpful if you need to troubleshoot the reconfiguration process.
The parameter
-log_priority=ALLensures that logs are logged in fine mode.Notes:
When you run thereconfig.cmdorreconfig.shcommand, the following error message might be displayed to indicate that the default cache directory is not valid:*sys-package-mgr*: can't create package cache dir
You can change the cache directory by setting the environment variable
CONFIG_JVM_ARGS. For example:CONFIG_JVM_ARGS=-Dpython.cachedir=valid_directory
-
- Task 2 Reconfiguring the Domain
-
The Reconfiguration Wizard displays a sequence of screens listed in Table 3-2. Perform the respective action(s) for each of the screens. Note that you may not see every screen listed below. In addition, you may need to complete additional screens based on your environment setup. For more information, see "Reconfiguring WebLogic Domains" in Upgrading Oracle WebLogic Server.
Table 3-2 Reconfiguration Wizard Screens
Reconfiguration Wizard Screen Description and Action Required Enter the absolute path to the existing domain directory, or click Browse to navigate to and select the domain directory.
Shows the progress of applying the reconfiguration templates.
Domain mode cannot be changed.
Select the JDK to use in the domain or click Browse to navigate to the JDK you want to use.
Note that Oracle Fusion Middleware 12c requires Java SE 7. For more information, see "Verifying Certification and System Requirements" in Planning an Installation of Oracle Fusion Middleware.
Use the RCU Data option to connect to the Server Table (_STB) schema. The Repository Creation Utility will automatically use service table to load the other 12c schema credentials automatically. Always verify the data on the JDBC screens that follow.
NOTE: For any existing 11g datasource, the reconfiguration will preserve the existing values. For new datasources where the schema was created by 12c RCU, the default connection data will be retrieved from the _STB schema. If no connection data for a given schema is found in the _STB schema, then the default connection data is used.
For more information, click Help, or refer to "Database Configuration Type" in Upgrading Oracle WebLogic Server.
This screen is displayed if you created custom data sources for a database-based OPSS security store or Audit Data store in 11g.
Use this screen to configure the JDBC data sources defined in your domain source.
For information about the fields on this page, click Help, or refer to "JDBC Data Sources" in Upgrading Oracle WebLogic Server.
Test the data source connections you configured on the JDBC Data Sources screen.
WARNING: If any data sources fail the test, correct the issue before proceeding to the next step. All data source tests must show a status of PASS.
For information about the fields on this page, click Help, or refer to "JDBC Data Sources Test" in Upgrading Oracle WebLogic Server.
Specify the data source settings for each of the schemas listed on the screen, by selecting the check box adjacent to each schema name.
Notes:
-
You must specify the 11g schema details for those schemas that you upgraded in Section 3.4. For the others, specify the 12.1.3 schema details.
-
For information about the fields on this page, click Help, or refer to "JDBC Component Schema" in Upgrading Oracle WebLogic Server.
Test the configurations that you specified for the data sources in the previous screen. Select the check boxes adjacent to the names of the schemas to test, and click Test Selected Connections.
The result of the test is indicated in the Status column. Click Next when the test is successful for all the schemas.
This screen is displayed only if the domain you are reconfiguring is currently using a per-host Node Manager. Use this screen to select the Node Manager configuration to use for the reconfigured domain. The resulting configuration depends on the combination of options you select for Node Manager Type and Node Manager Configuration.
For information on per-domain and per-host Node Manager configurations, see "Default Node Manager Configuration" in Administering Node Manager for Oracle WebLogic Server.
The categories that are listed on this screen depend on the resources defined in the templates you selected for the domain during domain configuration.
For example, when the SOA Suite and BPM template is being applied to the domain, select the Managed Servers, Clusters and Coherence if one or more of the following applies:
-
You have more than one managed server in a single domain (soa_server1 and bam_server1, for example)
-
You need to modify cluster or coherence data
For information on using the other advanced configuration options, such as Node Manager, Deployments and Services, Domain Front End Host Capture and JMS File Store, see "Advanced Configuration" in the Upgrading Oracle WebLogic Server.
You must specify the actual host name for the Listen Address for each managed server in your domain.
Do not use the default
localhostorAll Local Addressesoption.You must specify the actual host name as host name.company.com

Description of the illustration reconfig_soa11g_crop_managed_servers.pngIf you have created servers as part of the upgrade process, then select the server name in the Servers list box and target them to the correct Node Manager Machine.
Otherwise, no action is required on this screen when you are upgrading or reconfiguring the domain.
Cluster Upgrades Only: If you are upgrading clusters, use this screen to assign Managed Servers to clusters.
Note that only Managed Servers are displayed in the Server list box. The Administration Server is not listed because it cannot be assigned to a cluster.
Review the configuration summary.
Click Reconfig to reconfigure the domain, or click Back to change the configurations.
Review the reconfiguration progress. Click Next when the process is complete.
Review the final status of the reconfiguration process. Click Finish to exit the Reconfiguration Wizard.
-
3.6 Upgrading the Domain Component Configurations Using the Upgrade Assistant
Follow the instructions in this section to upgrade any additional domain component configurations using the Upgrade Assistant.
Note:
Do not start the Administration Server before launching the Upgrade Assistant.- Task 1 Starting the Upgrade Assistant
-
Start the Upgrade Assistant on the host where Administration Server is running, by doing the following:
-
Change directory to
ORACLE_HOME/oracle_common/upgrade/bin(on UNIX operating systems) orORACLE_HOME\oracle_common\upgrade\bin(on Windows operating systems). -
Enter the following command to start the Upgrade Assistant.
On UNIX operating systems:
./uaOn Windows operating systems:
ua.bat
-
- Task 2 Upgrading Component Configurations
-
The Upgrade Assistant displays a sequence of screens listed in Table 3-3 when upgrading WebLogic Component Configurations. Perform the respective action(s) for each of the screens.
NOTE: The Reconfiguration Wizard screens you see are based on your environment. You may or may not see all of the screens described below.
Table 3-3 Upgrade Assistant Screens: Upgrading WebLogic Component Configurations
Screen Description and Action Required This screen provides an overview of the Upgrade Assistant and some information about important pre-upgrade tasks.
Click Next to continue.
Select WebLogic Component Configurations.
Select the WebLogic Component Configurations option to upgrade component configurations for a managed WebLogic Server domain. You must enter the domain directory for the domain that you are upgrading now.
Click Next.
This screen is displayed if your 11g environment has multiple WebLogic Server domains, but the OWSM Policy Manager is only in one WLS domain and the OWSM agents are in other domains.
Provide the credentials for the WebLogic Administration Server domain where the Oracle Web Services Manager (OWSM) Policy Manager is deployed.
For information about the fields on this page, click Help, or refer to "OWSM Policy Manager" in Upgrading with the Upgrade Assistant.
This screen provides a list of components that will be included in the domain component configuration upgrade.
Check if the prerequisites for component configurations upgrade are met.
This screen is presented if there are remote managed servers hosting UMS 11g configuration files. You must provide the credentials to these servers so that the Upgrade Assistant can access the configuration files.
NOTE: You may be required to manually copy the UMS configuration files if the Upgrade Assistant is unable to locate them. See "Upgrade Assistant: Copying UMS Configuration Files" in Upgrading to the Oracle Fusion Middleware Infrastructure.
Review the status of the Upgrade Assistant as it examines each component, verifying that the component is ready for upgrade.
Review the summary of the options that you have selected for schema upgrade.
Click Upgrade to upgrade the schemas, or click Back if you wish to change the configurations.
Review the status of the upgrade process.
Click Next when the upgrade is complete.
Click Close if the Upgrade was successful.
If the upgrade failed or if you canceled the upgrade before it completed successfully, you should review the log files, restore the backed up environment, and restart the Upgrade Assistant.
Note:
Additional configuration tasks may be required.After the Upgrade Assistant has successfully completes the upgrade of your schemas and component configurations, you may need to perform the post-upgrade tasks in Chapter 8, "Performing Post-Upgrade Tasks" to ensure that your components continue to function as expected.
3.7 Upgrading JDeveloper Projects in Bulk
If you want to upgrade a large number of JDeveloper projects in bulk, without opening them one by one in JDeveloper, you can use the JDeveloper migration tool ojmigrate installed in the 12c Oracle home. You must provide the Workspace file name and files that have workspaces to upgrade.
For example:
ojmigrate [option]... file...|@file

Where: file is the name of the Workspace to upgrade and @file is the file with workspaces to upgrade (one filename per line)
You can also specify the following options:
-
-adeConnect to currnt ade view
-
-drySkip calling migrators
-
-failFastStop migrating after first failure
-
-generateDefaults
Let the upgrade tool generate files containing defaults for upgrade options. These generated files will usually be
migration.propertiesfile and the.jws file.
3.8 Upgrading BPM Web Forms
Most BPM Web Forms developed with BPM 11g (11.1.1.7.0) are compatible with 12c. There are a small number of cases where manual spacings are specified between elements and these forms may not work correctly in 12c. These forms must be upgraded manually. Without manual intervention, these forms will be in suspended mode. Those forms which do not use these manual layouts will work fine without migration.
To upgrade BPM Web Forms, a user with administrative privileges should navigate to the following URL and enter the administrator credentials when prompted.
http://host name:port/workflow/DefaultToDoTaskFlow/migratewebforms
Loading this page starts the upgrade and shows the upgraded forms. If there are any errors, check the log file and if the error is recoverable, you can try loading the page again. If the error is not recoverable, try to deploy the BPM composite with the failed forms.
Note:
The URL can be launched multiple times, but the upgrade should not be run when there are active users using the web forms.3.9 Managing Your Upgraded Oracle Fusion Middleware 12c Software
Table 3-4 lists some common administration tasks you will likely want to perform after upgrading to SOA 12.1.3. In addition, the component-specific administration guides may provide additional configuration tasks to perform after an upgrade.
Table 3-4 Basic Administration Tasks
| Task | Description | More Information |
|---|---|---|
|
Performing additional post-upgrade configuration steps for your component. |
In addition to the post-upgrade tasks described Chapter 8, "Performing Post-Upgrade Tasks", you may also need to perform additional configuration tasks to ensure your newly upgraded components function as expected. |
|
|
Getting familiar with Fusion Middleware administration tools |
Get familiar with the various tools available which you can use to manage your environment. |
"Overview of Oracle Fusion Middleware Administration Tools" in Administering Oracle Fusion Middleware. |
|
Configuring Secure Sockets Layer (SSL) |
Learn how to set up secure communications among between Oracle Fusion Middleware components using SSL. |
"Configuring SSL in Oracle Fusion Middleware" in Administering Oracle Fusion Middleware. |
|
Monitoring Oracle Fusion Middleware |
Learn how to keep track of the status of Oracle Fusion Middleware components. |
"Monitoring Oracle Fusion Middleware" in Administering Oracle Fusion Middleware. |